How to Set Up Mail Rules in the Mail App: A Step-by-Step Guide
This guide shows how to set up mail rules in Mail app and Outlook mobile to automate email sorting on Mac, iPhone, and mobile devices.
You open your inbox to find dozens of new messages, some important and others less urgent, all mixed together. Sorting through them manually can be time-consuming and overwhelming.
This article will guide you through how to set up mail rules in Mail app on Apple devices and Microsoft Outlook mobile, helping you automate the organization of incoming emails. You will learn the specific steps to create and customize rules on Mac, iPhone, and Outlook mobile, so you can streamline your email management regardless of your device.
By comparing these platforms side by side, you can decide which approach best fits your workflow and stay productive without missing key messages.
Key takeaways
- Mail rules on Mac are created through Mail's Preferences under Rules, allowing detailed condition setups.
- On iPhone, the Mail app uses VIP and flag settings but lacks full rule creation; workarounds involve server-side rules.
- Outlook mobile supports rule creation via Outlook.com or Exchange settings synced to the app.
- Consistent naming and clear conditions help avoid unintended filtering.
- Regularly review and update rules to keep your inbox organized as needs change.
Before you start: What you need to set up mail rules
Before creating mail rules, first confirm you have an active email account set up in the Apple Mail app on your Mac or iPhone, or that you have installed the Outlook mobile app on your device. Mail rules rely on your email account being properly configured to manage incoming messages effectively. Also, check which email protocols your account uses, such as IMAP or Exchange, because some filtering rules only work if supported by your mail server.
Next, ensure your device’s operating system and the Mail or Outlook app are updated to the latest stable versions. Updates often include important improvements to mail rule functionality and fix known issues. Having the latest version helps avoid unexpected behavior when applying your filters.
Finally, clarify what types of emails you want to automate or filter. For example, you might want to sort messages from specific senders, emails containing certain keywords, or messages with attachments. Knowing your goals helps you design rules that fit your workflow.
| Feature | Apple Mail (Mac/iPhone) | Outlook Mobile App |
|---|---|---|
| Basic filtering by sender or subject | Supported | Supported |
| Filtering by message content keywords | Supported on Mac (rules), limited on iPhone | Supported |
| Actions like moving, flagging, or deleting | Supported | Supported |
| Server-side rule support | Depends on email provider; better with Exchange | Supports Exchange and Outlook.com rules |
| Rule creation on mobile | Limited on iPhone Mail | Available |
- Open your Mail app or Outlook mobile app and verify your email account is set up correctly. You should see your inbox and be able to send and receive mail.
- Check your account settings to identify the email protocol (IMAP, POP, Exchange). This is usually found under Settings > Accounts > Your Email Account > Account Type.
- Update your device’s operating system and Mail or Outlook app to the latest stable versions through the App Store or system settings. After updating, relaunch your mail app.
- Decide on email criteria for your rules, such as filtering by sender address, keywords in the subject or body, or presence of attachments. Write these down to guide rule creation.
How to set up mail rules in Apple Mail on Mac
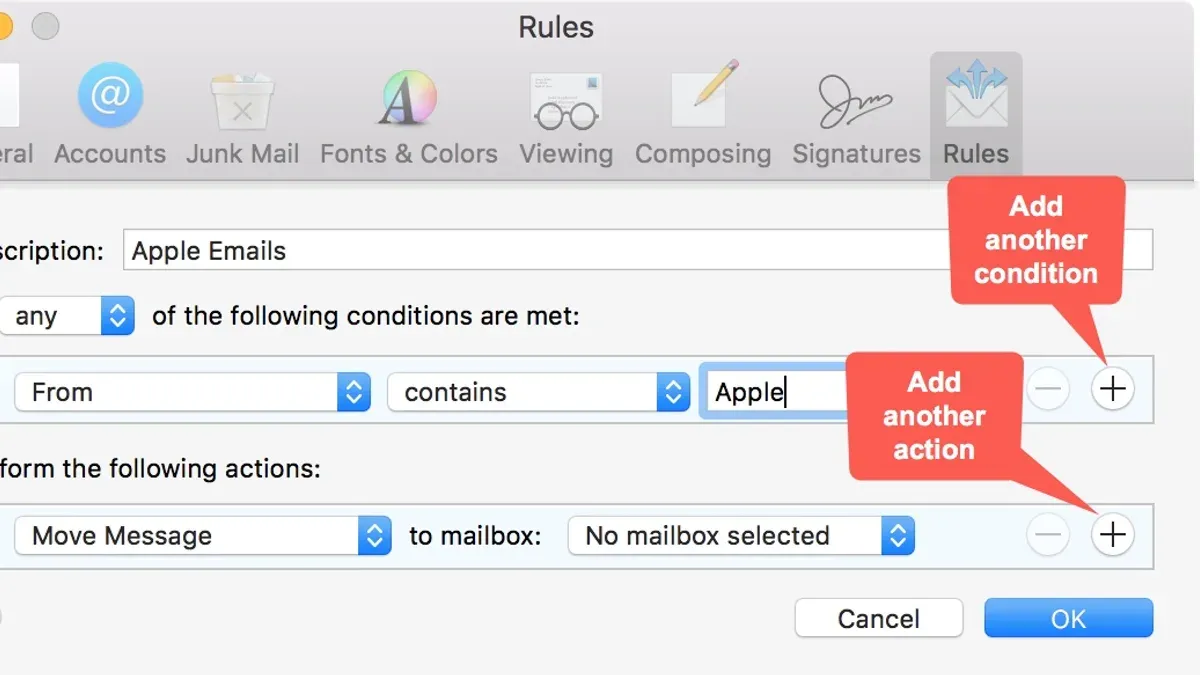
Setting up mail rules in Apple Mail on your Mac helps automate email management by sorting messages based on your specified criteria. Start by opening the Mail app, then go to the menu bar and select Mail > Preferences. In the Preferences window, click the Rules tab to view and manage your mail rules.
- Click the Add Rule button. A new dialog box appears where you can name your rule. For example, name it "Newsletters" if you want to filter newsletter emails.
- Set the conditions under which the rule will apply. Use the dropdown menus to select criteria such as From, Subject, or Message content. For instance, choose From and enter the email address or domain of your newsletter sender.
- Define the actions to take when the conditions are met. Common actions include Move Message to a specific folder, Mark as Read, Forward Message, or Delete Message. To organize newsletters, select Move Message and choose your desired folder like "Newsletters."
- Click OK to save the rule. Apple Mail will ask if you want to apply the rule to messages in your inbox immediately—choose based on your preference.
- Test your rule by sending a sample email matching your conditions or by checking new incoming mail. If the rule doesn’t work as expected, revisit the Rules tab to edit conditions or actions for better accuracy.
Apple Mail runs these rules automatically on incoming mail, helping you keep your inbox organized without manual sorting. Remember to periodically review and update your rules to maintain efficient email management as your needs change.
How to create rules in iPhone Mail app
The iPhone Mail app itself does not support creating mail rules directly within the app. This limitation means you cannot set up automated filters or actions on incoming emails solely from your iPhone’s Mail app interface. However, the rules you create on your mail server or through Apple Mail on a Mac will apply to your mail as it syncs to the iPhone, automatically organizing or sorting messages based on those server-side settings.
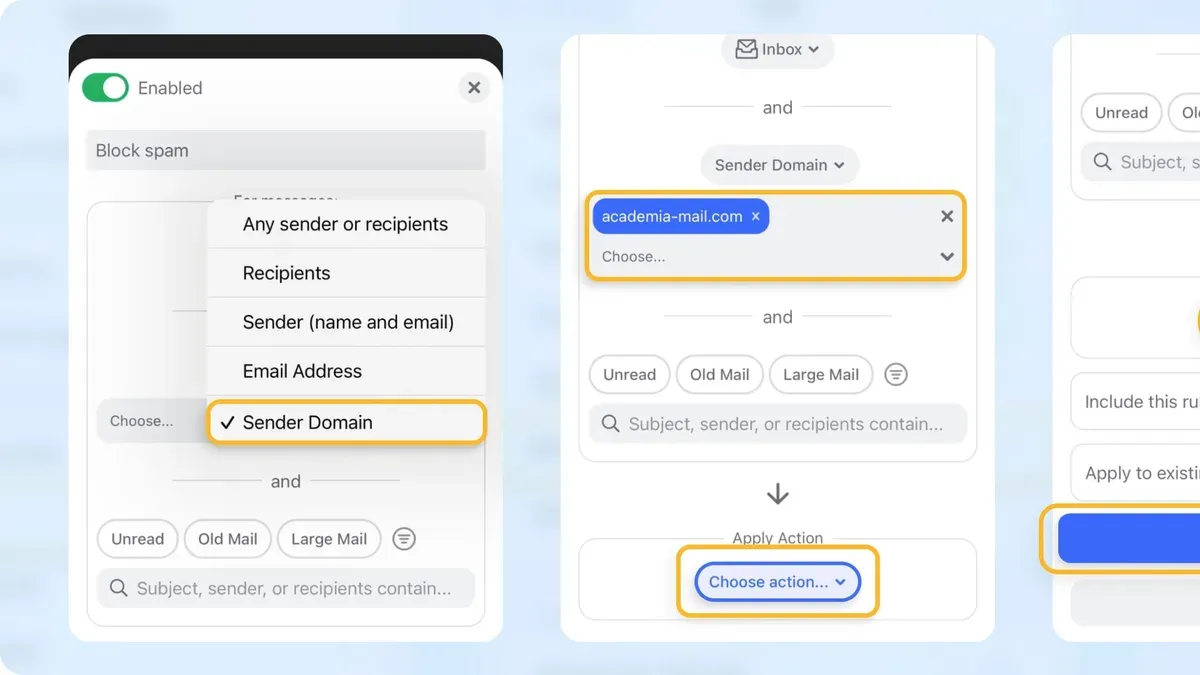
To have rules affect your iPhone Mail app, you need to set them up on the mail server or a desktop client that supports rule creation. For example, if you create a rule in iCloud.com to move all newsletters to a specific folder, this change will reflect in your iPhone Mail app by showing those emails already sorted into that folder.
If you want to create or modify rules directly on your iPhone, third-party mail apps or the Outlook mobile app offer more advanced rule or filter management options. Outlook mobile, for instance, allows you to create inbox rules that act on your Exchange or Microsoft 365 accounts without needing a desktop client.
Here is how a server-side rule influences your iPhone Mail app:
- Go to your mail provider’s web interface (e.g., iCloud.com or Gmail.com) and sign in.
- Navigate to the settings or preferences section and find the rules or filters area.
- Create a new rule, such as moving emails from a specific sender to a designated folder.
- Save the rule and allow some time for it to take effect.
- Open the Mail app on your iPhone and refresh your inbox; you should see emails already sorted according to the rule you created.
This process shows that while the iPhone Mail app does not create rules itself, it fully supports displaying the results of server-side mail rules, keeping your inbox organized on the go.
How to set up rules in Microsoft Mail and Outlook mobile app
Setting up mail rules in the Outlook mobile app or Microsoft Mail allows you to automate how incoming emails are handled, helping keep your inbox organized directly from your mobile device. Here is a clear, step-by-step guide to creating and managing these rules.
- Open the Outlook mobile app on your device. Tap the profile icon or gear icon to go to Settings.
- In Settings, scroll and select Mail, then choose Rules. This opens the list of your existing mail rules synced from your account.
- Tap Add Rule or the plus sign to create a new mail rule. You will see options to set conditions like From (sender), Subject contains specific words, or Importance level.
- After setting your conditions, select the action to take when these conditions are met. Actions include Move to folder, Flag, Mark as read, Delete, or Categorize emails.
- Give your rule a clear name, then tap Save. The new rule will sync immediately with your Microsoft Exchange or Outlook.com account.
- Manage your rules on mobile by returning to the Rules list where you can enable, disable, or delete rules as needed.
- For more advanced options, use Outlook desktop or Outlook on the web. The desktop version supports multi-condition rules and exceptions that mobile apps may not offer.
Note that rules created on the desktop or web will sync and apply to your mobile app, maintaining consistency across devices. However, the Outlook mobile app provides a streamlined set of rule options tailored for quick rule creation and basic email sorting on the go.
By following these steps, you can efficiently automate email management within Outlook mobile, reducing manual sorting and helping prioritize important messages.
How to set up rules in email generally: best practices
When creating mail rules, start with simple, straightforward conditions before layering in complexity. For example, begin by setting a rule that moves all emails from a specific sender to a folder. Once you confirm this works as expected, gradually add more criteria to refine the filtering. Testing each rule after creation helps ensure it behaves correctly and prevents unexpected sorting.
Prioritizing your rules is crucial to avoid conflicts. If you have one rule that marks all newsletters as read and another that moves emails from a particular newsletter to a folder, the order determines the outcome. Placing the specific newsletter rule above the general one ensures those emails are moved first rather than just marked read. Adjust rule order in your mail app’s rules list and observe the results to avoid unintended behavior.
Use clear, descriptive names for each rule to make managing them easier. Names like "Move invoices to Finance folder" or "Flag client emails" immediately convey purpose, helping you quickly identify and edit rules later. Avoid vague names such as "Rule 1" or "Filter A" which can cause confusion as your list grows.
Regularly review and update your mail rules to keep them effective. Email habits and workflows change over time, so some rules may no longer apply or new priorities may arise. Periodic audits prevent cluttered or obsolete rules from slowing down your email processing.
Where possible, back up your mail rules. Some apps allow exporting rules or syncing them through your account, safeguarding your setup against accidental deletion or device changes. This backup step is especially important for complex or numerous rules that would be time-consuming to recreate.
Troubleshooting common issues with mail rules
Sometimes your mail rules might not work as expected, and understanding why can save you time and frustration. One frequent issue is that rules only run when triggered manually instead of automatically. This often happens if the mail client or server doesn’t support automatic rule execution for your account type. For instance, POP accounts generally don’t support server-side rules, so rules may only apply when using the mail app on a device.
Conflicting rules can also cause problems. If two or more rules apply to the same incoming email but have opposing actions, the mail app may ignore one or both, or only apply the first rule it encounters. Checking the order and conditions of your rules helps prevent this.
Another common challenge is rules not syncing across your devices. Rules created on desktop apps may not appear or function on mobile apps if the apps or account types don’t fully support syncing. Also, some actions—like moving messages to local folders—may not be supported on mobile devices.
| Device / Account Type | Automatic Rule Support | Sync Across Devices | Common Limitations |
|---|---|---|---|
| Apple Mail on Mac (IMAP/Exchange) | Yes | Yes (if Exchange) | Local folder moves may not sync |
| iPhone Mail app (IMAP/POP) | No (client rules not supported) | No | Cannot create rules, limited actions |
| Outlook mobile (Exchange/Outlook.com) | Yes | Yes | Advanced rules require desktop app |
| POP accounts (any device) | No | No | Rules only run locally, manual trigger needed |
Example error messages you might see include “Rule could not be applied,” or “This rule conflicts with another.” These indicate either unsupported actions or conflicting conditions.
- Review your mail account type in the app settings to confirm if automatic rules are supported. If POP, expect limited functionality.
- Check the order of your rules in the rules or filters menu; reorder them so the most important rules run first. You should see the rules reordered accordingly.
- Test each rule manually using the "Apply" or "Run Rules" option to see if it works without error. Successful runs should move or organize emails as expected.
- Ensure your mail apps are updated, especially on mobile, to support syncing of rules where possible. Updated apps reduce syncing issues.
- If rules are not syncing, create or edit rules directly on the server’s web portal (e.g., Outlook.com) to ensure they apply across devices.
By carefully checking these points, you can identify and fix common causes of mail rule failures, making your email management smoother.
Managing and editing your mail rules over time
As your email habits and priorities evolve, your mail rules should adapt accordingly. Regularly reviewing, editing, or disabling rules helps keep your inbox organized and prevents outdated rules from interfering with email flow. Both Apple Mail and Outlook provide interfaces to manage existing rules easily, allowing you to update conditions, actions, or deactivate rules temporarily without deleting them.
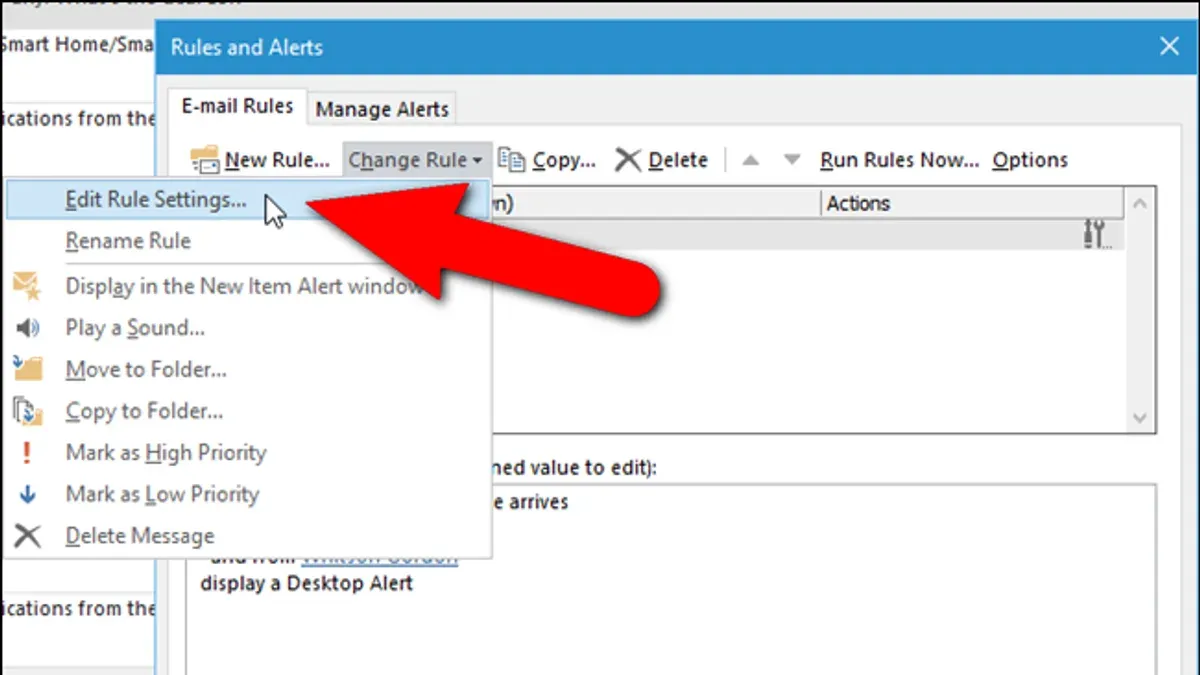
To edit or disable a rule, open the Mail app's preferences or settings, navigate to the Rules or Filters tab, and select the rule you want to modify. For example, in Apple Mail on Mac, go to Mail > Preferences > Rules, select the rule, then click Edit or uncheck the box next to it to disable. In Outlook mobile, tap your profile icon, select Settings > Mail > Rules, then tap the rule to edit or toggle its status. Changes save automatically, and you should test updated rules to verify they work as intended.
Exporting and importing mail rules is supported in Apple Mail on Mac via the Export and Import buttons in the Rules window, enabling you to back up your rules or transfer them between devices. Outlook desktop also supports exporting rules, though the mobile app does not. Regular exports provide a safeguard against accidental loss or corruption.
Monitoring rule effectiveness can be done by reviewing rule logs or history where available. Apple Mail does not provide detailed logs, but Outlook desktop offers a Run Rules Now dialog showing affected messages. Checking filtered folders and observing if emails are sorted as expected gives practical feedback on rule performance.
When rules become obsolete, archiving or deleting them is best. In Apple Mail, simply select the rule and click Delete or disable it to keep it for possible future use. In Outlook mobile, swipe left on a rule and tap Delete. Keeping too many inactive rules can slow processing and cause confusion, so periodically cleaning up helps maintain efficiency.
Frequently asked questions
How to set rules in microsoft mail?
In Microsoft Mail, you set rules by opening the app and selecting Settings (gear icon). Then choose Manage Rules or Rules under the Email section. From there, you can create new rules by specifying conditions like sender or subject and corresponding actions such as moving the email to a folder or deleting it automatically.
How to create rules in apple mail?
To create rules in Apple Mail on Mac, go to the Mail menu and select Preferences. Then click the Rules tab and choose Add Rule. You define the criteria for incoming messages and set actions like moving messages to a folder, marking them as read, or deleting them.
How to setup email rules?
Setting up email rules generally involves accessing your email app’s settings, finding the rules or filters section, and adding new rules by specifying conditions and actions. Make sure to choose clear conditions such as sender address or keywords, and decide what happens to matching emails, like organizing them into folders or flagging them.
How to create a mail rule?
To create a mail rule, open your email client’s settings and look for the rules or filters option. Start a new rule, set the conditions that incoming emails must meet (like sender, subject, or content), and choose the actions to take on those emails. Save the rule to have it apply automatically to future messages.
How to make a mail rule?
Making a mail rule involves selecting the conditions that identify which emails the rule applies to and defining the automatic actions to perform, such as moving messages to a folder or marking them as important. This is done through the email app’s settings, often under Rules or Filters. Double-check your rule to ensure it works as intended.
What This Advice Does Not Cover
This article does not cover server-side mail rules for all email providers, which can vary widely and often require using provider-specific web interfaces or control panels. Additionally, the iPhone Mail app itself does not support creating rules directly; if you rely solely on this app, you will need to set up rules on your desktop mail client or through your email provider’s settings. Some rule actions, such as forwarding messages automatically or running custom scripts, may not be available depending on the mail app you use or the type of email account configured.
To get the most out of mail rules, focus first on clearly defining what you want to automate and choose the device or app that supports those specific actions best. For example, Apple Mail on Mac offers more granular rule options compared to mobile apps.
Start by creating a simple rule that moves or flags messages based on sender or subject line. This practical step will help you gain confidence in managing your inbox automatically and can be expanded as you grow more comfortable with the tools.
See also: How to Create an Email Signature in the Mail App: Step-by-Step Guide · How to Add a Gmail Account in the Mail App: Step-by-Step Guide