How to Add a Spacer to the Dock on Mac: Step-by-Step Guide
This guide shows how to add spacers to the Mac Dock using Terminal commands to organize apps and improve your workflow.
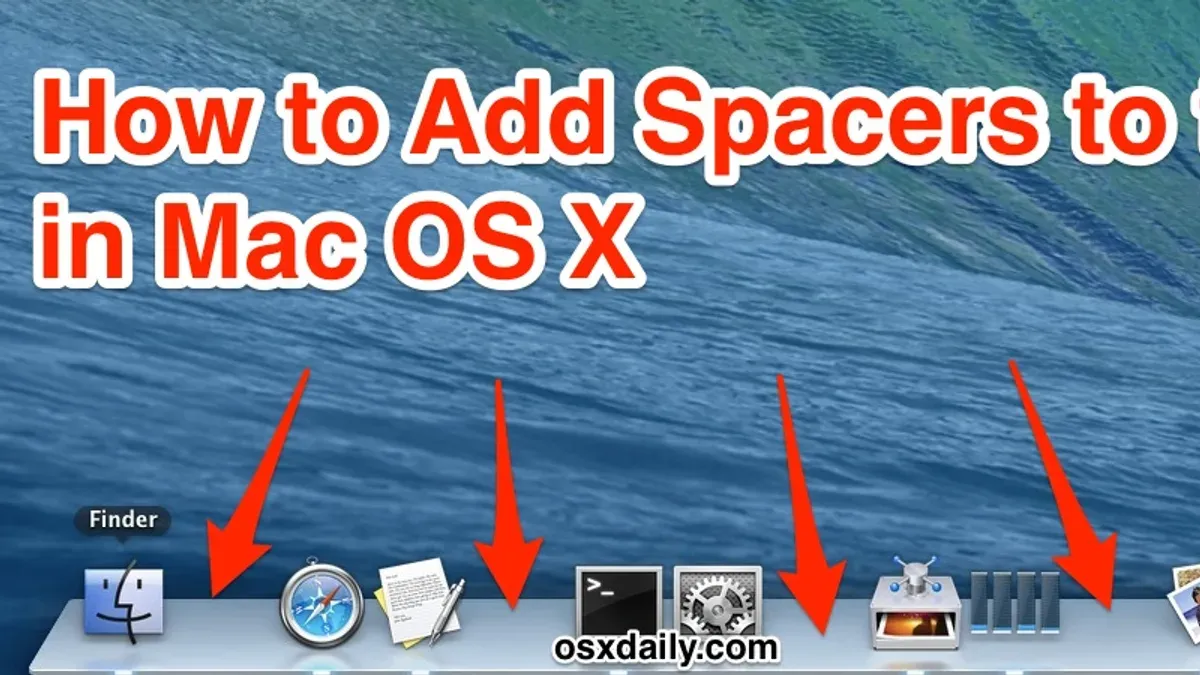
Your Mac Dock can quickly become cluttered with apps and folders, making it hard to find what you need. Adding spacers creates visual breaks that help you organize items logically and improve workflow efficiency.
This article explains how to add a spacer to the Dock on Mac using Terminal commands, a method beyond the standard drag-and-drop customization. You will learn the exact steps to insert spacers, resize the Dock to fit them, move the Dock for optimal layout, and manage Dock content wisely for better space use.
Key takeaways
- Use Terminal with a specific command to add invisible spacers to the Dock.
- Adjust Dock size in System Settings to accommodate added spacers.
- Move the Dock position via System Settings to complement your workspace layout.
- Organize apps and folders into groups separated by spacers for easier access.
- Remove spacers by restarting the Dock or deleting spacer entries using Terminal.
Before you start: What you need to add spacers to the Dock
Adding spacers to your Mac Dock requires basic familiarity with the Terminal app. You will use command-line inputs to create and insert these invisible separators, so understanding how to enter commands correctly is essential. No third-party applications are necessary, but you should exercise caution when typing commands, as incorrect input can affect your Dock’s behavior.
Before proceeding, it’s wise to back up your current Dock preferences. This ensures you can restore your original layout if needed. The Dock preferences are stored in a property list (plist) file located at ~/Library/Preferences/com.apple.dock.plist.
- Open Terminal from Applications > Utilities.
- Type
defaults read com.apple.dockand press Enter. You should see a list of current Dock settings, confirming Terminal access to Dock preferences. - To back up your Dock preferences, type
cp ~/Library/Preferences/com.apple.dock.plist ~/Desktop/dock-backup.plistand press Enter. This copies the plist file to your Desktop as a backup. - If you ever need to reset your Dock to default settings, use
defaults delete com.apple.dockfollowed bykillall Dockto restart the Dock.
Having these basics covered will help you confidently add spacers and manage potential issues if they arise.
How to add a spacer to the Dock on Mac using Terminal
- Open the Terminal app from your Applications > Utilities folder. You will enter commands here to modify the Dock.
- To create a generic spacer, enter the following command:
defaults write com.apple.dock persistent-apps -array-add '{"tile-type"="spacer-tile";}'
This adds an app spacer, which appears as a blank space between app icons in the Dock. - Press Enter, then type killall Dock and press Enter again. This restarts the Dock and applies the change. You should see a blank gap where the spacer was added.
- If you want a folder spacer instead, which separates folder groups in the Dock, use this command instead:
defaults write com.apple.dock persistent-others -array-add '{"tile-type"="spacer-tile";}' - Again, run killall Dock to restart the Dock and view the folder spacer in place.
- To add multiple spacers, repeat the appropriate command as many times as needed, then restart the Dock once after all additions are made. Each command adds one spacer.
- Note the difference: app spacers go among apps, folder spacers go among folders and stacks. Choose based on where you want spacing.
After these steps, your Dock will reflect the added spacers as empty sections, improving visual organization. If the Dock does not update, ensure commands are typed correctly and that you run killall Dock to refresh the interface.
How to resize the Mac Dock to accommodate spacers
Adjusting the size of your Mac Dock is essential to ensure that spacers and app icons fit well visually and maintain a balanced appearance. A Dock that is too small may cause spacers to look cramped or insignificant, while an overly large Dock can take up unnecessary screen space.
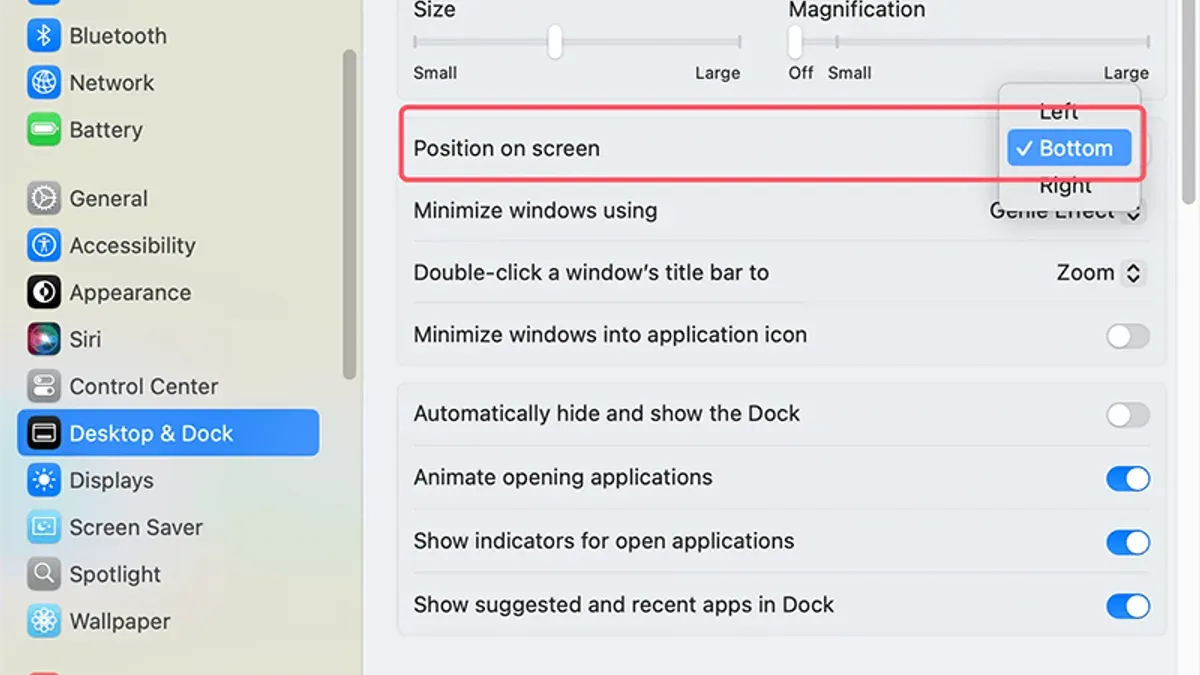
- Open System Settings on your Mac.
- Navigate to Desktop & Dock from the sidebar. You should see the Dock customization options.
- Locate the Size slider, which adjusts the size of the Dock icons and spacers simultaneously.
- Drag the slider to the right to increase the Dock size. You will notice the icons and spacers grow larger, making spacers more visible and distinct.
- Drag the slider to the left to decrease the Dock size if you prefer a more compact Dock that takes up less screen space.
- Observe the Dock as you adjust the slider; the goal is to find a size where spacers clearly separate groups of icons without overwhelming your desktop view.
- Once satisfied, close System Settings. The Dock size will remain adjusted until you change it again.
Balancing Dock size with screen space is a trade-off. Larger Dock sizes enhance spacer visibility and make navigation easier, but they reduce available vertical or horizontal screen area depending on Dock placement. Smaller Dock sizes save space but may cause spacers to blend in.
For example, increasing the Dock size by about 25% compared to the default often creates a clear visual distinction around spacers without sacrificing too much screen space. Comparing your Dock before and after resizing can help you decide the best fit for your workflow.
How to move the Dock on Mac to optimize your layout
Changing the Dock's position on your Mac can significantly enhance how spacers function and improve your overall workflow. You can position the Dock on the left, bottom, or right side of the screen through System Settings, each offering different advantages for spacer visibility and accessibility.
- Open System Settings and select Desktop & Dock.
- Scroll to the Dock section and find the Position on screen option.
- Choose Left, Bottom, or Right to reposition the Dock.
- Observe how spacers adjust their placement to maintain separation between groups of icons based on the new Dock orientation.
For example, placing the Dock on the left or right can make vertical spacers more apparent, allowing for clearer separation between app categories. Conversely, a bottom-positioned Dock shows spacers horizontally, which might suit workflows focused on wide screen layouts.
If you use multiple displays, you can move the Dock between screens by dragging the cursor to the bottom (or side) of the desired display. The Dock will jump to that screen, preserving your spacer arrangement relative to the new position. This is particularly useful when working with an external monitor in portrait mode, where a side Dock with vertical spacers can save screen space.
For quicker adjustments, use these Terminal commands to change the Dock's position without opening System Settings:
defaults write com.apple.dock orientation -string leftdefaults write com.apple.dock orientation -string bottomdefaults write com.apple.dock orientation -string right
After running a command, refresh the Dock with killall Dock. This method is handy for power users who want to experiment rapidly with different Dock placements to see which layout best highlights spacer use and fits their workflow.
How to customize the Dock on Mac beyond spacers
Adding folders and frequently used apps to your Dock complements spacers by enhancing quick access to essential items. To add a folder, open Finder, drag the folder to the right side of the Dock near the Trash, and release it; you should see the folder icon appear, allowing fast navigation. For apps, drag the application icon from Launchpad or the Applications folder to the left side of the Dock among the app icons.
You can also include Launchpad and Mission Control icons for convenient access. Open Finder, navigate to the Applications folder, then drag Launchpad and Mission Control icons individually to the Dock’s app section. Once added, clicking these icons launches their interfaces immediately.
- Open System Settings and select "Desktop & Dock." You will see options to customize Dock behavior.
- Toggle "Automatically hide and show the Dock" to enable or disable auto-hide. When enabled, the Dock disappears until you move the cursor to the screen edge, increasing screen space but requiring a cursor action to reveal the Dock.
- Adjust "Magnification" by toggling it on and using the slider to set how much icons enlarge when hovering over them. This effect helps identify icons quickly but can reduce visible Dock space.
- Change animation effects under "Minimize windows using" by choosing between "Genie" or "Scale". These animations affect how windows minimize to the Dock, balancing visual appeal with speed.
After these customizations, your Dock will show spacers interspersed with app icons, folders, Launchpad, and Mission Control icons. The Dock's appearance and behavior will better suit your workflow and screen space preferences.
How to make space on my Mac by managing Dock content wisely
Organizing your Dock effectively can significantly declutter your workspace and make your Mac feel more spacious, even though spacers themselves do not free disk space. Removing unnecessary or duplicate apps from the Dock reduces visual noise and streamlines access to frequently used tools.
- Review the current Dock items and identify apps you rarely use or duplicates. When you drag an unwanted app icon away from the Dock until you see a "Remove" label, releasing it will remove the app shortcut without deleting the app itself. Your Dock should now only display relevant apps.
- Add spacers using Terminal commands to separate groups of apps by function, such as productivity, communication, and media. After restarting the Dock, you will see clear visual breaks that make it easier to locate and switch between app groups.
- Combine Dock organization with desktop and Finder cleanup. Move frequently accessed folders to the Dock or remove clutter from your desktop to reduce distractions. This integrated approach enhances overall workspace clarity.
For example, a cluttered Dock with mixed app types can make it difficult to find what you need quickly. By removing duplicates and categorizing apps with spacers, you create a cleaner layout that improves workflow efficiency and reduces the time spent searching through icons.
Troubleshooting common issues when adding spacers to the Dock
If the Dock does not refresh after adding a spacer, manually restarting it usually resolves the issue.
- Open Terminal and type killall Dock, then press Enter. The Dock will disappear briefly and then reload, showing the new spacer.
To remove unwanted or extra spacers, use a Terminal command to delete the spacer entry from the Dock preferences and restart the Dock.
- Open Terminal and enter the command defaults write com.apple.dock persistent-apps -array followed by killall Dock to reset the Dock’s app list, which removes spacers.
- If you want to selectively remove spacers, edit the Dock preferences file located at
~/Library/Preferences/com.apple.dock.plistusing a plist editor ordefaultscommands to remove spacer entries, then reload the Dock with killall Dock.
When commands cause errors or the Dock behaves unexpectedly, resetting it to default settings can fix corruption.
- Enter defaults delete com.apple.dock in Terminal to delete Dock preferences.
- Restart the Dock by typing killall Dock. This resets the Dock to its original state without custom spacers.
Note that some macOS versions or configurations may limit spacer functionality or cause inconsistent behavior, especially with non-standard Dock arrangements or third-party customization tools. If spacers don’t appear or behave correctly, verify your macOS version and consider updating or removing conflicting apps.
Frequently asked questions
How to make dock bigger on mac?
To make the Dock bigger on your Mac, go to System Preferences > Dock & Menu Bar. Use the Size slider to increase the Dock's size. Keep in mind that making the Dock larger reduces the available screen space for other windows.
How to resize mac dock?
You can resize the Dock by dragging its divider line if the Dock is positioned on the left or right side of your screen. Alternatively, use the Size slider found in System Preferences > Dock & Menu Bar to set a precise size. Resizing adjusts both icon size and Dock thickness.
How to customize dock on mac?
Customizing the Dock is done via System Preferences > Dock & Menu Bar. Here, you can change its size, magnification, position on screen, and minimize effects. Additionally, you can add or remove apps, folders, and spacers to organize the Dock better.
How to add folder to mac dock?
To add a folder to the Dock, simply drag the folder from Finder and drop it to the right side of the Dock, near the Trash icon. The folder will appear as a stack or folder icon, which you can click to access its contents quickly.
How to make dock stay on mac?
To keep the Dock always visible, disable the auto-hide feature by going to System Preferences > Dock & Menu Bar and unchecking "Automatically hide and show the Dock." This ensures the Dock remains on screen unless you manually close or minimize it.
What this method does not cover and who should seek alternatives
Adding spacers requires using Terminal commands, which might not be suitable for all users. Incorrect commands can cause unexpected Dock behavior or issues that require resetting the Dock.
This method inserts static blank slots purely for visual organization and does not support dynamic or interactive spacers that change with context or app usage.
Additionally, macOS updates may occasionally alter Dock behavior or require updated commands to add spacers correctly. Users uncomfortable with Terminal or those needing more advanced Dock customization may prefer third-party utilities or wait for Apple to introduce official features.
For most users, the single most useful next step is to practice adding a spacer and then customize the Dock size via System Settings > Desktop & Dock > Size to ensure spacers are visible and serve their intended purpose. Adjusting Dock position and managing app icons thoughtfully will help you maintain an organized and efficient workspace.