How to Fix Zoom No Audio on Mac: Step-by-Step Troubleshooting
Step-by-step guide to troubleshoot and fix Zoom no audio issues on your Mac for clear sound during calls.
You join a Zoom meeting on your Mac, but there's no sound coming through. You check your volume and speakers, yet the audio remains silent during the call. This common issue can be frustrating, especially when you rely on Zoom for work or staying connected.
This article guides you through how to fix Zoom no audio on Mac using a clear, step-by-step approach. You'll learn how to diagnose the problem by reviewing both macOS and Zoom-specific audio settings. By understanding the root causes, you can confidently restore clear audio communication without guessing or random tweaks.
Key takeaways
- Verify macOS sound output and Zoom audio settings match your device.
- Reset sound preferences in System Preferences to clear conflicts.
- Check Zoom’s microphone and speaker selections within the app.
- Adjust macOS Security & Privacy settings to allow Zoom audio access.
- Test with external headphones or speakers to isolate hardware issues.
Before you start: What you need to check
Before troubleshooting Zoom audio issues on your Mac, it’s essential to verify a few basic settings and have some tools ready. First, check your Mac’s volume icon in the menu bar. If the speaker icon shows a line through it, your Mac is muted. Make sure the volume slider is turned up to an audible level. Also, confirm your internet connection is stable, as poor connectivity can affect Zoom audio performance.
Next, ensure you have the latest Zoom app version installed. Zoom updates frequently to fix bugs and improve compatibility, so running the current version reduces the chance of software-related audio problems. Keep headphones or external speakers handy for testing your sound outside the built-in speakers.
Finally, familiarize yourself with your Mac’s sound input and output settings. These are located in System Preferences under Sound. Knowing where to find these will help you quickly identify if Zoom is using the correct devices for audio during calls.
- Click the volume icon in your Mac’s menu bar and confirm it is not muted; you should see a speaker without a slash and the slider set above zero.
- Open System Preferences > Network to verify your internet connection status; it should say "Connected" with a green indicator.
- Launch the Zoom app, click your profile picture, select "Check for Updates," and install any available updates; the app should confirm you’re on the latest version.
- Plug in your headphones or external speakers and play any audio to confirm they are working properly.
- Go to System Preferences > Sound, review the Input and Output tabs, and note which devices are selected; these devices should match what you intend to use during Zoom calls.
How to fix no sound on Zoom
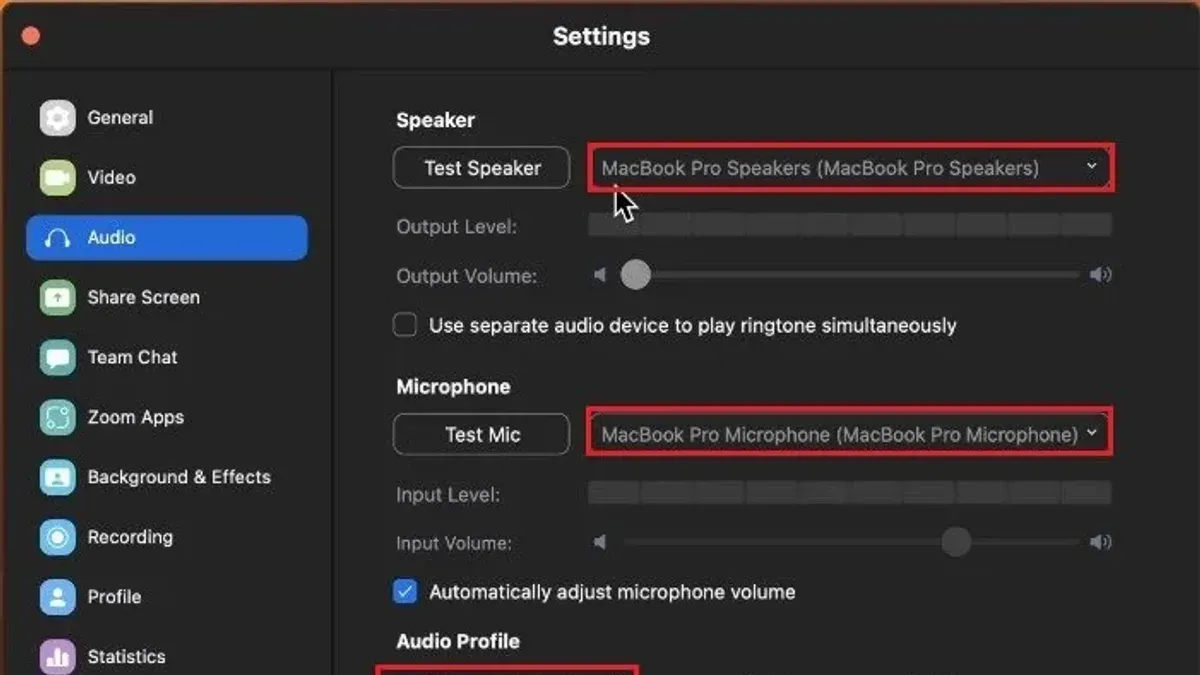
- Open your Zoom app and join a meeting or start a test meeting. Click the upward arrow next to the microphone icon in the bottom-left corner. From the list of audio output devices, select the correct speaker or headphones you want Zoom to use. You should see a checkmark next to the selected device.
- Click on "Test Speaker" in the same menu. You should hear a ringtone or sound from your chosen output device. If you do, it confirms Zoom is sending audio to that device correctly.
- Next, open your Mac’s System Preferences and go to "Sound" > "Output." Make sure the output device selected here matches the one chosen in Zoom. Adjust the volume slider to an audible level and verify the mute checkbox is unchecked.
- If the sound still does not work, quit the Zoom app completely by right-clicking its dock icon and selecting "Quit." Then reopen Zoom and rejoin the meeting. This ensures any recent changes to audio settings are applied properly.
Following these steps ensures Zoom’s audio output device and your Mac’s system sound settings are aligned, resolving most no sound problems during calls.
How to fix audio on Zoom by checking microphone and input settings
Ensuring your microphone input is correctly configured is crucial for clear Zoom audio. Start by confirming that Zoom is set to use the correct microphone device. You can do this within Zoom’s audio settings, where selecting the exact microphone you want to use helps avoid confusion with built-in or external mics.
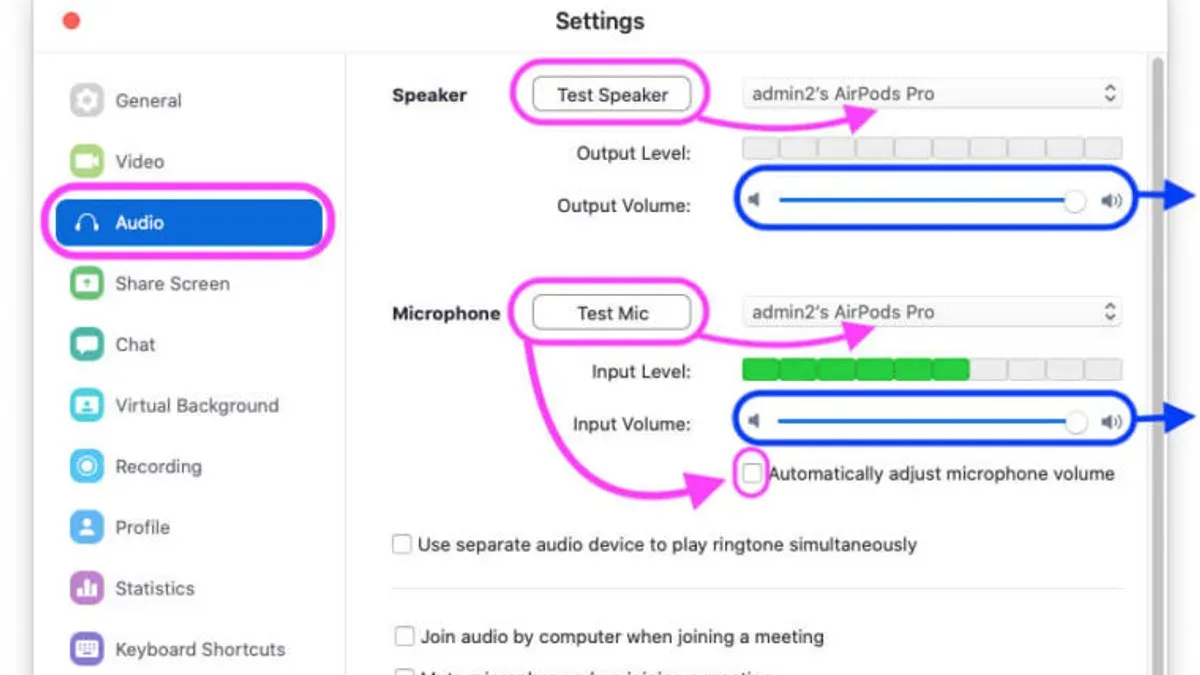
- Open Zoom and click the gear icon to access Settings.
- Go to the Audio tab and look under Microphone.
- Use the dropdown menu to select your preferred microphone device. When selected correctly, you should see the input level bars move as you speak, indicating sound is detected.
- Click Test Mic below the microphone selection. Speak into the microphone and watch the input level bars. If they move, your microphone is capturing sound properly.
- Next, open System Preferences on your Mac and select Sound, then go to the Input tab.
- Choose the same microphone device here and adjust the Input volume slider to a moderate level, typically around 70%–80%. Speak to see the input level meter respond.
- If Zoom or macOS prompts you to grant microphone access, accept the permission request in System Preferences > Security & Privacy > Privacy > Microphone to allow Zoom to use your mic.
Following these steps aligns Zoom’s microphone selection with your Mac’s input settings, ensuring your voice is captured clearly during calls. Seeing the input level bars move during testing confirms your microphone is functioning and recognized by both Zoom and macOS.
How to fix Zoom audio on computer by resetting sound settings
Sometimes, audio issues in Zoom on your Mac stem from misconfigured sound settings or corrupted preferences. Resetting these settings can clear conflicts and restore proper audio function. Begin by resetting your Mac’s sound input and output devices.
- Unplug any external audio devices such as headphones, microphones, or speakers from your Mac. Then wait a few seconds and plug them back in. You should see the audio devices refresh in System Preferences > Sound under Input and Output tabs, reflecting the reconnected hardware.
- Restart the Mac’s core audio service using Terminal to reset the system sound engine. Open Terminal and enter the command sudo killall coreaudiod, then press Enter. Your Mac’s audio will briefly stop and restart; the Terminal will return to the command prompt without errors when successful.
- If audio problems persist, consider reinstalling the Zoom app. Drag Zoom from the Applications folder to Trash, empty the Trash, then download the latest Zoom installer from the official website and install it fresh. This removes any corrupted Zoom audio settings.
- Clear Zoom’s cache files related to audio by navigating to
~/Library/Application Support/zoom.us/datain Finder. Delete the contents of this folder, then restart Zoom. Doing so removes stored audio configurations that might cause conflicts.
Before the reset, you may have noticed inconsistent device lists or missing audio options. After these steps, your Mac’s sound input and output devices should appear correctly, and Zoom will recognize them properly, resolving audio issues caused by misconfigurations or corrupted data.
How to fix the audio on Zoom by managing macOS security and privacy settings
macOS includes security features that can block Zoom from accessing your microphone or other audio input devices, which causes audio problems during calls. To ensure Zoom can use your audio devices, you need to verify and adjust its permissions in the system privacy settings. This is especially important after macOS updates, which often reset or change app permissions.
- Open System Preferences from the Apple menu and select Security & Privacy.
- Click the Privacy tab, then select Microphone from the sidebar.
- Look for Zoom in the list of apps. If the checkbox next to Zoom is unchecked, click it to allow Zoom access to your microphone. You should see Zoom listed with a checked box when permission is granted.
- Next, go to Input Monitoring in the same Privacy sidebar (if available) and confirm Zoom has permission there as well. Some macOS versions require this for audio input devices.
- Close System Preferences, then quit and restart the Zoom app to apply the changes.
After these steps, Zoom should be able to access your microphone and audio input devices correctly. If macOS was recently updated, re-check these permissions, as updates can revoke app access unexpectedly.
Below are example screenshots showing Zoom permissions enabled and disabled in the Privacy settings, illustrating what you should look for:
| Zoom Permissions Disabled | Zoom Permissions Enabled |
|---|---|
 |  |
How to fix zoom audio on laptop by testing with external devices
Using external audio devices like headphones or speakers helps you isolate whether the audio issue comes from your Mac's built-in hardware or Zoom's settings. Start by connecting a pair of wired headphones to the Mac’s headphone jack or plugging in external speakers via USB or Bluetooth.
- Plug in your headphones or connect your Bluetooth speakers. On your Mac, go to System Preferences > Sound > Output and select the connected device. When done correctly, the device name appears checked in the output list.
- Open Zoom and click the upward arrow next to the microphone icon. Under Speaker, select the same external device you chose in System Preferences. You should hear a test sound when you click Test Speaker.
- If you do hear sound through the external device, the issue likely lies with your Mac’s internal speakers. If not, continue troubleshooting your Mac’s audio settings or Zoom configuration.
- For Bluetooth devices, ensure that the device is paired and connected. Check under System Preferences > Bluetooth. If it shows "Connected," but audio still does not play, try disconnecting and reconnecting the device, or remove it and pair it again.
- Test Zoom audio again after reconnecting. Hearing sound confirms the Bluetooth device works properly with Zoom.
Testing with external devices helps pinpoint whether audio problems stem from hardware faults, connection issues, or software settings, allowing you to address the correct cause effectively.
How to fix audio issues on Zoom by updating software and drivers
Outdated software and drivers are common culprits behind Zoom audio problems on your Mac. Keeping macOS, the Zoom app, and audio device drivers up to date helps ensure compatibility and fixes known bugs that may cause no sound or poor audio quality. For example, macOS updates often include patches for audio system stability, while Zoom updates regularly address audio-related issues in their changelogs.
- Update macOS: Open the Apple menu and select "System Settings" (or "System Preferences"), then click "General" and "Software Update." Install any available updates and restart your Mac. When done, your system will run the latest stable version with improved audio support.
- Update Zoom: Open the Zoom app, click your profile picture in the top-right corner, then select "Check for Updates." If an update is available, follow the prompts to install it. After updating, Zoom will include the latest fixes and enhancements for audio issues.
- Check audio device drivers: While macOS generally manages drivers automatically, if you use external audio interfaces, visit the manufacturer’s website to download and install the latest driver versions. Updated drivers often resolve compatibility glitches that prevent proper audio functioning.
Regularly updating these components can resolve many audio problems by addressing underlying software conflicts or bugs that cause no sound in Zoom calls.
How to fix Zoom audio on Mac by adjusting advanced Zoom audio settings
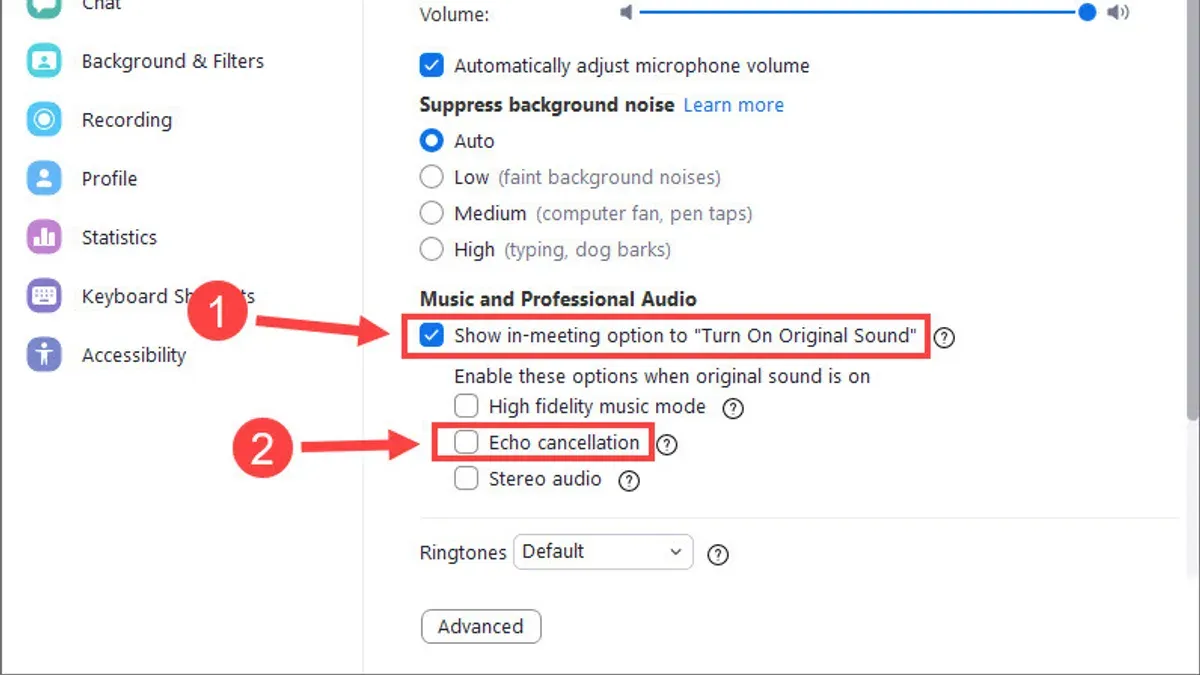
Zoom includes several advanced audio settings that can significantly affect your call sound quality. Disabling the Automatically adjust microphone volume option lets you manually set the input level, preventing sudden volume changes that might cut out your voice. If this was enabled, turning it off can lead to steadier, clearer audio.
Next, check the Suppress background noise setting. Zoom offers levels like Auto, Low, Medium, and High. While higher suppression removes unwanted noise, it may also mute quieter speech or subtle sounds. Setting this to Low or turning it off can improve voice presence and reduce clipping.
If you use high-quality headsets or external microphones, enabling Stereo audio can enhance sound richness and spatial clarity. This is especially useful for music or nuanced vocal tones but requires compatible hardware and may increase bandwidth use.
- Open Zoom and go to Preferences > Audio. You should see the audio input and output device options.
- Uncheck Automatically adjust microphone volume. Speak into your mic and manually move the slider to a comfortable level. Your voice should sound consistent without unexpected drops.
- Set Suppress background noise to Low or Off. Test with background sounds present; your voice should remain clear without abrupt silences.
- If you have a stereo-capable device, check the Stereo audio box. Join a test call and notice a fuller, more detailed sound experience.
After these adjustments, you should notice improved audio clarity and fewer interruptions caused by automatic processing. These settings offer more control but require you to fine-tune input levels and noise suppression according to your environment.
How to zoom out Mac: quick tip for interface navigation
Sometimes when people search for "how to fix Zoom no audio on Mac," they are actually looking for how to zoom out or adjust the display size on their Mac. This is a different issue related to macOS interface zoom levels, not the Zoom app's audio functionality. Understanding this distinction helps avoid confusion and directs you to the right solution.
To zoom out the Mac interface, you can use keyboard shortcuts. Press Command + Minus (⌘ -) to decrease the zoom level in most applications like Safari, Mail, or Finder. You will see the content shrink, confirming the zoom out worked. This shortcut does not affect Zoom app audio settings.
For system-wide screen zoom control, go to System Preferences > Accessibility > Zoom. Here, you can enable and customize zoom features such as keyboard shortcuts, scroll gesture with modifier keys, and more. Adjusting these settings changes how your Mac's display zoom behaves independently from any app.
- Press Command + Minus (⌘ -) in any app with zoomable content; the text and images should reduce in size.
- Open System Preferences from the Apple menu.
- Click Accessibility, then select Zoom in the sidebar.
- Enable options like “Use keyboard shortcuts to zoom” and test zooming with Option + Command + Minus to zoom out the screen.
Frequently asked questions
How to fix my zoom audio?
To fix your Zoom audio, start by checking your Mac’s sound output and input settings to ensure the correct devices are selected. Verify Zoom’s audio settings under Preferences > Audio, confirming that the right microphone and speaker are chosen. If issues persist, restart Zoom, test with external headphones or microphones, and update both Zoom and your macOS audio drivers.
Why is there no audio on zoom?
No audio on Zoom often results from incorrect audio device selection, muted microphones, or macOS security restrictions blocking Zoom’s microphone access. It can also happen if the Zoom volume is set too low or if there’s a conflict with other audio applications running simultaneously.
Why is audio not working on zoom?
Audio may not work on Zoom due to outdated software, missing permissions in macOS Security & Privacy settings, or misconfigured Zoom audio preferences. Additionally, physical hardware issues or disconnected audio devices can cause sound failure during calls.
Why is there no audio on Zoom?
When there is no audio on Zoom, check if Zoom has permission to use your microphone by going to System Preferences > Security & Privacy > Privacy > Microphone. Also, ensure your Mac’s sound output is not muted or set to an incorrect device, and confirm that Zoom’s audio settings are properly configured.
How do I fix my Zoom audio not working on a Mac?
Fix Zoom audio on a Mac by first confirming Zoom has microphone access in System Preferences > Security & Privacy. Next, select the correct input and output devices in both macOS Sound settings and Zoom’s Audio Preferences. Restart Zoom, test with other devices if needed, and update Zoom and your macOS to the latest versions.
What This Advice Does Not Cover
This article focuses on software and system settings on Mac devices related to Zoom audio issues. If you suspect hardware faults such as broken speakers, malfunctioning microphones, or damaged audio ports, these problems require professional repair or replacement rather than software troubleshooting. Additionally, some advanced fixes involving Terminal commands to restart audio services carry risks and should only be attempted by users comfortable with command-line operations. Corporate or school-managed Macs might have restricted permissions that prevent you from changing certain settings explained here; in those cases, contacting your IT department is advisable.
To move forward confidently, the most useful next step is to verify and adjust your macOS Sound settings. Open System Preferences, go to Sound, and carefully check both the Output and Input tabs to ensure the correct devices are selected and volume levels are adequate. This step often uncovers overlooked misconfigurations that cause no audio during Zoom calls.
See also: How to Use Virtual Background in Zoom on Mac: Step-by-Step Guide · How to Allow Screen Recording Permission for Zoom on Mac