
How to Record Audio in the Notes App: Step-by-Step Guide
Capture key points effortlessly by recording audio directly in the Notes app and organize your voice recordings with written notes.
You’re in a meeting or lecture and want to capture key points without typing everything. Recording audio directly in the Notes app can keep your thoughts organized alongside your written notes, making review easier later.
This guide shows you how to record audio in Notes in Notes app across your Apple devices, including iPhone, iPad, and Mac. You’ll learn step-by-step instructions for recording, organizing your audio clips, and how this method compares with other apps like OneNote. By the end, you’ll know how to integrate voice recordings smoothly into your note-taking workflow.
Key takeaways
- You can start an audio recording in the Notes app by tapping the microphone icon within a note.
- Audio recordings sync across your devices via iCloud when Notes syncing is enabled.
- On Mac and iPad, use the built-in controls in Notes to manage recordings without switching apps.
- OneNote offers more advanced audio features but requires switching apps for notes and recordings.
- Organize audio clips in Notes by creating folders and adding descriptive titles to notes with recordings.
Before you start: What you need to record audio in Notes
Recording audio in the Notes app requires certain hardware, software, and settings to be ready on your Apple device. You can use an iPhone, iPad, or Mac, but make sure your device meets the minimum operating system requirements for this feature. On iPhone and iPad, you need iOS or iPadOS 14 or later. For Mac, macOS Big Sur or newer is required. These versions support the built-in audio recording function within the Notes app.
Next, verify that the Notes app has permission to access your microphone. Without this, you won’t be able to record any audio. To check, open Settings, scroll down to Notes, tap it, then tap Microphone and make sure the toggle is on. On Mac, go to System Preferences, select Security & Privacy, click Privacy, then Microphone, and confirm Notes is checked.
Audio files can use considerable storage, so it’s wise to check your available device storage before recording. A typical 1-minute audio note can take around 1 to 2 MB, depending on quality settings. Ensure you have enough free space to avoid interruptions. You can check storage on iPhone and iPad by opening Settings > General > iPhone Storage or iPad Storage. On Mac, click the Apple menu > About This Mac > Storage.
Finally, familiarize yourself with the Notes app interface. Knowing where to find the microphone icon and how to start a new note will make the recording process smoother. Open the Notes app and observe the toolbar at the bottom or top of the screen, depending on your device, so you’re ready to begin recording when you want.
How to record audio in Notes on iPhone
Recording audio directly within the Notes app on your iPhone is straightforward and integrates seamlessly with your text notes. Follow these steps to add voice recordings to your notes efficiently.
- Open the Notes app. Tap the Notes icon on your Home screen or in your app library. You will see your list of existing notes.
- Select an existing note or create a new one. Tap on a note to open it, or tap the new note button (a square with a pencil icon) at the bottom right to start a fresh note.
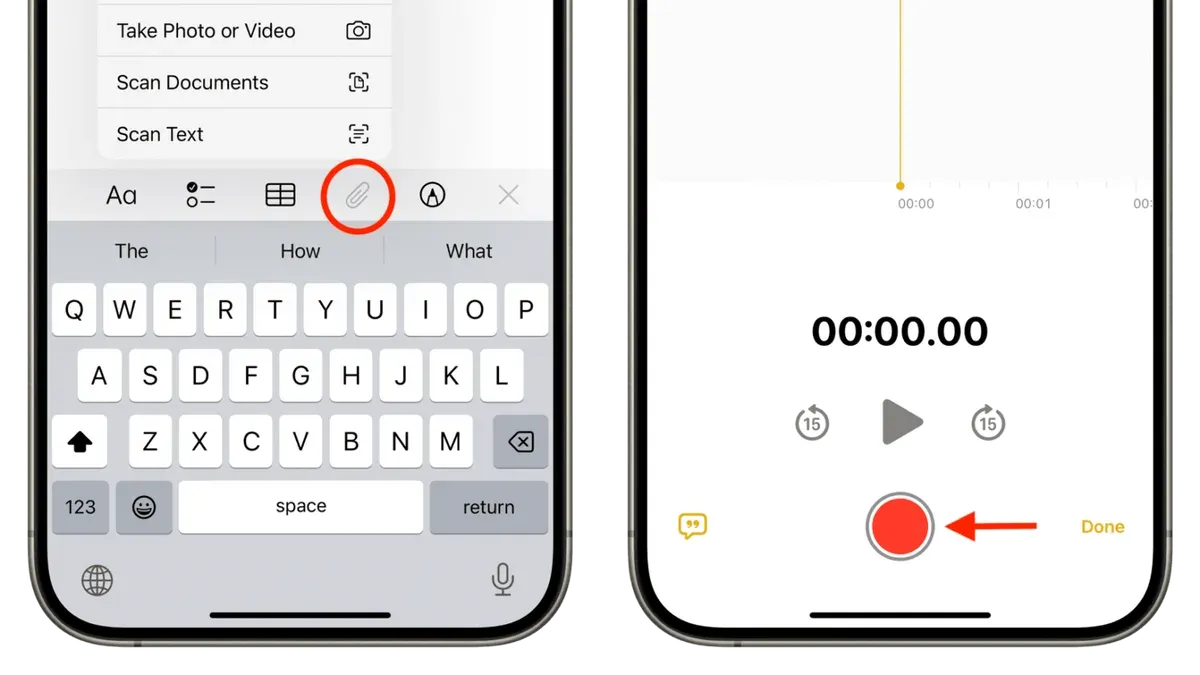
- Locate the microphone or audio recording button. At the bottom of the note interface, you will find a row of icons. Tap the mic icon or the audio waveform button to start recording.
- Start recording. Once you tap the audio button, the recording interface appears with a timer showing elapsed time. Speak clearly into your iPhone’s microphone. You can pause the recording by tapping the pause button if needed.
- Stop recording. When finished, tap the stop button. The audio clip will automatically embed within your note as a playable waveform.
- Save and playback your recording. The recording is saved within the note immediately. Tap the waveform to play back your audio. You can pause, rewind, or fast-forward using the playback controls.
- Manage your recordings. You can rename the note to reflect the audio content for easier identification. To move or delete a recording, edit the note and use the contextual menu on the audio clip by long-pressing it. Deleting the clip removes it from the note without affecting other content.
Most audio recordings can last as long as your device storage allows, but for practical use, shorter clips under 30 minutes are easier to manage. The interface clearly shows controls to pause or stop, so you won’t accidentally lose your recording.
How to record voice notes in the Notes app on iPad and Mac
Recording audio in the Notes app on iPad and Mac follows a similar process to iPhone but includes device-specific features and interface differences. On iPad, you can record voice notes using the built-in microphone or connect an external mic for better sound quality. The Mac version supports audio recording via the internal microphone or external USB and Bluetooth microphones, allowing more flexibility for professional or clearer recordings.
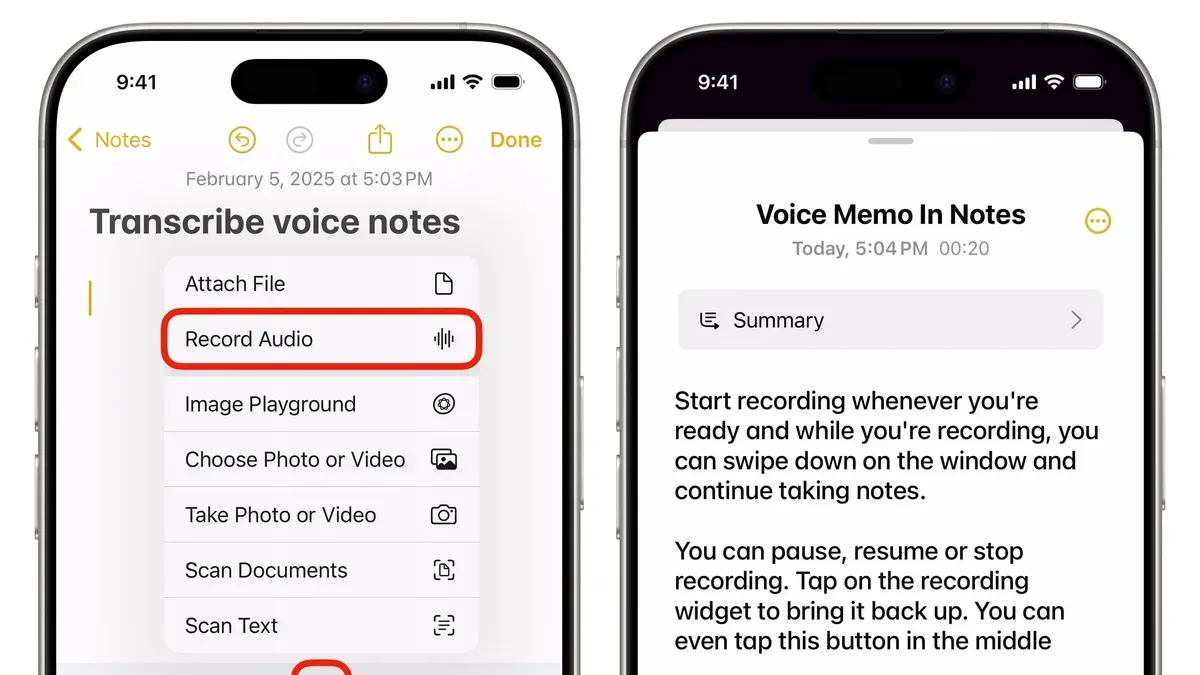
To start recording on iPad or Mac, open the Notes app and create or select a note. Tap or click the microphone icon located above the keyboard toolbar on iPad or in the toolbar at the top of the window on Mac. This opens the recording interface where you can start, pause, or stop your recording. On Mac, you can also use the Touch Bar if your device supports it, which provides quick access to recording controls.
- Open the Notes app and select or create a note where you want to add audio.
- Tap the microphone icon on iPad above the keyboard or click the microphone button in the Mac toolbar. A recording interface will appear.
- Press the record button to start capturing audio. You will see a waveform or timer indicating recording is in progress.
- Tap or click the stop button when finished. The audio clip will appear inline in your note.
- Play back the recording by tapping or clicking the play icon embedded in the note to verify the capture.
Audio recordings sync across your Apple devices via iCloud, usually updating within seconds when connected to a stable Wi-Fi network. This synchronization ensures you can access and play your voice notes from iPhone, iPad, or Mac seamlessly. However, syncing speed can be slower with large audio files or limited network conditions.
Compared to iPhone, iPad and Mac offer larger screens and more precise controls for managing recordings. Mac especially benefits from support for multiple external microphones and integration with keyboard and Touch Bar shortcuts. A key limitation is that the Notes app on Mac does not support recording while the app is minimized, unlike iPhone which can record in the background. Additionally, on iPad, the interface is more touch-optimized, while Mac relies on mouse and keyboard input.
| Feature | iPhone | iPad | Mac |
|---|---|---|---|
| Access to recording controls | Above keyboard | Above keyboard | Toolbar and Touch Bar |
| Microphone options | Built-in only | Built-in or external | Built-in or external USB/Bluetooth |
| Background recording | Yes | No | No |
| Sync speed | Fast on Wi-Fi | Fast on Wi-Fi | Fast on Wi-Fi |
| Interface input | Touch | Touch | Mouse/keyboard |
How to record audio in OneNote while taking notes
OneNote offers a seamless way to record audio while typing your notes, making it a versatile tool for meetings, lectures, and interviews. To start recording, open your desired notebook and page, then tap or click the Insert tab. From there, select Audio or Record Audio depending on your device. You should see a red recording indicator and timer confirming that audio capture has begun.
The recorded audio is embedded directly into your note, aligned with the typed text where you started recording. This integration allows you to play back the audio by clicking the embedded recording icon without leaving your notes. Unlike Apple Notes, OneNote stores these audio clips within the notebook file, making it easier to associate specific recordings with related text.
Here is an overview comparing OneNote audio recording with Apple Notes:
| Feature | OneNote | Apple Notes |
|---|---|---|
| Audio Integration | Embedded inline with typed notes | Separate audio attachment below text |
| Playback | Playback controls directly on note | Playback requires opening the audio file |
| Syncing | Syncs across devices via OneDrive | Syncs via iCloud |
| Editing | Can add timestamps and link notes to audio | Limited audio editing |
OneNote’s audio recording is preferable if you want synchronized audio and typed notes in one place, especially for detailed review or timestamped note-taking. However, the app can be heavier and more complex, which may not suit users seeking quick voice memos. Apple Notes excels in simplicity and quick access but lacks advanced integration.
How to organize and manage audio recordings within Notes
Keeping your audio recordings organized in the Notes app helps you find important voice notes quickly and maintain device storage efficiently. Start by grouping related audio notes into folders and subfolders. For example, create a main folder called "Work Meetings" with subfolders like "Project A" and "Project B" to separate recordings by topic. This structure makes navigation straightforward, especially when you accumulate many voice notes.
Adding clear text labels or tags to your audio notes improves searchability. When you create or edit a note with an audio recording, add descriptive titles such as "Client Call - March" or "Brainstorm Session Ideas." You can also include keywords within the note text that relate to the audio content, making it easier to locate through the Notes app’s search bar.
Pinning important audio notes to the top of your note list offers quick access to frequently used recordings. To pin a note, swipe right on it in the list view and tap the pin icon. Pinned notes stay visible above others, so you won’t have to scroll through long lists.
Archiving or deleting old audio recordings is essential to free up storage space. Review your audio notes periodically and delete ones no longer needed by swiping left on the note and tapping "Delete." Before deleting, check your device’s storage in Settings > General > iPhone Storage to see how much space the Notes app occupies. After cleanup, you should notice a reduction in used storage, helping your device run smoothly.
- Open the Notes app and navigate to the folder containing your audio notes. You should see your notes organized by folders.
- To create a new folder, tap the back arrow to reach the Folders screen, then tap the "New Folder" icon in the bottom-left corner. Name the folder and tap "Save." The folder now appears in your list.
- Move notes into folders by tapping "Edit," selecting notes, then tapping "Move To" and choosing the target folder. Notes move accordingly, simplifying your structure.
- Tap on a note with an audio recording, then tap the title area to edit it. Add descriptive text or tags that summarize the recording. Changes save automatically and improve search results.
- In the notes list, swipe right on an important audio note and tap the pin icon. The note moves to the top section labeled "Pinned."
- To delete unwanted audio notes, swipe left on the note and tap "Delete." Confirm if prompted. Check storage before and after to observe space saved.
Troubleshooting common audio recording issues in Notes
When you encounter issues recording audio in the Notes app, several common problems might be the cause. One frequent issue is the microphone button missing or appearing disabled. This often indicates that the app lacks permission to access your microphone. To fix this, go to Settings > Privacy > Microphone and ensure that Notes is toggled on. You should then see the microphone button enabled within the app.
If you experience permission issues despite enabling microphone access, try restarting your device to refresh app permissions. Sometimes, a quick reboot resolves lingering system glitches that block audio recording.
Audio playback problems may occur if the recording is corrupted or incomplete. If a recording won’t play or stops abruptly, check your device storage space under Settings > General > iPhone Storage. Low storage can cause incomplete saves. Deleting unneeded files to free space can prevent this. Also, ensure your Notes app is updated to the latest version via the App Store.
When a recording fails or stops unexpectedly, check your network if you use iCloud syncing. Poor connectivity can interrupt saving or syncing audio files. You might see an error message like “Unable to save recording.” In such cases, try recording again while offline or on a stable Wi-Fi connection.
To improve audio quality, record in a quiet environment and hold your device’s microphone close to the sound source. Background noise reduction is limited in Notes, so external noise will affect clarity. Using an external microphone compatible with your device can also enhance recording fidelity.
- Open Settings > Privacy > Microphone and toggle Notes on. When successful, the microphone button appears active in Notes.
- Restart your device if microphone access was already enabled but issues persist. After reboot, test recording again.
- Check available storage at Settings > General > iPhone Storage. Free up space if below 1 GB. Then retry recording.
- Update the Notes app via the App Store to ensure the latest bug fixes are applied. Open the app and confirm the microphone button is responsive.
- If you see an error about saving recordings, switch off Wi-Fi and cellular data, then record offline. After saving, reconnect to sync.
- For better sound, record in a quiet place and hold your device’s microphone near you. Consider using an external mic for clearer audio.
Integrating audio recordings with your note-taking workflow
Using audio recordings alongside typed notes can enhance your productivity, especially during meetings, lectures, or brainstorming sessions. Audio captures tone, emphasis, and nuances that typed words may miss, making it easier to revisit complex discussions or instructions. You might choose to record audio when ideas flow quickly or when you need to capture verbatim quotes without distraction.
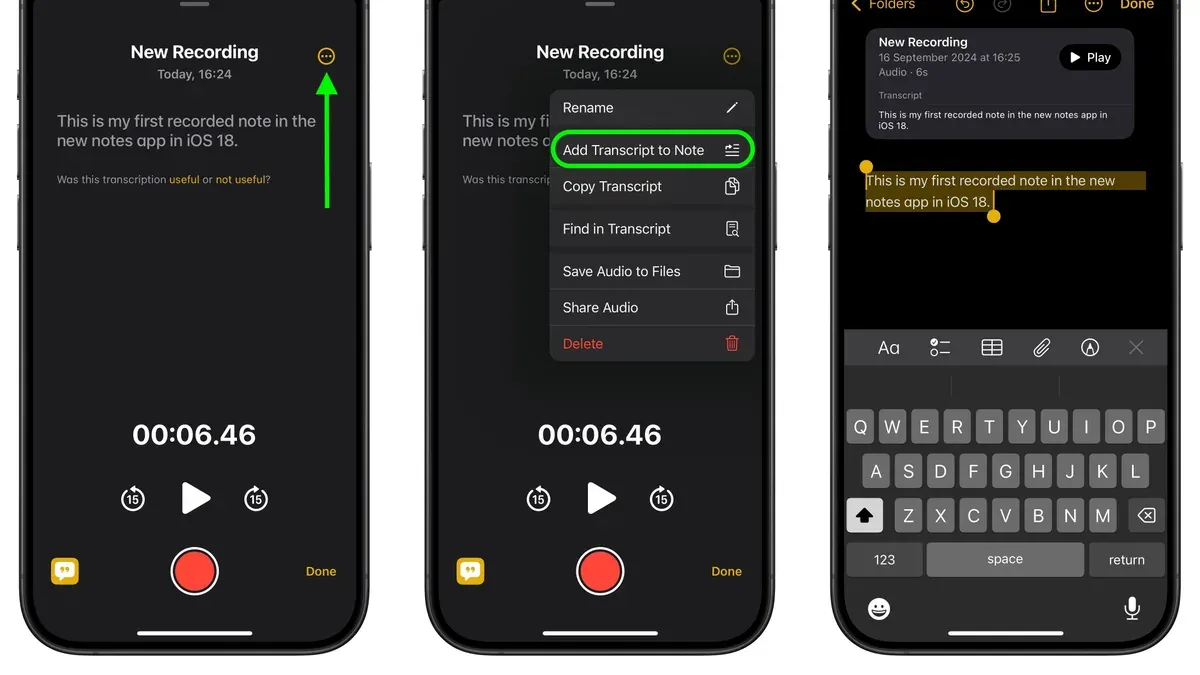
To create richer notes, combine voice memos with text by adding typed summaries, timestamps, or key points to your recordings within the same note. This dual approach lets you quickly scan the text for context while relying on audio for detailed review. For example, after recording a meeting, jot down action items or highlights beneath the audio file to keep everything organized and accessible.
Exporting audio recordings for sharing or transcription is straightforward. Tap the share icon on the audio file in Notes, then choose your preferred method—Mail, Messages, or cloud services. This helps when collaborating with colleagues or submitting assignments. Some users find that sending audio clips to transcription apps or services improves review efficiency by turning speech into searchable text.
Audio notes also boost recall for study or work. Listening to recordings during review sessions can reinforce memory through auditory repetition. Users who integrate audio into their study routines often report better retention of spoken content compared to text alone. Consider playing recordings at varying speeds or in different environments to maximize focus.
- Record audio during your next meeting or lecture within Notes. When the recording stops, confirm the audio file appears in your note.
- Add a typed summary or key points below the audio to capture main ideas. You should see your text immediately beneath the recording.
- Use the share button on the audio file to export it for collaboration or transcription. A sharing menu will appear, allowing you to select your method.
- Review audio notes periodically by playing them back while following your typed annotations. This reinforces understanding and helps with recall.
Frequently asked questions
How to record in notes?
To record audio in the Notes app, open or create a note, then tap the microphone icon or the record button within the app’s toolbar. This starts the audio recording directly inside the note. When you finish, tap stop to save the recording embedded in your note for easy playback and reference.
How to record notes on iphone?
On your iPhone, launch the Notes app and either open an existing note or create a new one. Tap the plus (+) icon above the keyboard and select the microphone or audio recording option. This allows you to capture voice notes seamlessly, which are saved inside the note for later playback.
How to record audio notes on iphone?
Open the Notes app on your iPhone and tap to create a new note. Tap the camera or plus icon and choose the audio recording tool, then tap record to start capturing your voice. Tap done or stop when finished, and the audio file will be saved inside the note itself.
How to record in notes iphone?
Within the Notes app on iPhone, tap to open or create a note. Look for the microphone icon in the formatting toolbar or the plus (+) button and select the audio recording feature. Start recording by tapping the record button, then stop and save the clip within your note when you’re done.
How to record voice notes in notes app?
To record voice notes in the Notes app, open or create a note, then tap the plus (+) icon or the microphone symbol in the toolbar. Press the record button to begin capturing your voice, and tap stop once you are finished. The recording is embedded in your note and can be played back anytime.
What This Guide Does Not Cover
This guide focuses on using the native Notes app across Apple devices and includes a brief comparison with OneNote for audio note-taking. It does not cover other third-party note-taking apps in depth, so if you rely heavily on apps like Evernote or Notability, you might want to explore those separately. Additionally, if your work requires advanced audio editing features—such as multi-track editing, noise reduction, or professional mixing—you should consider dedicated audio recording and editing apps like GarageBand or Audacity, as the Notes app provides basic recording functionality without editing tools.
For users needing seamless integration between detailed audio editing and note-taking, specialized software will better meet those demands.
Next Step: Start Recording Your First Audio Note
To get hands-on experience, open the Notes app on your iPhone or iPad and create a new note. Tap the microphone icon on the toolbar to begin recording your voice note, and experiment with pausing or stopping the recording to see how the audio clip integrates into your text. This direct practice will help you understand the simplicity of audio recording within Notes and how it fits naturally into your workflow. Once comfortable, try organizing your recordings with folders or tags to keep everything accessible and streamlined.
See also: How to Link One Note to Another in the Notes and OneNote Apps · How to Use Tags in Notes App: Organize Your Notes Efficiently · How to Recover Deleted Notes in the Notes App: Step-by-Step Guide



