How to Move Your Photos Library to an External Drive in Photos App
This guide shows how to safely move your Photos library to an external drive in Photos app to free up Mac storage without losing access.
Your Mac's internal storage is filling up fast, slowing down your workflow and limiting space for new files. You want to free up space without losing access to your entire Photos library.
This article explains how to move Photos library to external drive in Photos app safely and effectively. You'll learn how to prepare your external drive, copy your library while preserving its integrity, open the library from the new location, and remove the original to reclaim space. The guide also covers troubleshooting common issues and optimizing your external drive setup specifically for storing your Photos library.
Key takeaways
- Use a formatted external drive with APFS or Mac OS Extended (Journaled) for compatibility and speed.
- Copy the Photos Library package by dragging it in Finder rather than using shortcuts or aliases.
- Always open the library from the external drive first to confirm proper access before deleting the original.
- Backup your Photos Library before moving to avoid accidental data loss.
- Keep your external drive connected when using the Photos app to prevent missing library errors.
Before You Start: What You Need to Prepare
Before moving your Photos library to an external drive, you need to ensure the external drive has enough space to hold your entire library plus some extra margin. Photos libraries commonly range from around 20GB to over 100GB, depending on the number of photos and videos you store. It's recommended to have at least 20% more free space on the external drive than your library size to allow for smooth copying and future growth.
Next, confirm that your external drive is formatted in either APFS or Mac OS Extended (Journaled). These formats are compatible with the Photos app and help maintain library integrity. You can check your drive's format via Disk Utility under the "Info" section.
Before starting the move, create a backup of your Photos library using Time Machine or another backup method. This step is crucial to avoid any data loss should an issue arise during copying. Finally, make sure to close the Photos app completely and quit any related background processes to prevent file corruption during the move.
- Check your Photos library size by selecting the library file in Finder and pressing Command+I; you should see the total size displayed.
Result: You know the exact size of your library. - Connect your external drive and open Disk Utility (found in Applications > Utilities). Select the drive and verify the format under "Info".
Result: You confirm the drive is APFS or Mac OS Extended (Journaled). - Create a backup of your Photos library using Time Machine or manual copy.
Result: You have a secure copy of your library stored safely. - Close the Photos app and quit any related processes by right-clicking the Photos icon in the Dock and choosing "Quit".
Result: The library is not in use and ready to move.
Locate and Identify Your Current Photos Library
To move your Photos library successfully, you first need to locate the exact file on your Mac. By default, your Photos library is stored in the Pictures folder inside your user directory. The library appears as a single file named Photos Library.photoslibrary, but it is actually a package containing all your photos, albums, and metadata.
- Open a Finder window and click Go in the menu bar, then select Home. You should now see your home folder.
- Open the Pictures folder. Here, look for a file called Photos Library.photoslibrary. If you have multiple libraries or chose a custom location before, check those places accordingly.
- Right-click (or Control-click) the Photos Library.photoslibrary file and select Show Package Contents to confirm it is a package. You will see folders like Masters or Originals, confirming this is your full photo library.
- Before proceeding, make sure the Photos app is closed. You can verify this by right-clicking the Photos icon in the Dock and checking if Quit is available or if Force Quit is needed.
Having located and verified your Photos library, you are now ready to copy it safely, ensuring you move the entire package without missing crucial data.
Copy the Photos Library to the External Drive
Copying your Photos library rather than moving it immediately is the safest way to preserve your original library until you confirm the transfer was successful. This approach prevents data loss if anything interrupts the process. You can use Finder for a straightforward method or Terminal if you prefer command-line precision.
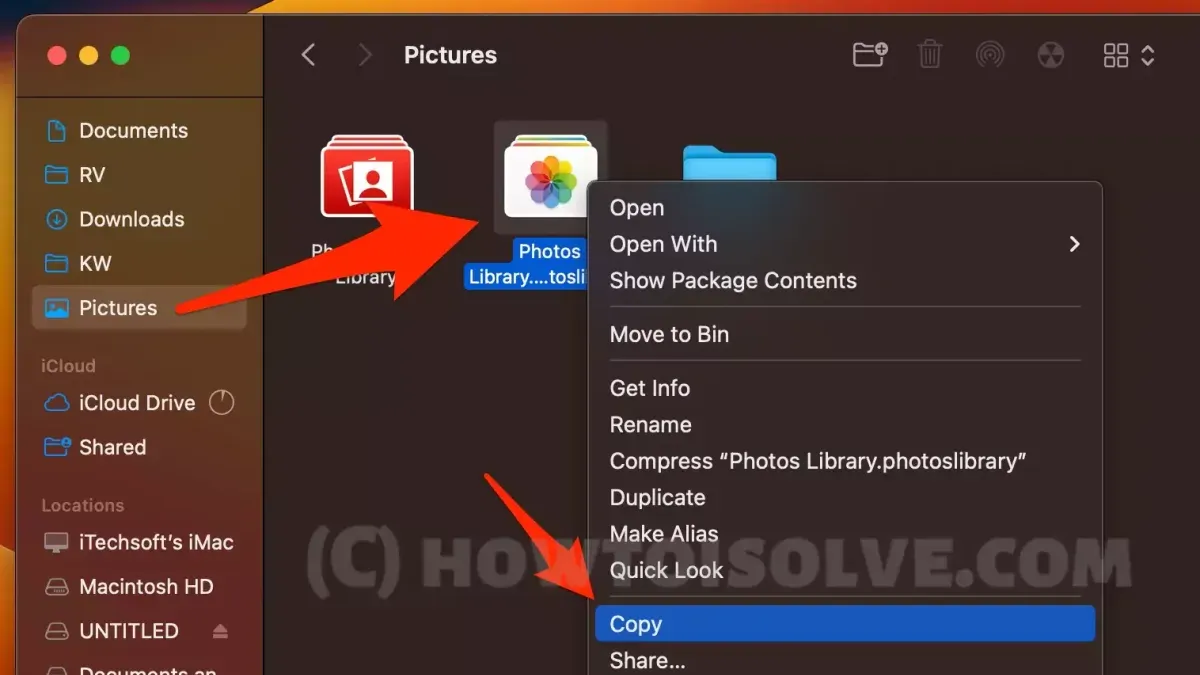
- Open Finder and navigate to the Pictures folder where your Photos Library package is located. You should see a file named "Photos Library.photoslibrary".
- Connect your external drive to your Mac and open it in Finder. Ensure it has enough free space; for example, a 50GB library requires at least 50GB available.
- Drag the "Photos Library.photoslibrary" file from the Pictures folder to the external drive window. You will see a progress bar indicating the copying status. For a 50GB library, this may take roughly 15 to 30 minutes depending on your drive speed.
- Once the copy finishes, compare the file size and modification date of the copy on the external drive with the original. Right-click each file, choose "Get Info," and verify the sizes match within a small margin and the creation dates are recent.
- If you prefer Terminal, open it and use the command cp -R ~/Pictures/"Photos Library.photoslibrary" /Volumes/ExternalDrive/ replacing "ExternalDrive" with your drive's name. Terminal will return to the prompt once copying completes.
- Confirm the copy completed successfully by listing the file details with ls -l /Volumes/ExternalDrive/ and checking the size matches the original.
After verifying the copy, you can proceed confidently to open the library from your external drive.
Open Photos Library from the External Drive
- Close the Photos app if it is open. Then, press and hold the Option key on your keyboard and open Photos. You will see a dialog box prompting you to choose a library.
- In the dialog, click Other Library… and navigate to your external drive. Locate the copied Photos library package file, typically named Photos Library.photoslibrary, and select it. Click Choose Library. This action opens Photos using the library on the external drive.
- Once Photos opens, look at the Photos menu and select Preferences. Under the General tab, click the button labeled Use as System Photo Library. This sets the external library as the default for your Mac.
- To confirm that the external library is active, check the library name shown in the Photos window title bar; it should match the library on the external drive. Additionally, in Preferences > General, the Use as System Photo Library button will be greyed out, indicating it is set.
- From now on, opening Photos will automatically load the library from your external drive. Ensure your external drive is connected before launching Photos to avoid errors or loading an empty library.
Delete the Original Library to Free Up Space
After you have confirmed that your Photos library on the external drive functions flawlessly and contains all your images and albums, it's wise to wait a few days before deleting the original library. This waiting period helps ensure that you haven't missed any issues with the external copy and that all recent changes are safely reflected there.
When you are ready, follow these steps to remove the original Photos library from your Mac's internal drive and reclaim storage space:
- Open Finder and navigate to your Pictures folder where the original Photos library is located. You should see a file named Photos Library.photoslibrary.
- Right-click or Control-click on the Photos Library.photoslibrary file and select Move to Trash. This action moves the library to the Trash but does not yet free up space.
- Empty the Trash by right-clicking the Trash icon in the Dock and choosing Empty Trash. Confirm the action if prompted. This permanently deletes the original library and frees up significant storage on your internal drive.
- To verify the freed space, open About This Mac from the Apple menu, then click Storage. You should see a noticeable increase in available space after emptying the Trash.
Before deleting, ensure you have a reliable backup of your Photos library, preferably stored separately from both your internal and external drives. Keeping an additional backup protects against unexpected data loss and allows you to recover your photos if needed.
Troubleshoot Common Issues When Moving Photos Library
Sometimes, after moving your Photos library to an external drive, you may encounter issues that disrupt your workflow. One frequent problem is the library not opening because the external drive is formatted incorrectly. Photos requires the drive to be formatted as APFS or Mac OS Extended (Journaled). If you see an error like "The file is not recognized as a valid library," check your drive’s format in Disk Utility and reformat if necessary.
Performance can also be a concern, especially if your external drive is a traditional hard disk drive (HDD). HDDs are slower than solid-state drives (SSDs), which means you might experience lag when browsing or editing photos. For smoother operation, using an SSD is recommended because it offers faster read/write speeds, reducing wait times significantly.
Error messages about permissions or library corruption, such as "You don’t have permission to access this file" or "The library cannot be opened because it appears to be damaged," often occur due to incorrect file permissions or interrupted transfers. To fix this, select the Photos library file, choose File > Get Info, and adjust permissions to ensure you have Read & Write access. Running Disk Utility’s First Aid on the external drive can also help repair corruption.
Lastly, if your external drive disconnects unexpectedly, Photos may crash or close. Ensure the USB or Thunderbolt connection is secure and avoid using hubs that may cause instability. Keeping the external drive powered independently, if possible, helps maintain a stable connection and prevents interruptions.
Optimize Your External Drive Setup for Photos Library
Choosing the right external drive and managing it properly ensures smooth performance and protects your Photos library. Solid State Drives (SSDs) are highly recommended over Hard Disk Drives (HDDs) due to their faster read and write speeds, which can significantly reduce loading and saving times when accessing your library. HDDs, being mechanical, are slower and more prone to wear, which may cause delays or data integrity issues during photo operations.
Using a dedicated external drive exclusively for your Photos library prevents file fragmentation and reduces the risk of accidental deletion or corruption caused by mixing different types of data. This separation also makes backing up simpler and more organized.
Regular backups are crucial. Utilize Time Machine or other reliable backup solutions to create consistent copies of your external Photos library. This practice safeguards against unexpected drive failure or data loss.
When disconnecting your external drive, always eject it safely by right-clicking the drive icon and selecting "Eject" or using Finder’s eject button. This prevents corruption caused by interrupted data transfer.
Frequently asked questions
Can I move my Photos library to any external drive?
You can move your Photos library to most external drives, but it must be a drive connected via USB, Thunderbolt, or FireWire that macOS can access reliably. The drive should have sufficient free space and be formatted correctly to avoid problems. Avoid network drives or drives with slow connection speeds as they may cause errors or slow performance.
What format should the external drive be to work with Photos?
The external drive must be formatted as APFS (Apple File System) or Mac OS Extended (Journaled) to work smoothly with the Photos library. APFS is recommended for SSDs and newer drives, while Mac OS Extended is compatible with traditional spinning drives. You can check and format the drive using Disk Utility before moving your library.
Will moving my Photos library to an external drive affect iCloud Photos?
Moving your Photos library to an external drive does not affect iCloud Photos syncing, as long as you open the library from the external drive and have iCloud Photos enabled in Photos preferences. Changes you make will still sync with iCloud as usual. Just ensure the external drive is connected whenever you want to access or update your library.
How can I tell if my Photos library was moved successfully?
You can verify the move by opening the Photos app while holding the Option key and selecting the library on the external drive. Check that all your photos and albums appear as expected. Also, confirm that the original library on the internal drive is intact before deleting it to free up space.
What This Guide Does Not Cover
This guide focuses on moving a local Photos library to an external drive and does not cover relocating iCloud Photos system files or libraries managed exclusively by iCloud. If you use iCloud Photos to sync your images across devices, moving the library can cause syncing delays or conflicts. Users who rely heavily on iCloud Photos syncing should carefully consider these risks or look into Apple’s official recommendations before proceeding.
For those managing multiple libraries with iCloud integration, or using shared libraries, this process may not maintain seamless syncing as expected. In such cases, keeping the library on your internal drive or using iCloud’s storage options might be safer.
Next Step: Verify and Backup Your Library After Moving
After you have moved your Photos library to the external drive and opened it successfully, immediately create a full backup of the library on another drive or cloud service. This backup ensures your photos remain safe if the external drive encounters issues. Regularly verify that your library opens and functions properly from the external drive before deleting the original copy. Taking this careful approach protects your memories while freeing up internal storage.
See also: How to Remove Duplicate Photos in Photos App: Step-by-Step Guide · How to Hide Photos in the Photos App: A Step-by-Step Guide · How to Create a Shared Album in Photos App: Step-by-Step Guide · How to Turn a Live Photo into a Video in Photos App