How to Join Two Videos in QuickTime Player: Step-by-Step Guide
This guide shows you how to join two videos in QuickTime Player quickly and easily without downloading additional software.
You have two video clips you'd like to combine into one seamless file, but you want to avoid downloading complicated software. QuickTime Player, built into your Mac, offers a straightforward way to merge videos without extra tools. If you're wondering how to join two videos in QuickTime Player, this guide will walk you through the exact steps you need to take.
This article explains what you need before starting, how to open and prepare your clips, and two practical methods to join videos within QuickTime Player itself. You'll also learn how to save your merged video correctly, what to do if you encounter common issues, and when it might be better to explore other video merging options.
Key takeaways
- QuickTime Player lets you merge videos using copy-paste or its timeline feature.
- You must have videos in compatible formats for smooth merging.
- Saving your project properly ensures you don’t lose quality or edits.
- QuickTime’s merging tools are basic—consider other apps for advanced editing.
- Common issues often involve unsupported file types or export settings.
Before you start: What you need to merge videos in QuickTime Player
To merge videos smoothly using QuickTime Player, first ensure you have the application installed on your Mac. QuickTime Player comes pre-installed on macOS, so you likely already have it, but if not, you can download it from the Mac App Store. Next, use video files in compatible formats such as MOV or MP4. QuickTime Player supports these formats natively and works best with them.
Before merging, check that your videos have similar resolutions and frame rates. For example, combining a 1080p video at 30fps with a 720p video at 60fps may cause playback inconsistencies after merging. While QuickTime Player offers basic editing features like trimming and merging, it is not a full-featured video editor. If you need advanced options like transitions or effects, consider dedicated video editing software instead.
Here are the steps to prepare your setup:
- Verify QuickTime Player is installed: Open your Applications folder and locate QuickTime Player. When opened, you should see the QuickTime Player menu bar at the top.
- Confirm your video files are MOV or MP4: Select a video, right-click, and choose Get Info. The file extension should be.mov or.mp4. If your files use other formats like AVI or MKV, QuickTime may not open them and show an error.
- Check video resolution and frame rate: Open each video in QuickTime Player, go to Window > Show Movie Inspector. Note the Resolution and FPS (frames per second) values. Videos should ideally match for smooth joining.
Following these preparations ensures QuickTime Player can handle your video merging task without unexpected issues.
Open and prepare your videos in QuickTime Player
To start merging your videos, you first need to open each one in QuickTime Player. This means launching each file in its own window so you can work with them individually before combining. Having separate windows helps you review and edit each video without confusion.
- Open QuickTime Player from your Applications folder or Dock.
- Go to the File menu and select Open File....
- Choose your first video file and click Open. The video will appear in a new QuickTime window.
- Repeat these steps for each additional video you want to merge. Each file will open in its own window.
Once all videos are open, play each one briefly to confirm they are the correct files and check their length. This helps avoid merging the wrong clips or including unwanted footage. If any video includes parts you don't want, you can trim it before merging.
- With a video window active, click the Edit menu and choose Trim....
- Drag the yellow handles on the timeline to select the section you want to keep.
- Click Trim to cut away the unneeded portions. The video length updates accordingly.
- Repeat trimming for other videos as needed to prepare clean clips for joining.
After these steps, you’ll have multiple video windows open, each showing a trimmed or original clip ready for merging. This clear setup makes the next steps smoother and helps you avoid common mistakes like merging incorrect segments.
How to merge two videos in QuickTime Player using copy and paste
Joining two videos in QuickTime Player can be done efficiently by copying one video and pasting it after another. This method is straightforward and works well when your videos have similar settings, helping ensure smoother transitions.
- Open the second video in QuickTime Player and select Edit from the menu bar, then click Select All to highlight the entire video content. Once selected, choose Edit > Copy. You should see the video copied to your clipboard.
- Switch to the first video’s window. Click on the timeline or the end of the video clip to place the insertion point exactly where you want to add the second video. Then go to Edit > Paste. The second video will be appended to the end of the first video’s timeline.
- Play through the merged video to check for smooth transitions. If needed, use the trim tool to adjust clip lengths for a better flow.
- Once satisfied, save your combined video by selecting File > Save As. Choose a new file name to keep the original videos intact. Your new file size will generally be close to the sum of the original files, depending on any trimming or encoding applied.
This copy-and-paste method is ideal for quick merges but may not handle complex edits or differing video formats well. Keeping your clips trimmed and aligned before merging helps maintain video quality and playback consistency.
How to join two videos using QuickTime Player’s timeline feature
QuickTime Player offers a timeline or clip view that lets you visually arrange clips for merging. This feature is especially useful if you want to reorder clips before combining them. To access it, open one of your video files and select View > Show Clips from the menu bar. This reveals the timeline at the bottom, displaying your video as one or more segments.

- Open the first video in QuickTime Player and choose View > Show Clips. You should see the clip represented as a thumbnail in the timeline.
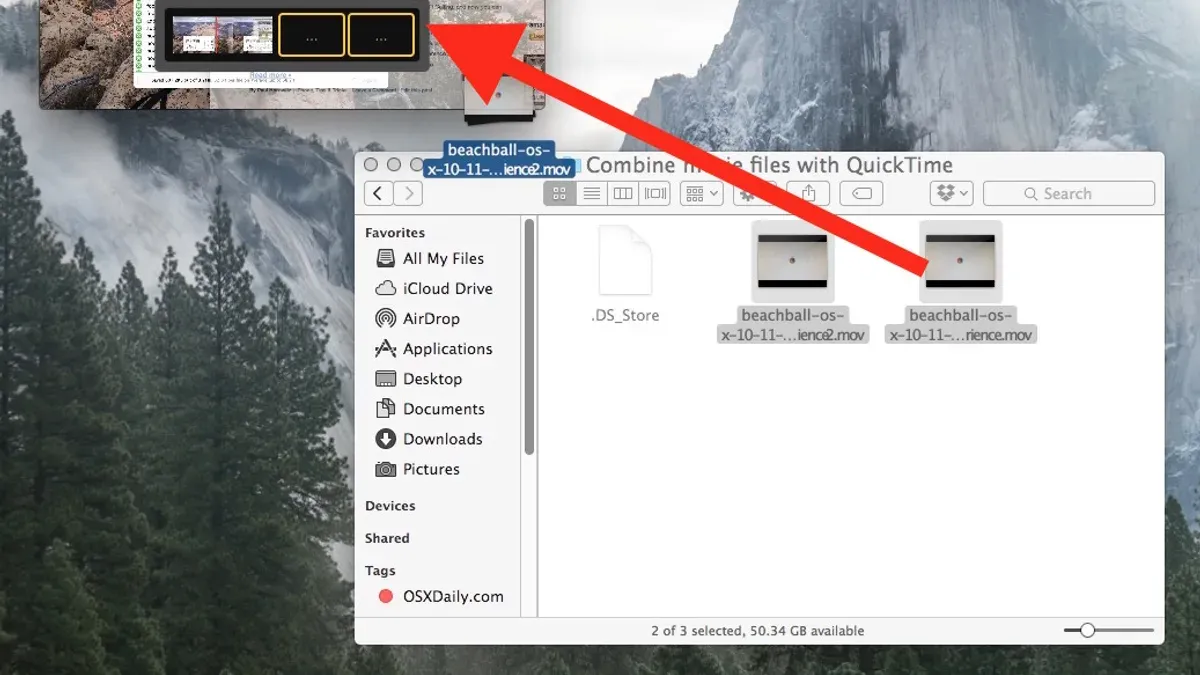
- Drag the second video file directly into the timeline area. A thumbnail of this clip will appear alongside the first.
- Click and drag the clips within the timeline to reorder them as you prefer. You can place one clip immediately after the other to create a seamless sequence.
- Use the play button to preview how the clips play back together in the timeline. This helps confirm the order and smoothness of the join before saving.
- When satisfied, go to File > Export As and choose your desired resolution to save the merged video.
While this timeline method provides a clear visual way to merge clips, the output quality is generally similar to the copy-and-paste approach. However, it may be less flexible for fine edits like precise trimming or adding transitions. Additionally, this timeline feature might not support all video formats for dragging and dropping, so compatibility can be a limitation compared to copy-paste.
How to save and export your merged video properly
Once you have combined your videos in QuickTime Player, the next important step is to save and export the merged file correctly. This ensures your video maintains the desired quality and is compatible with your intended playback devices or platforms. QuickTime Player offers several export options tailored to different needs, such as resolution and format.
- Click File in the menu bar and select Export As. You will see a list of resolution options like 4K, 1080p, 720p, and 480p. Choose the resolution that best matches your source video and target use—for example, select 1080p for HD playback.
- After selecting resolution, a save dialog appears. Enter a clear and distinctive filename to avoid overwriting original files, and choose a safe location such as your Movies folder. Confirm the Format is set to Movie (.mov), which is QuickTime’s native format and widely supported.
- Click Save. The export process starts and may take time depending on video length and resolution. If you encounter an error like "export failed" or a corrupted file, check that all merged clips have compatible codecs and try exporting at a lower resolution.
- When export completes, locate the file and double-click to open it in QuickTime Player. Play through the video to verify smooth playback, correct merging, and audio synchronization.
If you follow these steps, you can confidently save your merged video without quality loss or file issues. Remember that choosing an export resolution higher than your original video does not improve quality but increases file size. Exporting in.mov format ensures broad compatibility, but if you need MP4 or other formats, consider using dedicated video converters after exporting.
How to play QuickTime videos on Windows
QuickTime Player was once available for Windows, but Apple discontinued support several years ago. You can still find and install legacy versions of QuickTime Player for Windows, but these versions may be outdated and pose security risks. Therefore, using QuickTime Player on Windows is not recommended unless absolutely necessary.
For better compatibility and security, consider alternative media players that support QuickTime video formats, such as.mov. VLC Media Player is a popular choice because it is free, regularly updated, and supports a wide range of video formats including QuickTime files. Windows Media Player, by default, does not support all QuickTime formats and may require additional codecs.
Here is a comparison chart to help you understand the options:
| Player | Supports QuickTime (.mov) | Regular Updates | Security Risk | Platform |
|---|---|---|---|---|
| QuickTime Player (Windows) | Yes (limited formats) | No (discontinued) | High (no recent patches) | Windows |
| Windows Media Player | No (requires codecs) | Yes | Low | Windows |
| VLC Media Player | Yes (broad support) | Yes | Low | Windows, macOS, Linux |
How to use VLC to play QuickTime videos
- Download and install VLC Media Player from the official website. After installation, open VLC.
- Click on Media in the menu bar, then select Open File....
- Navigate to your QuickTime video file (.mov) and select it, then click Open. The video should begin playing immediately.
- If playback issues occur, try updating VLC to the latest version or converting the video format using VLC's convert feature.
Common playback issues and fixes on Windows
- If QuickTime videos do not play in Windows Media Player, installing a codec pack like K-Lite Codec Pack can help, but this may introduce compatibility issues or security risks.
- Videos with advanced codecs or higher resolutions may not play smoothly in QuickTime Player for Windows or Windows Media Player.
- Using VLC avoids most compatibility problems due to its wide codec support and frequent updates.
Troubleshooting common issues when joining videos in QuickTime Player
When merging videos in QuickTime Player, you might encounter issues like failure to merge, playback problems, or crashes. One common problem is incompatible video formats or codecs. QuickTime supports formats like MOV and MP4 but may reject files encoded with uncommon codecs, causing errors such as "The movie could not be opened." To fix this, convert your videos to a supported format using tools like HandBrake before merging.
If your merged video plays incorrectly—such as missing audio, stuttering, or unexpected length—this often results from differences in frame rates or resolutions between the clips. Ensuring your clips share similar settings before merging helps prevent this. You can check video info in QuickTime via Window > Show Movie Inspector.
QuickTime Player may crash or become unresponsive during merging if your system is low on memory or if the video files are very large. Closing other applications and restarting QuickTime can alleviate this. If crashes persist, updating macOS and QuickTime to the latest versions usually resolves stability issues.
Sometimes, the Paste option is greyed out or missing when attempting to merge. This usually means the copied content is incompatible or no video is copied. To resolve this:
- Open the second video in QuickTime and select Edit > Select All. You should see the entire video timeline highlighted.
- Choose Edit > Copy. The Paste option should become active.
- Switch to the first video, click at the desired insertion point in the timeline, then select Edit > Paste. The second video should append or insert correctly.
Following these steps can help you navigate common hurdles and merge your videos smoothly in QuickTime Player.
When to consider alternative video merging tools instead of QuickTime Player
QuickTime Player offers a straightforward way to join videos, but it has limitations that may affect your editing needs. It supports only certain formats like MOV and MP4, with limited codec options and no advanced features such as multi-track editing, transitions, or effects. If your project requires greater flexibility, higher format compatibility, or professional-grade editing, you might need a different tool.

Here is a comparison of QuickTime Player with some popular alternatives:
| Feature | QuickTime Player | iMovie (Free) | Adobe Premiere Pro (Paid) |
|---|---|---|---|
| Supported Formats | Limited (MOV, MP4) | Wide (MP4, MOV, AVI, and more) | Extensive (all major formats) |
| Editing Features | Basic trimming, joining | Multi-track editing, transitions, effects | Advanced multi-track, effects, color grading |
| Ease of Use | Very simple | Intuitive for beginners and intermediate users | Steeper learning curve |
| Cost | Free | Free with macOS | Subscription-based |
You should consider QuickTime Player sufficient when you need to join a few clips quickly without extra effects or format conversions. However, if your videos come in diverse formats, you want to add transitions, or plan more complex editing workflows, tools like iMovie for casual use or Adobe Premiere Pro for professional work are better choices.
Frequently asked questions
Can i merge videos in quicktime?
Yes, you can merge videos in QuickTime Player by opening multiple clips and combining them in a single window. The app allows you to paste one clip after another or arrange clips on the timeline to create a seamless video. However, this works best with simple editing needs and compatible video formats.
How to merge two clips in quicktime player?
To merge two clips, open the first video in QuickTime Player, then drag the second video into the same window or use Edit > Add Clip to End. You can also copy one clip and paste it at the desired position on the timeline. Once combined, you can reorder clips by dragging them before saving the merged file.
How to combine two videos in quicktime player?
Combining two videos involves opening both files and arranging them on the timeline within QuickTime Player. Use the Edit menu to add clips or drag videos directly into the window. After placing the videos in the correct sequence, save the project by exporting it as a new file to retain the merged content.
How to use quicktime player?
QuickTime Player is a built-in Mac app for playing, recording, and editing videos. You open files via File > Open File, and use the playback controls for viewing. For editing, use the Edit menu to trim, split, or combine clips. The interface is straightforward, making it accessible for beginners to perform basic video tasks.
How to join two videos online?
Joining two videos online typically requires using a web-based video editor or merger service. You upload your video files to the platform, arrange them in order, and then process the merge. This method is useful if you don’t have QuickTime Player or want more advanced features, but it requires a stable internet connection and might have file size limits.
What QuickTime Player Can’t Do
QuickTime Player is great for simple video merging tasks, but it has its limits. It only supports joining videos that share compatible formats and similar encoding settings. If your videos differ significantly in format or resolution, you might run into issues or poor-quality results. Additionally, QuickTime Player does not offer advanced editing features like adding transitions between clips or mixing audio tracks. For those needs, dedicated video editors such as iMovie, Final Cut Pro, or other third-party tools are better suited.
To get the best results with QuickTime Player, ensure your videos are in compatible formats like MOV or MP4 and have similar resolution and frame rates before merging. Check your clips in the “Inspector” under the “Window” menu to confirm their details.
The most useful next step is to try merging a couple of simple, compatible videos following the copy-and-paste or timeline methods described earlier. This hands-on practice will clarify how QuickTime Player works for your specific files and help you decide if it meets your needs or if exploring other software is necessary.
See also: How to Trim a Video in QuickTime Player: Step-by-Step Guide · How to Screen Record with Internal Audio in QuickTime Player