How to Remove Vocals from a Song in GarageBand: Step-by-Step Guide
Discover step-by-step how to remove vocals from a song in GarageBand on Mac, iPhone, or iPad to create karaoke or remix versions easily.
You have a favorite song and want to create a karaoke version or remix by removing the vocals. GarageBand offers tools to help you do this, but the process varies depending on whether you're using a Mac, iPhone, or iPad.
This article explains how to remove vocals from a song in GarageBand with clear, step-by-step instructions tailored to each device. You'll also learn practical troubleshooting tips and how to set realistic expectations about vocal removal quality. Whether you want to isolate the instrumental or separate vocals and instruments, this guide will help you navigate GarageBand’s features effectively.
Key takeaways
- Use the Track EQ and Vocal Transformer on Mac for basic vocal reduction.
- On iPhone and iPad, apply the Vocal Removal setting in the Audio Unit Extensions.
- Complete vocal removal is challenging; some vocal traces may remain.
- If the usual methods fail, try phase inversion or third-party plugins compatible with GarageBand.
- Export your track as an audio file once you achieve the desired vocal removal.
Before you start: What you need to remove vocals in GarageBand
To effectively remove vocals from a song in GarageBand, you need a few essential tools and files ready. First, ensure you have GarageBand installed on your Mac, iPhone, or iPad. Using the latest version is recommended, as it supports the most audio formats and offers improved editing features. GarageBand supports common audio formats like MP3, WAV, AIFF, and AAC, which are suitable for vocal removal tasks.
You also need a stereo audio file of the song you want to edit. Mono files or tracks with heavily mixed vocals can be more challenging to work with. A basic understanding of GarageBand’s interface and track editing functions will help you navigate the process smoothly. Since GarageBand does not include a dedicated vocal remover tool, you’ll use workarounds such as phase inversion and equalization to isolate or reduce vocals.
Optional but helpful is a good pair of headphones for critical listening during editing. This lets you hear subtle changes in the audio as you adjust settings. Familiarize yourself with GarageBand's track controls, the EQ panel, and the track header where you can access plugins and volume settings. Having these prepared will make the vocal removal process clearer and more manageable.
Key points:
- GarageBand installed (latest version recommended) on your device.
- A stereo audio file in MP3, WAV, AIFF, or AAC format.
- Basic knowledge of GarageBand’s interface and track editing.
- Understanding that vocal removal uses workarounds (phase inversion and EQ).
- Optional: headphones for precise audio monitoring.
How to remove vocals from a song in GarageBand on Mac
- Open GarageBand and create a new project. Import your stereo song by dragging it into the workspace. You should see the audio waveform displayed clearly in a track.
- Duplicate the imported track by selecting it and pressing Command+D. You will now have two identical tracks stacked vertically, both showing the same waveform.
- Insert a phase inverter plugin on the duplicate track. Since GarageBand does not include a native phase inverter, add the "Gain" plugin found under Audio Units > Apple > AUPeakLimiter or use a trusted third-party phase inverter plugin. Activate the phase inversion option in the plugin settings. When done correctly, the waveform of this track should appear visually identical but phase-inverted compared to the original.
- Pan the original track fully to the left and the phase-inverted track fully to the right. This separation helps cancel out the center-panned vocals when the audio is played together.
- Apply an EQ effect to both tracks. Use a parametric EQ to reduce frequencies typically occupied by vocals, generally around 1 kHz to 4 kHz. Adjust the EQ until the vocals are less prominent but the instruments remain clear. Avoid excessive EQ cuts to prevent unnatural sound.
- Play both tracks simultaneously and listen for vocal reduction. You should hear the vocals significantly diminished or removed, leaving mostly instrumental audio. Visual comparison of the waveforms before and after phase inversion will show some cancellation in the overlapping vocal frequencies.
- When satisfied, bounce the project to export your instrumental track. Use Share > Export Song to Disk and choose your preferred format. Test the exported file on other devices or apps to confirm the vocal removal quality.
How to remove vocals from a song in GarageBand on iPhone and iPad
GarageBand on iOS devices does not support phase inversion, a common method for vocal removal on Mac. However, you can still reduce vocals by carefully using the built-in EQ to target and lower vocal frequency ranges. This method won’t completely remove vocals but can make them less prominent.
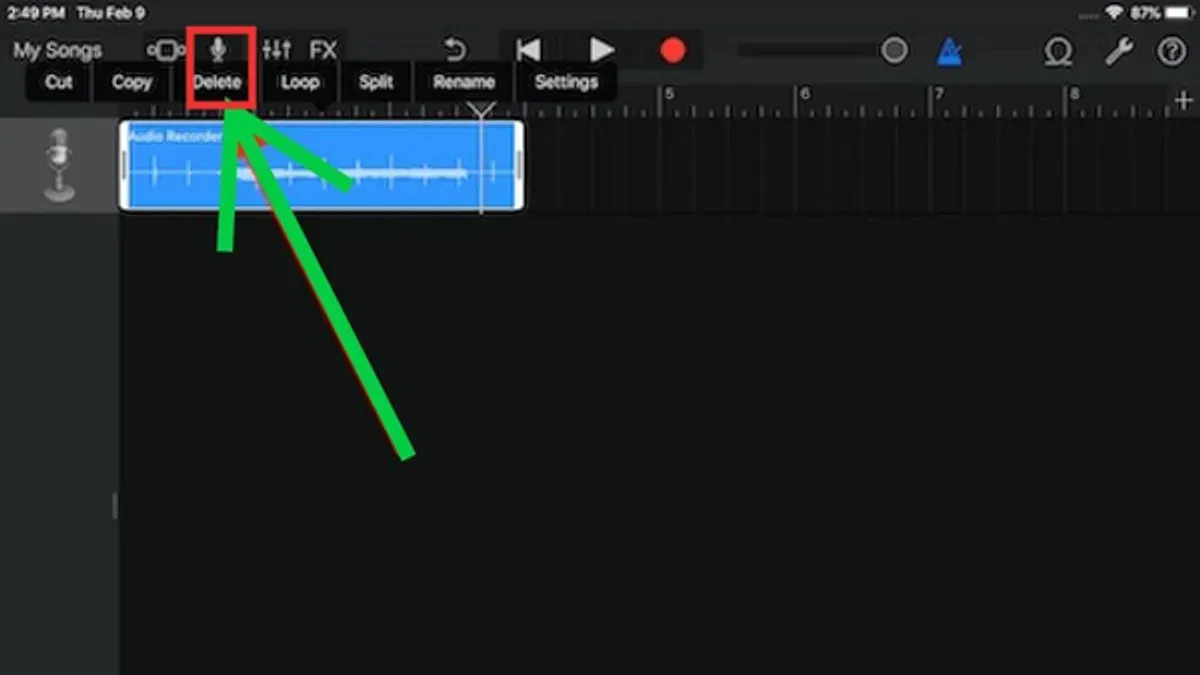
- Import your song into GarageBand by tapping the + icon and selecting the audio file. You should see the track appear on the timeline.
- Tap the track to select it, then tap the Mixer icon (three sliders) to open track settings.
- Choose EQ from the options, then tap Visual EQ to access the equalizer interface.
- Use the EQ bands to reduce frequencies typically occupied by vocals, usually between 1 kHz and 4 kHz. Lowering these bands will diminish vocal presence; you should hear the vocals become less clear after adjustment.
- Optionally, duplicate the track by tapping it, selecting Duplicate, then pan one track hard left and the other hard right. This sometimes helps reduce centered vocals slightly, although phase inversion isn’t possible.
- If GarageBand’s tools don’t meet your needs, consider third-party vocal removal apps like Moises or Vocal Remover, which can export tracks that you can then import back into GarageBand.
- When satisfied, export your edited track by tapping the down arrow, selecting My Songs, then sharing or exporting the project audio.
Remember, vocal removal on iOS GarageBand is limited and best suited for reducing vocals rather than fully isolating or removing them.
How to separate vocals from a song in GarageBand
Separating vocals from a song in GarageBand involves emphasizing the vocal frequencies while reducing the surrounding instruments. Unlike vocal removal, which tries to cancel out vocals, isolation focuses on making the vocals more prominent. This is challenging because vocals and instruments often share overlapping frequencies, making perfect separation difficult with GarageBand alone.
One common approach uses equalization (EQ) to boost vocal frequency ranges, typically between 1 kHz and 4 kHz, while lowering frequencies where instruments dominate, such as bass below 250 Hz and high cymbals above 8 kHz. This method makes the vocals clearer but does not completely isolate them.
On Mac, you can try duplicating the track, applying phase inversion to subtract the instrumental part, and then inverting that track to emphasize vocals. However, this requires careful alignment and may only partially isolate vocals due to audio complexity.
If you have access to stems (separate audio tracks for vocals and instruments), importing these into GarageBand is the best way to isolate vocals. Otherwise, external vocal isolation software can provide cleaner separation than GarageBand’s built-in tools.
- Import your stereo audio track into GarageBand. You should see the waveform clearly displayed.
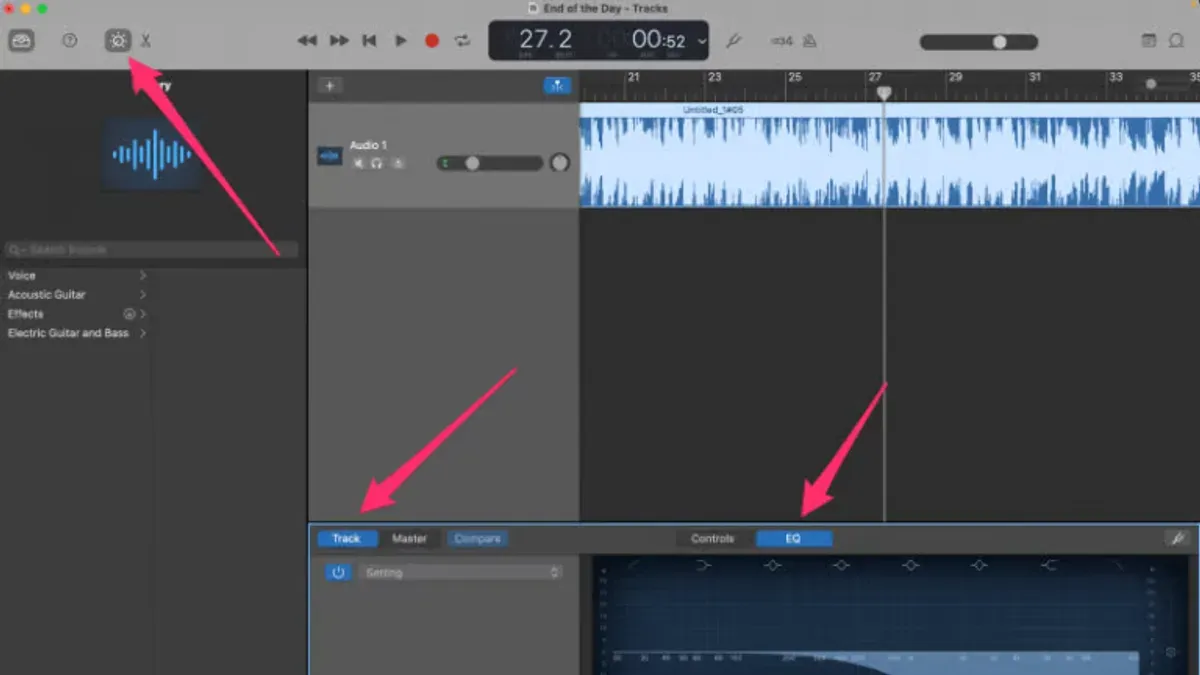
- Open the Track EQ by clicking on the track header, then selecting Smart Controls > EQ. You should see a graph with frequency bands.
- Boost frequencies between 1 kHz and 4 kHz by raising the EQ band in this range by about 3–6 dB. This enhances vocal presence. You should hear the vocals become more prominent.
- Reduce low frequencies below 250 Hz and high frequencies above 8 kHz by lowering those EQ bands. This helps reduce instrument sounds like bass and cymbals. The track should sound less full instrumentally.
- On Mac, duplicate the track, then select the duplicated track and invert its phase by clicking Track > Show Track Info > check Invert Phase. Align the tracks exactly. This process tries to cancel the instrumental part, emphasizing vocals on the duplicated track.
- Listen to both tracks together and solo the duplicated track with inverted phase. You should hear partial vocal isolation but expect some instrument bleed and artifacts.
This approach offers partial vocal isolation but rarely perfect clarity. For better results, consider exporting stems if available or using dedicated vocal isolation software designed for clearer separation.
How to remove vocals from a track in GarageBand when the usual method fails
If the typical vocal removal technique doesn’t work, start by confirming your song is stereo. Vocal removal depends on differences between the left and right channels, so if the track is mono, the method won’t be effective. You can check this by viewing the waveform in GarageBand’s track editor—stereo tracks show two distinct waveforms stacked vertically, while mono tracks show one. If your track is mono, vocal removal within GarageBand will be very limited.
Next, consider the song’s mixing and effects. Some vocals are mixed in mono or heavily processed with reverb, delay, or compression, making them blend into the instrumental parts. This complexity reduces the difference between channels, which vocal removal relies on. In such cases, the usual phase inversion method may leave artifacts or only partially remove vocals.
Verify that you have correctly applied the phase inversion plugin and routed the signals properly. On Mac, ensure you duplicated the track, inverted the phase on one copy, and panned them hard left and right. If the plugin is missing or the track routing is off, vocal removal won’t work as intended.
If challenges persist, try using a multi-band EQ to reduce vocal frequencies manually, focusing around 1kHz to 3kHz where vocals are prominent. This won’t fully remove vocals but can help reduce them. Alternatively, consider third-party vocal removal tools or apps designed for more complex processing, as GarageBand’s built-in options have limitations.
- Check your audio track in GarageBand’s editor. You should see two separate waveforms if it's stereo. If only one waveform appears, the track is mono and vocal removal won’t fully work.
- Confirm you applied the phase inversion effect on the duplicated track and panned the tracks hard left and right. When done correctly, the vocals should reduce noticeably during playback.
- Listen for vocal artifacts or incomplete removal, which indicate heavy vocal processing or complex mixing.
- Use the Graphic EQ plugin to reduce frequencies between 1kHz and 3kHz on the track, lowering vocal presence as much as possible.
- If these steps fail, try exporting the track and using specialized vocal removal software outside GarageBand for better results.
How to separate vocals and instruments from a song in GarageBand on Mac
GarageBand is not built for full stem separation, so completely isolating vocals and instruments from a mixed track is limited. However, you can use a combination of phase inversion and EQ techniques to create tracks emphasizing either vocals or instrumental parts. This approach involves duplicating tracks, applying phase inversion to cancel out elements, and carefully adjusting EQ to highlight or reduce specific frequency ranges.
To isolate components, layer your tracks by duplicating the original, then mute or solo tracks as needed to hear different parts clearly. For example, one track can be EQed to emphasize vocal frequencies while the other suppresses them, helping you approximate separate vocal and instrumental tracks. Exporting these tracks individually allows you to remix or process them further.
For professional and more precise stem separation, dedicated external tools offer advanced algorithms that GarageBand lacks. These tools can split a song into multiple stems including vocals, drums, bass, and more, with higher fidelity.
| Feature | GarageBand on Mac | Dedicated Stem Separation Tools |
|---|---|---|
| Full stem separation | Limited, partial separation using phase inversion and EQ | High-quality, multiple stems with clear isolation |
| Ease of use | Manual, requires editing knowledge | Automated with user-friendly interfaces |
| Export options | Separate tracks manually exported | Direct export of individual stems |
| Processing time | Instant but manual | Varies, often longer due to processing |
- Import your stereo audio file into GarageBand and duplicate the track. You should see two identical tracks in the timeline.
- Apply phase inversion to one duplicated track by inserting a plugin that inverts the phase (such as a Gain plugin set to -1). The inverted track should partially cancel out common elements when played together.
- Adjust the EQ on each track: boost vocal frequency ranges (roughly 1kHz to 3kHz) on one track to emphasize vocals, and reduce those frequencies on the other to isolate instruments. Listening closely should reveal clearer separation between vocals and instruments.
- Layer or mute tracks individually to focus on either vocals or instrumentals. You should hear more isolated components compared to the original mix.
- Export each track separately using GarageBand’s share or export function. These files can be used for remixing or further processing.
How to improve vocal removal quality in GarageBand
Improving vocal removal quality in GarageBand involves using high-quality source files and careful audio adjustments. Start with lossless or high-bitrate stereo audio files to preserve details in both vocals and instruments. Using compressed or low-quality files makes vocal removal less effective and can degrade the overall sound.
Fine-tune the EQ settings by targeting vocal frequency ranges around 1 kHz to 4 kHz, but avoid overcutting these bands, as it can dull instruments like guitars and snare drums. Adjust the Channel EQ on each track slowly, making subtle cuts or boosts while listening closely.
Experiment with volume and pan controls to optimize phase cancellation. Slightly offsetting track volume or panning duplicated tracks left and right can improve vocal reduction. For example, pan one track hard left and the duplicate hard right, then adjust volumes so the vocals cancel without losing instrumental balance.
Adding gentle compression with the Compressor plugin can smooth out dynamic inconsistencies after vocal removal. Follow this with light Reverb to add natural space and prevent the track from sounding too dry or artificial.
Always monitor your adjustments using quality headphones or speakers to catch subtle audio changes. Comparing before and after EQ adjustments helps identify improvements. Reference frequency charts showing typical vocal ranges (1–4 kHz) and instrument ranges to guide your EQ choices effectively.
- Import a high-quality stereo audio file into GarageBand. You should see a clear waveform with distinct stereo channels.
- Apply Channel EQ and carefully cut frequencies between 1 kHz and 4 kHz in small increments. Listen for clearer vocals reduction without losing instrument brightness.
- Duplicate the track, pan one fully left and the other fully right, then adjust their volume sliders to balance vocal cancellation and instrumental retention.
- Insert Compressor with a mild ratio (around 2:1) and medium attack/release to smooth the dynamics. You should hear a more consistent instrumental sound.
- Add Reverb with a low mix level (around 10–15%) to create a natural ambiance. The track should sound less flat and more polished.
- Use good headphones or studio monitors to compare the original and processed tracks, ensuring vocals are reduced while instruments stay vibrant.
How to export your vocal-removed track from GarageBand
After you've removed vocals and finalized your edits, exporting your track allows you to use it outside GarageBand for karaoke, remixes, or practice. Follow these steps carefully to ensure your vocal-removed audio exports with the quality and format you need.
- Select your project or specific tracks: Open your GarageBand project. If you want to export the entire mix, make sure all tracks are unmuted. To export only certain tracks, mute those you don’t want included. You should see your project timeline ready for export.
- Open the export dialog: Go to the menu bar and click Share > Export Song to Disk. This opens the export settings window.
- Choose your export format: Select from options like WAV, AIFF, or MP3. WAV and AIFF are uncompressed formats that preserve audio quality but produce larger files. MP3 compresses the file for smaller size but with some quality loss. For karaoke or remixing, WAV or AIFF is recommended.
- Set quality settings: For MP3, select a bitrate such as 192 kbps or higher for a good balance between file size and sound quality. For WAV or AIFF, choose the standard 44.1 kHz sample rate and 16-bit depth unless you need higher specs.
- Name and save your file: Choose a clear file name and destination folder. Click Export. You should see a progress bar and a confirmation once done.
- Test your exported file: Play it on different devices like your computer, phone, or a car stereo to confirm quality and vocal removal effectiveness.
- Use and share your track: Now you can upload your instrumental for karaoke sessions, import it into remix software, or practice singing along with a clean backing track.
File Size and Format Comparison:
| Format | File Size | Sound Quality | Best Use |
|---|---|---|---|
| WAV | Large (tens to hundreds of MBs) | High (lossless) | Professional editing, karaoke, remixing |
| AIFF | Large (similar to WAV) | High (lossless) | Professional editing, karaoke, remixing |
| MP3 (192 kbps or higher) | Small (a few MBs) | Good (lossy compression) | Sharing, casual listening |
Frequently asked questions
How to isolate vocals from a song in garageband?
To isolate vocals, use the Vocal Transformer plugin on the track and adjust the settings to emphasize the vocal frequencies. You can also try duplicating the track, inverting the phase on one, and adjusting EQ to minimize instruments. However, GarageBand's ability to perfectly isolate vocals is limited, so results may vary depending on the song's mix.
Can garageband remove vocals from a song?
GarageBand can reduce vocals by using the Vocal Reduction and Isolation feature found in the Track Editor on Mac. This method works best on stereo tracks where vocals are centered. Keep in mind that complete vocal removal is difficult and some vocal traces usually remain.
How to separate vocals from music in garageband?
Separating vocals completely is challenging in GarageBand alone. You can try using the Vocal Isolation setting or apply EQ to reduce instruments, but full separation typically requires third-party software. GarageBand’s tools provide a basic split but often with some overlap between vocals and music.
How to remove vocals from a song GarageBand Mac?
On Mac, import your song, open the Track Editor, and select the Vocal Reduction and Isolation option. Choose "Reduce Vocals" to lower the vocal track volume. Adjust the amount slider to balance vocal removal and instrumental quality, noting that some vocals may still be audible.
How to remove vocals from a song GarageBand iPhone?
On iPhone, import your song and tap the track to open settings. Use the Track Controls and enable Vocal Isolation to reduce or isolate vocals. The feature is more limited than on Mac, so perfect removal might not be achievable, but it works well for karaoke or practice purposes.
Understanding GarageBand’s Limitations and When to Use Other Tools
GarageBand does not have a dedicated vocal removal feature, so the effectiveness of removing vocals depends heavily on the song’s stereo mix and how vocals are positioned within it. Perfectly isolating or removing vocals using GarageBand alone is often impossible, especially with tracks that have vocals mixed in mono or with heavy effects. For professional-quality vocal stems or complete isolation, you may need to use specialized external software designed for stem separation.
This guide assumes you have a basic familiarity with GarageBand’s interface and audio editing concepts. If you are new to audio editing or require precise vocal removal for professional projects, consider exploring dedicated vocal isolation tools or plugins that integrate with GarageBand or other digital audio workstations.
The single most useful next step is to experiment with the vocal removal techniques covered here on a variety of songs to understand how different mixes respond. Pay close attention to the track’s stereo image and try using the Channel EQ and Pan settings to fine-tune the balance. This hands-on practice will help you set realistic expectations and improve your results over time.
See also: How to Record a Podcast in GarageBand: Step-by-Step Guide · How to Record Electric Guitar in GarageBand: A Clear Step-by-Step Guide · How to Make a Custom Ringtone in GarageBand on iPhone and iPad