How to Record Electric Guitar in GarageBand: A Clear Step-by-Step Guide
Discover step-by-step instructions to record electric guitar in GarageBand on your Mac, iPad, or iPhone with ease and quality.
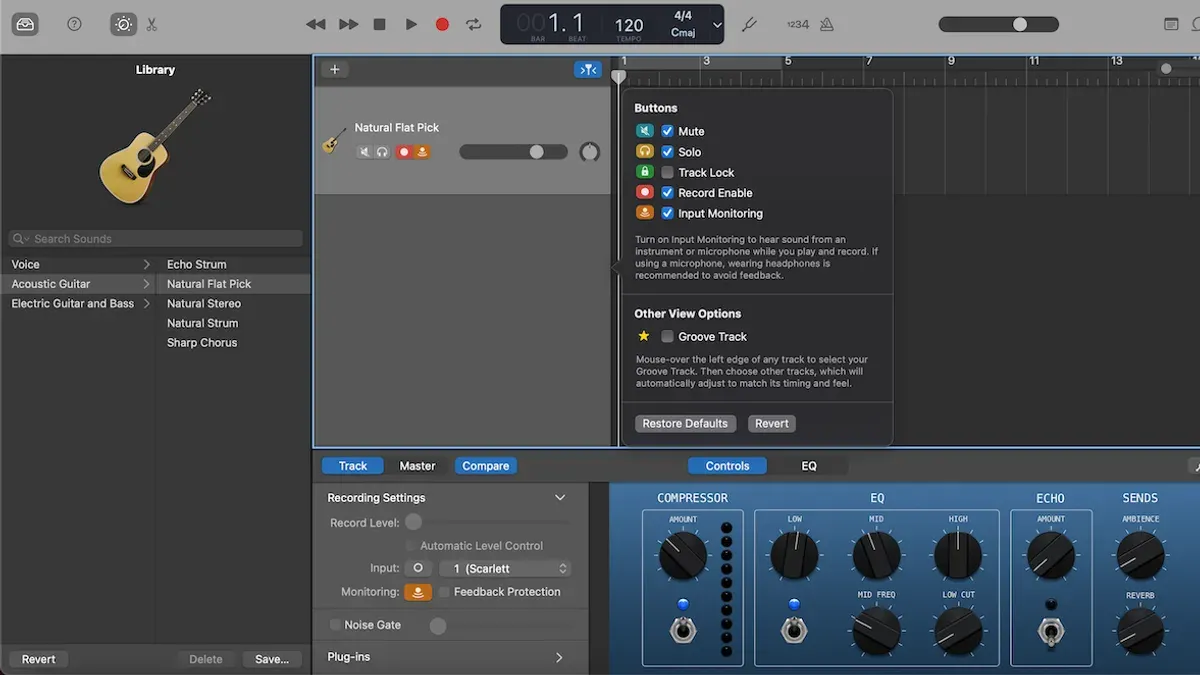
You’ve just picked up your electric guitar and want to start recording your riffs and solos at home. Whether you’re using an iPhone, iPad, or Mac, setting up to capture your sound can feel confusing without clear guidance.
This article shows you how to record electric guitar in GarageBand with step-by-step instructions tailored to each device. You’ll learn practical setup tips, multi-track recording, and troubleshooting techniques specific to guitarists. By the end, you’ll confidently create your own guitar recordings using GarageBand’s tools, avoiding common pitfalls that beginners face.
Key takeaways
- Use a proper audio interface or adapter to connect your guitar to your device for best sound quality.
- Choose the correct input settings in GarageBand to avoid latency and echo issues.
- Record multiple tracks by adding new audio tracks and using the built-in metronome for timing.
- Save your projects regularly and export recordings in standard formats like WAV or MP3.
- Check cable connections and input levels first if you hear no sound or distorted audio.
Prepare your gear and software before recording
To record your electric guitar using GarageBand, ensure you have a compatible device: a Mac, iPad, or iPhone. Each device requires specific accessories to connect your guitar effectively. For Mac, a standard USB audio interface and a 1/4-inch guitar cable work well. For iPad and iPhone, you will need a compatible audio interface plus appropriate adapters such as a Lightning to USB Camera Adapter or USB-C adapter, depending on your device model.
Before starting, check that GarageBand is installed and updated to the latest version available on the App Store to avoid compatibility issues. GarageBand updates often improve audio driver support and add features relevant to guitar recording.
Power and storage are key considerations. Ensure your device has sufficient free storage—at least a few gigabytes—to save recordings and accommodate app caching. A minimum of 4GB RAM is recommended for smooth audio processing, especially when layering multiple tracks.
| Audio Interface | Compatible Devices | Pros | Cons |
|---|---|---|---|
| Focusrite Scarlett Solo | Mac, iPad (with adapter), iPhone (with adapter) | High-quality preamp, simple setup | Requires adapters for iOS devices |
| IK Multimedia iRig HD 2 | iPhone, iPad, Mac | Compact, designed for iOS portability | Limited input options |
| Apogee Jam+ | iPhone, iPad, Mac | Excellent sound quality, plug-and-play | Higher price point |
- Confirm your device model (Mac, iPad, or iPhone) and check for the latest GarageBand update in the App Store. You should see an "Open" button if already installed and up to date.
- Select a compatible audio interface that fits your device. When connected properly, your device should recognize the interface as an input source.
- Gather your guitar cable and any required adapters for iOS devices. Plug in your guitar and interface, then check for a green signal indicator in GarageBand’s input settings.
- Verify you have at least 4GB RAM and free storage space by visiting your device’s settings: on Mac, use About This Mac > Storage; on iOS, use Settings > General > iPhone/iPad Storage.
- Charge your device fully or connect to power to prevent interruptions during recording.
Connect your electric guitar to GarageBand on iPad
- Use a compatible audio interface like the Focusrite iTrack Solo or IK Multimedia iRig HD 2 as your connection hub. Connect your electric guitar’s 1/4-inch output cable into the interface’s instrument input. When done correctly, the interface's input LED should indicate signal presence when you play.
- Attach the audio interface to your iPad using the appropriate adapter: either a Lightning to USB Camera Adapter for older iPads or a USB-C to USB adapter for newer models. After connecting, your iPad should recognize the interface automatically with no extra drivers needed.
- Open GarageBand on your iPad and create a new Audio Recorder track by tapping the "+" button and selecting "Audio Recorder." GarageBand will default to the connected audio interface as its input source, which you can verify by tapping the track settings icon (the mixer symbol).
- Enable Input Monitoring by tapping the monitoring button (an ear icon) in the track settings. This allows you to hear your guitar sound live through headphones or speakers connected to your iPad. You should hear your guitar signal as you play.
- Adjust the input level using the interface’s gain knob while observing GarageBand’s input meter. Aim for the input meter peaks to reach around -6 dB to avoid clipping and distortion. If the meter turns red, reduce the gain until it stays in the safe range.
This setup lets you connect your electric guitar cleanly to GarageBand on iPad, ensuring the app recognizes your input and you can monitor your playing with minimal latency.
Connect your electric guitar to GarageBand on iPhone
To record your electric guitar on an iPhone, you need an audio interface compatible with iOS devices. Popular budget-friendly options include the IK Multimedia iRig series or the Apogee Jam. These interfaces usually connect via the Lightning port, so if you have an iPhone with USB-C, use the appropriate adapter. Once connected, your guitar signal routes cleanly into GarageBand with minimal latency.
- Plug your guitar into the audio interface using a standard 1/4" instrument cable. When connected properly, the interface’s input indicator should light up.
- Connect the audio interface to your iPhone via the Lightning or USB-C port. Your iPhone will recognize the device and make it available in GarageBand.
- Open GarageBand, create a new Audio Recorder track, and tap the track settings icon. Under “Input,” select your connected audio interface. You should see the input meter move when you play guitar.
- Enable monitoring by tapping the monitoring button (headphone icon) so you can hear your guitar through headphones or earbuds plugged into the interface or iPhone. This helps avoid feedback through the iPhone’s speakers.
- Adjust the input gain on your audio interface or within GarageBand’s track controls. Aim for a strong signal without clipping (red meter), typically around -6 dB. This reduces noise and distortion.
Latency varies by interface and connection type. Budget interfaces like the iRig HD 2 typically produce latency around 10-15 ms, which is barely noticeable for most players. Using wired headphones plugged directly into the interface rather than Bluetooth reduces delay significantly.
By following these steps, you’ll have a solid setup for recording your electric guitar on iPhone with GarageBand, balancing sound quality, monitoring, and latency.
Record your electric guitar on GarageBand for Mac
To record your electric guitar on GarageBand for Mac, start by connecting your guitar to your Mac. Use either a USB guitar cable or an audio interface compatible with your setup. Once connected, launch GarageBand and create a new project, selecting the option to create an Audio Track.
- Open GarageBand and choose File > New, then select Audio for your track type. You should see an empty track ready for input.
- Click the track header, then open the Smart Controls pane by clicking the knob icon or pressing B. In the Input section, select your guitar input source, such as your USB guitar cable or audio interface channel.
- Enable Monitoring by clicking the headphone icon on the track. You will now hear your guitar through the Mac speakers or headphones.
- Adjust the input gain on your audio interface or within GarageBand’s input slider to avoid clipping. Watch the level meter as you play; aim for green to yellow levels without reaching red.
- To shape your tone, open the Library pane and select from GarageBand’s built-in amps and effects. Choose presets like “Clean Guitar” or “Crunch” to suit your style.
- Press the red Record button in the control bar and start playing. You will see a waveform form on the track as you record.
- After recording, stop and review the waveform. A clean recording shows clear peaks without flat tops; clipping appears as distorted, flat peaks.
Following these steps ensures your guitar signal is properly captured with tone control and clean levels for high-quality recordings.
How to record multiple tracks in GarageBand
Layering guitar parts along with other instruments or vocals is essential for creating full, dynamic songs in GarageBand. You start by creating multiple tracks, each dedicated to a different instrument or vocal part. Naming each track clearly, such as “Rhythm Guitar,” “Lead Guitar,” or “Vocals,” helps keep your session organized and easy to navigate.
Use the metronome and count-in features to ensure your timing stays consistent when recording each new part. You can enable the metronome by clicking the metronome icon in the control bar and turn on count-in via GarageBand > Preferences > Recording. This preparation helps you overdub parts precisely without timing issues.
To overdub, record your first guitar part, then create a new track for the next part. GarageBand automatically layers the new recording on top of the existing ones, letting you build complex arrangements. You can reorder tracks by dragging them up or down in the track list to manage your session visually and prioritize important parts.
After recording multiple tracks—such as three guitar layers and vocals—save your project frequently using File > Save As. Organize your GarageBand projects in dedicated folders on your device, and use clear naming conventions like “SongName_Demo” or “SongName_Final” to track your progress effectively.
- Create a new track by clicking the “+” button and select the desired instrument or audio input. You should see the new track appear in the track list with a default name.
- Rename the track by double-clicking its name in the track header and typing a descriptive title. The new name should replace the default.
- Enable the metronome by clicking the metronome icon in the control bar; then enable count-in by going to GarageBand > Preferences > Recording and checking “Count-in.” The metronome sound plays during recording, and you get a one-bar count-in before recording starts.
- Record your first guitar part. After finishing, click the “+” button to add another track for the next part. Repeat for additional layers. Each new track should display in the track list stacked vertically.
- Drag tracks up or down in the track list to reorder them visually. This helps keep rhythm parts near the top and vocals or solos easily accessible.
- Save your project with File > Save As, choosing a clear file name and location. The project should save without errors and be accessible later for further editing.
Save and export your GarageBand recordings
After recording your electric guitar tracks, saving your project regularly ensures your work is secure. On iPhone and iPad, GarageBand projects save automatically, but you can also tap My Songs to manually save or duplicate your session. On Mac, click File > Save or Save As to name and store your project in a chosen folder. Clear naming helps you find projects later, such as including the song title and date.
Exporting your finished song allows you to share or further edit your tracks. In GarageBand, go to Share > Export Song to Disk on Mac or tap My Songs > Select > Share on iOS. You can choose formats like MP3 for smaller files suited to sharing, or WAV for higher quality at the cost of larger file size. For example, a 3-minute song exported as MP3 might be around 5 MB, while WAV can be 30 MB or more.
Backing up your GarageBand projects is wise. Use iCloud Drive or manually copy project files to an external drive or cloud service. This protects your files from accidental loss and lets you access them on different devices.
- Save your project: On Mac, click File > Save As, name the file clearly, and choose a folder. On iOS, tap My Songs to save or duplicate your project. You should see your project listed with the chosen name.
- Export your song: On Mac, select Share > Export Song to Disk, pick MP3 or WAV, choose quality settings, then save. On iOS, tap My Songs, tap Select, choose your project, tap Share, and select export format. You’ll see a confirmation and the exported file in your chosen location.
- Back up your files: Copy your saved GarageBand project file or exported audio to iCloud Drive or an external storage device. Verify the files open correctly on another device to confirm the backup worked.
Troubleshoot common issues: echo, latency, and no sound
When recording your electric guitar in GarageBand, you may encounter echo, latency, or no sound. These issues often stem from input monitoring settings, connection problems, or interface configurations. Follow the steps below to identify and fix these common problems.

- Fix echo caused by input monitoring: In GarageBand, click the track’s monitoring button (the speaker icon) to toggle input monitoring off and on. If you hear an echo, try turning off monitoring on one track or check if your audio interface has direct monitoring enabled. Echo usually disappears when only one monitoring source is active.
- Reduce latency: Open GarageBand Preferences, go to the Audio/MIDI tab, and set the "Audio Buffer Size" to a lower value like 128 samples. Lowering buffer size reduces latency but may increase CPU use. You can also adjust latency settings on your audio interface’s control panel if available. After adjustment, latency can drop from noticeable delay to near real-time response.
- Check cables and connections: Ensure your guitar cable is fully plugged into the audio interface and that the interface is properly connected to your device. Loose or faulty cables are common causes of no sound or intermittent audio.
- If GarageBand doesn’t detect your guitar input: Quit and reopen GarageBand. In GarageBand Preferences under Audio/MIDI, verify your audio interface is selected as the input device. If you see error messages like "No input detected," unplug and reconnect your interface, then restart GarageBand. Also, confirm that the interface’s drivers or firmware are up to date.
Following these steps should resolve most echo, latency, and no sound issues, helping you focus on playing and recording with confidence.
Record live music and get the best sound with GarageBand
Capturing live performances or jam sessions with GarageBand requires careful attention to levels and environment for a natural sound. Start by setting your input levels so the loudest parts of your playing peak around -6 dB on the GarageBand meter. This leaves headroom to avoid clipping while capturing dynamics clearly.
Use GarageBand’s built-in amp and pedal effects to shape your live tone in real time. Experiment with the Compressor and EQ settings under the Smart Controls panel to add warmth or clarity depending on your guitar and style. You can also apply reverb subtly to avoid a dry, unnatural sound.
Record in a quiet space to minimize background noise and distractions. If possible, use external microphones positioned near your amp’s speaker or a DI box for a cleaner signal path. The DI box helps preserve your guitar’s tone and reduces interference from other electronics in your setup.
Comparing waveform screenshots from different setups shows that using a DI box combined with GarageBand’s amp effects produces smoother peaks and less noise than a direct guitar-to-interface connection alone. External mics capture the room ambiance, adding natural character when mixed properly.
- Set your GarageBand track input level so it peaks around -6 dB during your loudest playing; the meter should show green to yellow without hitting red clipping.
- Open Smart Controls and adjust Compressor and EQ to suit your tone; listen for balanced warmth and clarity without harshness.
- Position an external mic close to your amplifier speaker or connect a DI box between guitar and interface; check GarageBand input is set accordingly and levels remain consistent.
- Record a short live passage and review the waveform; it should display smooth dynamic range without spikes or excessive noise.
- Apply subtle reverb in the effects panel to add natural ambiance; avoid overdoing it to keep the live feel.
Frequently asked questions
How to record electric guitar on garageband ipad?
To record electric guitar on GarageBand for iPad, first connect your guitar using a compatible audio interface like the iRig or a Lightning-to-USB adapter with an audio interface. Open GarageBand and create a new Audio Recorder track. Make sure to select the proper input source in the track settings, then tap the red record button to start recording. Adjust the input gain to avoid clipping and use the built-in amp simulations or effects to shape your tone.
How to record electric guitar on garageband iphone?
Recording electric guitar on GarageBand for iPhone requires a similar setup as the iPad. Connect your guitar via a Lightning-to-USB interface or an instrument adapter designed for iPhone. Create a new Audio Recorder track, check that the input is correctly set, and then hit record to capture your playing. You can also use GarageBand’s amp models and stompboxes to customize your sound as you record.
How to record in garageband?
In GarageBand, start by creating a new project and adding an Audio Recorder or Instrument track depending on your source. Connect your instrument or microphone properly and select the correct input in the track settings. Arm the track for recording by tapping the record enable button, then press the main record button to begin. Monitor levels closely and adjust input gain to prevent distortion while ensuring a strong signal.
How to record a song on garageband?
To record a full song in GarageBand, start by planning your track order and creating separate tracks for each instrument or vocal part. Record each part individually, using the metronome or a pre-recorded rhythm track to stay in time. Utilize features like track layering, editing, and mixing to refine your song. When finished, save your project and export the song in your preferred audio format.
How to record live music with garageband?
Recording live music with GarageBand involves connecting a suitable audio interface that can handle multiple inputs if you want to capture several instruments simultaneously. Use a Mac for the best multi-track live recording experience, and configure each input to its own track. Adjust buffer size and latency settings in GarageBand’s preferences to minimize delay. Test sound levels before recording live to prevent clipping or unwanted noise.
What This Guide Does Not Cover
This guide does not cover advanced mixing or mastering techniques, which require separate tutorials and more specialized knowledge. GarageBand’s features and compatibility vary between iOS and Mac versions; some advanced recording features may not be available on iPhone or iPad. If you are aiming for highly professional studio recordings, you may need hardware and software beyond what GarageBand and common audio interfaces provide.
For now, focus on getting comfortable with recording your electric guitar tracks using the tools and setups described here. The single most useful next step is to start a simple recording session on your preferred device, experiment with input settings and amp simulators in GarageBand, and listen back critically. This hands-on practice will help you understand how your gear and software interact and prepare you for more complex projects.
See also: How to Reduce Recording Latency in Logic Pro: Step-by-Step Solutions