How to Reduce Recording Latency in Logic Pro: Step-by-Step Solutions
Discover effective steps to reduce recording latency in Logic Pro and improve your tracking experience with better timing and less delay.
You start recording a new guitar track in Logic Pro, but the sound you hear through your headphones lags behind your playing. This noticeable delay can disrupt your timing and creativity, making it frustrating to capture your best performance.
This article walks you through how to reduce recording latency in Logic Pro by explaining its causes and offering step-by-step solutions. You will learn specific adjustments like setting buffer sizes, managing plugin latency, and configuring audio interface settings to minimize delay. By following these practical steps, you’ll better understand which changes fit your setup and workflow, helping you record with confidence and precision.
Key takeaways
- Lower the I/O Buffer Size in Logic Pro’s Audio Preferences to reduce delay.
- Bypass or freeze latency-inducing plugins during recording.
- Use Low Latency Mode under the Options menu when tracking.
- Check your audio interface’s driver settings for optimal performance.
- Adjust monitoring settings to balance latency and sound quality.
Before you start: What you need to reduce latency
Reducing recording latency in Logic Pro requires a combination of the right hardware, software knowledge, and a methodical approach. First, ensure you have a compatible audio interface with low-latency drivers. Interfaces from brands such as Focusrite, Universal Audio, PreSonus, and MOTU are well-regarded for their stable, low-latency Core Audio drivers, which are essential for smooth recording performance.
You should have a basic understanding of Logic Pro’s audio settings, especially the Audio preferences where you manage the I/O Buffer Size and sample rate. These settings critically impact latency and must be adjusted thoughtfully. Additionally, use reliable headphones or studio monitors to listen carefully for any delay during playback or recording; this helps you accurately assess latency improvements.
Patience is key. Reducing latency often involves incremental changes and testing each adjustment. Avoid rushing through settings changes; instead, observe the effect of each tweak on your system’s performance. This approach helps you find the right balance between low latency and stable operation tailored to your particular setup.
- Confirm your audio interface is connected and recognized by Logic Pro. You should see its name listed under Logic Pro > Preferences > Audio > Devices.
- Check that the Core Audio driver is active by ensuring the “Core Audio” checkbox is enabled in the same Audio preferences window. When active, Logic Pro handles communication with your audio interface efficiently.
- Put on your headphones or turn on your monitors and play a track or record enable a channel. You should hear audio with minimal delay or delay consistent with your current buffer size settings.
- Prepare to adjust settings step-by-step, testing latency after each change to note improvements or issues. This methodical testing ensures you understand how each setting affects latency.
How to fix recording latency in Logic
Reducing recording latency in Logic Pro starts with adjusting the buffer size and monitoring settings to balance performance and delay. The I/O Buffer Size controls how much audio data Logic processes at once, directly affecting latency. A smaller buffer size reduces delay but requires more CPU resources, so finding the right balance is key.
- Open Logic Pro and go to Logic Pro > Preferences > Audio. Locate the I/O Buffer Size setting under the Devices tab. When you adjust this, you should see lower latency values reflected immediately.
- Lower the buffer size to values like 32 or 64 samples for recording. This will significantly reduce latency, often from tens of milliseconds to under 10 ms, improving your timing when tracking instruments or vocals.
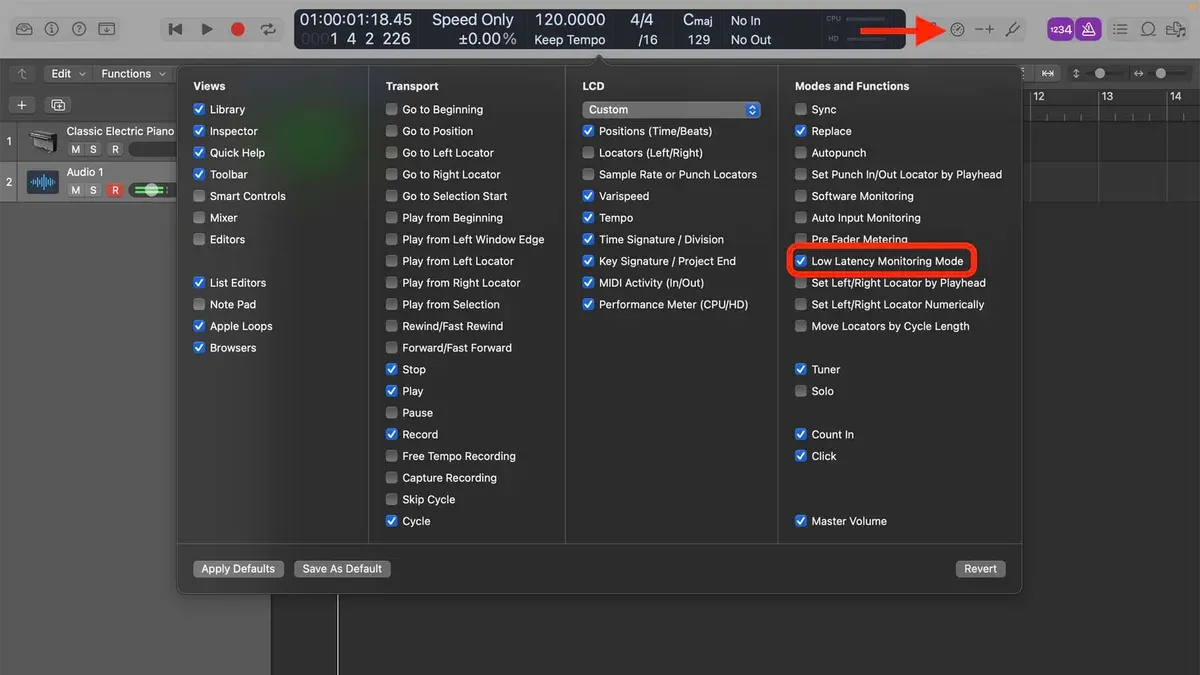
- Enable Low Latency Mode by navigating to Options > Low Latency Mode. This bypasses plugins that add delay, further decreasing latency during recording. You should notice smoother, more immediate monitoring feedback.
- Use software monitoring only if necessary, as it adds latency. If your audio interface supports hardware monitoring, use that instead, as it provides near-zero delay by routing the signal directly to your headphones or monitors.
Here is a simple comparison of latency at different buffer sizes:
| Buffer Size (samples) | Approximate Latency (ms) |
|---|---|
| 128 | ~6-8 ms |
| 64 | ~3-4 ms |
| 32 | ~1.5-2 ms |
By following these steps, you reduce recording delay to a level that feels natural and responsive, making your sessions more productive and enjoyable.
How to fix latency in Logic Pro when using plugins
Plugins can be a major source of latency during recording because some require extra processing time, known as plugin delay. Logic Pro compensates for this automatically, but the delay can still affect timing and feel. To manage this, you need to identify which plugins introduce latency and adjust your workflow accordingly.
- Open the Mixer and look for the “Plugin Delay Compensation” indicator in the Transport bar. This shows the total latency caused by active plugins. When it’s high, note which tracks have heavy plugins like linear-phase EQs, look-ahead compressors, or convolution reverbs.
- Temporarily disable or bypass these latency-inducing plugins on the tracks you’re recording. You can do this by clicking the power button on the plugin slot. When bypassed, you should notice a significant reduction in input delay.
- Enable “Low Latency Mode” from the Options menu. This mode automatically disables certain plugins that cause delay during recording, helping maintain tight timing without permanently altering your mix.
- If you need to keep plugin settings, consider rendering or freezing tracks with latency-heavy effects before recording new parts. This reduces CPU load and latency without losing your sound.
For example, a track with a linear-phase EQ might cause around 30-50 ms of latency. Bypassing this plugin during recording can cut latency down to nearly zero, making monitoring and timing more accurate. After tracking, you can reactivate the plugin for mixing.
How to adjust latency in Logic Pro for different recording scenarios
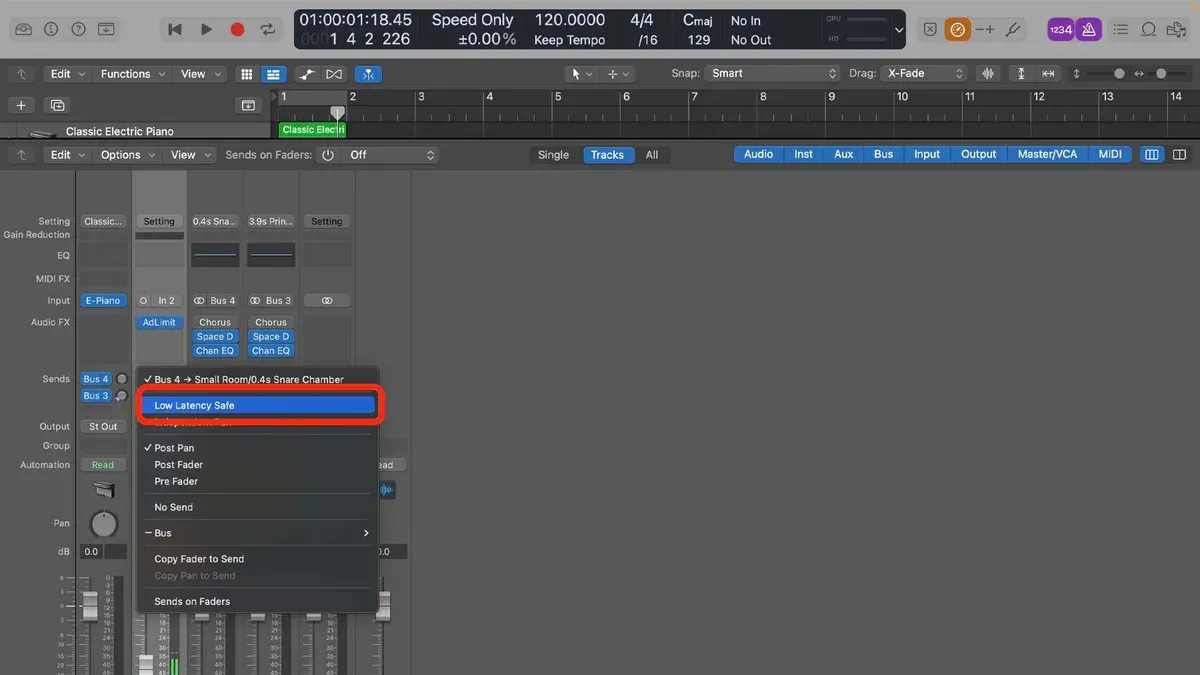
When tracking or recording, your priority is minimizing latency to ensure your performance feels natural and responsive. Use a low I/O Buffer Size—typically between 32 and 128 samples—and enable Low Latency Mode. This keeps delay to a minimum but increases CPU load, which can cause instability if your system is under heavy strain.
During mixing or editing, latency is less critical. You can increase the I/O Buffer Size to 512 samples or higher to ease CPU demands and improve system stability. This setting reduces the chance of audio dropouts or glitches, although it introduces more latency, which is not a problem when you’re not recording live.
Logic Pro offers presets and templates for different session types that streamline switching between these settings. For example, you might have a “Tracking” preset with a low buffer size and Low Latency Mode activated, and a “Mixing” preset with a higher buffer size and Low Latency Mode off. Switching presets quickly adapts your system to the current phase of your workflow.
Keep in mind the trade-off: lower latency means higher CPU usage and potential instability, while higher latency improves stability but feels less immediate. Understanding this balance lets you make informed decisions based on whether you’re recording or mixing.
| Scenario | I/O Buffer Size | Low Latency Mode | CPU Usage | Latency |
|---|---|---|---|---|
| Tracking/Recording | 32–128 samples | On | High | Low |
| Mixing/Editing | 512 samples or higher | Off | Lower | Higher |
- Open Logic Pro and go to Preferences > Audio > Devices.
- Set the I/O Buffer Size to 32 or 64 samples for tracking; you should hear minimal delay when playing your instrument.
- Enable Low Latency Mode by clicking the button in the control bar; this bypasses plugins causing delay.
- To switch to mixing, increase the I/O Buffer Size to 512 samples or more; you should notice your system runs more smoothly with fewer audio glitches.
- Turn off Low Latency Mode when mixing to allow all plugins to process fully.
- Save your settings as presets or templates under File > Save as Template for quick recall.
By following this approach, you adapt Logic Pro’s latency and CPU settings to the task at hand, reducing recording delay without compromising system stability during mixing.
How to stop recording delay in Logic Pro X
If you experience recording delay specific to Logic Pro X, there are targeted steps that can help resolve the issue. These focus on software updates, audio engine resets, and ensuring your audio interface settings match your project configuration.
- Update Logic Pro X to the latest version. Open the App Store, check for updates, and install the newest Logic Pro X release. Updates often include bug fixes that address latency and delay issues. When successful, you should notice improved responsiveness during recording sessions.
- Reset Core Audio and restart Logic Pro X. Go to Logic Pro X’s menu bar, select Logic Pro X > Preferences > Audio, then click Reset Core Audio. Afterward, quit and reopen Logic. This refreshes the audio engine, often eliminating persistent delay problems. You will know it worked when input monitoring and recorded tracks align more closely in time.
- Verify sample rate consistency. In Logic, open File > Project Settings > Audio and note the sample rate. Then check your audio interface’s control panel to ensure it matches exactly (e.g., both set to 48 kHz). Mismatched sample rates cause timing delays. Matching these should reduce or eliminate the lag during recording.
- Use Aggregate Device setups carefully. If you combine multiple audio interfaces into an Aggregate Device via the Audio MIDI Setup app, ensure all devices share the same sample rate and clock source. Misaligned devices introduce delay and jitter. Some user reports show clearing and recreating the Aggregate Device with consistent settings resolves delay issues.
Troubleshooting logs from users often show delay disappearing after these steps, especially when resetting Core Audio and aligning sample rates. Taking these actions in order helps isolate and fix Logic Pro X-specific recording delays effectively.
How to reduce latency when using Pro Tools and Logic Pro together
When working with both Pro Tools and Logic Pro in your audio workflow, latency issues often arise from mismatched sample rates, clock sources, and buffer sizes. To minimize delay, the first step is to sync the sample rates and clock sources between the two DAWs. This ensures both software platforms process audio data in perfect harmony, reducing timing discrepancies.
- Open the audio settings in both Pro Tools and Logic Pro and set the sample rate to the same value (commonly 44.1 kHz or 48 kHz). Successful synchronization is indicated by smooth playback without timing shifts when switching between DAWs.
- Configure your audio interface to use a single clock source for both DAWs, usually the interface’s internal clock or an external word clock if available. You should observe consistent audio timing and no clicks or pops during playback.
- Match the I/O Buffer Size settings across both Pro Tools and Logic Pro. Typically, a buffer size between 128 and 256 samples balances latency and system stability. When set correctly, you will experience reduced delay and stable CPU performance in both programs.
- Enable hardware monitoring via your audio interface’s direct monitoring feature to bypass software monitoring latency completely. You will notice immediate audio feedback with no perceptible delay during recording.
A case study of a hybrid setup showed that before synchronization, users experienced noticeable latency and timing drift between the two DAWs. After aligning sample rates, clock sources, and buffer sizes, latency was significantly reduced, resulting in a seamless cross-DAW workflow.
How to improve input latency and audio latency overall
Reducing latency involves more than just adjusting settings inside Logic Pro. One effective step is to use direct monitoring on your audio interface, if it supports it. Direct monitoring routes your input signal straight to your headphones or speakers without passing through the computer, eliminating noticeable delay. When direct monitoring is enabled, you should hear your instrument or microphone in real time, without delay.
Another common source of latency is wireless MIDI or audio devices. These can introduce additional delay due to the nature of wireless transmission. For best results, connect MIDI controllers and audio gear via wired USB or MIDI connections during recording sessions, ensuring more stable and lower-latency performance.
Keeping your computer optimized also helps reduce latency. Close unnecessary applications and background processes that consume CPU and memory resources. This frees up processing power for Logic Pro and your audio interface, which can result in smoother, lower-latency audio performance.
Finally, upgrading your computer hardware can provide significant latency improvements. Increasing RAM allows for better multitasking, upgrading to a faster CPU improves processing speed, and switching to an SSD reduces load times and data bottlenecks. Users often notice a marked improvement in latency and overall system responsiveness after such upgrades, especially when working with complex sessions or many plugins.
- Enable direct monitoring on your audio interface through its control software or hardware switch. You should hear your inputs in real time without delay.
- Disconnect wireless MIDI or audio devices and connect them via cables instead. Latency should reduce as transmission delay is eliminated.
- Close all non-essential applications running on your computer. Logic Pro should run more smoothly with less audio dropouts or delay.
- Consider upgrading your CPU, adding RAM, or installing an SSD. After upgrading, test latency again to confirm improved performance.
Troubleshooting common latency issues in Logic Pro
If latency reduction steps do not solve your problem, it’s time to investigate common hidden issues. Start by checking if your audio interface drivers are up to date and if any conflicts exist. Outdated or incompatible drivers can cause unusual latency or audio glitches. Visit your interface manufacturer’s website to download the latest drivers and firmware.
Next, inspect all cable connections between your audio interface and computer. Loose or damaged cables often introduce audio dropouts or latency spikes. Swap cables if you suspect any faults and ensure connections are secure.
Hidden plugins or complex sidechain routing can also introduce unexpected delay. Open the Mixer and carefully look for plugins on all tracks and auxiliary channels. Disable any suspect plugins temporarily. Check sidechain routing in compressor or gate plugins that may add latency indirectly.
Keep in mind that USB interfaces generally have higher latency limits compared to Thunderbolt models. If you experience persistent latency despite all adjustments, hardware limitations of USB connections might be the cause. Consider upgrading to a Thunderbolt interface for lower inherent latency.
Common symptoms and fixes include:
- "Core Audio driver is not responding" error: Restart Logic Pro and your audio interface, check driver updates.
- Intermittent audio dropouts: Inspect and replace cables, reduce buffer size cautiously.
- Latency spikes when enabling certain plugins: Bypass or freeze those plugins during recording.
- Delay only present during USB interface use: Test with a Thunderbolt interface if possible.
- Check for driver updates on your audio interface manufacturer’s site and install any available updates. You should see improved stability or lower latency reports in Logic’s Audio Preferences.
- Inspect and reseat all cables between your interface and computer. Replace cables if audio dropouts continue. Successful action results in uninterrupted audio playback and recording.
- Review all plugin chains and sidechain routings; disable plugins one at a time while monitoring latency behavior. Latency should reduce noticeably when problematic plugins are bypassed.
- Compare latency performance using USB versus Thunderbolt interfaces if available. Thunderbolt should show less latency and fewer glitches if hardware is the cause.
Frequently asked questions
How to reduce latency in pro tools?
In Pro Tools, you can reduce latency by lowering the Hardware Buffer Size in Setup > Playback Engine. Setting this to a smaller value, like 64 or 128 samples, decreases latency but increases CPU load. Also, turn off any unnecessary plugins during recording and enable Low Latency Monitoring under the Options menu to minimize delay.
How to reduce audio latency?
Reducing audio latency generally involves decreasing the buffer size in your audio interface settings, closing unused applications, and ensuring your audio drivers are up to date. Additionally, using direct monitoring and disabling unnecessary plugins during recording helps keep latency as low as possible.
How to reduce input latency?
To reduce input latency, lower the buffer size in your DAW’s audio preferences and use a high-quality, low-latency audio interface. Enabling software monitoring with low latency options or switching to direct monitoring from your audio interface can also effectively reduce the delay you hear while recording.
How to lower audio latency?
Lower audio latency by adjusting your DAW’s buffer size to a smaller value, typically between 32 and 128 samples. Make sure your audio interface’s driver is optimized, and avoid adding CPU-heavy effects during tracking. Turning off background processes and using faster USB or Thunderbolt connections can further improve latency.
How to improve latency?
Improving latency means balancing low buffer sizes with stable performance. Update your audio drivers, choose efficient plugins, and optimize your computer for audio tasks by disabling unnecessary services. Using an audio interface with dedicated low-latency drivers and enabling direct monitoring options will also enhance latency performance.
Understanding the Limits of This Guide
This guide focuses on software and hardware adjustments within typical home and project studio environments. If you are working with extremely high channel counts, very complex routing setups, or professional-grade live sound environments, you may find that specialized hardware solutions such as dedicated DSP-based audio interfaces or external latency compensation systems are necessary. These advanced scenarios often require tailored approaches beyond the scope of this article, including consultation with experienced audio engineers or manufacturers’ technical support.
For most Logic Pro users, however, the steps and explanations provided here will help you identify and reduce the common sources of latency effectively, improving your recording experience without expensive upgrades.
To take the most useful next step, open Logic Pro’s Preferences > Audio panel and set your I/O Buffer Size to the lowest stable value your system can handle, typically 64 or 128 samples. This adjustment usually offers the biggest immediate reduction in latency while maintaining system stability. From there, you can explore plugin latency compensation and other workflow optimizations detailed earlier.
See also: How to Set Up Sidechain Compression in Logic Pro: A Step-by-Step Guide · How to Draw Automation in Logic Pro: A Step-by-Step Guide