
How to Bounce a Track in Logic Pro: Step-by-Step Guide
Follow this step-by-step guide to confidently bounce a track in Logic Pro, ensuring your audio exports correctly every time.
You're working on your latest Logic Pro project, and it's time to export your tracks for mixing or sharing. Maybe you want to bounce a single instrument track or the entire song, but you're unsure of the best method to use. This article covers how to bounce a track in Logic Pro with clear, step-by-step guidance to help you confidently export your audio.
You'll learn how to prepare your project for bouncing, choose the right settings for individual tracks or full songs, and avoid common mistakes that can affect your final bounce. By the end, you'll be able to tailor your bounce process to your production needs, whether for mastering, live performance, or collaboration.
Key takeaways
- Use the File > Bounce > Project or Section menu to bounce your entire song or selected region.
- To bounce individual tracks, solo the track or use the Track Stacks feature for grouped exports.
- Choose between offline and real-time bouncing depending on your project needs and plugin compatibility.
- Ensure your output settings, such as bit depth and sample rate, match your delivery requirements.
- Check your bounced files for clipping or unwanted effects before finalizing.
Before you start: What you need to bounce a track in Logic Pro
Bouncing in Logic Pro means exporting your audio or MIDI tracks into a single audio file. This process is crucial for sharing, mastering, or further production steps. Before you bounce, make sure your project is organized: name your tracks clearly, arrange them in logical order, and confirm that each track's role is understood—whether it's an audio, MIDI, or instrument track. For example, a typical setup might include a vocal audio track, a MIDI drum track, and several instrument tracks like bass or keys.
You should have a basic understanding of the mixing console, such as knowing how to solo tracks, adjust volumes, and apply effects. This helps you control what exactly you want to bounce. Also, ensure your playback device is ready—either a connected audio interface or the built-in Mac sound system—to monitor the output during bouncing.
Storage space is another important consideration. Exported files can vary in size: a 3-minute stereo WAV file at 44.1 kHz/16-bit may be roughly 30-40 MB, while MP3s are smaller but lower quality. Decide on the format you need—WAV or AIFF for high quality, MP3 for smaller files. Having enough disk space avoids interruptions and lost work.
- Open your Logic Pro project and verify each track is named and arranged logically; you should see clear labels like "Vocal Lead" or "Drums".
- Confirm track types by checking the track headers—audio waveforms for audio tracks, MIDI piano roll icons for MIDI tracks.
- Check your audio output device under Logic Pro > Preferences > Audio; ensure your interface or built-in output is selected and working.
- Review available storage space on your Mac by clicking the Apple menu > About This Mac > Storage; ensure at least a few hundred MB free for export files.
- Decide on your export format by planning whether you want uncompressed audio (WAV/AIFF) for quality or compressed (MP3) for smaller size and quicker sharing.
How do I bounce a track in Logic Pro?
Bouncing a track in Logic Pro means exporting it as an audio file. This can be a single track or multiple selected regions within your project. Follow these steps carefully to ensure your bounced file matches your project settings and quality expectations.
- Select the track or region you want to bounce by clicking on its header or highlighting the desired region in the timeline. Ensure only the material you want exported is selected; otherwise, Logic will bounce everything within the project’s active range.
- Open the Bounce dialog by going to the top menu and clicking File > Bounce > Project or Section. Alternatively, right-click the track header and choose Bounce Track in Place for quick single-track export. The Bounce dialog window will appear.
- Choose your bounce settings in the dialog. Decide between Offline Bounce, which is faster and not affected by CPU load, or Realtime Bounce, useful when using external gear or real-time effects. Select your desired file format such as WAV, AIFF, or MP3. Set the bit depth (commonly 24-bit for quality) and sample rate (typically 44.1 kHz or 48 kHz) to match your project or delivery specs.
- Name and save your bounced file by entering a filename and choosing a destination folder. Use clear names like “Lead Vocal Bounce” to keep your files organized and easy to find.
- Check your bounced file by importing it back into Logic or playing it in a media player. This ensures the bounce worked correctly, with no clipping or unwanted noise.
For example, when bouncing a vocal track, select the vocal region, open the Bounce dialog, choose Offline Bounce in WAV format at 24-bit/44.1 kHz, name it clearly, and save. Afterward, import the bounced file into a new track to verify fidelity and timing.
How to bounce a track in Logic Pro X for mastering
Bouncing a track for mastering requires careful preparation to preserve audio quality. Before bouncing, apply your final mix settings such as EQ, compression, and automation without adding any mastering effects. This ensures the mastering engineer receives a clean, unaltered mix to work with. Choose offline bounce for faster exports unless your project uses real-time-dependent effects like external plugins or certain hardware inserts, in which case use real-time bounce.
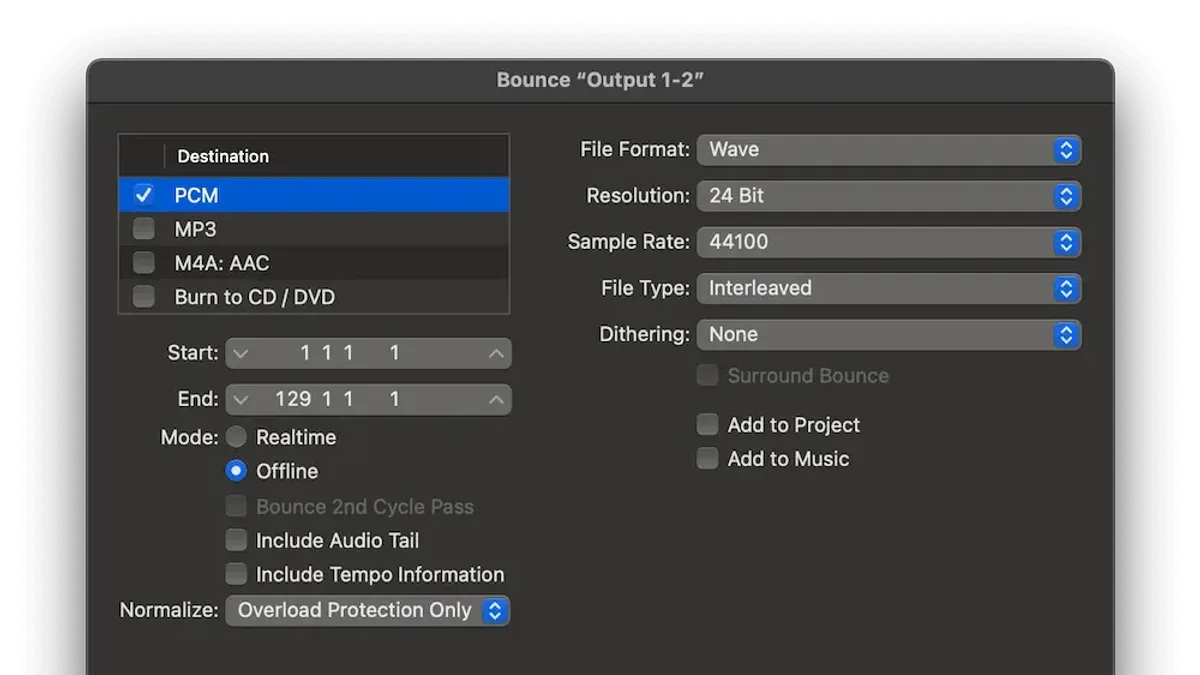
When setting bounce options, select uncompressed formats such as WAV or AIFF. Set the bit depth to 24-bit or higher and use a sample rate matching your project, commonly 44.1 kHz or 48 kHz. Avoid enabling normalization or dithering during the bounce, as these processes are typically handled by the mastering engineer and can alter the audio prematurely.
Depending on the mastering engineer’s request, export either the full stereo mixdown or individual stems. Stems allow more precise control during mastering but create larger files and more complex workflows. The trade-off for mastering is always between maintaining maximum audio fidelity and managing file size. Compared to casual listening exports, mastering bounces prioritize uncompressed, high-resolution files without added processing to ensure optimal quality.
- Open your final mix project and confirm all mix settings are complete without mastering effects. You should hear your final balanced mix.
- Go to File > Bounce > Project or Section. The Bounce dialog box appears.
- Select the "Offline" bounce mode unless you have time-based effects requiring "Realtime". Your bounce speed will increase with Offline mode.
- Choose WAV or AIFF as the file format. Set bit depth to 24-bit or 32-bit float, and sample rate to match your project. The file size preview reflects high-resolution quality.
- Uncheck "Normalize" and "Dither" options to avoid unintended processing. This keeps the audio clean for mastering.
- Specify whether to bounce the full stereo mix or individual stems by selecting tracks or regions accordingly. Confirm your selection.
- Click "Bounce" and save the file. Verify the exported file plays correctly and matches your mix.
How to bounce a song in Logic Pro
To bounce your entire song in Logic Pro, start by setting the cycle region to cover the full length of your arrangement. Drag the yellow cycle bar in the ruler from the beginning of the first bar to the end of your last bar, ensuring it includes any fade-outs or tails in your mix.
Next, double-check your automation, effects, and fade-outs. Make sure all volume fades, plugin settings, and automation curves are finalized and sounding smooth during playback. This step prevents unexpected cuts or abrupt changes in the bounced file.
Once your project is ready, go to File > Bounce > Project or Section. In the bounce dialog, select your desired output format based on your use case: WAV or AIFF for high-quality demos and mastering, or MP3 and AAC for streaming and distribution. Choose whether to include digital normalization and dithering based on your target format.
Finally, name your bounced file clearly, including the song title and mix version, such as “MySong_FullMix_v1.wav”, and save it in a dedicated folder. Organizing your exports helps avoid confusion during mixing and distribution.
- Set the cycle region to the full song length, including fade-outs — the yellow bar spans from the start to the end of the arrangement.
- Check automation and effects carefully during playback, confirming smooth transitions and no abrupt changes.
- Choose File > Bounce > Project or Section to open the bounce dialog window.
- Select your output format (e.g., WAV, AIFF, MP3) and configure options like normalization and dithering as needed.
- Name the bounced file clearly and save it in a structured folder dedicated to your project exports.
For example, after bouncing a 4-minute 32-second full mix, Logic Pro will generate a file named “MySong_FullMix_v1.wav” showing a file length of 4:32. This confirms the entire song was included in the export.
How to bounce individual tracks in Logic Pro
When you need to export multiple single tracks or stems for mixing or collaboration, Logic Pro’s Export All Tracks as Audio Files is a powerful feature. This saves each track as a separate audio file, letting you manage stems easily. To keep your workflow consistent, set your bounce options uniformly across tracks, such as bit depth and sample rate, to ensure smooth mixing later.
Consider how you want to handle track effects. If you bounce tracks with inserts and sends active, you capture the sound including plugins and effects, which is useful for final stems. Bouncing without effects exports the dry source audio, allowing more flexibility during mixing. Naming conventions are crucial: include track numbers and descriptive names like “01_Bass_Dry” or “05_Lead_Voc_Efx” to avoid confusion when importing files elsewhere.
MIDI tracks must be bounced as audio since Logic cannot export MIDI as audio files directly. Bounce the MIDI track with its instrument plugin active or freeze the track before exporting. For example, exporting a 10-track project with effects enabled results in larger files compared to dry exports, sometimes doubling the file size, so plan storage accordingly.
- Open your Logic Pro project and go to File > Export > All Tracks as Audio Files. You should see a dialog box with export options.
- Choose the destination folder where you want the audio files saved. Confirm the format (e.g., WAV or AIFF), bit depth (24-bit recommended), and sample rate (match your project’s).
- Decide whether to include track effects by checking or unchecking Include Audio Tail and Include Volume/Pan Automation. Including them bounces with inserts and sends; leaving unchecked exports dry tracks.
- Click Export. Logic will create individual audio files for each track in the selected folder. You should see progress and then a confirmation of completion.
- Review the exported files and verify naming conventions. Files should be clearly labeled with track numbers and names matching your project’s tracks for easy identification.
How to bounce a single track in Logic Pro X
In Logic Pro X, bouncing a single track is streamlined with the Bounce Track in Place feature, which quickly renders the selected audio or MIDI region with effects applied, creating a new track layer. This method is faster than traditional bouncing and keeps your session tidy by allowing you to replace or keep the original track.
- Select the track or region you want to bounce by clicking on it in the main window. You should see the track highlighted, indicating it’s ready for processing.
- Go to the Track menu and choose Bounce Track in Place. This opens a dialog box with bounce options specific to Logic Pro X.
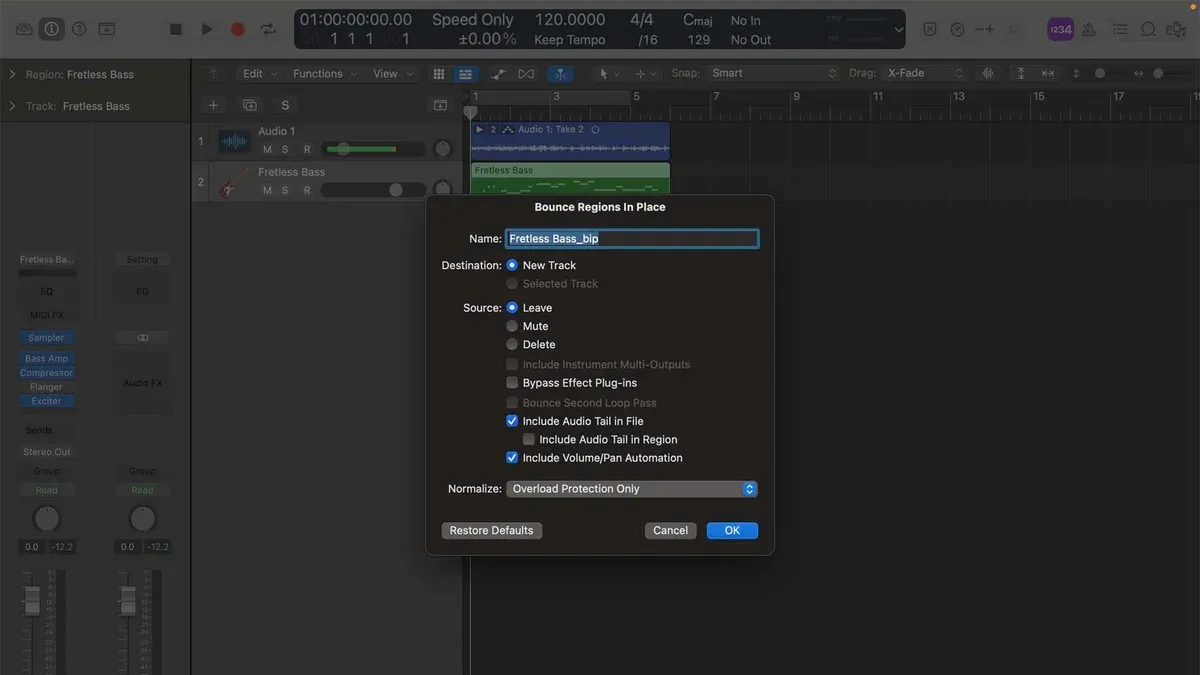
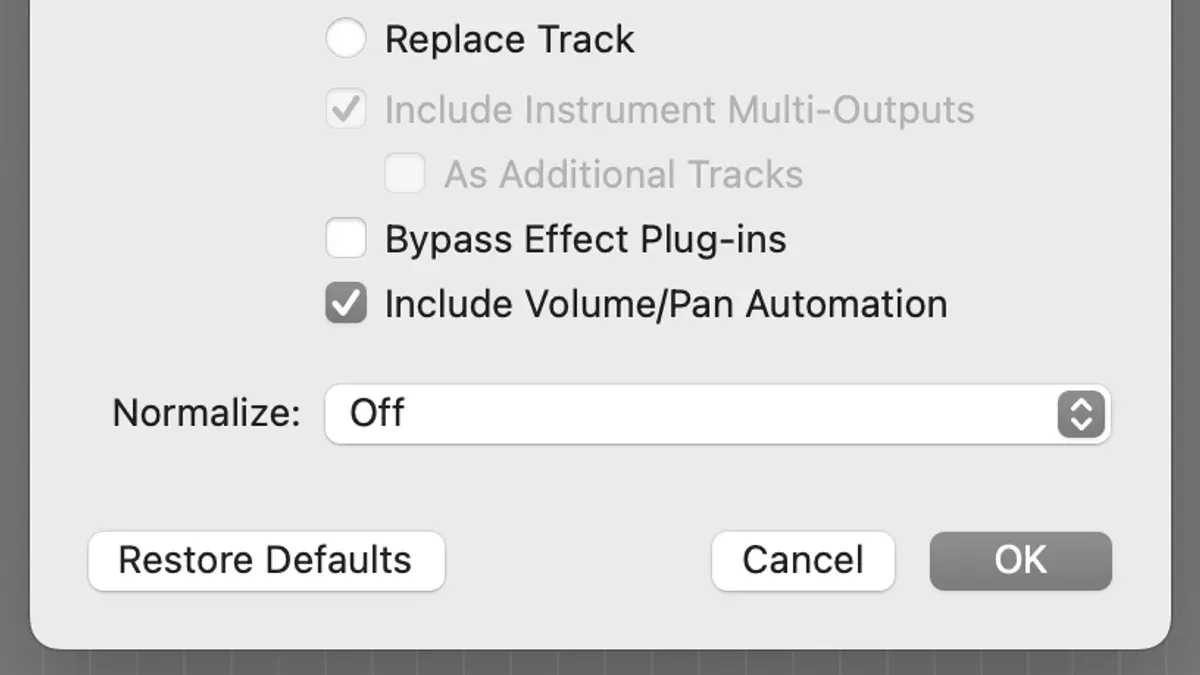
- Configure the Bounce Track in Place settings. You can name the bounced track, decide whether to include volume and pan automation, and choose to mute or delete the original track. Leave "Add to Project" checked to add the bounced track to your session.
- Click OK to start the bounce. Logic Pro X will render the track based on your settings. When done, a new track appears with the bounced audio waveform visible in the track lane.
- Review the bounced track by playing it back to ensure effects and automation are correctly applied. Compare the new waveform with the original to confirm the bounce succeeded.
Use Bounce Track in Place when you want a quick, non-destructive way to commit effects and edits on a single track without exporting externally. Traditional bouncing is better suited when you need standalone audio files or real-time processing. Checking your bounced track immediately helps avoid workflow interruptions later.
Below are example screenshots showing the Bounce Track in Place dialog and the track waveform before and after bouncing, highlighting the changes in audio data and track naming.
Troubleshooting common issues when bouncing tracks in Logic Pro
When bouncing tracks in Logic Pro, you might encounter several common problems. One frequent issue is a bounce resulting in no sound or muted audio. This often happens if the track or regions are muted, the output is routed incorrectly, or the bounce range excludes active regions. Double-check that the track is unmuted, the output is set to the correct audio device, and the bounce cycle covers the intended sections.
Incorrect bounce length or missing regions can occur if the cycle region is too short or if some regions are disabled. Make sure the cycle area includes the entire length you want to export and that all relevant regions are enabled. Also, verify that no track automation or plugin settings are causing unwanted silence.
File format or sample rate mismatches might cause playback issues. Logic Pro displays error messages such as “File format not supported” or “Sample rate mismatch.” Ensure the bounce settings match your project’s sample rate and that you select a compatible file format like WAV or AIFF for your target platform.
Performance problems like bounce failures or glitches can arise from CPU overload or software conflicts. Try bouncing offline if real-time bounce fails. If persistent, reset bounce preferences by quitting Logic Pro, then deleting the preferences file located at “~/Library/Preferences/com.apple.logic10.plist.” Clearing the audio cache can also help: go to Preferences > Audio > Reset All Audio Units & Cache.
Here is a step-by-step to reset bounce preferences and clear cache:
- Quit Logic Pro completely. You should see the application fully close.
- Open Finder, press Cmd+Shift+G, and enter “~/Library/Preferences/”.
- Locate and move “com.apple.logic10.plist” to the desktop as a backup. This resets preferences on next launch.
- Relaunch Logic Pro. Preferences will reset to default.
- Go to Logic Pro > Preferences > Audio, then click “Reset All Audio Units & Cache.” You should see a confirmation dialogue.
- Attempt your bounce again. Bounce should proceed without previous glitches.
Common error messages include “Bounce failed due to hardware error,” often resolved by checking audio interface connections, or “Offline bounce not available for this project,” which requires switching to real-time bounce. Understanding these typical scenarios helps you quickly identify and fix bounce-related issues.
Optimize your bounce workflow for live performance and production
Using bounced tracks can greatly enhance both live performances and studio production by providing stable, high-quality audio playback without taxing your system’s CPU. One practical use is creating click tracks or backing tracks from your bounced stems, which ensures tight timing and consistent sound during a live set. You can import these bounced files into Logic Pro’s Live Loops or sampler instruments, allowing you to trigger them on the fly with minimal latency.
Managing your bounced files efficiently is key to quick recall during sessions. Organize your audio files in clearly labeled folders and use Logic Pro’s Project Audio Browser to keep everything accessible. Additionally, integrating bounced tracks with Logic Pro’s chord track and arrangement track features lets you experiment with song structure and key changes without rerendering audio repeatedly.
Choosing to bounce tracks rather than rely on real-time playback is preferable when you need reliability and reduced processing load, especially in complex live setups. For example, a live performance case involved using bounced drum and synth stems instead of MIDI playback, which minimized glitches and latency. This setup provided seamless transitions and consistent sound quality, proving the advantage of bouncing for performance stability.
Frequently asked questions
How to learn logic pro?
Start by exploring the built-in Logic Pro tutorials available under the Help menu. Focus on learning the interface, track types, and basic editing tools first. Supplement your learning with video tutorials and practice by creating simple projects to familiarize yourself with key functions.
How to bounce one track in logic?
To bounce a single track, solo the track you want to export, then go to File > Bounce > Track in Place. Choose your desired settings such as destination (new track or audio file), file format, and effects processing before clicking Bounce. This creates a new audio file of just that track with applied effects.
How do I bounce a track in Logic Pro X?
In Logic Pro X, select the track or region you want to bounce. Then choose File > Bounce > Regions in Place or Bounce > Project or Section for the whole project. Adjust settings like format, bit depth, and whether to include effects, then click OK to export your track or project.
How to learn Logic Pro effectively?
Create small, focused projects that highlight different features, such as MIDI editing or automation. Use the Logic Pro user manual and Apple’s official support resources for accurate information. Regular practice with real music ideas helps reinforce learning and builds confidence.
How do I bounce a track in Logic Pro X for mastering?
First, finalize your mix and disable any master effects you don’t want included. Then select File > Bounce > Project or Section, choose a high-quality format like WAV or AIFF, and set the bit depth to 24 or 32 bits. Ensure the sample rate matches your project, then click Bounce to export a clean stereo track ready for mastering.
What This Guide Does Not Cover
This guide does not cover advanced mastering techniques or troubleshooting issues specific to third-party plugins during the bounce process. If your project relies heavily on specialized plugins or requires detailed mastering beyond basic export settings, it is best to consult resources dedicated to those areas. Additionally, bouncing MIDI tracks to audio renders the MIDI data non-editable, so always keep backups of your original MIDI files before proceeding.
To take your bouncing skills further, focus next on exploring Logic Pro’s Bounce Regions feature. This allows you to export multiple selected sections or tracks quickly and flexibly, optimizing your workflow for both production and live performance scenarios. Familiarizing yourself with this feature will save you time and help maintain consistency across your projects.
See also: How to Quantize MIDI in Logic Pro: A Step-by-Step Guide · How to Tune Vocals with Flex Pitch in Logic Pro: Step-by-Step Guide · How to Use Drummer in Logic Pro: A Step-by-Step Guide



