How to Master a Song in Logic Pro: A Step-by-Step Guide
Master your song in Logic Pro with this step-by-step guide to achieve a polished, professional sound using built-in mastering tools.
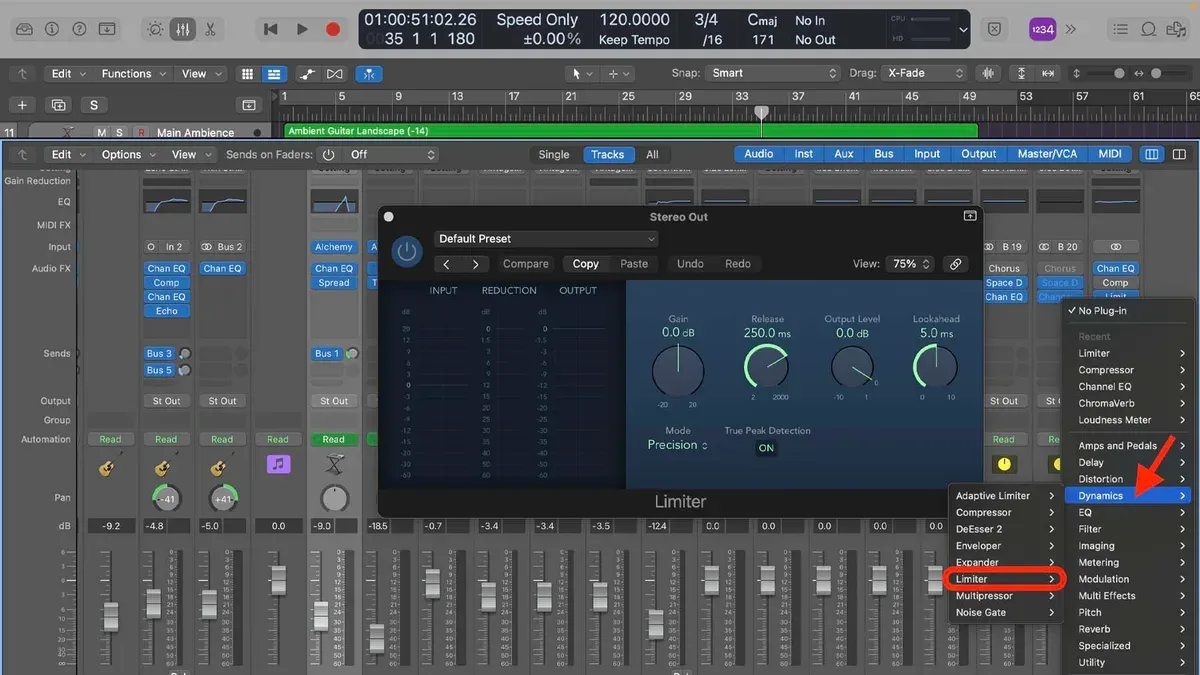
You’ve finished mixing your track in Logic Pro, and now you want to give it that polished, professional edge. The final step—mastering—can feel overwhelming, especially if you’re unsure how to set up the master track or apply the right effects within Logic Pro itself. This guide walks you through how to master a song in Logic Pro, combining vocal mixing tips and mastering workflow to help you achieve a balanced, clear, and loud master without needing external tools.
We’ll start by showing you how to display and configure the master track, then move on to preparing your vocals for mastering. Next, you’ll learn how to apply mastering effects directly on the master channel, followed by a step-by-step walkthrough of the mastering process. Finally, we’ll cover how to integrate mixing and mastering smoothly and troubleshoot common issues that can arise during mastering.
Key takeaways
- Enable the master track by selecting View > Show Master Track in the Tracks area.
- Use Logic’s Compressor and Channel EQ on vocals before mastering to ensure clarity and presence.
- Add mastering effects such as Multipressor, Adaptive Limiter, and Linear Phase EQ on the master channel.
- Adjust gain staging carefully to avoid clipping and preserve dynamics during mastering.
- Check your master in mono and on different monitors to catch potential issues early.
Before you start: What you need to master your song in Logic Pro
Before mastering your song in Logic Pro, ensure you have a mixed stereo track or a fully mixed project ready. This means your individual tracks are balanced, EQ’d, and processed to your satisfaction, allowing you to focus on polishing the overall sound during mastering. A basic understanding of mixing concepts and familiarity with the Logic Pro interface will help you navigate the mastering process smoothly.
Accurate listening is essential. Use headphones or studio monitors with a flat frequency response to hear the true characteristics of your mix without coloration. This helps you make precise adjustments and avoid over- or under-processing your master. While third-party plugins can be used, this guide emphasizes Logic Pro’s built-in tools, which are powerful and versatile enough for professional mastering.
Finally, you need to enable and display the master track in Logic Pro since this is where you will add your mastering effects. The master track allows you to apply processing to the entire mix rather than individual tracks.
- Open Logic Pro and load your mixed project or stereo track. You should see your tracks laid out in the main window.
- Go to the menu bar and select View > Show Master Track. Once enabled, a new track labeled “Master” will appear at the bottom of your track list.
- Click on the Master track header to select it. The Inspector on the left will show the channel strip for the Master, where you can add plugins such as Channel EQ, Multipressor, Compressor, Limiter, and Adaptive Limiter—all native Logic Pro plugins commonly used in mastering chains.
With these preparations in place, you are set to begin the mastering process confidently within Logic Pro’s environment.
How to show master track in Logic Pro
To begin mastering your song, you need to access the master track channel strip in Logic Pro. This channel strip is different from individual track channels because it controls the overall output of your entire project rather than any single instrument or vocal. The master track is central to the mastering process because it allows you to apply effects and adjustments that affect the whole mix simultaneously.
- Open the Mixer view by pressing X on your keyboard or selecting View > Show Mixer from the menu bar. The Mixer displays all your track channel strips.
- In the Mixer, look to the far right or bottom depending on your layout; you will see the Master channel strip. If you don’t see it, click the View button (a small button with three horizontal lines) in the Mixer and make sure Master is checked. You should now see the master channel strip appear.
- Click on the master channel strip’s header to select it. You will notice it lacks the typical input section seen on individual tracks because it handles the stereo output. This channel strip includes insert slots for effects, volume fader, pan controls, and output metering for the entire mix.
- To confirm you are on the master track, check the channel strip label, which reads Output 1-2 or similar, indicating the stereo output. This differentiates it from regular track channels labeled by their track names or instrument types.
- Once visible and selected, you can now add mastering plugins or adjust the output level directly on the master channel strip, which will affect your entire song.
How to mix vocals in Logic Pro before mastering
Optimizing vocal presence and clarity is crucial before you begin mastering. Start by applying an EQ to your vocal track. Use the Channel EQ plugin, and cut frequencies around 200-400 Hz to remove muddiness, which often makes vocals sound boxy or unclear. Then, gently boost the high frequencies between 5 kHz and 10 kHz to add brightness and air. A typical setting might be a 3-4 dB boost with a gentle shelf or bell curve, but adjust by ear to avoid harshness.
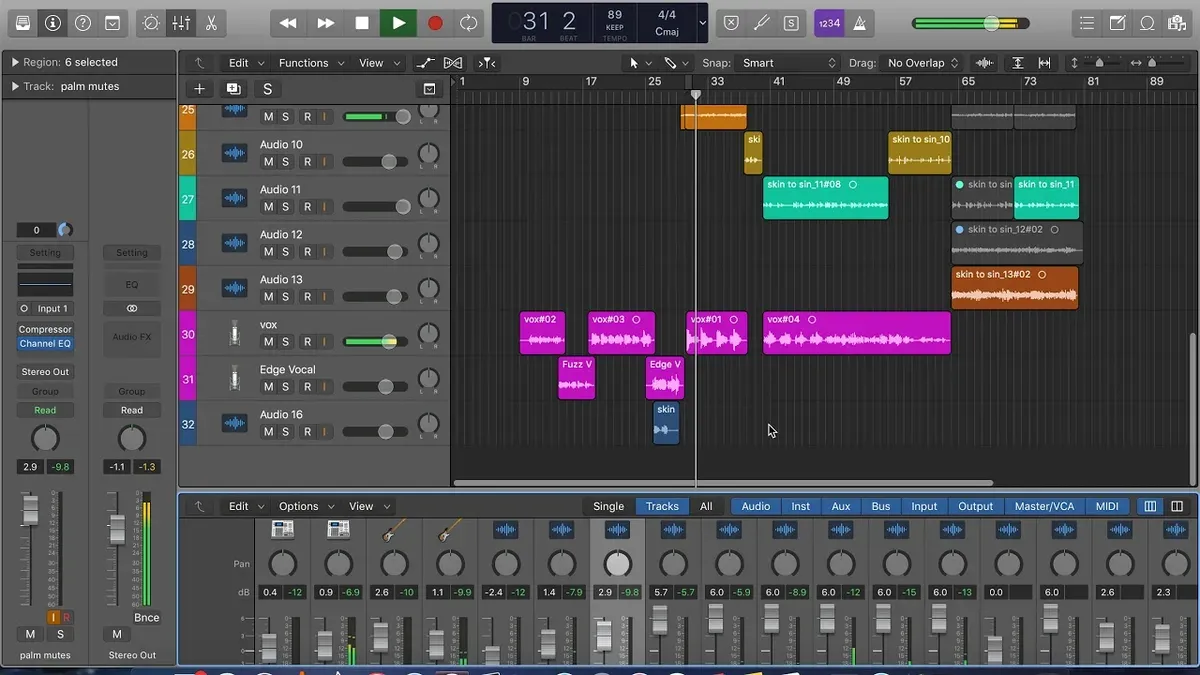
Next, apply compression to control the vocal dynamics without squashing natural expression. Use Logic Pro's Compressor plugin in Vocal mode or set a ratio around 3:1, with a medium attack of 10-30 ms and a release time of 50-100 ms. Aim for 3-6 dB of gain reduction on louder sections. You should hear the vocal sitting more consistently in the mix while retaining its emotional nuances.
Adding subtle reverb or delay creates space and depth without washing out the vocals. Use the Space Designer or Delay Designer plugins with low wet mix percentages, typically 10-15%. Choose short decay times (around 1-1.5 seconds for reverb) and low feedback for delay. This helps the vocal blend naturally with the instrumental without becoming distant.
Finally, balance your vocal levels relative to the instrumental tracks. Solo your vocal and then bring it back with the full mix playing, adjusting the fader so the vocal stands out clearly but does not overpower. A common mistake is pushing vocals too loud, which can mask other elements in mastering. Before and after applying these steps, compare the vocal clarity and presence to ensure the mix feels cohesive and polished.
- Insert Channel EQ on your vocal track and cut 200-400 Hz frequencies; you should hear reduced muddiness.
- Boost 5-10 kHz frequencies by 3-4 dB gently; vocals should sound brighter but not harsh.
- Apply Compressor with a 3:1 ratio, 10-30 ms attack, 50-100 ms release, aiming for 3-6 dB gain reduction; vocals become more consistent.
- Add Space Designer reverb with 10-15% wet mix and ~1.2 sec decay; vocals gain subtle space.
- Adjust vocal fader in the full mix to sit clearly without overpowering instruments; the vocal should feel balanced and natural.
How to make a master track in Logic Pro and add mastering effects
Setting up your master track with the right plugins is crucial to achieving a polished, professional sound. In Logic Pro, you’ll typically insert an Adaptive Limiter, a Multiband Compressor, and an EQ on the master channel strip. This chain helps control dynamics, shape tone, and maximize loudness while preventing clipping.
- Open the Mixer (shortcut: X) and select the Master channel strip.
- Click an empty Insert slot and choose Dynamics > Multipressor to add the multiband compressor. This lets you control different frequency bands independently, tightening your mix without over-compressing.
- Add an EQ next by selecting EQ > Channel EQ on the next insert slot. Use this to make subtle tonal adjustments, such as reducing muddiness or enhancing clarity.
- Finally, insert the Adaptive Limiter from Dynamics > Adaptive Limiter. Set the output ceiling to around -0.1 dB to avoid digital clipping while maximizing loudness.
- Adjust the gain staging throughout these plugins to maintain a healthy level: aim for peaks just below 0 dB and an integrated LUFS value between -14 and -10 LUFS, which is typical for streaming platforms.
- Use Logic Pro’s built-in metering tools by opening the Metering section in the Channel EQ or adding the Level Meter plugin. Monitor peak levels and LUFS loudness to ensure your master is both loud and clean.
This order—Multiband Compressor, EQ, then Adaptive Limiter—is effective because it first controls dynamics, then shapes tone, and finally maximizes loudness without distortion. Double-check your levels at each stage to prevent clipping and keep your sound balanced.
How to master a song in Logic Pro step-by-step
- Import or open your final mix
You can either import your stereo bounced mix into a new Logic project or work within your mixed project. When successful, your full track waveform will appear in the main workspace or audio track region. - Clean up frequencies with Linear Phase EQ
Insert the Linear Phase EQ on the master channel. Use a high-pass filter around 20-30 Hz to remove inaudible low rumble and gently reduce any harsh frequencies between 2-5 kHz. The spectrum display will show the adjustments, and you should hear a clearer overall tone. - Apply gentle multiband compression
Add a Multipressor plugin on the master channel next. Set low, mid, and high bands with light compression ratios (around 1.5:1 to 2:1) and slow attack/release times. This step glues the mix elements together subtly, visible in the gain reduction meters without squashing dynamics. - Widen the stereo image subtly
Use the Stereo Spread plugin on the master bus, increasing the width control modestly (around 20-30%) to avoid unnatural effects. The stereo meter will reflect a wider image without phase issues. Play back several sections to confirm a natural, open sound. - Apply a final adaptive limiter
Place the Adaptive Limiter last in the chain. Set the output ceiling to -0.3 dB to prevent clipping, and adjust the gain to reach target loudness levels just below distortion. Watch the loudness meter reach a competitive LUFS level while ensuring no red clipping indicators appear. - Check your master on multiple playback systems
Use Logic’s built-in metering tools like the Multimeter and Loudness Meter to verify levels. Export a test version and listen through headphones, monitors, and consumer devices for balance and consistency, adjusting settings if necessary. - Export the mastered track
Go to File > Bounce > Project or Section. Choose PCM format at 24-bit or 16-bit depending on your distribution target, sample rate matching your project (commonly 44.1 kHz). Enable dithering if reducing bit depth. Confirm the waveform preview shows no clipping before bouncing.
Following these steps ensures your master is polished, well-balanced, and ready for professional release, all within Logic Pro’s native environment.
How to mix and master a song in Logic Pro X: Integrating both processes
Organizing your Logic Pro X session effectively is key to a smooth transition from mixing to mastering. Start by grouping similar tracks using buses and auxiliary channels—for example, route all vocal tracks to a vocal bus and all instruments to separate buses. This approach lets you apply group processing during mixing and provides cleaner stems if you decide to bounce them later for mastering.
To avoid common pitfalls, such as over-compression during mixing, keep your dynamic range intact by applying moderate compression on individual tracks and buses. Heavy compression during mixing can reduce the headroom needed for mastering effects, making the final result sound squashed or lifeless. Maintain conservative gain staging throughout the session to preserve clarity and dynamics.
When deciding whether to bounce stems or master the full stereo mix, consider the complexity of your project. Bouncing stems (vocals, drums, instruments separately) is useful if you want more control during mastering or plan to collaborate with another mastering engineer. Mastering the full stereo mix is faster and suitable if your mix is finalized and balanced. In Logic Pro X, you can quickly bounce stems via File > Bounce > Tracks in Place or export the full mix through File > Bounce > Project or Section.
- Group related tracks by selecting them, then pressing Command + Shift + D to create a new auxiliary channel strip. You should see the grouped tracks routed to this aux channel in the mixer.
- Apply gentle compression and EQ on buses instead of heavy processing on individual tracks. Check that dynamics remain natural and peaks do not clip in the channel meters.
- Keep your master fader below 0 dBFS to preserve headroom for mastering effects. The peak meters should show levels around -6 to -3 dBFS.
- Export stems by selecting the tracks, then choose File > Bounce > Tracks in Place. You will see new audio files corresponding to each stem in your project folder.
- Alternatively, bounce the full mix by selecting File > Bounce > Project or Section. Confirm that the output is a single stereo file ready for mastering.
By structuring your session with buses and cautious processing, you ensure the mix retains flexibility and quality, making the mastering stage more effective and efficient.
Troubleshooting common mastering issues in Logic Pro
Mastering can sometimes present challenges that affect your track's final sound quality. One common issue is unwanted distortion or clipping on the master track. To identify this, watch the waveform in the main window or the master channel strip meter—if the waveform hits the top or the peak meter shows red, clipping is occurring. Reduce the output gain on the adaptive limiter or lower the gain staging on preceding plugins to eliminate distortion. You should see the waveform no longer clipping and peak meters staying below 0 dB.
Unbalanced frequency ranges or harshness often come from excessive EQ boosts. Use the Channel EQ on the master track and gently sweep with a narrow Q to locate harsh frequencies, typically between 2 kHz and 5 kHz. Cutting by 1-3 dB in these areas should smooth the sound. A screenshot of the EQ curve will show a subtle dip in the offending frequency range. Listen carefully to confirm the harshness diminishes without dulling the overall mix.
Over-limiting can squash your track’s dynamics, making it sound lifeless. Check the gain reduction meter on the adaptive limiter; if it consistently shows more than 3-5 dB reduction, try backing off the input gain or adjusting the release time to preserve dynamics. The goal is to hear controlled loudness without pumping or unnatural compression artifacts.
If your master sounds different on other playback systems, this often signals a monitoring or translation issue. Test your master on multiple devices like headphones, car speakers, and smartphone speakers. If drastic changes occur, consider revisiting your monitoring setup or applying gentle mid-side EQ adjustments to balance stereo width. Listener feedback scenarios where vocals disappear or bass overwhelms can guide your corrective EQ choices.
- Open the adaptive limiter on the master channel strip and lower the output gain until the peak meter no longer shows red clipping — the waveform should stop touching the top of the display.
- Insert a Channel EQ and sweep a narrow band boost between 2 kHz and 5 kHz; reduce gain where harshness is detected by 1-3 dB — the EQ curve will show a smooth dip in that range.
- Observe the gain reduction meter on the adaptive limiter; reduce input gain or adjust release time if reduction exceeds 5 dB to maintain dynamic range.
- Play your master through different systems (headphones, car stereo, phone) and note any inconsistencies; apply mid-side EQ to adjust stereo balance if vocals or bass are disproportionately affected.
Frequently asked questions
How to master your song in logic pro 10?
To master your song in Logic Pro 10, start by opening the project and selecting the master output track in the mixer. Apply mastering plugins such as the Multipressor, Adaptive Limiter, and Channel EQ to shape the overall sound. Adjust settings carefully to enhance loudness and clarity without causing distortion or clipping. Finally, bounce your project to a stereo file for distribution.
How to add a master track in logic pro?
Logic Pro automatically includes a master track in every project, visible in the mixer as the stereo output channel. If you don’t see it, open the mixer with the X key and ensure that “Show Master Track” is enabled from the View menu. This master track is where you add your mastering effects and control the final output level.
How to master your song in Logic Pro 10?
Mastering in Logic Pro 10 involves using the master output channel to apply final processing. Use a combination of EQ, compression, multiband compression, and limiting plugins found in Logic’s stock library. Monitor your levels to avoid clipping, and use metering tools like the Loudness Meter to maintain consistency. Export the final master by bouncing the project with the desired settings.
How to master a song in Logic Pro X?
In Logic Pro X, mastering a song means working on the master output channel by applying plugins such as Channel EQ, Multipressor, and Adaptive Limiter. Begin with subtle EQ adjustments, then use compression to control dynamics, followed by limiting to maximize loudness. Check your mix on different playback systems to ensure balance and clarity before bouncing your final master.
How to add a master track in Logic Pro?
The master track is always present in Logic Pro as the stereo output channel, so you don’t need to add it manually. If it’s hidden, open the mixer with X and select “Show Master Track” from the View menu. This track is where you place your mastering effects and control the final stereo output of your project.
What This Guide Does Not Cover
This guide focuses on in-the-box mastering using Logic Pro’s native tools and is not a substitute for professional mastering engineers, especially for commercial releases requiring high-end processing and critical listening environments. It does not cover analog hardware mastering or advanced third-party plugins that some professionals use to achieve particular sonic characteristics. If your project demands precise tonal shaping, loudness maximization beyond Logic’s built-in capabilities, or mastering for multiple formats with exacting standards, consulting a dedicated mastering engineer or specialist software may be necessary.
For the best results within Logic Pro, always monitor your mixes and masters on reference monitors or quality headphones in an acoustically treated space. This ensures that adjustments you make translate well across playback systems.
To continue improving your mastering skills, focus next on critical listening exercises with reference tracks similar in style and production to your project. Train your ears to detect subtle changes in EQ, compression, and stereo imaging, which will guide your decisions more confidently than any preset or plugin setting.
See also: How to Quantize MIDI in Logic Pro: A Step-by-Step Guide · How to Use Drummer in Logic Pro: A Step-by-Step Guide · How to Tune Vocals with Flex Pitch in Logic Pro: Step-by-Step Guide