
How to Quantize MIDI in Logic Pro: A Step-by-Step Guide
Fix timing issues and tighten your rhythm by learning how to quantize MIDI in Logic Pro with this clear step-by-step guide.
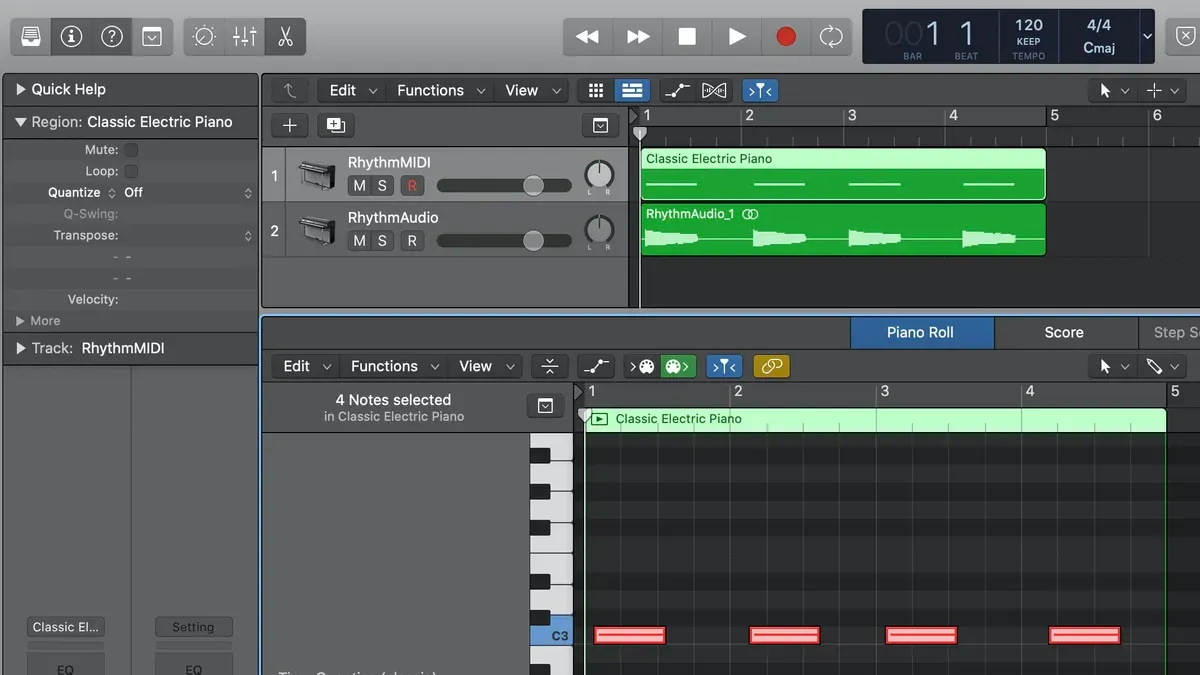
You’ve just recorded a MIDI performance in Logic Pro, but the timing feels slightly off, making the rhythm less tight than you want. Instead of re-recording, you want to clean up the timing quickly and precisely. This is where knowing how to quantize MIDI in Logic Pro becomes essential.
This guide walks you through the process step-by-step, starting with preparing your MIDI data and opening the MIDI editor. You’ll learn how to select notes, choose the right quantize settings, and apply quantization effectively. We’ll also cover special cases like quantizing drums and working with audio-to-MIDI conversions, plus troubleshooting tips for common issues.
Key takeaways
- Prepare your MIDI track by cleaning unwanted notes before quantizing.
- Use the MIDI editor’s Quantize menu to select note values that match your musical style.
- For drums, choose appropriate rhythmic subdivisions like 1/16 notes for tight timing.
- Use Flex Time and Audio-to-MIDI to quantize and convert audio performances.
- Turn off Auto Quantize in the Inspector to avoid unwanted timing changes while recording.
Before you start: Prepare your MIDI data and setup
MIDI quantization aligns your MIDI notes to a specified timing grid, tightening the rhythm and improving the groove of your performance. This is essential when your MIDI notes are slightly off-beat, which can happen with live recordings or manual input. For example, imagine a drum pattern where the snare hits just a few milliseconds late; quantization shifts these notes to the exact beat, making the rhythm feel tighter.
To begin, you’ll need either a MIDI keyboard or controller for live input or pre-recorded MIDI tracks already in your Logic Pro project. Logic Pro’s powerful MIDI editor lets you quantize these notes precisely. It’s important to distinguish between MIDI quantization, which adjusts note timing data, and audio quantization, which manipulates audio waveforms. Logic Pro supports both but uses different tools and workflows for each.
Before applying quantization, always save a backup of your original MIDI data. This allows you to revert if the quantization doesn’t produce the desired feel. Logic Pro users commonly duplicate the MIDI region or save alternative takes to preserve the original timing.
- Select the MIDI region you want to quantize. You should see its notes displayed in the Piano Roll editor.
- Listen to the region and identify notes that fall slightly off the grid, such as a hi-hat hitting just after the beat.
- Check that your MIDI controller or keyboard is properly connected if you plan to input new MIDI data.
- Duplicate the MIDI region (Edit > Duplicate or Command + D) to keep an unaltered version for comparison.
Open the MIDI editor and select the notes to quantize
To begin quantizing your MIDI notes in Logic Pro, you first need to access the Piano Roll editor, where all MIDI editing takes place. Locate the MIDI region you want to work on in the Tracks area, then double-click it. This action opens the Piano Roll at the bottom of the screen, displaying all the notes within that region. You should see the piano keyboard on the left and a grid representing time and pitch.
Once the Piano Roll is open, selecting the notes you want to quantize is your next step. You can select individual notes by clicking them directly. To select multiple notes, hold down the Shift key and click each note you want to include. Alternatively, if you want to select all notes in the region, press Command + A (⌘A), which highlights everything.
For more precise selection, use the Marquee tool. Activate it by clicking the tool menu in the Piano Roll's upper left corner and choosing "Marquee Tool," or press the Esc key repeatedly until it appears. Click and drag a rectangle around the notes you want. This method is especially helpful for selecting specific timing ranges or pitches without grabbing everything. When notes are selected successfully, they will be highlighted in a brighter color, making it clear what will be affected by quantization.
If you accidentally select notes outside your target area, click on empty space in the Piano Roll to deselect everything, then try again. Accurate selection ensures your quantize settings only affect the intended notes, avoiding unintended timing shifts.
Choose your quantize settings and apply quantization
Quantization in Logic Pro allows you to tighten the timing of your MIDI notes by aligning them to a rhythmic grid. The quantize grid values range from broad divisions like 1/8 notes to finer ones such as 1/16 notes or triplets. Selecting the appropriate grid depends on the groove you want: 1/8 notes work well for slower, more laid-back rhythms, while 1/16 notes suit faster, precise passages. Triplet grids add a swing or shuffle feel, ideal for genres like jazz or blues.
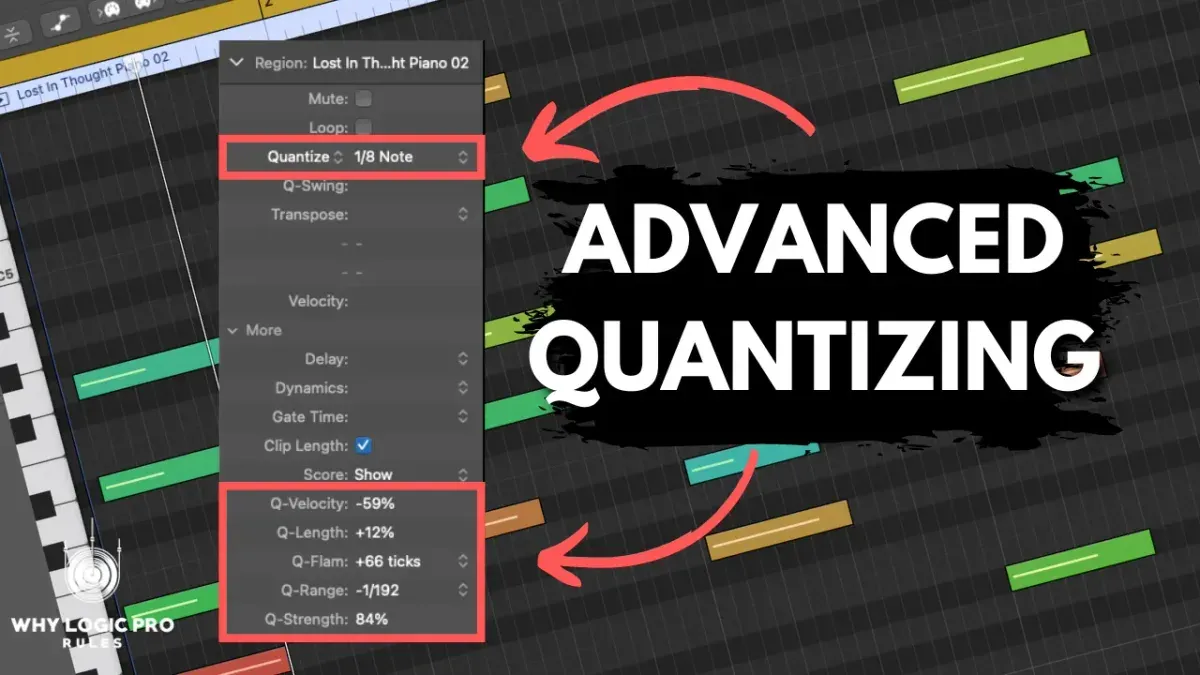
To set quantize parameters, select your MIDI notes and open the Inspector pane. Locate the Quantize menu under Region parameters. Here, you can choose the grid value that fits your musical context. Applying quantization adjusts the start times of the notes to the nearest chosen grid, but you can also control note lengths separately.
Adjusting the Strength slider allows you to apply quantization partially, preserving some natural timing and feel. The Swing slider shifts the quantize grid unevenly, introducing a rhythmic groove by delaying every other note slightly. This is especially useful for humanizing programmed parts.
Note that quantizing only the start times affects when notes begin, making rhythms tighter. However, quantizing note lengths ensures notes end consistently, which can clean up overlaps or unintended sustain. Many users overlook adjusting lengths, which can improve clarity in busy arrangements.
- Select the MIDI region and open the Inspector to find the Quantize menu. You should see a dropdown list of grid values.
- Choose a grid value such as 1/8, 1/16, or 1/16 triplets. When selected, the start times of your notes snap to that grid.
- Modify the Strength slider below the Quantize menu to a percentage less than 100% to retain some timing variation; the MIDI notes will move closer to the grid but not fully snap.
- Adjust the Swing slider to add groove by delaying every other subdivision; you should hear the rhythmic feel shift accordingly when playing back.
- For finer control, check the "Length" quantize option to align note lengths to the grid, preventing overlaps or uneven note durations.
- Play back your MIDI drum pattern before and after applying different grid values to hear how the timing tightens or the groove changes.
How to quantize MIDI drums in Logic Pro
Drum MIDI requires a different approach to quantization compared to melodic instruments because rhythm and groove are crucial. Over-quantizing drums can make your beats sound mechanical and lifeless. Logic Pro’s Drum Kit Designer and Drum Editor provide specialized tools to help you tighten your drum timing while retaining a natural feel.
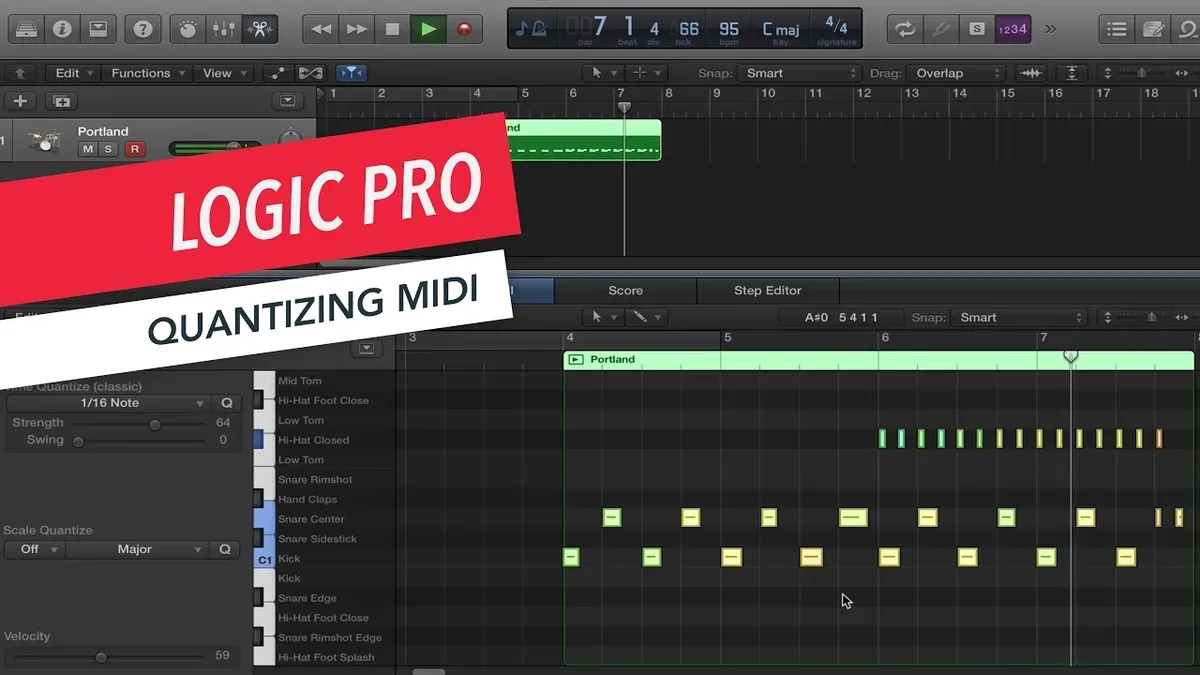
- Open your drum MIDI region in the Drum Editor by double-clicking the region and selecting the Drum Editor view. You should see individual drum hits clearly labeled.
- In the Inspector, set the Quantize value to a suitable grid for drums, such as 1/16 note or 1/8 note, which matches typical drum patterns. This will align your drum hits to the nearest subdivision.
- Adjust the Quantize Strength slider to less than 100% (try around 70-80%) to preserve some of the natural timing variations. You’ll notice the hits move closer to the grid but keep a human feel.
- To add groove, select a groove template from the Groove menu in the Inspector, like “Swing 16th” for a subtle rhythmic shuffle. Apply it and listen to compare the difference between straight quantization and swung timing.
- If certain drum hits should remain loose for expressiveness, select those notes and disable quantization for them by setting their individual Quantize parameter to “Off” in the MIDI Draw area.
- Play back your drum part to hear the effect. You should hear tighter timing with a natural groove rather than robotic precision.
For example, a straight 1/16 quantize on a snare and kick can sound mechanical, but reducing strength and applying a swing groove template adds feel without sacrificing tightness. Use partial quantization to balance precision and expression effectively.
How to quantize audio in Logic Pro using Flex Time and convert audio to MIDI
Logic Pro’s Flex Time feature allows you to quantize audio recordings, aligning rhythmic elements like drum loops or guitar riffs to your project’s grid. This is especially useful when working with live recordings that may not be perfectly in time. Additionally, you can convert audio performances into MIDI data, enabling precise editing and quantization using MIDI tools.
Quantizing audio with Flex Time
- Select the audio track you want to quantize, such as a drum loop. You will see the track highlighted in the workspace.
- Enable Flex Time by clicking the Flex button (a waveform icon) in the track header. You should see the waveform display update with transient markers.
- From the Flex Mode dropdown menu in the track header, choose "Slicing" for percussive audio or "Rhythmic" for more melodic or sustained material. The waveform will now show transient markers that Logic uses for timing adjustments.
- Open the Region Inspector on the left side and locate the "Quantize" menu. Select the desired note value, for example, 1/16 note, to snap transient markers to the nearest grid position.
- Play back the track to hear the timing adjusted. You can tweak the quantize strength slider below the menu to reduce mechanical feel if needed.
Converting audio to MIDI
- Right-click the audio region you want to convert (such as a vocal or guitar phrase) and choose "Convert > Convert to MIDI Track" from the contextual menu.
- Logic will create a new software instrument track containing the MIDI performance extracted from the audio. This MIDI region will appear aligned beneath your original audio.
- Select the new MIDI region and open the Piano Roll editor. Here, you can quantize the MIDI notes using the same methods you use for any MIDI data, such as setting quantize values in the Inspector.
- Adjust note velocities and lengths to refine the performance. Using MIDI conversion allows you to apply grooves, swing, or humanize the timing more flexibly than audio quantization.
For example, quantizing a live drum loop with Flex Time’s "Slicing" mode can tighten the groove by snapping hits to a 1/16 grid without altering pitch. Meanwhile, converting a recorded vocal riff to MIDI lets you rearrange and quantize individual notes precisely, combining the expressiveness of audio capture with the control of MIDI editing.
Turn off auto quantize MIDI in Logic Pro X
Auto quantize in Logic Pro X automatically adjusts the timing of MIDI notes immediately after you record them or enter them manually. This feature helps keep your performance rhythmically tight but can sometimes interfere with your creative feel or detailed editing, especially if you prefer to quantize manually. When auto quantize is on, notes snap to the nearest grid value as soon as they are input, which might not always be desirable.
To disable auto quantize, you need to adjust your MIDI recording preferences. This gives you full control over when and how quantization is applied, allowing you to preserve the natural timing of your performance during recording and edit notes afterward.
- Open Logic Pro X and go to the top menu bar. Click Logic Pro X and select Preferences from the dropdown menu. You should see the preferences window appear.
- In Preferences, click on Recording to open recording-related settings. Here you will find the Auto Quantize options.
- Look for the section labeled Auto Quantize. It will have a dropdown menu showing the current quantize value, such as "1/16" or "1/8". To turn off auto quantize, select Off from this dropdown.
- Close the Preferences window. Now when you record or input MIDI notes, Logic Pro will not automatically quantize them. You can confirm this by recording a short MIDI passage and observing that the notes retain your original timing.
Using manual quantization after recording is often preferable when you want to maintain expressive timing and adjust note positions precisely. You can apply quantization selectively, adjusting strength and swing to fit the musical context. Disabling auto quantize prevents unwanted timing corrections during performance while keeping the power of Logic’s quantize tools available when you need them.
Tip: If you want to double-check your settings, take screenshots of the Recording preferences before and after turning off auto quantize. This helps track your workflow changes and revert easily if needed.
Troubleshooting common quantization issues in Logic Pro
When quantized notes sound robotic or lose their natural groove, adjusting the Quantize Strength and Swing settings can help. Lowering the quantize strength below 100% softens timing corrections, preserving the original feel. Increasing swing adds rhythmic variation that can make playback feel more human and less mechanical.
If notes don’t snap correctly, check your MIDI region settings and confirm the project’s time signature matches the MIDI data. Mismatched time signatures or irregular region boundaries can cause notes to align unexpectedly. Ensure the MIDI region is trimmed properly and that the key and time signature are consistent throughout your project.
Overlapping or stuck notes after quantization often result from overlapping MIDI events or improper note lengths. Use Logic Pro’s Note Repeat or manually trim note lengths in the Piano Roll to fix overlaps. Also, try selecting all notes and using Edit > MIDI Transform > Fix Overlaps to resolve stuck notes automatically.
MIDI controller latency can affect quantization accuracy, causing notes to trigger slightly off-grid. To mitigate this, calibrate your MIDI interface latency in Logic Pro > Preferences > MIDI > Inputs or adjust the Recording Delay in Audio Preferences. This ensures recorded notes align better with the quantize grid.
- Play your MIDI region and listen for timing issues or robotic feel.
- Adjust the Quantize Strength slider to around 60–80% and add slight Swing (e.g., 5–10%) in the Inspector; play again to hear improvement.
- Check the region’s start and end points, and confirm your project’s time signature matches the MIDI data.
- If notes overlap, select all in the Piano Roll and choose Edit > MIDI Transform > Fix Overlaps; verify notes now play cleanly.
- Measure MIDI latency by recording a simple performance; if timing is off, calibrate latency in Preferences to improve quantize accuracy.
Comparing your MIDI before and after these adjustments should reveal a more natural groove without timing errors or stuck notes.
Advanced tips for mixing MIDI and audio quantization in Logic Pro
When mixing quantized MIDI with live audio, maintaining a natural groove is key. Avoid over-quantizing MIDI parts to prevent a robotic feel; instead, use quantize strength settings between 50-80% to retain some human timing variation. Balance this with subtle timing adjustments on audio tracks using Flex Time’s Groove Template feature, which lets you match audio timing to your MIDI groove for a cohesive mix.
Incorporate Logic Pro’s MIDI controllers and external hardware to streamline your quantization workflow. For example, using the Logic Pro Smart Controls or a MIDI hardware controller like the Novation Launchkey allows you to adjust quantize parameters, swing, and strength in real-time during playback. This hands-on approach facilitates dynamic groove shaping beyond static quantize settings.
Consider exploring specialized online courses and resources focused on MIDI programming and mixing techniques in Logic Pro. These can offer in-depth strategies for integrating MIDI and audio elements effectively, expanding your creative toolkit.
Here is a practical example: In a session combining quantized MIDI piano with recorded live drums, applying a 70% quantize strength to the piano kept it rhythmically tight yet expressive. The drum audio was subtly shifted with Flex Time’s Groove Template derived from the piano’s timing, creating a locked-in feel without sounding mechanical. This synergy demonstrates how careful control of both MIDI and audio quantization can produce a polished and natural mix.
Frequently asked questions
What is midi quantization?
MIDI quantization is the process of adjusting the timing of MIDI notes to align them more precisely with a specified rhythmic grid. This helps tighten up performances by correcting notes that are slightly off-beat, making your MIDI parts sound more polished and in time. You can choose different note values to quantize to, such as 1/8 notes or 1/16 notes, depending on the rhythmic feel you want.
How to quantize midi in ableton?
In Ableton Live, you quantize MIDI by selecting the notes in the MIDI editor and pressing Command+U (Mac) or Ctrl+U (Windows). You can adjust quantization settings like note value and amount in the Quantize Settings window, accessed via right-click or the Edit menu. This lets you control how strictly the notes snap to the grid, which is useful for preserving some natural groove.
How to quantize in logic pro?
To quantize in Logic Pro, open the MIDI editor and select the notes you want to adjust. Then use the Quantize dropdown in the Inspector to pick a note value, such as 1/16 or 1/8 triplet. Clicking the Quantize button applies the timing correction instantly. You can also modify parameters like strength and swing to fine-tune how the quantization affects your performance.
How to quantize midi notes in logic pro?
Quantizing MIDI notes in Logic Pro involves selecting your desired notes in the Piano Roll or Score Editor, then choosing a quantize value from the Inspector panel on the left. After selecting the note value, press the Quantize button or hit Option+Q to apply. Adjusting the 'Q-Strength' slider lets you control how much the notes move toward the grid, which helps keep some of your original timing feel.
How to quantize midi in logic pro x?
In Logic Pro X, quantizing MIDI works the same way as in Logic Pro: select the MIDI notes, choose a quantize value from the Inspector, and apply it. You can also access advanced quantize features like 'Q-Strength', 'Q-Range', and 'Q-Flam' to customize the quantization effect further. Remember to disable 'Auto Quantize' if you want to prevent Logic from automatically quantizing new recordings.
What This Guide Does Not Cover
This guide focuses on Logic Pro’s built-in quantization tools and does not cover third-party MIDI quantization plugins or advanced scripting options. If you rely heavily on custom scripts or specialized plugins for quantization, exploring those tools separately will be necessary. Also, quantization can improve timing but may reduce the natural feel of a performance if overused. Strive to balance precise timing with preserving the musical expression and groove you want in your project.
For the best results, always listen critically after applying quantization and adjust settings such as strength, swing, or note length as needed to avoid a robotic or overly rigid sound.
Your Next Step: Experiment with Quantize Strength and Swing
After mastering basic quantization, try adjusting the "Quantize Strength" slider in the Region Inspector. This lets you control how strictly notes snap to the grid, helping you retain some human feel. Additionally, explore the "Swing" settings to add groove to your quantized parts, especially with drums or rhythm instruments. These subtle adjustments can make a big difference in keeping your MIDI performances sounding natural while still tight and polished.
See also: How to Use Drummer in Logic Pro: A Step-by-Step Guide · How to Tune Vocals with Flex Pitch in Logic Pro: Step-by-Step Guide



