
How to Set Up an Audio Interface in Logic Pro: A Step-by-Step Guide
This guide explains how to set up an audio interface in Logic Pro, from connecting hardware to configuring software settings for optimal recording.
You've just unboxed your new audio interface, eager to start recording vocals or guitar in Logic Pro. Connecting the hardware is only the start; ensuring it works smoothly within your DAW can feel tricky if you're not sure where to begin.
This guide covers how to set up an audio interface in Logic Pro step-by-step, helping you move from physical connections to configuring settings inside the software. You'll learn how to correctly install drivers, adjust Logic Pro's audio preferences, create audio tracks tailored to your interface inputs, and set up monitoring for accurate playback. Along the way, common setup pitfalls will be highlighted so you can avoid frustrating delays and focus on your music.
Key takeaways
- Install the correct drivers from your interface manufacturer before connecting to Logic Pro.
- Set the audio input and output devices under Logic Pro Preferences > Audio.
- Create new audio tracks selecting the right input channels matching your interface.
- Configure monitoring settings carefully to prevent latency or feedback issues.
- If you encounter no sound or distorted audio, check sample rate and buffer size consistency.
Before you start: What you need to set up your audio interface with Logic Pro
To set up your audio interface with Logic Pro smoothly, you first need to ensure you have compatible hardware and software. Logic Pro runs exclusively on Mac, so a Mac computer with the latest version of Logic Pro installed is essential. Windows users will need to look for alternative DAWs or workarounds, as Logic Pro does not support Windows.
Your audio interface must connect via USB, Thunderbolt, or FireWire, depending on the model. Popular interfaces compatible with Logic Pro include the Focusrite Scarlett series (USB), Universal Audio Apollo Twin (Thunderbolt), and PreSonus AudioBox (USB). Check your interface’s specifications to confirm compatibility and connection type. You will also need the appropriate cables that come with your interface or can be purchased separately.
Before connecting, understand your interface’s driver or firmware installation requirements. Most modern interfaces are class-compliant and plug-and-play with macOS, but some require official driver installation—consult the manufacturer’s instructions. A quiet room and good-quality headphones or studio monitors are necessary for testing and monitoring audio output during setup.
Finally, familiarize yourself with Logic Pro’s audio preferences and interface support. Logic Pro allows you to select your audio device and configure input/output settings, so knowing where to find these options prepares you for a smooth setup process.
- Verify that your Mac meets the minimum system requirements for the latest Logic Pro version; you should see Logic Pro run without performance issues.
- Confirm your audio interface supports macOS and is listed as compatible by the manufacturer; you should see official documentation or website confirmation.
- Have the correct connection cable ready (USB, Thunderbolt, or FireWire); the cable should fit your interface and Mac ports securely.
- Prepare a quiet environment and have headphones or monitors connected for sound testing; you should hear clear audio output during tests.
Connect and install your audio interface hardware and drivers
- Locate the correct cable for your audio interface, typically USB, Thunderbolt, or USB-C. Connect one end to your audio interface and the other end to your Mac. When connected properly, your interface should power on automatically or via a power button.
- Visit the manufacturer’s official website to check if your interface requires specific drivers or firmware updates. For example, Focusrite Scarlett series users should go to the Focusrite Downloads page, select their model, and download the latest drivers compatible with macOS.
- Install the downloaded driver or firmware by following the on-screen instructions. This usually involves running an installer package and restarting your Mac if prompted. Without these drivers, interfaces like the Scarlett often will not be recognized correctly by Logic Pro.
- After installation, open the macOS Audio MIDI Setup utility (found in Applications > Utilities) to verify your interface is listed as an audio device. If you see it there, macOS recognizes your hardware and it is ready for Logic Pro.
- Note that some audio interfaces are class-compliant, meaning they do not require additional drivers to work with macOS. In these cases, simply connecting the device and powering it on should make it appear in Audio MIDI Setup.
- Check the manufacturer’s support site periodically to ensure your interface’s firmware is up to date. Firmware updates can improve performance, fix bugs, and add features. Follow the provided instructions carefully when updating firmware to avoid issues.
Set up your audio interface inside Logic Pro preferences
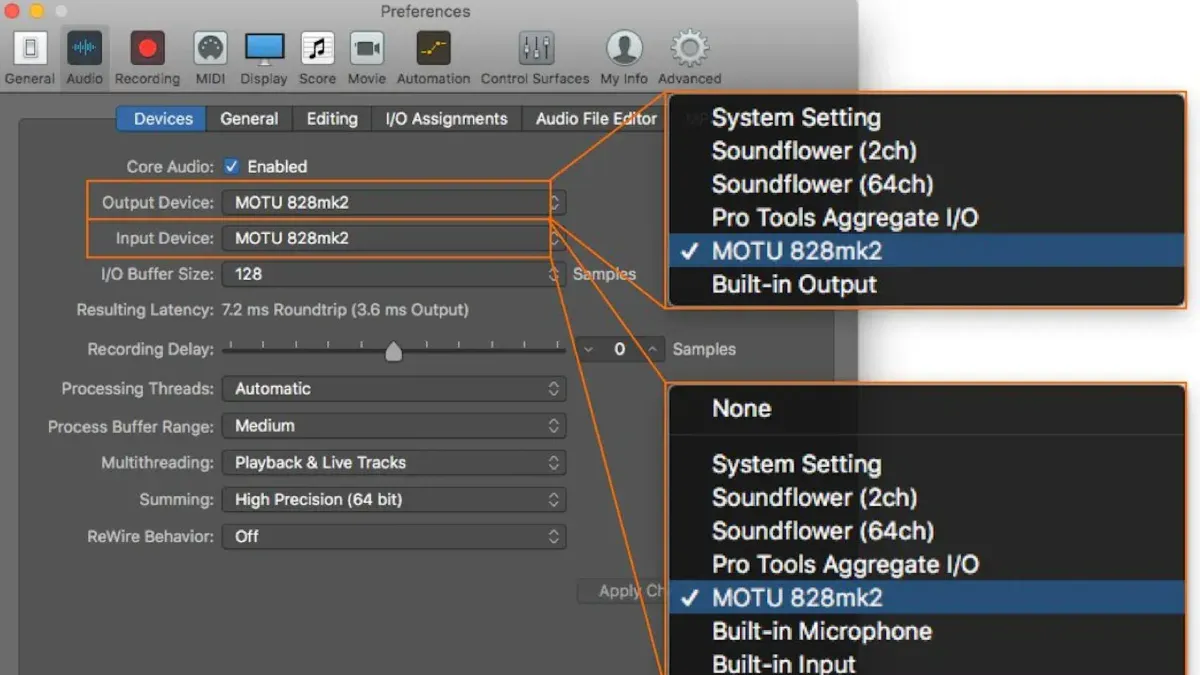
To ensure Logic Pro uses your audio interface correctly, you need to select it as both the input and output device. Open Logic Pro, then go to the menu bar and choose Logic Pro > Preferences > Audio. In the Audio preferences window, under the Devices tab, click the drop-down menus for Input Device and Output Device, and select your audio interface from the list. When selected, Logic Pro routes audio signals through your interface for recording and playback.
- Open Logic Pro and navigate to Logic Pro > Preferences > Audio. The Audio preferences pane appears.
- Under the Devices tab, set both Input Device and Output Device to your audio interface. You should see your interface’s name listed here.
- Adjust the Buffer Size to a low value (like 64 or 128 samples) for minimal latency when recording. For mixing or playback, a larger buffer (256 or 512) improves stability. Select your preferred setting under I/O Buffer Size.
- Select the Sample Rate matching your project’s needs, commonly 44100 Hz or 48000 Hz. Higher rates increase CPU load and file size but can improve audio fidelity.
- If you use external monitors or multiple output devices, enable a multi-output device in macOS Audio MIDI Setup, then select it here as the output device.
- Close the preferences. These settings will automatically be saved and applied to new projects unless changed.
Choosing the right buffer size and sample rate balances recording responsiveness with system performance. A smaller buffer reduces delay when tracking but requires more processing power, while a larger buffer prevents audio glitches during mixing. Setting your audio interface here ensures Logic Pro communicates correctly with your hardware for smooth recording and playback.
Create and configure audio tracks to record with your interface in Logic Pro
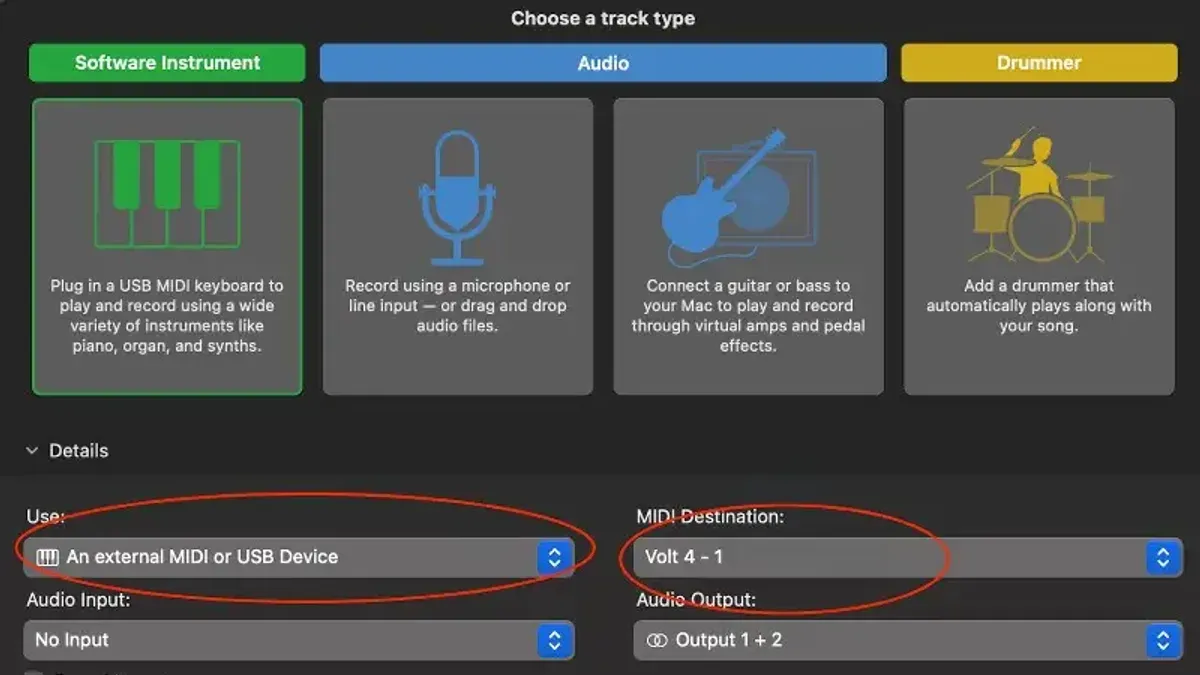
- Open Logic Pro and go to the Track menu, then select "New Tracks…". Choose "Audio" as the track type, and ensure the input is set to the correct channel from your audio interface, such as Input 1 for a vocal microphone. Click "Create" and you will see the new audio track appear in the workspace.
- Locate the input monitoring button (the small headphone icon) on the track header and enable it. You should now hear the live input signal through your speakers or headphones, allowing you to monitor your performance in real time.
- Adjust the gain knob on your audio interface while watching the input level meter in Logic’s channel strip. Aim for healthy signal levels without hitting the red peak indicator to avoid clipping and distortion.
- Click the record enable button (the red circle) on the audio track to prepare it for recording. If everything is set correctly, the input signal meter will respond as you sing or play your instrument, confirming the track is ready.
- Rename the track to something descriptive like "Lead Vocal" or "Guitar" by double-clicking the track name. Organize multiple tracks into track stacks or groups for smoother workflow during mixing.
For example, when recording a vocal on Input 1, setting the input correctly and monitoring the gain lets you capture clean, unclipped audio. Using input monitoring and record enable ensures you hear yourself live and can start recording confidently.
Set up your speaker or headphone monitoring for correct audio playback
- Open Logic Pro, go to Logic Pro > Preferences > Audio, and select your audio interface under the Output Device dropdown. You should now hear Logic's audio routed through your interface.
- Launch the macOS Audio MIDI Setup utility. Select your audio interface in the left panel, then configure the speaker setup to match your system—choose stereo for two speakers or a surround sound option if your interface supports it. Correct channel assignment ensures accurate spatial playback.
- Adjust the output volume on your interface and in Logic Pro’s Audio Preferences, aiming for clear sound without clipping or distortion. Avoid maxing out volume levels to prevent audio dropouts or distortion during playback.
- If you use headphones for monitoring, plug them into your interface’s headphone jack. Enable Direct Monitoring on your interface if available; this routes input signals to the headphones with near-zero latency, bypassing software monitoring delays.
- Compare direct monitoring with Logic's software monitoring: direct monitoring offers almost no latency, ideal for live tracking, while software monitoring can introduce noticeable delay depending on buffer size. Choose based on your session needs and comfort.
- For live performance setups in Logic Pro, ensure your interface’s hardware monitoring is active to minimize latency. Lower buffer sizes help, but direct monitoring remains the most reliable for real-time monitoring without lag.
Troubleshoot common audio interface setup issues in Logic Pro
If Logic Pro doesn’t recognize your audio interface, first disconnect and reconnect the device, then restart Logic Pro. If the issue persists, check macOS’s Audio MIDI Setup to confirm the interface is detected. Sometimes, installing the latest drivers or firmware from the manufacturer’s website resolves recognition problems.
Audio dropouts, crackling, or latency often stem from an improperly set buffer size. To fix this, open Logic Pro Preferences, navigate to Audio > Devices, and increase the I/O buffer size incrementally (e.g., from 64 to 256 samples) until the audio stabilizes. Updating drivers can also reduce these issues by improving compatibility.
When input or output channels appear missing or routing seems incorrect, double-check Logic Pro’s track input assignments and the I/O buffer settings. Also ensure your interface’s channel routing is properly configured in its dedicated control software if applicable.
Conflicts with other audio software or MIDI devices may cause unpredictable behavior. Close other audio applications and disconnect unnecessary MIDI devices to isolate the problem. If conflicts continue, consider resetting Logic Pro’s preferences by holding down Option + Command while launching Logic Pro, then selecting to reset preferences.
If audio problems remain unresolved, resetting macOS audio settings can help. Restart your Mac, open Audio MIDI Setup, and create a new aggregate device if needed or reselect your interface as the default audio device.
- Disconnect and reconnect your audio interface, then relaunch Logic Pro. You should see your interface listed in Logic Pro’s Audio preferences.
- If audio glitches persist, increase the I/O buffer size in Logic Pro Preferences > Audio > Devices. Stable audio playback indicates success.
- Check input/output routing on audio tracks and your interface’s control panel. Correct channel assignment confirms the fix.
- Close other audio/MIDI applications and disconnect extra devices. Logic Pro should then operate without conflicts.
- Reset Logic Pro preferences by launching with Option + Command held down, then confirm reset. Logic Pro should open with default settings and your interface recognized.
- Restart your Mac, open Audio MIDI Setup, and ensure your interface is selected as the default device. Proper audio routing here resolves remaining issues.
Frequently asked questions
How to set up logic pro?
To set up Logic Pro, first open the app and go to Logic Pro > Preferences > Audio. From there, choose your audio interface under the Devices tab by selecting it as the input and output device. Next, create a new project and add audio tracks configured to receive input from your interface. Finally, adjust buffer size and latency settings for optimal performance under Preferences > Audio > Devices.
How to install logic pro?
Logic Pro is available through the Mac App Store. To install it, open the App Store on your Mac, search for Logic Pro, and click the purchase or download button. Installation will happen automatically, and you can launch the app from your Applications folder once completed. Ensure your macOS version meets the minimum requirements before installation.
How to install logic pro on windows?
Logic Pro is not officially supported or available on Windows. It is designed exclusively for macOS. Windows users interested in similar digital audio workstation software should consider alternatives like Ableton Live, FL Studio, or Pro Tools.
How to use logic pro?
Using Logic Pro involves creating a project, adding tracks, and recording or importing audio and MIDI. You can arrange your recordings, apply effects, and mix using the built-in mixer. Familiarize yourself with key features like the Library for presets, the Inspector for track settings, and the Mixer for adjusting levels and routing.
How to use logic pro on windows?
Logic Pro cannot be used natively on Windows because it is macOS-exclusive software. If you want to run it on a Windows machine, you would need a macOS virtual machine or Hackintosh setup, which is complex and not officially supported. Instead, consider using a DAW designed for Windows.
What This Guide Does Not Cover
This guide focuses specifically on setting up hardware audio interfaces with Logic Pro on macOS. It does not cover installing or using Logic Pro on Windows, as the software is exclusive to macOS; Windows users will need to explore alternative DAWs or virtualization solutions. Additionally, virtual audio routing software setups are outside the scope of this article. If you use highly specialized or vintage audio interfaces, consult your manufacturer's documentation for instructions that may go beyond the general advice provided here.
To move forward confidently, the single most useful next step is to open Logic Pro and verify that your audio interface appears correctly in Logic Pro > Preferences > Audio > Devices. From there, create a new audio track, set its input to your interface’s channel, and test recording a short clip. This hands-on check will confirm your setup is working and ready for your creative projects.
See also: How to Bounce a Track in Logic Pro: Step-by-Step Guide · How to Master a Song in Logic Pro: A Step-by-Step Guide · How to Quantize MIDI in Logic Pro: A Step-by-Step Guide · How to Use Drummer in Logic Pro: A Step-by-Step Guide



