How to Export a Song as MP3 in GarageBand: Step-by-Step Guide
This guide shows you how to export a song as MP3 in GarageBand on iPhone and Mac, plus tips for importing and troubleshooting.
You’ve finished creating a song in GarageBand and want to share it or use it outside the app. To do this, you need to export your project as an MP3 file, which is widely compatible and easy to share. This article explains how to export a song as MP3 in GarageBand on both iPhone and Mac, guiding you through each step clearly and patiently.
You’ll also learn how to import MP3 files back into GarageBand, convert GarageBand projects to MP3, and troubleshoot common issues that might come up during export or import. Whether you’re using GarageBand on your iPhone or Mac, these instructions will help you handle the process efficiently and avoid common pitfalls.
Key takeaways
- You can export MP3s directly from GarageBand on Mac via the Share menu and on iPhone using the Share options.
- Importing MP3s into GarageBand requires using the Files app or drag-and-drop methods depending on your device.
- GarageBand exports uncompressed audio by default, so choosing MP3 requires selecting the right options or converting afterward.
- Common issues include missing export options and incorrect file formats, often fixed by checking project settings or app updates.
Before you start: What you need to export MP3s from GarageBand
To export your GarageBand project as an MP3 file, you first need to ensure you have the right tools and understanding in place. You must have GarageBand installed on your Mac or iPhone/iPad. Familiarity with your project, including its tracks and arrangement, will help you navigate the export process smoothly. GarageBand typically exports audio in WAV or AIFF formats by default, which are uncompressed and larger in file size compared to MP3.
You do not need an active Apple Music or iTunes account to export your project as an MP3. However, if you want to customize MP3 quality or convert other formats, you may consider using third-party MP3 encoder apps or software. Being aware of the differences between GarageBand’s export formats and MP3 will help you choose the best option for your needs.
| Format | File Size (Approx.) | Audio Quality | Use Case |
|---|---|---|---|
| WAV | Large (Uncompressed) | High (Lossless) | Professional editing, archiving |
| AIFF | Large (Uncompressed) | High (Lossless) | Professional editing, archiving |
| MP3 | Smaller (Compressed) | Good to Moderate (Lossy) | Sharing, streaming, saving space |
- Confirm GarageBand is installed and up to date on your device. When successful, you can open your project without errors.
- Review your project tracks to understand what will be included in the export. You should see all intended audio and MIDI tracks arranged properly.
- Know that GarageBand’s default export options produce WAV or AIFF files. If you specifically need MP3, plan to convert these files or use an export method that supports MP3.
- Decide if you need additional tools for MP3 encoding or quality control. If yes, have a compatible third-party app ready before exporting.
- Verify you do not need an Apple Music or iTunes account to export audio files. You should be able to export without signing into these services.
How to export songs from GarageBand iPhone as MP3
GarageBand on iPhone does not export MP3 files directly, so you'll first export your song as M4A or WAV, then convert it to MP3. Start by opening your project and tapping the My Songs button to save your work. Next, tap the Select option, choose your song, and tap the Share icon.
From the sharing options, select Song. Choose your preferred audio quality, typically High Quality, then tap Share. You will see options to save the file via Files or share it through apps like Mail or Messages. Saving to the Files app keeps your exported audio handy for conversion.
To convert the M4A or WAV file to MP3, use the built-in Shortcuts app with a trusted audio conversion shortcut, or download a reputable third-party app designed for audio format conversion. When running the shortcut or app, select your exported file from Files, then choose MP3 as the output format. Pay attention to bitrate settings to preserve audio quality, usually 192 kbps or higher.
After conversion, your MP3 file will be saved back into Files or your chosen location. This two-step approach ensures you maintain control over quality and compatibility when exporting GarageBand projects from iPhone.
How to export audio from GarageBand on Mac as MP3
GarageBand on Mac primarily exports audio in high-quality formats such as AIFF or WAV through its Share menu. While GarageBand itself does not always provide a direct MP3 export option, you can easily convert these files to MP3 using the Music app (formerly iTunes) on your Mac. Exporting as AIFF or WAV ensures you preserve the best sound quality before conversion.
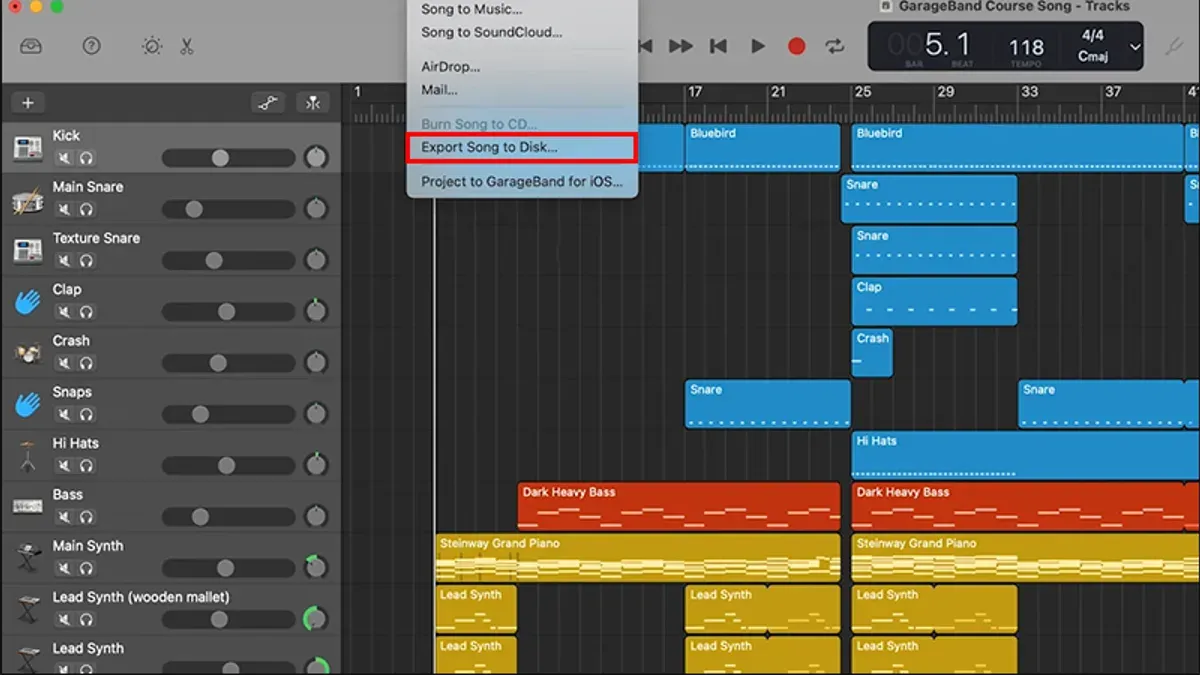
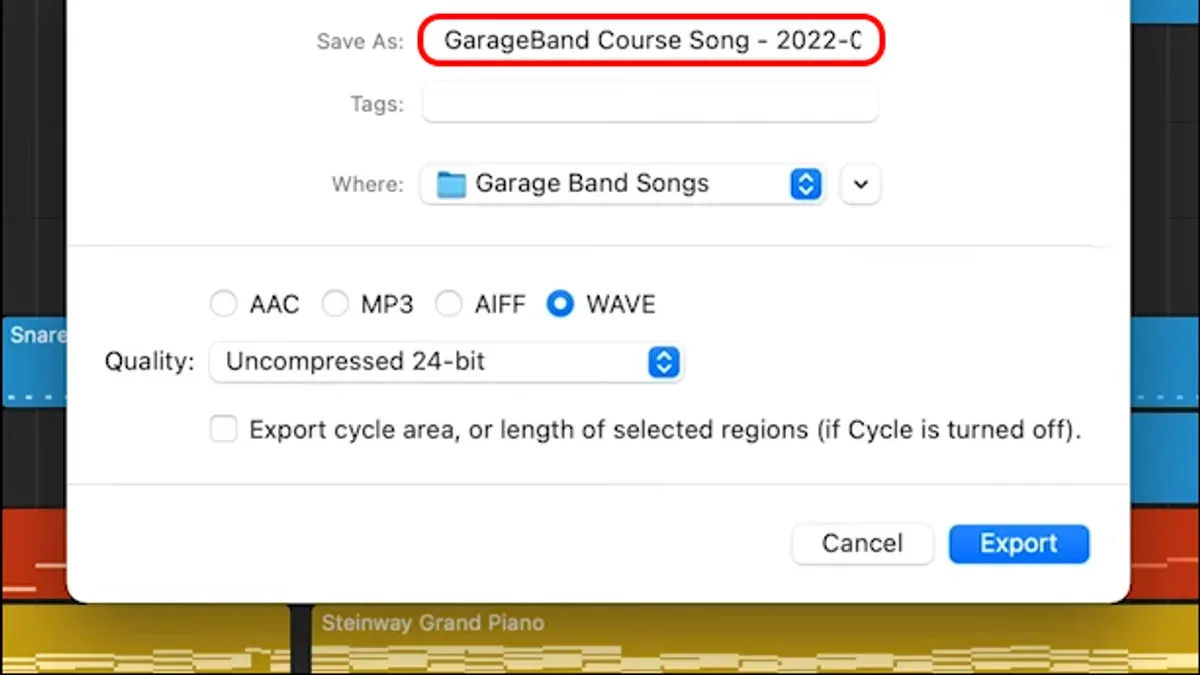
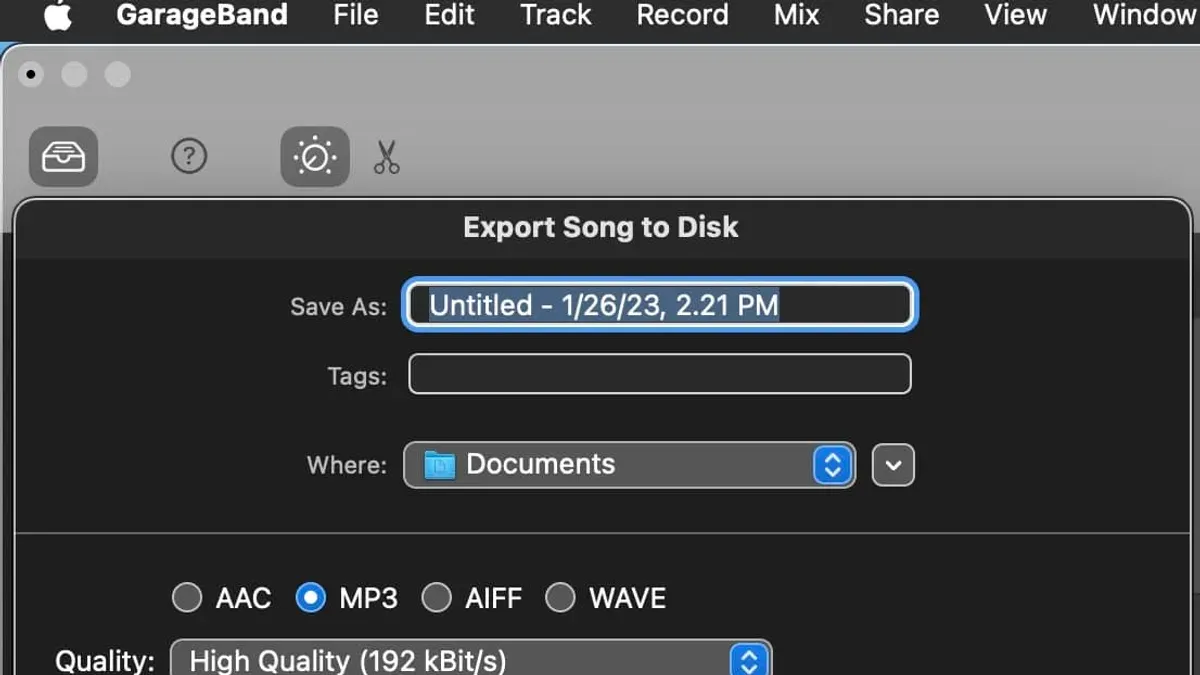
- Open your project in GarageBand and click on Share in the menu bar, then select Export Song to Disk. You will see a dialog box with file format options.
- Choose AIFF or WAV as the file format for export to maintain maximum audio fidelity. Set the audio quality to High Quality (24-bit) or Maximum. Click Export. You should see a large file size reflecting the uncompressed quality—typically tens of megabytes for a few minutes of audio.
- Locate the exported AIFF or WAV file in Finder, then open the Music app. From the Music app menu, go to Music > Preferences > Files > Import Settings and set Import Using to MP3 Encoder. Choose a bitrate such as 192 kbps or 256 kbps for a balance between file size and quality.
- Back in the Music app, import your AIFF or WAV file by dragging it into your library. Right-click the imported file, select Create MP3 Version. The app will generate an MP3 file which will be smaller (often around a tenth of the AIFF size) with slightly reduced audio fidelity.
- Find the MP3 file by right-clicking it in the Music app and selecting Show in Finder. This is your exported MP3 ready for use.
This method ensures you can control both the original export quality from GarageBand and the MP3 encoding settings, giving you flexibility for different use cases like online sharing or storage. AIFF and WAV files are large but lossless, while MP3 files are compressed and more portable.
How to import MP3 to GarageBand
GarageBand supports importing MP3 files directly, allowing you to add existing audio tracks into your project smoothly. On Mac, the drag and drop method is the quickest way to bring an MP3 into your workspace. Simply locate the MP3 file in Finder, then drag it onto the GarageBand timeline or the track area. Once dropped, you should see the waveform appear as a new audio track, ready for editing.
On iPhone, importing MP3 files requires using the Files app. First, save the MP3 to your iCloud Drive or local storage accessible by Files. In GarageBand, tap the Loop Browser icon, then choose the Files tab. Navigate to your MP3 and tap it to import. The track will appear in your project, where you can move or trim it as needed.
After importing, you can adjust the MP3 track’s timing and pitch using GarageBand’s tools. For example, use the Flex Time feature to align the MP3 rhythm with your project’s tempo or the Pitch Shifter effect to change key without affecting speed. This is helpful when integrating a popular MP3 track, such as a cover song, to fit seamlessly within your arrangement.
Common import issues include unsupported formats or corrupted files, which GarageBand will notify you about. If an MP3 fails to import, verify the file isn’t DRM-protected and try converting it to WAV or AIFF as a workaround. Also, ensure your GarageBand version is up to date to avoid compatibility problems.
How to convert GarageBand file to MP3
GarageBand project files (.band) cannot be converted directly to MP3 because they contain editable track and effect data rather than finalized audio. To create an MP3, you must first export a mixdown audio file from GarageBand. This mixdown consolidates your tracks into a single audio file, typically in AIFF or WAV format, which can then be converted to MP3.
On Mac, after exporting your project as AIFF or WAV, use the Music app to convert to MP3 by selecting the file, choosing File > Convert > Create MP3 Version. This method allows control over bitrate settings, balancing quality and file size. On iPhone, since GarageBand exports in M4A or WAV, you can convert these using iOS Shortcuts or trusted third-party apps, though audio quality may vary depending on the app used.
To retain the best audio fidelity, export from GarageBand at the highest sample rate and bit depth available before conversion. Avoid multiple compressions by exporting once and then converting directly to MP3, rather than converting intermediate formats repeatedly.
| Workflow | Export Format | Conversion Tool | Output Quality |
|---|---|---|---|
| Mac | AIFF or WAV | Music app (Create MP3 Version) | High quality with adjustable bitrate |
| iPhone | M4A or WAV | iOS Shortcuts or third-party apps | Good quality, depends on app used |
- Open your GarageBand project and finalize your mix.
- Export your project as an AIFF or WAV file on Mac, or as M4A/WAV on iPhone.
- On Mac, open the exported file in the Music app, then select File > Convert > Create MP3 Version. You should see the MP3 file appear alongside the original.
- On iPhone, open your exported audio file in a shortcut or third-party app designed for audio conversion, choose MP3 as the output, and run the conversion. Successful conversion is confirmed by a new MP3 file saved or accessible within the app.
- Check the MP3 file by playing it back to ensure audio quality meets your expectations.
How to export garageband file on iPhone specifically to MP3
GarageBand on iPhone does not support direct export to MP3 format, so you need to follow a workaround to get your audio in MP3. The usual method involves exporting your project as an M4A file first, then converting that file to MP3 using either the Shortcuts app or a third-party conversion app. This two-step process ensures you maintain good audio quality while producing the MP3 format.
- Export your GarageBand project as an M4A file: In GarageBand, tap the My Songs button, then tap Select and choose your project. Tap the Share icon, select Song, choose Audio Quality (usually high or uncompressed), and export as an M4A file. You will see the option to save to Files or directly to apps.
- Use the Shortcuts app to convert M4A to MP3: Open the Shortcuts app and run a pre-made or downloaded shortcut designed for audio conversion (search for "Convert Audio to MP3"). Select the exported M4A file when prompted. Once conversion is done, you will see a confirmation and be able to save or share the MP3 file. This method preserves metadata like title and artist if the shortcut supports it.
- Alternatively, use reliable third-party apps: Apps such as "The Audio Converter" or "MP3 Converter - Audio Extractor" have user-friendly interfaces and high conversion success rates. Import your M4A file into these apps, convert to MP3, and verify metadata fields before exporting. You will get options to save locally on your device or upload directly to cloud services like iCloud Drive, Dropbox, or Google Drive.
- Save or share your MP3 file: After conversion, use the share or save options to archive your MP3 on your iPhone or upload to your preferred cloud storage. This ensures easy access and backup outside GarageBand.
Following these steps helps you overcome GarageBand iOS limitations and get high-quality MP3 exports ready for sharing or further use.
How to export in GarageBand efficiently
Optimizing your export process in GarageBand saves time and ensures the best audio quality. Before exporting, finalize your mix by balancing volume levels and applying effects carefully to avoid clipping or distortion. This preparation reduces the need for re-exports due to quality issues.
Choose the export format that fits your goal. Exporting as AIFF or WAV results in larger files and longer export times but preserves audio quality, ideal for mastering. For quicker exports with smaller file sizes, compressed formats like M4A are preferable, though they involve some quality loss.
If you need multiple tracks or stems, use GarageBand's track export feature to batch export them. This prevents repetitive exporting and saves time when working on separate parts. You can access this by selecting the track, then using Share > Export Song to Disk while choosing the "Export Track as Audio File" option.
Adjust GarageBand preferences to speed exports. In Preferences > Advanced, enabling "Low Latency Mode" during export can improve performance. Also, closing other applications frees system resources, leading to faster export times.
Always back up your project before exporting by saving a duplicate. This step protects against data loss or accidental changes during the export process.
Troubleshooting common GarageBand export and import problems
When exporting or importing audio in GarageBand, several issues can arise. If your exported file won’t play or seems corrupted, check that you exported to a supported format and that the export process completed without interruption. Sometimes, closing and reopening GarageBand before re-exporting resolves temporary glitches.
If MP3 files won’t import or appear as unsupported, verify the file’s integrity and format. GarageBand supports standard MP3s, but damaged or unusual bitrate files may cause errors. Try re-exporting the MP3 or converting it to WAV or AIFF before importing.
Audio quality loss after conversion often happens when using low-bitrate settings or poor conversion tools. Use GarageBand’s recommended export formats first, then convert with reliable software, adjusting bitrate to 192 kbps or higher for better fidelity.
If the export button is grayed out or unresponsive, ensure your project has at least one active track selected and is not currently recording. Also, make sure you have enough free storage on your device, as insufficient space can disable export options.
File location confusion is common on Mac and iPhone. On Mac, exported files usually save to the Music > GarageBand folder unless you specify otherwise. On iPhone, check the Files app under On My iPhone > GarageBand. Use the share or save options carefully to locate your files.
| Error Message | Cause | Fix |
|---|---|---|
| "Export Failed" | Insufficient storage or interrupted export | Free up space, close other apps, retry export |
| "Unsupported File Format" | Corrupted or incompatible MP3 | Convert to WAV or AIFF before import |
| "Export Button Disabled" | No track selected or recording active | Select track, stop recording |
- Confirm your project is saved and all tracks are finalized; the export button should become active.
- Choose your export format and destination folder carefully; verify the location after export.
- Test the exported file in a media player to ensure it plays correctly.
- If import fails, convert the file to a supported format using the Music app or a trusted converter.
- Restart GarageBand and your device if problems persist, then try again.
Frequently asked questions
How to import song into garageband?
To import a song into GarageBand, open your project and click the Loop Browser icon (looks like a loop or headphones) on the top right. Then drag and drop your audio file directly into the timeline or drag it from Finder into your track area. GarageBand supports MP3, WAV, AIFF, and other common audio formats. Make sure the audio file is accessible on your device, and it will import automatically into your project.
How to export garageband to mp3 iphone?
On iPhone, open your GarageBand project, tap the arrow icon in the top left, then select "My Songs" to save your work. Next, tap and hold your project, choose "Share," then select "Song." In the export settings, choose MP3 as the format, set your desired quality, and tap "Share" to save or send the MP3 file. This exports your song directly as an MP3 from GarageBand on iPhone.
How to save garageband as mp3?
To save your GarageBand project as an MP3 on Mac, go to the Share menu and select "Export Song to Disk." Choose MP3 as the file format, pick your quality (e.g., 192 kbps for a good balance), and select the destination folder. Click Export, and GarageBand will create an MP3 copy of your song without altering the original project file.
How to convert garageband to mp3?
Converting a GarageBand project to MP3 involves exporting the finished project as an audio file. On Mac, use "Share > Export Song to Disk" and select MP3. On iPhone, use the Share option within your project and choose MP3 format. This process renders your tracks into a single MP3 audio file, ready to use outside GarageBand.
how to save garageband as mp3
Saving GarageBand as MP3 requires exporting the project as a song file. On Mac, select "Share" then "Export Song to Disk," and choose MP3 format before saving. On iPhone, tap the Share icon in your project, pick "Song," then select MP3 to export. This ensures your GarageBand work is saved as a standard MP3 file.
Limits of This Guide
This guide focuses on straightforward steps to export and convert your GarageBand projects to MP3 format on Mac and iPhone. It does not cover professional mastering techniques or advanced audio editing beyond these basic export functions. If you require high-end audio production workflows, such as multitrack mixing with precise control, third-party plugins, or mastering suites, you will likely need specialized software designed for those purposes.
Additionally, this article assumes you are working within the standard GarageBand interface and export options. Custom scripting, batch processing, or using external converters for non-supported formats is beyond its scope. For users who want to distribute music commercially or require precise audio quality control, consulting dedicated audio engineering resources is advisable.
The single most useful next step is to practice exporting a short test project as an MP3 using the exact steps outlined here. This helps you familiarize yourself with the menus and settings like “Share” > “Export Song to Disk” on Mac or the “My Songs” export options on iPhone. Confirming that your exported file plays correctly on different devices ensures your workflow is solid before working on larger or more complex projects.
See also: How to Record a Podcast in GarageBand: Step-by-Step Guide · How to Make a Hip Hop Beat in GarageBand: Step-by-Step Guide · How to Record Electric Guitar in GarageBand: A Clear Step-by-Step Guide