How to Share Your Screen on FaceTime on Mac: Step-by-Step Guide
Discover easy steps to share your screen on FaceTime in FaceTime on Mac for better collaboration and presentations.
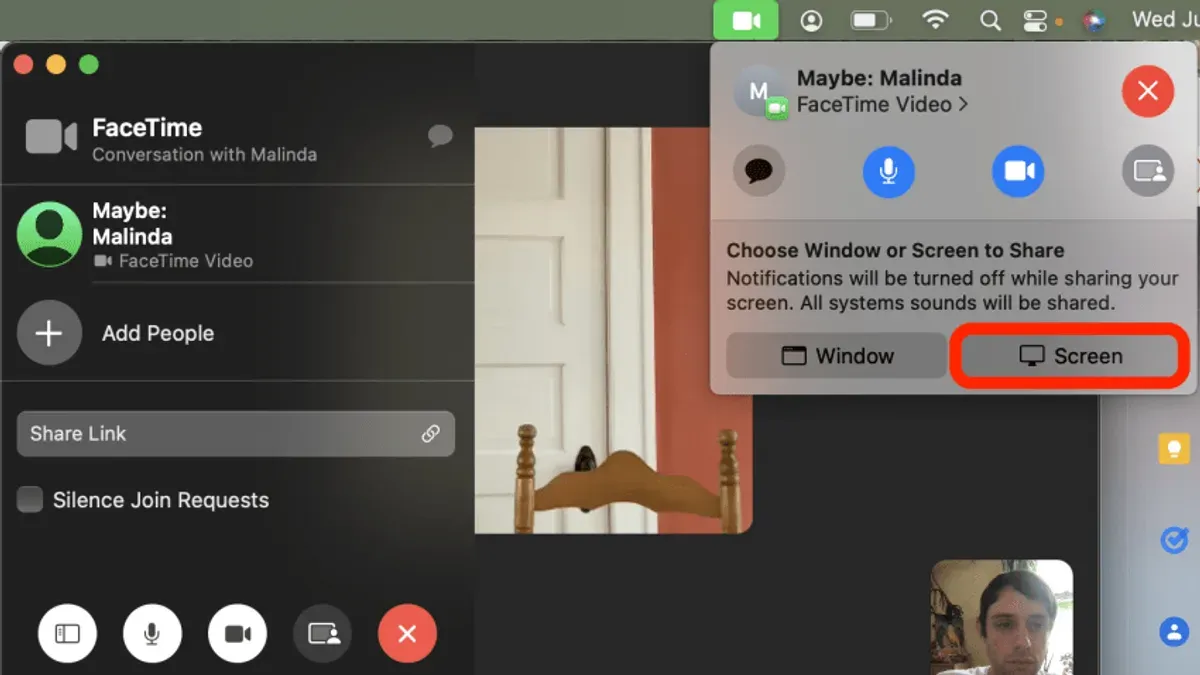
You’re on a FaceTime call with a colleague, trying to explain a complex issue, but words alone aren’t enough. Sharing your screen can make collaboration much easier, yet you’re unsure how to do it smoothly on your Mac.
This guide explains clearly and patiently how to share screen on FaceTime in FaceTime on Mac. Whether you have a MacBook Air, MacBook Pro, or another Mac model, and whatever macOS version you’re running, you’ll find step-by-step instructions tailored to your setup. You’ll also learn how to share an iPad screen during a FaceTime call on your Mac, making your presentations or troubleshooting sessions more effective.
Key takeaways
- Ensure your Mac is running macOS Monterey or later for built-in FaceTime screen sharing features.
- Start a FaceTime call, then click the Share Content button to begin screen sharing.
- Screen sharing steps differ slightly between MacBook Air, MacBook Pro, and other Mac models—follow device-specific instructions.
- You can share your iPad screen via FaceTime on Mac using Continuity features.
- Troubleshoot common issues by checking permissions, network connection, and software updates.
Before you start: Requirements for screen sharing on FaceTime
To share your screen on FaceTime using your Mac, you need to ensure your device and software meet specific requirements. First, your Mac must be running macOS Monterey or a later version, as these versions support FaceTime screen sharing. Apple officially states that macOS Monterey, macOS Ventura, and subsequent releases include this feature.
Additionally, all participants in the FaceTime call need compatible Apple devices, such as Macs with the required macOS versions, iPhones or iPads running iOS 15 or later, or iPadOS 15 or later. This compatibility ensures that screen sharing functions smoothly across devices.
A stable internet connection is crucial. Screen sharing demands consistent bandwidth to avoid lag or dropped connections, so using Wi-Fi or Ethernet with good signal strength improves your experience. Finally, make sure FaceTime is set up and you are signed in with your Apple ID on your Mac. Without an active Apple ID sign-in, FaceTime’s full features, including screen sharing, will not be available.
- Check your macOS version by clicking the Apple menu > About This Mac. You should see macOS Monterey or later listed. If not, update your system via System Preferences > Software Update. When updated, your Mac is ready for FaceTime screen sharing.
- Verify that all call participants use compatible Apple devices with supported software versions. This ensures screen sharing works for everyone involved.
- Confirm you are signed in to FaceTime with your Apple ID by opening the FaceTime app and checking your account status in FaceTime > Preferences. You should see your Apple ID and be logged in.
- Test your internet connection speed and stability, ideally using a wired or strong Wi-Fi connection. When your connection is stable, screen sharing will proceed without interruptions.
Open FaceTime and start a call on your Mac
To begin sharing your screen on FaceTime, you first need to open the FaceTime app and start a call. This is essential because screen sharing can only be activated once your call is live. You can easily access FaceTime from your Dock if you have it pinned there, or by opening your Applications folder.
- Open FaceTime: Click the FaceTime icon in the Dock or open Finder, go to the Applications folder, and double-click FaceTime. The FaceTime window will appear, showing your recent calls and contacts.
- Start a call: At the top of the FaceTime window, locate the search bar labeled "Enter a name, email, or number." Type the contact’s Apple ID, phone number, or name saved in your Contacts app. When the contact appears below, click it to select.
- Choose call type: Click the green video camera icon to start a video call, or the green phone icon to start an audio call. The call window will open, and you’ll see the connecting status.
- Wait for the call to connect: Once the other person answers and the call is active, you’ll see their video or hear their audio. Now you are ready to share your screen.
Having the call active is crucial; screen sharing controls only become available during the live call interface. FaceTime’s clean layout shows your contacts on the left and the call window in the center, making it straightforward to navigate these steps.
How to share screen on FaceTime on MacBook and MacBook Pro
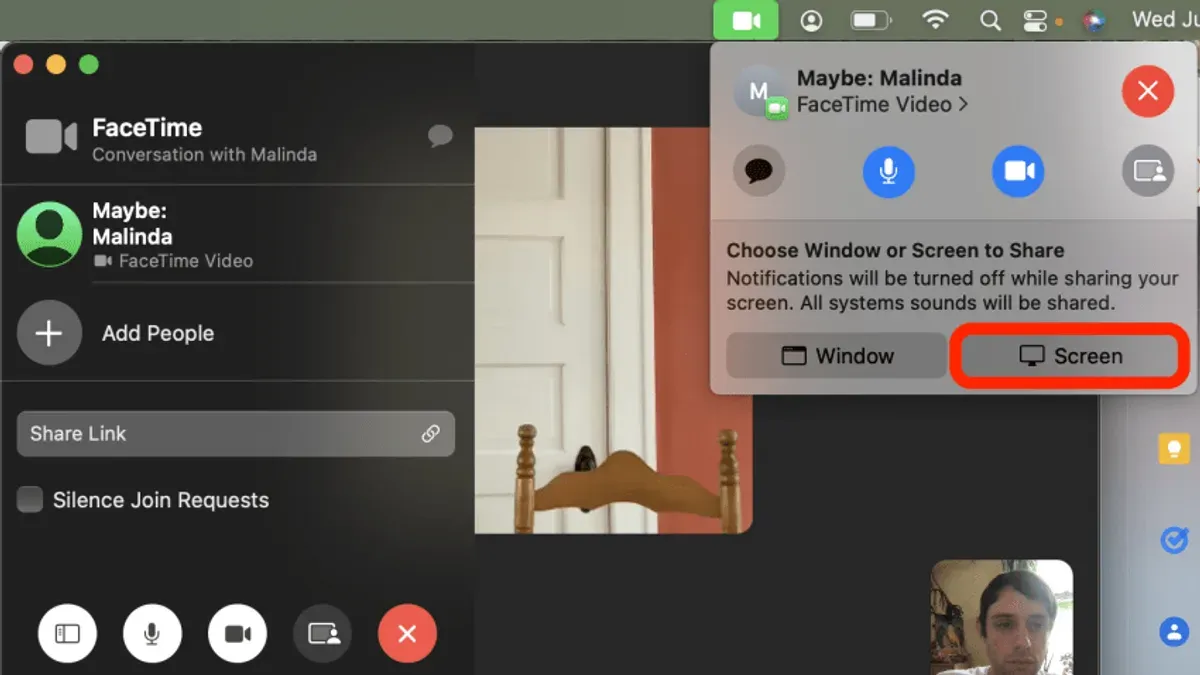
- During your FaceTime call on your MacBook or MacBook Pro, locate the FaceTime window. Look for the Share Screen button, which appears as two overlapping rectangles and is usually found in the controls bar at the top-right corner of the call window.
What you should see: The Share Screen icon clearly visible among the call controls. - Click the Share Screen button. A menu will appear giving you two choices: "Share Entire Screen" or "Share Window."
What you should see: A small pop-up menu displaying these two options. - If you choose "Share Entire Screen," your whole desktop will be visible to other participants. If you prefer to share only a specific app window, select "Share Window," then click the desired application window from the thumbnails presented.
What you should see: Either your full screen highlighted for sharing or a selection of open app windows to choose from. - To stop sharing your screen, click the Stop Sharing button that replaces the Share Screen icon during sharing. This button is often red and located in the same controls area.
What you should see: Your screen sharing ends immediately, and the call returns to normal video or audio mode.
How to share screen on FaceTime on MacBook Air
The process to share your screen on FaceTime using a MacBook Air is essentially the same as on other MacBook models like the MacBook Pro. However, before starting, you should verify that your MacBook Air is running macOS Monterey or later to ensure compatibility with FaceTime screen sharing features. This check is crucial because older macOS versions do not support this functionality.
When sharing your screen on a MacBook Air, keep in mind that performance can vary compared to a MacBook Pro. The MacBook Air is designed with energy efficiency in mind, which can lead to increased battery usage and occasional system responsiveness delays during screen sharing, especially when sharing high-resolution content or running multiple apps simultaneously.
Users have noted that while the MacBook Air handles screen sharing well for basic tasks like presentations or troubleshooting, it may show slight lag if you share graphically intensive applications or multiple windows at once. To maintain smooth performance, consider closing unnecessary apps and connecting to power during longer sessions.
- Start your FaceTime call on your MacBook Air. Once connected, locate and click the Share Screen button in the FaceTime window; a screen sharing menu should appear.
- Select whether you want to share your entire screen or just a specific window. After making your choice, your screen or window will become visible to the call participants.
- To end screen sharing, click the Stop Sharing button that appears on your screen or within the FaceTime call controls. The participants will no longer see your screen once sharing stops.
How to share screen on FaceTime on macOS Big Sur and later versions
Native FaceTime screen sharing was introduced with macOS Monterey, so if you are using macOS Big Sur, this feature is not built into FaceTime by default. This means that Big Sur users cannot directly share their screen via FaceTime as Monterey and later versions allow. However, there are workarounds to achieve screen sharing during FaceTime calls on Big Sur.
To share your screen on macOS Big Sur, you can use third-party apps that support screen sharing alongside FaceTime. Apps like Zoom, Microsoft Teams, or Google Meet allow screen sharing and can be used concurrently while you maintain a FaceTime call for video or audio. This approach requires coordinating with your call participants to switch between apps for screen sharing.
If you prefer a seamless experience, upgrading your Mac’s operating system to macOS Monterey or later will enable native FaceTime screen sharing. Apple’s release notes for macOS Monterey highlight the introduction of SharePlay, which includes integrated screen sharing within FaceTime calls. Upgrading also brings additional FaceTime improvements and security updates.
- Check your Mac’s current macOS version by clicking the Apple menu and selecting About This Mac. You should see “macOS Big Sur” or “macOS Monterey” and later here.
- If you are on Big Sur and want native FaceTime screen sharing, open System Preferences, click Software Update, and follow on-screen instructions to upgrade to the latest compatible macOS version. Once updated, open FaceTime to access screen sharing features.
- For Big Sur users not upgrading, install a third-party screen sharing app like Zoom from its official website. Launch Zoom, start a meeting, and share your screen there while continuing your FaceTime call separately.
- Coordinate with your call participants to join the third-party app meeting for screen sharing, then return to FaceTime for conversation. This ensures you can still collaborate visually while using FaceTime for communication.
How to share iPad screen on FaceTime on Mac
You can share your iPad screen with participants on a FaceTime call on your Mac using SharePlay, which allows you to share app content and presentations seamlessly. Both your iPad and Mac need to be signed in with the same Apple ID or be part of the same FaceTime call for this to work smoothly. Additionally, ensure that SharePlay is enabled in Settings on your iPad under FaceTime and that your Mac is running macOS Monterey or later.
- Start a FaceTime call on your Mac with the participant(s) who will view your iPad screen. You should see the call interface on your Mac.
- On your iPad, open the app or presentation you want to share, such as Keynote or Safari. The app should support SharePlay for screen sharing.
- Swipe down from the top-right corner of your iPad to open Control Center, then tap the Screen Mirroring or SharePlay icon and select your Mac from the list of available devices. You should see a message indicating the iPad screen is being shared.
- Back on your Mac, participants will see your iPad screen appear within the FaceTime call window, allowing everyone to view the shared content in real time.
- To stop sharing, return to Control Center on your iPad and tap the Screen Mirroring or SharePlay icon again to disconnect. Your Mac participants will see the shared screen end promptly.
Keep in mind that audio from your iPad app will also transmit through FaceTime, which is helpful for presentations with sound. However, some apps may restrict SharePlay usage or have limited performance depending on network quality. Close unnecessary apps on both devices to improve responsiveness during sharing.
How to share screen during FaceTime on Mac: Tips for smooth sharing
To ensure your screen sharing session on FaceTime runs smoothly, start by closing any unnecessary apps. This frees up system resources and improves performance, reducing lag and glitches during the call. You should also aim to use a wired Ethernet connection or a strong Wi-Fi signal to maintain a stable and fast internet connection, which is crucial for uninterrupted screen sharing.
Adjusting your display resolution can further enhance the experience. Lowering the resolution temporarily can reduce the load on your Mac and increase responsiveness. Next, disable notifications by turning on Do Not Disturb mode in the Control Center to avoid distractions and prevent pop-ups from appearing on the shared screen.
If you need to share audio along with your screen, verify that the Share Audio option is enabled in the FaceTime screen sharing controls. This lets participants hear sounds from your Mac, such as videos or apps. Managing audio carefully avoids feedback or echo, which can disrupt communication.
- Close unnecessary apps by right-clicking their icons in the Dock and selecting "Quit". You should see improved system responsiveness when fewer apps consume resources.
- Connect your Mac to the internet via Ethernet or ensure your Wi-Fi shows a strong signal (at least three bars). This stabilizes the connection, reducing lag or dropped frames.
- Lower your display resolution by going to System Settings > Displays > Display Settings, then choosing a resolution lower than your default. The screen should refresh more smoothly during sharing.
- Turn on Do Not Disturb by clicking the Control Center icon in the menu bar, selecting "Focus," then "Do Not Disturb." Notifications will be temporarily silenced and hidden from the shared screen.
- When sharing your screen, click the Share Audio checkbox in the FaceTime toolbar to include your Mac’s sound. Confirm participants can hear audio clearly without feedback.
Troubleshoot common screen sharing issues on FaceTime for Mac
If you don’t see the Share Screen button during a FaceTime call, first confirm your Mac is running macOS Monterey or later, as earlier versions do not support native screen sharing. Also, check that all participants use compatible Apple devices. If your connection drops or sharing stops unexpectedly, a weak or unstable internet connection is often the cause.
Screen sharing requires specific permissions in System Preferences. To verify, open System Preferences, go to Security & Privacy, then select Privacy. Click on Screen Recording, and ensure FaceTime is checked. If FaceTime is missing or unchecked, you must add or enable it to allow screen sharing. After changes, you might see a prompt stating "FaceTime wants to record the contents of your screen." Accepting this prompt is necessary for screen sharing to work.
When screen sharing fails or participants cannot see your screen, restarting FaceTime often resolves temporary glitches. If that does not help, reboot your Mac to clear system caches and refresh services. Participants should also ensure their FaceTime app and macOS are updated to avoid compatibility issues.
- Open System Preferences > Security & Privacy > Privacy > Screen Recording. Look for FaceTime and check the box next to it. Successful setting will show FaceTime enabled here.
- If FaceTime is not listed, quit FaceTime, reopen it, and check again. You should see a permission request prompt; grant access.
- Restart FaceTime by quitting the app completely and reopening it. Confirm if the Share Screen button appears during a new call.
- If the problem persists, restart your Mac. After rebooting, open FaceTime and test screen sharing again.
- Ensure all participants update their FaceTime apps and macOS to the latest version available to prevent compatibility problems.
Common error messages include "Screen recording permission denied" and "Cannot share screen due to incompatible device." These typically point to permission or version issues. User forums frequently highlight permission settings and outdated macOS versions as the top causes of screen sharing problems.
Frequently asked questions
How to share your screen on facetime on mac?
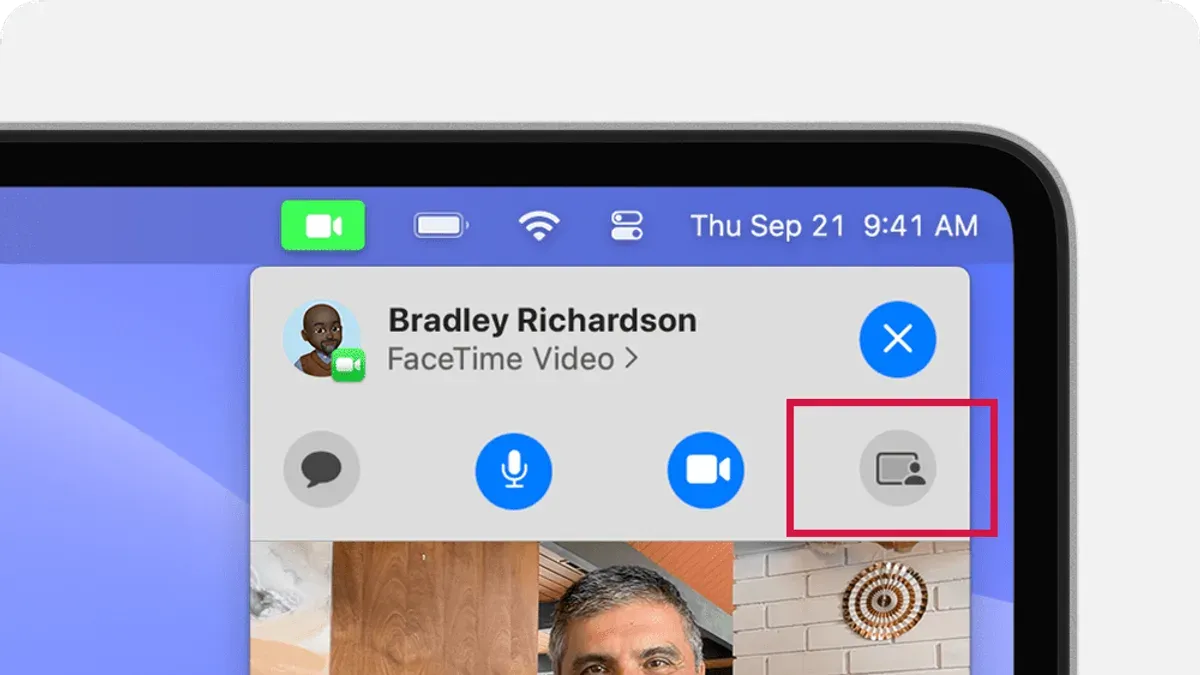
To share your screen on FaceTime on Mac, start a FaceTime call, then click the Screen Share button, which looks like a rectangle with a person icon. Choose whether to share your entire screen or a specific window. The other person will receive a prompt to view your screen.
How to share screen while on facetime on mac?
While on a FaceTime call, move your cursor to the FaceTime window controls and click the Screen Share icon. Select either "Share My Screen" or "Share Window". Confirm the selection and your screen will be shared during the call.
How to share screen on FaceTime on MacBook?
On a MacBook, open FaceTime and start a call. Click the Screen Share button in the call controls, then pick to share either your full screen or an app window. Make sure your MacBook is running macOS Monterey or later for the full screen sharing features.
How to share screen on FaceTime on MacBook Air?
Sharing your screen on a MacBook Air is similar to other Mac models. During a FaceTime call, click the Screen Share icon and choose the screen or window you want to share. Ensure your MacBook Air is updated to macOS Monterey or newer to access this functionality.
How to share screen on FaceTime macOS?
On macOS Big Sur and later versions, you can share your screen by clicking the Screen Share button during a FaceTime call. Select whether to share your entire screen or a specific window. If you use an earlier macOS version, screen sharing might not be supported or could require different steps.
What This Guide Does Not Cover
This article does not cover screen sharing on FaceTime for iPhone or iPad in detail; it focuses primarily on the Mac experience and related iPad sharing only. Some older Mac models or macOS versions may not support native FaceTime screen sharing, so you might need to upgrade your system or consider alternative screen sharing apps if your device is not compatible. Also, keep in mind that screen sharing quality depends heavily on your internet connection speed and device performance, which can vary widely and affect your experience.
The most useful next step is to check your Mac’s macOS version under System Settings > About to ensure it supports FaceTime screen sharing features. If your Mac is up to date, open FaceTime, start a call, and try sharing your screen following the steps outlined earlier. This practical trial will help you understand the process and identify any specific adjustments you might need for your setup.
See also: How to Use Reactions in FaceTime on Mac: A Step-by-Step Guide · How to Export Chat History in Messages on Mac: Step-by-Step Guide · How to Send SMS from Mac Using Messages: Step-by-Step Guide