How to Create Your First Shortcut in the Shortcuts App: A Step-by-Step Guide
This guide walks you through creating your first shortcut in the Shortcuts app with easy steps to automate simple tasks on your device.
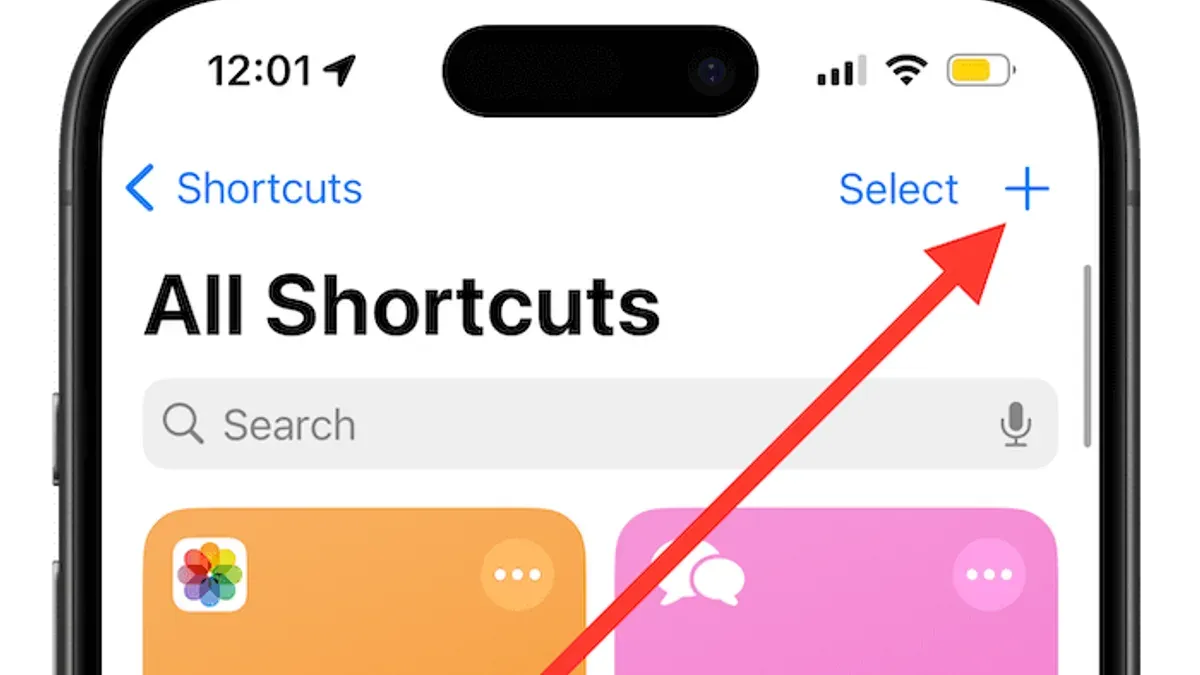
You’ve just opened the Shortcuts app for the first time, and the array of options and buttons feels overwhelming. You want to create a simple, practical shortcut but aren’t sure where to begin.
This guide will walk you through how to create your first shortcut in Shortcuts app with clear, patient steps. You’ll learn how to start with a basic action, customize it to your needs, test it, and save it for easy access later. By the end, you’ll feel confident enough to explore more complex shortcuts on your own.
Key takeaways
- Start by opening the Shortcuts app and tapping the plus (+) icon to create a new shortcut.
- Add a simple action like sending a message or opening an app to get comfortable.
- Customize action details by tapping on parameters like contacts or text fields.
- Test your shortcut immediately using the play button to ensure it works as expected.
- Save and name your shortcut clearly for easy access from the app or widgets.
Before You Start: What You Need to Get Ready
Before creating your first shortcut, make sure your device supports the Shortcuts app. It is available on iPhones and iPads running iOS 13 or later and iPadOS 13 or later. The app usually comes pre-installed, but if you don't see it, you can download it for free from the App Store.
You should have basic familiarity with your device’s settings and apps, such as knowing how to open apps, adjust settings, and navigate menus. This foundational knowledge will make building shortcuts more intuitive.
At a simple level, a shortcut automates a task you perform regularly, such as sending a message to a friend or opening a favorite app. Having a clear idea of a simple task you want to automate will help guide your first shortcut creation and keep it manageable.
- Check if your device is compatible by going to Settings > General > About and verifying your iOS or iPadOS version is 13 or newer.
Result: You see your software version number. - Locate the Shortcuts app on your Home screen or in the App Library.
Result: The Shortcuts app icon is visible and ready to open. - Think of a simple, repeatable task to automate, like sending a “Good morning” text to a contact or opening the Weather app.
Result: You have a clear task in mind to create your first shortcut.
Open the Shortcuts App and Create a New Shortcut
To begin creating your first shortcut, start by launching the Shortcuts app on your device. When you open the app, you will notice two main tabs at the bottom: Gallery and My Shortcuts. The Gallery tab features pre-made shortcuts you can browse and add, while My Shortcuts is where your custom shortcuts live.
To create a new shortcut from scratch, tap the My Shortcuts tab. Then, locate and tap the + button, usually found in the top-right corner of the screen. This action opens a blank shortcut workspace where you will build your shortcut step by step.
The blank workspace shows a large area labeled “Add Action”. This is your starting point for adding tasks or commands to your shortcut. You will also see a toolbar at the bottom with categories to help you find actions. This clean interface is designed to focus your attention on creating your shortcut without distraction.
- Open the Shortcuts app on your device; you will see the Gallery and My Shortcuts tabs at the bottom.
- Tap the My Shortcuts tab to view your existing shortcuts or create new ones.
- Tap the + button in the top-right corner; a blank shortcut workspace opens.
- Notice the “Add Action” prompt and toolbar at the bottom – this is where you will start building your shortcut.
Following these steps will get you ready to add your first action and begin customizing your shortcut.
Add Your First Action to the Shortcut
In the Shortcuts app, an action is a single task or command that your shortcut will perform. Think of it as a building block for your shortcut. To start, you will add one action that does something simple and useful, such as sending a message.
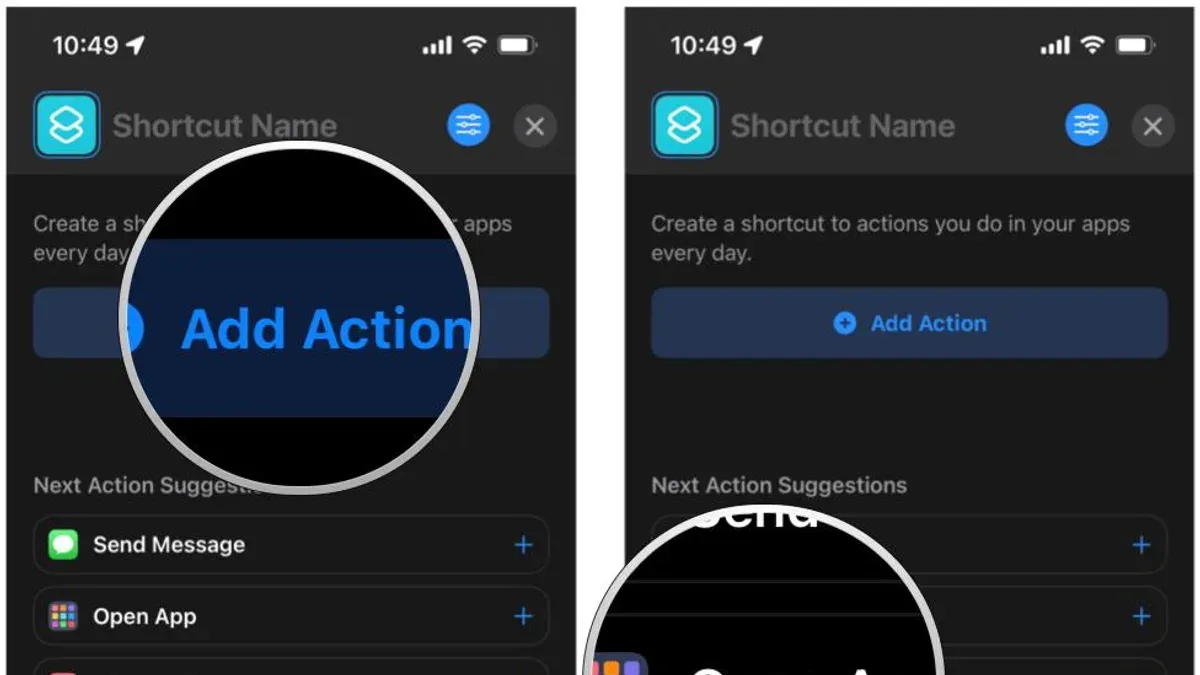
- Tap the Search Bar at the bottom of the screen. You will see categories like Apps, Favorites, and Scripting, which help you browse different types of actions.
- Type Send Message into the search bar. This will filter actions to show the one named "Send Message" under the Messages app.
- Tap the Send Message action. The action card will appear in your shortcut workspace. This card is where you customize what the action does.
- On the action card, fill in the Recipient field by tapping and selecting a contact or typing a phone number. Then, tap the Message field and enter some text, for example, "Hello from my first shortcut!"
- Once added, you will see the action card neatly stacked in your shortcut’s workspace, showing the message details. This confirms the action is part of your shortcut.
You’ve just added your first action. This is the core of building shortcuts—selecting and customizing these actions to create automated tasks.
Customize Action Details and Parameters
Once you add an action to your shortcut, you need to tailor it to perform exactly what you want. Most actions have fields where you can type text, choose options from a menu, or provide other specific inputs. For example, if your action sends a message, you'll enter the recipient’s phone number or select a contact, and write the message content in the text box labeled "Message." When you fill these fields, you shape the behavior of the action.
To make your shortcut dynamic, you can use variables that change depending on input or context. Tap the variable icon or "Magic Variable" button to insert data like the current date, clipboard content, or previous action results. This lets your shortcut adapt rather than repeat the same fixed text or values every time.
- Tap into the text input or option fields in your action. You should see a keyboard or a dropdown menu appear.
- Enter or select the desired value, such as a phone number or a time delay. The field updates with your input.
- To add a variable, tap the variable button (usually labeled "Variable" or a magic wand icon), then choose from the list of available variables. The variable name appears in the field, showing it’s set.
- Look for a preview area or a small play icon on the action block to see how it will behave with your inputs.
- If the preview shows unexpected results, double-check your entries and variables for typos or mismatches before running the shortcut.
A common mistake is leaving required fields blank or entering incompatible values, which can cause the shortcut to fail. Make sure all highlighted fields are completed and that variables are appropriate for the action’s purpose. Previewing helps catch these issues early.
For example, in a "Send Message" action, entering the recipient’s contact and a clear message text in the fields ensures the shortcut sends exactly what you intend. Inserting a variable like "Current Date" into the message text can personalize it automatically. This step of customizing details transforms your basic action into a useful tool tailored to your needs.
Test and Run Your Shortcut
Once you've added and customized your actions, it's time to test your shortcut to see it in action. Running your shortcut within the app helps confirm it works as expected before saving it for regular use. You can run the shortcut by tapping the Play button (a triangle icon) at the top right of the shortcut editor.
- Tap the Play button to start your shortcut. When it runs successfully, you should see the output or result immediately. For example, if your shortcut sends a message, you’ll see the message compose screen appear with your text filled in.
- If the shortcut completes without errors, the app shows a checkmark and the last action's result. This confirms your shortcut ran smoothly.
- If there is an error, a message will pop up describing the issue, such as “Action failed because input was missing”. This means an expected input wasn’t provided, so review your actions and inputs carefully.
- Use this feedback to adjust your shortcut. Modify actions or parameters, then run the shortcut again to verify fixes. Repeat this process until it works reliably.
- Testing in small steps helps you catch problems early and understand how each part contributes to the final result.
By running your shortcut multiple times and interpreting both successful outputs and error messages, you develop confidence and improve your shortcut’s reliability before saving it for everyday use.
Save, Name, and Access Your Shortcut
After building your shortcut, it’s essential to save it properly to avoid losing your work. Tap Done in the upper right corner of the shortcut editor; this action saves your shortcut automatically and takes you back to the main Shortcuts library. To make it easy to find later, give your shortcut a clear, descriptive name that reflects its function, such as Send ETA or Morning Reminder. You can rename your shortcut anytime by tapping the three dots on its icon, then tapping the name field at the top.
Once saved, you can run your shortcut from several convenient places. Access it directly in the Shortcuts app under My Shortcuts, add it as a widget to your Today View for quick access, or ask Siri to run it by saying its name out loud. For better organization when you have many shortcuts, consider grouping related shortcuts into folders by tapping Select, choosing shortcuts, then Move to a folder.
- Tap Done in the shortcut editor; you should see the shortcut appear in your library.
- To rename, tap the three dots on the shortcut’s icon, then tap the name field; enter a meaningful name and tap Done.
- Find your shortcut in the My Shortcuts tab; tap it to run and confirm it works.
- Add your shortcut to a widget by tapping Settings (gear icon) within the shortcut editor, then Add to Home Screen or configure widgets from your device’s Today View.
- To organize, tap Select in the library, choose shortcuts, then tap Move and select or create a folder.
Troubleshoot Common Issues When Creating Your First Shortcut
When your shortcut doesn’t run or crashes, start by checking for error messages. Common errors include "Permission Denied" or "Action Not Supported." These usually mean the shortcut lacks necessary permissions or the action is incompatible with your device or app version.
If you see a permissions error, go to Settings > Shortcuts and ensure the app has access to required apps or data like Contacts, Location, or Photos. For app access errors, verify that the app you’re trying to control is installed and updated.
Sometimes actions won’t work because they rely on features your device or operating system doesn’t support. If an action fails repeatedly, consider replacing it with a simpler or more compatible one.
If your shortcut remains unresponsive or confusing, it can help to reset by creating a new shortcut from scratch. This lets you focus on one action at a time and avoid hidden mistakes.
Here’s a simple troubleshooting process:
- Run your shortcut and note any error message shown. If none, proceed to step 2.
- Check Settings > Shortcuts for permissions related to the apps and data your shortcut uses. Enable any disabled permissions.
- Update the apps involved in your shortcut via the App Store to ensure compatibility.
- Replace any actions that consistently fail with simpler alternatives.
- If issues persist, create a new shortcut with just one action to isolate the problem.
- Test the new shortcut; if it runs successfully, gradually add more actions to identify where errors occur.
By methodically addressing permissions, compatibility, and complexity, you can resolve most beginner issues and build confidence with your shortcuts.
Frequently asked questions
Can I create shortcuts without any programming knowledge?
Yes, you can create shortcuts without any programming experience. The Shortcuts app uses a visual interface where you select and arrange actions rather than writing code. Each action represents a specific task, and you connect them step-by-step, which makes it accessible for beginners.
What are some simple shortcut ideas for beginners?
Good starting shortcuts include turning on Low Power Mode, sending a quick message to a favorite contact, or opening your favorite playlist. These actions are straightforward and help you get familiar with adding and customizing steps. As you become more comfortable, you can combine multiple actions to create shortcuts that save more time.
How can I share my shortcut with others?
You can share your shortcut by opening it, tapping the three dots to edit, then tapping the share icon. From there, choose "Share Shortcut" to send it via Messages, Mail, or other apps. The recipient needs the Shortcuts app to add and use the shared shortcut.
What should I do if my shortcut doesn’t work as expected?
If a shortcut isn’t working, first check the actions to ensure all required permissions are granted, like access to Contacts or Location. Review each step to verify parameters are set correctly and test the shortcut step-by-step. If problems persist, try deleting and rebuilding the problematic action or consult online forums for similar issues.
What This Guide Does Not Cover
This guide covers only basic shortcut creation and does not delve into advanced scripting, automation triggers, or integration with third-party services that require additional setup. If you want to create shortcuts that automatically run based on events like time of day, location, or connecting to Wi-Fi, you'll need to explore the Automation tab and more complex actions. Also, shortcuts involving APIs, web requests, or combining multiple apps with custom inputs require a deeper understanding of scripting and possibly external accounts.
If your goal is to build those more sophisticated shortcuts, consider looking for tutorials focused on automation, JavaScript for Shortcuts, or third-party app integrations once you feel comfortable with the basics covered here.
Now that you have created and tested your first shortcut, the single most useful next step is to explore the Gallery tab inside the Shortcuts app. The Gallery offers pre-made shortcuts crafted by Apple and the community, which you can add and modify. Reviewing these examples helps you understand how different actions work together and inspires you to customize shortcuts that fit your daily routine. Take your time experimenting with these, and gradually your confidence will grow to create more complex shortcuts tailored to your needs.
See also: How to Fix Library Not Opening in Photos App: Step-by-Step Guide · How to Trim a Video in Photos App: Step-by-Step Guide · How to Create a Slideshow with Music in the Photos App