
How to Add Text Titles in iMovie: A Step-by-Step Guide
Discover step-by-step how to add and customize text titles in iMovie to make your videos look polished and professional.
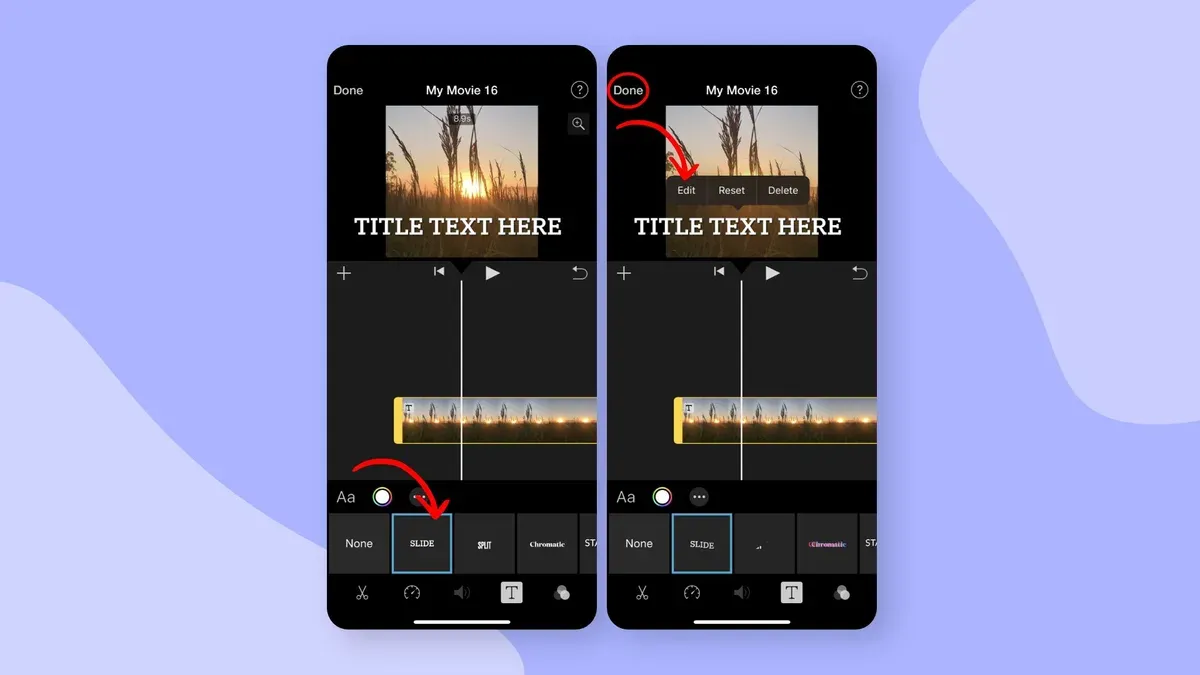
Imagine you're piecing together your latest video project, and you want to add clear, attractive text to highlight key points or introduce scenes. You open iMovie and realize you’re unsure how to start adding text titles that look polished and professional.
This article will guide you through how to add text titles in iMovie, covering everything from inserting titles to customizing their appearance and position. You'll learn step-by-step methods for adding text overlays, syncing subtitles, and adjusting text animations so your videos communicate exactly what you want. By following along patiently, you'll gain practical skills that go beyond the basics, helping you use iMovie's text features with subtle creative control.
Key takeaways
- Access titles by clicking the "Titles" tab above the browser to insert preset text styles.
- Drag and drop titles onto your timeline to position them before or over clips.
- Use the preview window's text box to edit content, font, size, and alignment.
- Adjust text duration by dragging the edges of the title clip in the timeline.
- Position text precisely by dragging it within the preview window or using animation options.
Before you start: What you need to add text in iMovie
To add text titles or captions smoothly in iMovie, you need to prepare a few essentials first. Make sure you have iMovie installed on your Mac or iOS device, using at least version 10.1.8 on Mac or iMovie 3.0 on iOS, as these versions support the latest text features. iMovie is compatible with macOS Mojave and later, and iOS 13 and later, so check your device's system version to avoid compatibility issues.
Your video project should be ready to edit, meaning you have imported your media clips into iMovie’s library and arranged them on the timeline. This setup lets you immediately add and adjust text without interruptions. Familiarity with iMovie’s basic interface elements is essential: you should recognize the timeline where clips are arranged, the preview window where you see your edits in real time, and the media library where your imported videos and images reside.
Understanding the difference between titles, subtitles, and overlays in iMovie helps you choose the right text type for your project. Titles are preset text templates that appear at the beginning or over a clip, often used for opening or section headers. Subtitles are text elements synced to dialogue or narration, usually positioned at the bottom of the screen. Overlays are customizable text that can be placed anywhere on your clip for labels or captions. Knowing these distinctions lets you decide how to enhance your video storytelling or accessibility effectively.
- Check your device’s operating system version by clicking the Apple menu and selecting “About This Mac” or “Settings > General > About” on iOS. Confirm it meets or exceeds the minimum requirements.
You should see your system version displayed, ensuring compatibility. - Open the App Store and verify that iMovie is installed and updated to the latest compatible version.
The app should show “Open” if installed, or an “Update” button if an update is available. - Launch iMovie and open your existing project or create a new one by clicking “Create New” and selecting “Movie.”
The timeline and media library should be visible, ready for editing. - Familiarize yourself with the interface by locating the timeline at the bottom, the preview window at the top right, and the media library on the left side.
You should be able to select clips and see them in the timeline and preview window.
How to add title to iMovie: inserting text titles step-by-step
Adding a title to your video in iMovie is straightforward once you locate the Titles browser. This section guides you through placing a standard title text onto your project timeline, customizing it, and adjusting its duration to fit your video’s pacing.
- Open your project: Launch iMovie and select the project where you want to add a title. The timeline will appear at the bottom of the screen showing your video clips.
- Locate the Titles browser: Click the Titles button above the browser panel on the left side. This opens a variety of title styles, from simple text to animated options.
- Drag and drop a title style: Choose a title style that fits your video’s tone. Click and drag it down onto the timeline, placing it either above a clip or between clips where you want the title to appear. When placed on its own track, the title will overlay the video below.
- Type your custom text: Select the title clip in the timeline, then look at the preview window. Click the default text box to type your custom title. You’ll see your changes update immediately in the preview.
- Adjust the duration: To control how long the title appears, drag the edges of the title clip in the timeline. For example, a short clip might use a 3-second title, while a longer introduction could last 6 seconds or more.
By following these steps, you ensure your title text appears exactly where and how you want it, enhancing your video’s message and flow.
How to add text in iMovie: adding text overlays on video clips
Adding text overlays directly on your video clips in iMovie lets you integrate captions or labels without inserting separate title clips. This approach keeps the text visually connected to the footage, making the effect more seamless. Unlike title clips that appear as standalone segments in the timeline, text overlays sit on top of your video clip, allowing you to maintain continuous flow.
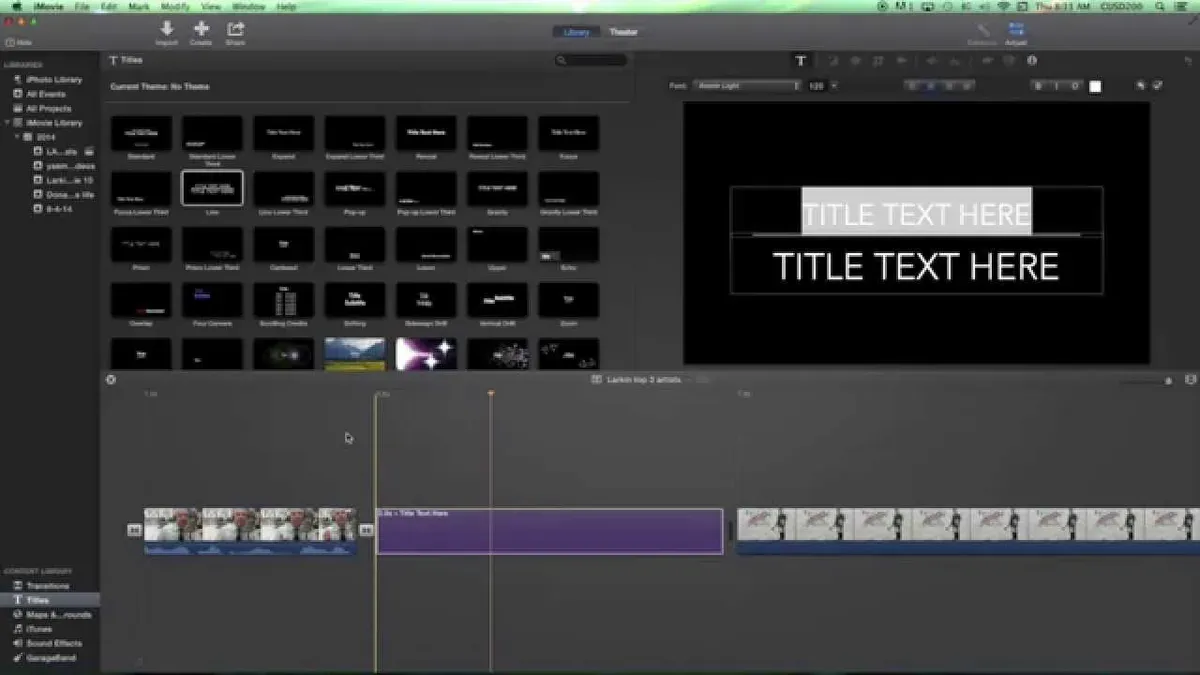
- Select the video clip in your timeline where you want the text overlay to appear. When selected, the clip should be highlighted, indicating it is ready for editing.
- Click the Titles button above the browser. Look for overlay styles such as Lower Third, Standard Lower Third, or Reveal that are designed to appear directly on video clips. Avoid styles labeled as full-screen title clips.
- Drag your chosen overlay style onto the clip in the timeline. The overlay will snap to the clip, appearing as a text layer above it. This confirms it is an overlay, not a separate clip.
- With the overlay selected, open the text editing box in the preview window. Here, you can customize the font, size, color, and alignment. For example, you might choose a clean sans-serif font like Helvetica, set the color to white for visibility, and align the text left or center based on your video’s composition.
- Preview the video by playing the timeline. Watch how the text appears over the clip. Adjust the overlay’s duration by dragging its edges in the timeline if you want the text to display longer or shorter.
Using text overlays is particularly useful when you want captions or labels to complement the visuals without interrupting the video flow. Compared to title clips, overlays provide more subtlety and flexibility in positioning and timing.
How to add subtitles in iMovie: creating and syncing captions
Subtitles or captions make your videos more accessible and can help viewers who speak different languages. In iMovie, you add subtitles by using the Titles browser to insert text boxes that you time to match speech or important scene changes. This approach lets you control when each subtitle appears and disappears, ensuring clear communication.
- Open the Titles browser and drag a basic title style onto the timeline above the clip where you want the subtitle to appear. You should see a text box overlay on the video preview.
- Click the text box in the preview window and type your subtitle text. Position the subtitle near the lower center of the screen, which is the standard placement for subtitles and keeps them out of the main visual focus.
- If your clip is 5 seconds long and you want the subtitle to appear precisely during that time, drag the edges of the title clip in the timeline to match the 5-second duration. The title duration bar should align exactly with the clip segment you want captioned.
- To add multiple subtitles for different parts of the video, split the clip at speech or scene changes using the timeline playhead and Command+B (or Edit > Split Clip). Then add separate title clips for each segment and adjust their timing individually.
- Maintain consistent font size and style across all subtitles by selecting the same title style in the Titles browser and using the font controls in the preview window. This consistency improves readability and gives a polished look.
For example, if you have a 5-second clip where someone says "Welcome to our channel," add a title clip of the same length, type the phrase, and position it at the bottom center. This ensures the subtitle appears exactly when the speech happens. Compared to placing subtitles higher or off-center, the lower middle placement is easiest for viewers to read without distracting from the video content.
How to move text in iMovie: positioning and animating text elements
To reposition a text box in iMovie, first select the text in the preview window by clicking on it. Once selected, you can drag the text box freely across the screen to your desired location. For example, you might move a text title from the center to the top left, then to the bottom right, and finally to the top right corner to see how placement affects your video’s composition. This direct manipulation gives you control over text positioning but is limited to the preview area.
iMovie offers built-in title styles that include preset animations such as fade-ins, slide-ins, and typewriter effects. These animations automatically apply when you add certain titles from the Titles browser. You can preview these effects by selecting the title clip in the timeline and playing the preview window. Adjusting the duration of the title clip changes the animation speed, allowing smoother or quicker transitions.
Keep in mind that iMovie does not allow keyframe editing for text movement, so you cannot animate a text box moving across the screen manually. A common workaround is to split the title clip into multiple segments and reposition the text differently in each segment to simulate motion. Experimenting with these segments and animation presets can achieve subtle dynamic effects within iMovie’s limitations.
- Click the text box in the preview window to select it. The text box border should appear, indicating selection.
- Drag the text box to one corner of the screen; release the mouse and confirm the new position visually in the preview.
- Repeat the drag action to move the text box to two other screen corners, noting how the position changes the viewer’s focus.
- Open the Titles browser, select a title style with animation (e.g., "Fade" or "Slide") and add it to your timeline.
- Play the timeline preview to observe the preset animation effect on the text.
- Adjust the title clip’s duration in the timeline to speed up or slow down the animation.
- For simulated text movement, split the title clip into segments, reposition the text in each segment, and preview the sequence to check the effect.
How to edit in iMovie: modifying existing text titles and overlays
Editing text after you have added it in iMovie is straightforward and gives you flexibility to improve your video’s look without starting over. To begin, click on the title clip or text overlay in your timeline. This action reactivates the text editing box in the preview window, allowing you to change the content directly.
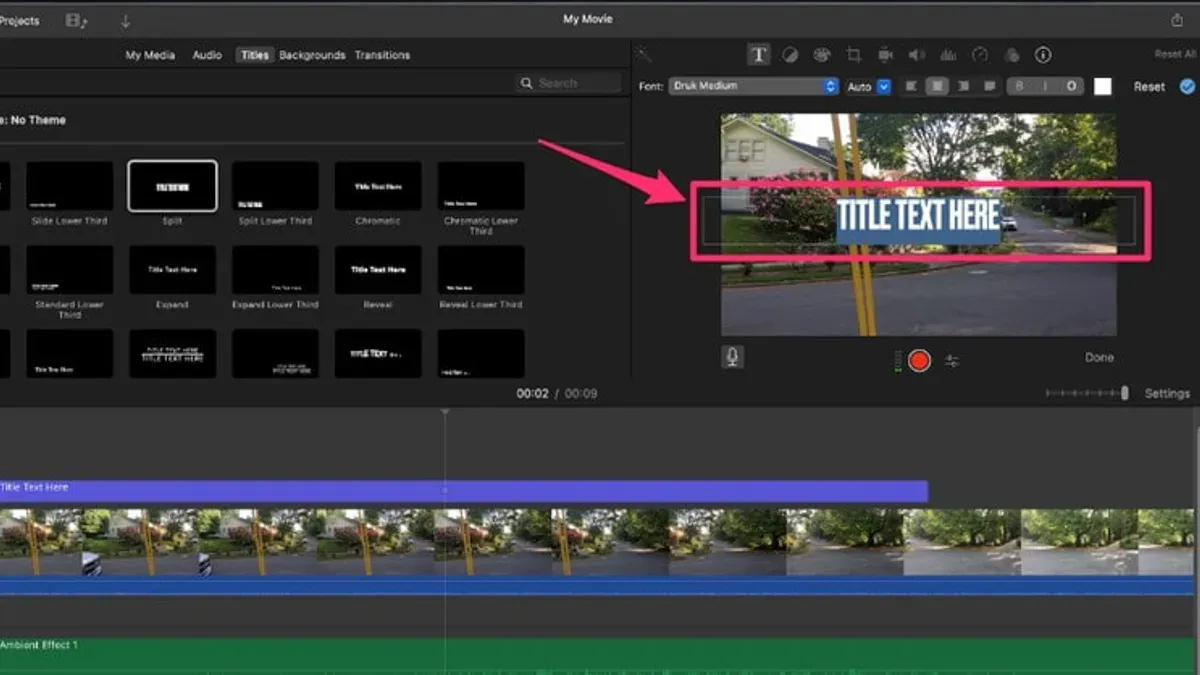
You can update the font, size, color, and alignment without deleting or replacing the entire clip. Look for the font controls above the preview area, where you can choose from iMovie’s font list, adjust the size slider, pick a new color, and set text alignment (left, center, or right). Changes appear immediately in the preview so you can check the effect.
Adjusting the duration of a text title or overlay is done by dragging its edges in the timeline. Extending the clip length keeps the text visible longer on screen. To reposition the text timing, simply drag the entire clip left or right along the timeline. This changes when the text appears during your video.
For consistent styling across your project, make a note of your chosen font, size, and color settings. Apply these same settings each time you edit or add new text. Consistency helps maintain a polished look and supports clear storytelling.
- Click the title clip or overlay in the timeline. The text editing box appears in the preview window for direct editing.
- Highlight the existing text and type your new content. The preview updates instantly.
- Use the font, size, color, and alignment controls above the preview to customize the style. Watch the text update live.
- Drag the edges of the text clip in the timeline to extend or shorten its duration. The clip length changes accordingly.
- Move the entire text clip along the timeline to reposition when it appears in your video. The preview marker helps you sync timing.
These steps let you refine your text titles and overlays efficiently, improving clarity and design without extra work.
Troubleshooting common issues when adding text in iMovie
When adding text in iMovie, you might encounter issues such as text not appearing, disappearing too quickly, or difficulties moving text freely. These problems often stem from clip duration, timeline placement, or software limitations. Understanding these common pitfalls can help you fix them efficiently and keep your project on track.
- Text not appearing or disappearing too quickly: Check the length of your text clip in the timeline. If the clip is too short, the text will only display briefly or not at all. To fix this, drag the edges of the text clip to extend its duration. You should see the text remain visible in the preview window for the desired time.
- Unable to move text freely: iMovie restricts manual text movement within the preview window to preset positions tied to the title style. If you try to drag text beyond these limits, it won’t move. Instead, reposition the entire text clip in the timeline or choose a different title style with better placement options. When successful, your text should appear where intended without unexpected shifts.
- Font or style options greyed out: This usually happens if your iMovie version doesn’t support certain title styles or if you’re using a default style that limits customization. Verify you are running a recent iMovie version by checking the App Store for updates. Also, switch to a fully customizable title style in the Titles browser. Once fixed, font and style menus will become accessible and editable.
- Text overlapping important video elements: Use the preview window carefully to spot any overlap with faces, logos, or key visuals. If overlap occurs, reposition the text using the allowed preset positions or adjust the clip timing to avoid covering critical content. You want the text to complement, not obstruct, your video elements.
By following these checks and adjustments, you can resolve the most frequent text-related issues in iMovie and maintain clear, well-placed titles and captions throughout your project.
Frequently asked questions
Can imovie add captions?
Yes, iMovie allows you to add captions by using the text overlay feature. You can insert text boxes directly on your video clips and position them to act as captions. While iMovie does not have an automatic captioning tool, you can manually type and sync your captions to match the dialogue or sounds in your video.
Can you add text in imovie?
Absolutely. You can add text in iMovie by selecting the Titles browser where various preset styles are available. Simply drag a title style onto the timeline either above a clip or as a standalone title slide. Then, you can customize the text content, font, size, and position to suit your project.
How to edit a movie in imovie?
To edit a movie in iMovie, start by importing your video clips into the timeline. You can trim clips by dragging their edges, split clips using the Modify menu or keyboard shortcut, and rearrange clips by dragging them around. You also have access to tools for adding transitions, effects, and audio adjustments to refine your movie.
How to make video subtitles with imovie?
Making subtitles in iMovie involves adding text overlays timed to your video’s speech. Choose a simple title style and place it above the clip where the subtitle belongs. Type your subtitle text and adjust its duration by trimming the text clip in the timeline to sync with the spoken words. Repeat this process for each subtitle segment.
How to add title text in imovie?
To add title text, open the Titles browser and pick a style that fits your video’s tone. Drag it onto the timeline at the beginning or over a clip where you want the title to appear. Double-click the title in the preview window to edit the text, then use the controls to adjust font, size, color, and alignment for a polished look.
What This Guide Does Not Cover
While iMovie provides a solid set of tools for adding and editing text, its capabilities for text animation and advanced positioning are limited. If you need intricate motion effects, 3D text, or highly customizable typography, you might find iMovie’s options restrictive. Professional video editors like Final Cut Pro or Adobe Premiere Pro offer far greater control over text styling and animation. For projects requiring polished, complex text presentations, consider exploring those specialized programs.
For now, mastering the practical steps here gives you reliable control over basic titles, captions, and text overlays to enhance your video storytelling.
The single most useful next step is to practice adding and adjusting text directly in a short clip, focusing on aligning your titles with the tone and pacing of your video. Experiment with different title styles and placements to see how subtle changes impact your message before finalizing your project.



