How to Use Drummer in Logic Pro: A Step-by-Step Guide
Discover how to set up and customize Drummer tracks in Logic Pro to create realistic and dynamic drum parts for your music productions.
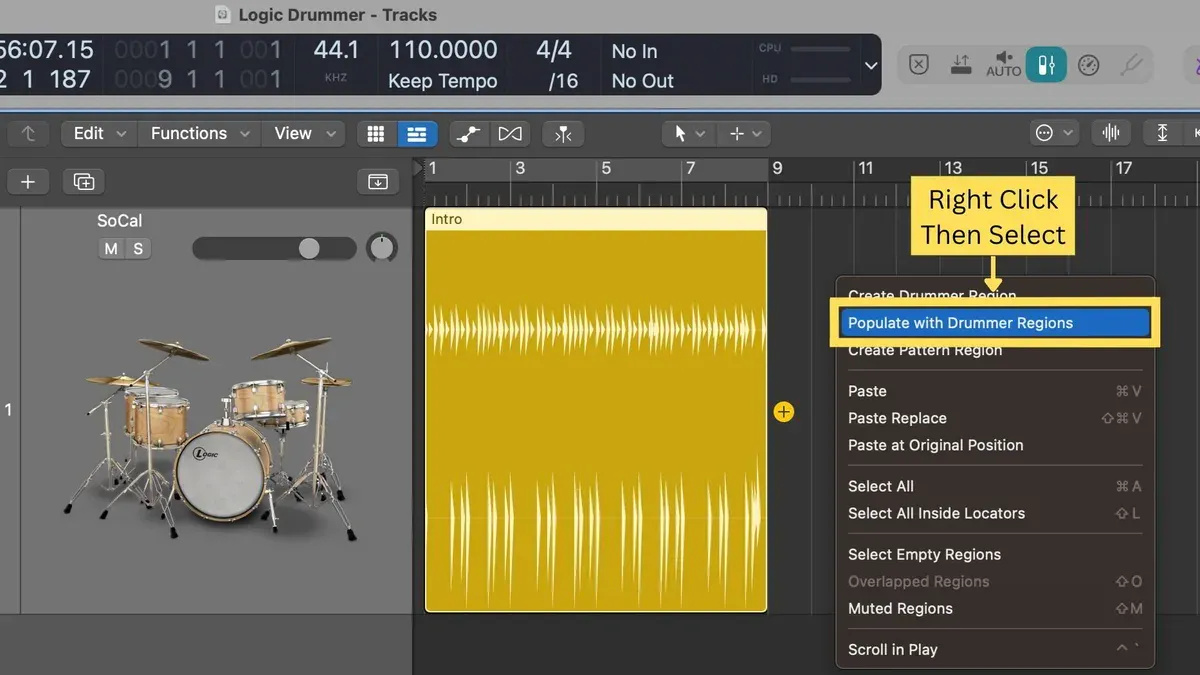
You’ve opened Logic Pro to start building a drum track but want more than the standard loops or MIDI programming. Perhaps you’re wondering how to use Drummer in Logic Pro to create realistic, dynamic drum parts that fit your unique style. This guide walks you through setting up and customizing Drummer tracks, making full use of Drum Kit Designer, and blending Drummer with third-party drum plugins for a professional sound.
Beyond the basics, you’ll learn how to mix your drums effectively alongside vocals, use MIDI editing to enhance your drum performances, and even apply Drummer in live performance scenarios. Step by step, you’ll gain practical tips that mirror real-world session workflows, helping you make informed creative and technical decisions when producing your drum parts.
Key takeaways
- Create a Drummer track via Track > New Tracks > Drummer for instant dynamic drum grooves.
- Customize drum sounds using Drum Kit Designer to tailor kits to your project’s style.
- Integrate third-party drum plugins on auxiliary channels to blend electronic and acoustic drum elements.
- Use Logic Pro’s mixer to balance drums with vocals, applying EQ and compression thoughtfully.
- Employ MIDI editing on Drummer regions to fine-tune performances or create hybrid drum parts.
Before you start: What you need to use Drummer in Logic Pro
To use Drummer effectively in Logic Pro, you need a Mac computer with Logic Pro version 10.2 or later installed. This version introduced Drummer, so earlier versions do not support it. Make sure you have a basic understanding of the Logic Pro interface, including how to create and manage tracks, navigate the timeline, and use the Mixer window.
You should also be familiar with MIDI concepts and software instruments, as Drummer generates MIDI drum patterns that can be edited or layered with other instruments. While not mandatory, having third-party drum plugins such as EZ Drummer or Addictive Drums can enhance your drum tracks by allowing you to blend Drummer's patterns with more detailed or specialized drum sounds. These plugins integrate smoothly with Logic Pro through software instrument tracks.
Finally, to accurately hear and mix your drum tracks, use a reliable audio interface paired with quality headphones or studio monitors. This setup ensures you can detect nuances in your drum sounds and make informed mixing decisions.
- Check your Mac for Logic Pro version 10.2 or newer. Open Logic Pro, go to the Logic Pro menu, and select About Logic Pro to verify the version number. You should see 10.2 or above.
- Confirm you understand track creation and management by creating a new software instrument track via Track > New Tracks. You should see a new track appear in the Tracks area with a default instrument loaded.
- Familiarize yourself with MIDI basics by opening the Piano Roll editor on a MIDI region. You should see the grid where MIDI notes can be edited.
- If you plan to use third-party drum plugins, install one like EZ Drummer and load it onto a software instrument track. The plugin interface should open, confirming successful installation.
- Connect your audio interface and use headphones or monitors to test playback. Play any drum sound or loop; you should hear clear, accurate audio output.
Create and set up a Drummer track in Logic Pro
- Open a new or existing Logic Pro project. You should see your workspace with tracks and the control bar ready for editing.
- Go to the Track menu at the top and select New Drummer Track. A new Drummer track will appear in the track list, and the Drummer Editor panel opens automatically below the tracks.
- In the Drummer Editor, choose a drummer style that fits your song’s mood. Use the genre tabs such as Rock, Alternative, or R&B, then select one of the available drummers. Each has a unique playing style and feel.
- Explore the Drummer Editor interface: select individual kit pieces by clicking their icons to emphasize or mute them. Use the Loudness slider to control volume intensity, the Complexity knob to adjust groove intricacy, and the Swing slider for rhythmic feel.
- Play your project to hear the Drummer track in action. Adjust these parameters while listening to find the right balance between energy and subtlety for your arrangement.
Once set up, your Drummer track serves as a dynamic and editable drum foundation, ready to be customized further or combined with other drum instruments.
Customize drum patterns and sounds with Drum Kit Designer
Once you have your Drummer track set up, tailoring the drum sounds to fit your song’s vibe is essential. To start, open Drum Kit Designer by selecting your Drummer track, then clicking the Drum Kit Designer icon in the Track Inspector. This opens a detailed view of your drum kit, showing each individual piece.
- Click on any drum element—such as kick, snare, hi-hat, or cymbals—to select it. When selected, you will see options to swap the sample with a different kit piece from the dropdown menu, allowing you to replace, for example, a deep kick with a punchier one.
- Adjust individual drum articulations by using the tuning knob to raise or lower pitch and the muffling slider to control resonance and sustain. For example, tuning the snare slightly higher can add brightness, while increasing muffling on the kick reduces unwanted ring.
- Modify the MIDI region generated by Drummer by double-clicking it to open the Piano Roll editor. Here, you can fine-tune note velocities to create dynamic hits or move notes to tighten timing. For instance, lowering the velocity on ghost snare hits softens their presence, making the groove feel more natural.
- Explore Drummer’s built-in pattern variations and fills by clicking the Pattern and Fills buttons in the Drummer Editor. Selecting different variations changes the complexity and feel of the drum part, letting you add musical interest without manual editing.
Using Drum Kit Designer combined with MIDI editing gives you control over both the sound character and rhythmic nuance of your drum track. For example, swapping out the default hi-hat for a sizzly ride and adjusting its velocity can transform a straightforward beat into a groove with more shimmer and movement. Screenshots of the Drum Kit Designer interface and MIDI Piano Roll highlight these editing points clearly.
Use Drummer alongside third-party drum plugins in Logic Pro
Integrating Logic Pro’s Drummer with third-party drum plugins like EZ Drummer or Addictive Drums expands your sonic palette and realism. To start, create a new software instrument track loaded with your preferred external drum plugin. This allows you to layer or replace Drummer’s sounds with the high-quality samples these plugins provide.
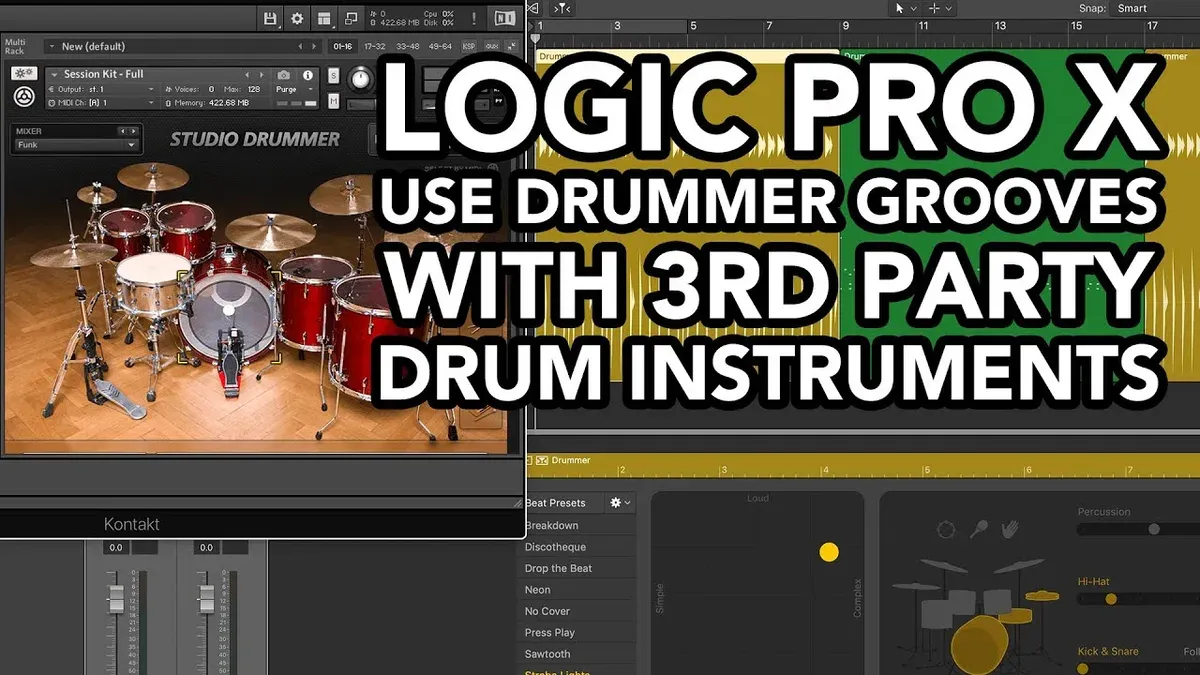
You can route Drummer’s MIDI output to your third-party plugin for precise control. In the Drummer track header, set the MIDI output to the external instrument track hosting EZ Drummer or Addictive Drums. This way, Drummer’s performance triggers the third-party sounds instead of Logic’s built-in kits.
For complex drum arrangements, sync both Drummer and your external plugin tracks within the same Logic session. This lets you blend acoustic kits from Drummer with sampled percussion from the third-party plugin, creating richer textures.
Balance the mix by adjusting volume, pan, and EQ on both the Drummer and plugin tracks. Use Logic Pro’s MIDI FX like Arpeggiator or Modifier on the Drummer track to modify MIDI data before it reaches the external plugin. Automation of plugin parameters and track levels helps dynamically control the drum blend throughout your song.
- Create a new software instrument track and load EZ Drummer.
- On the Drummer track, open the track inspector and set MIDI Output to the new EZ Drummer track; you should see EZ Drummer respond to Drummer’s MIDI.
- Play the session to confirm that Drummer triggers EZ Drummer sounds.
- Adjust volume and pan on both tracks to balance the mix; you can solo each track to check.
- Add MIDI FX on the Drummer track (e.g., Modifier) and automate plugin parameters to shape the sound dynamically.
By routing Drummer MIDI to your external drum plugin and mixing their outputs carefully, you gain detailed control and sonic variety without losing Logic Pro’s intelligent groove generation.
Mix vocals and drums effectively in Logic Pro
Balancing vocals and drums is essential for a polished mix, especially when using Drummer-generated drum tracks. Start by loading an EQ on your vocal track and gently cut muddiness around 200-400 Hz while boosting presence around 3-6 kHz to enhance clarity. Apply a compressor with a moderate ratio (around 3:1) and a medium attack and release to smooth vocal dynamics without squashing the natural feel. Add a subtle reverb using Logic’s Space Designer or ChromaVerb to place vocals in a natural space without washing them out.
To carve space between vocals and drums, use frequency separation. On your drum bus, apply a narrow EQ cut around 3-6 kHz where the vocal presence is boosted. Conversely, on the vocal track, reduce some low-mid frequencies overlapping with the kick drum and snare. This technique helps each element occupy its own sonic space.
Sidechaining the drum bus to the vocal track can further improve clarity. Insert a Compressor on the drum bus, enable sidechain input from vocals, set a fast attack and release, and adjust the threshold to gently duck drum levels when vocals are present. This lets vocals cut through heavy drum parts smoothly.
- Insert an EQ on the vocal track and apply a gentle cut at 300 Hz and a boost at 5 kHz. You should hear improved vocal clarity.
- Add a Compressor to the vocal track with a 3:1 ratio, 10 ms attack, and 50 ms release. Vocal dynamics become more controlled without sounding flat.
- On the drum bus, apply an EQ and reduce 4 kHz by 3 dB. The drums will sound less congested in the vocal frequency range.
- Enable sidechain compression on the drum bus triggered by the vocal track with a fast attack (1-3 ms) and release (50 ms). Drums subtly lower in volume when vocals are active.
- Use reference tracks to compare your vocal and drum balance. Adjust levels and processing until vocals sit clearly above the drums without being overpowered.
Following these steps helps you create a mix where vocals and drums complement rather than compete, leading to a more professional and polished sound.
Play drums like a pro using Logic Pro Drummer and MIDI editing
To enhance the realism of your drum tracks, you can combine Drummer’s intelligent patterns with precise manual MIDI editing. Start by converting your Drummer region to MIDI: Control-click the Drummer track region and select Convert to MIDI Region. This lets you access and tweak individual drum hits in the Piano Roll.
- Open the MIDI region in the Piano Roll editor. You should see all drum hits as MIDI notes corresponding to drum kit pieces.
- Adjust the timing of individual notes slightly off the grid to create a natural groove. For example, move some snare ghost notes a few milliseconds ahead or behind the beat to avoid robotic timing.
- Modify velocity values of hits to add dynamic variation. Lower velocity ghost notes can simulate lighter, subtle hits, while stronger beats remain prominent.
- Manually add ghost notes and articulations by placing additional MIDI notes with lower velocity, such as soft hi-hat taps or rimshots, to increase rhythmic complexity.
- Apply Logic’s Groove Templates: Select a MIDI region of other instruments with a groove you like, then choose MIDI > Apply Groove Template to Selection on your drum MIDI to sync their feel.
- Use the Drummer Editor’s Swing and Shuffle controls to introduce subtle rhythmic variations. Keep these settings moderate (around 5-15%) to maintain natural timing without sounding mechanical.
- For richer drum textures, layer multiple Drummer tracks with different kits or complementary patterns. Adjust volume and panning to blend them smoothly.
Before editing, your MIDI might show perfectly quantized hits with uniform velocity, sounding mechanical. After these steps, expect a groove with dynamic timing shifts and velocity nuances that emulate a live drummer’s feel.
Use Logic Pro’s Drummer in live performance settings
To use Drummer effectively in live shows or jam sessions, you need to set it up for real-time triggering and seamless pattern changes. Start by enabling the Drummer track and preparing multiple regions with different drum patterns to switch between on the fly. Logic Pro’s Live Loops grid is ideal for launching these regions during performance, giving you hands-on control over drum arrangements.
Next, sync Drummer with external MIDI controllers or drum pads. Connect your device through MIDI Studio Setup or USB, then assign pads or buttons to trigger specific Drummer regions or toggle parameters like complexity and loudness. This interaction lets you dynamically shape drum parts without stopping playback.
Managing CPU and latency is critical for smooth live playback. Use Logic Pro’s Low Latency Mode under the Options menu to minimize delay, and freeze or bounce unused tracks to reduce processing load. Keeping your buffer size low (between 64 and 128 samples) strikes a balance between responsiveness and stability.
Professional setups often combine Logic Pro with hardware controllers like Ableton Push or Novation Launchpad for clip launching, alongside electronic drum kits routed to Drummer tracks. For example, some artists use a combination of Live Loops and Drummer patterns synced to external gear, as demonstrated in performance videos around the 3:15 mark of various live tutorials online. This approach integrates software flexibility with tactile control, enhancing live drumming performance.
- Open Logic Pro and create a Drummer track with multiple pattern regions; verify you can switch regions during playback smoothly.
- Connect your MIDI controller or drum pad, then map controls to trigger Drummer regions or adjust pattern settings; test that triggering changes the drum parts in real time.
- Activate Low Latency Mode from the Options menu and set your audio buffer size to 64–128 samples; monitor for latency or glitches and adjust settings as needed.
- Set up Live Loops with your Drummer regions arranged in cells; launch different cells live to confirm responsive pattern changes without stopping the session.
- Optional: Freeze or bounce tracks not in use to reduce CPU load; confirm the session runs smoothly with no audio dropouts during live triggering.
Troubleshoot common issues with Drummer and drum tracks in Logic Pro
When using Drummer or integrating third-party drum plugins, you may encounter issues like Drummer tracks not playing, audio glitches, sync problems, or unexpected drum sounds. Quickly identifying and resolving these problems ensures smooth workflow and professional output.
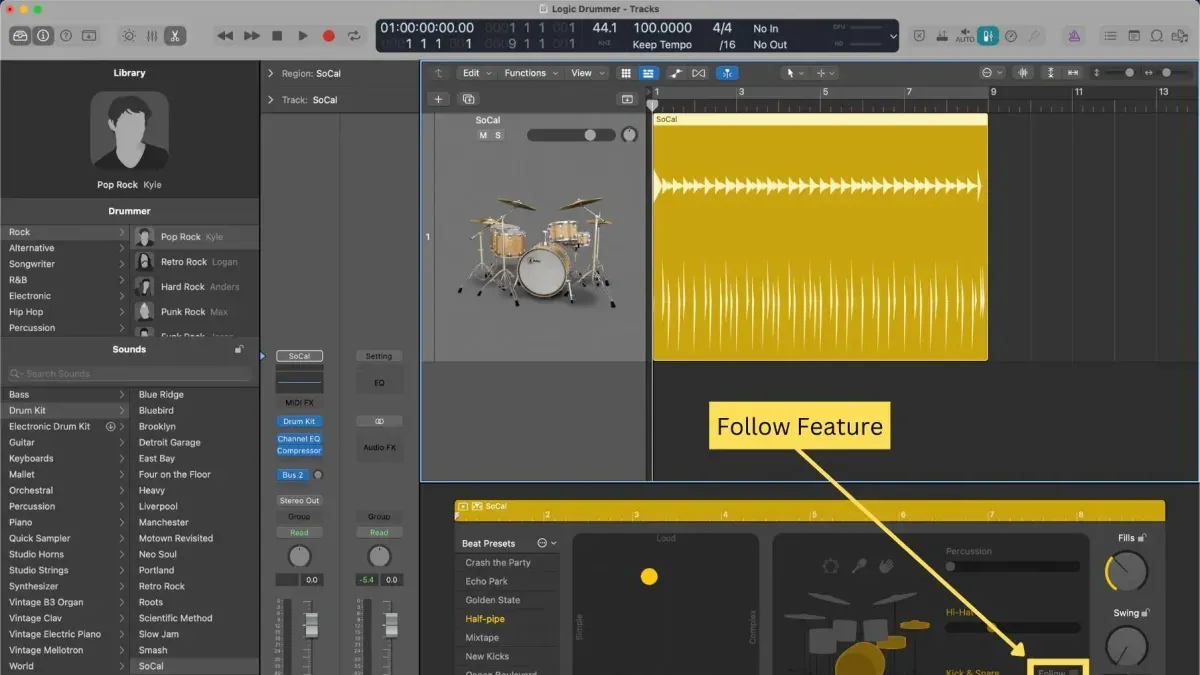
Drummer track not playing or generating MIDI
- Check that the Drummer track is not muted and the volume is up in the track header. You should hear drum patterns playing back.
- Verify the Drummer plugin is active by opening the track's Channel Strip and confirming Drummer is loaded. If missing, add it via the Instrument slot.
- Ensure the Drummer region contains MIDI data. Double-click the region to open the MIDI editor; if empty, create a new Drummer region from the + button.
- If you see error messages like “No Drummer plugin found,” try removing and re-adding the Drummer track.
Audio glitches or latency when layering drum kits
Audio dropouts or latency often result from CPU overload or buffer size settings. Go to Logic Pro > Preferences > Audio and increase the I/O Buffer Size to 256 or 512 samples. This reduces CPU strain and should eliminate glitches.
User forums confirm raising buffer size resolves crackling sounds when combining Drummer with multiple third-party drum plugins.
Sync issues between Drummer and third-party drum plugins
To fix timing mismatches, ensure all plugins are set to the same sample rate and buffer size in Preferences. Also, check that Logic’s Project Settings > Synchronization > MIDI Clock is properly configured when syncing external gear.
Routing Drummer MIDI to third-party plugins requires enabling MIDI output on the Drummer track and setting the plugin to receive on the correct MIDI channel.
Drum sounds not matching expectations or too synthetic
If Drummer’s sounds feel artificial, try adjusting the Drummer’s Style and Complexity sliders or switch to a different Drummer genre. For more authentic tones, layer Drummer MIDI with third-party drum plugins that use sampled sounds.
Resetting Drum Kit Designer settings or swapping kits can also improve sound quality.
Reset Drummer settings or reinstall drum kits
- Close Logic Pro.
- Navigate to ~/Library/Application Support/Logic/ and delete the 'Drummer' folder to remove cached settings. This resets Drummer preferences.
- Reopen Logic Pro and create a new Drummer track to see default settings restored.
- If drum kits appear missing or corrupted, reinstall Logic Pro’s additional content via Logic Pro > Sound Library > Download All Available Sounds.
These steps address common user-reported errors like missing drum samples or unresponsive Drummer controls, confirmed in Apple user forums.
Frequently asked questions
How to use logic pro?
To use Logic Pro, start by creating a new project and selecting the type of track you want, like audio, software instrument, or Drummer. Familiarize yourself with the main windows: the Tracks area, Mixer, and Piano Roll. Import or record audio, add MIDI instruments, and arrange your session using the timeline. Use Logic’s built-in effects and plugins to shape your sound, and save your work regularly.
How to mix vocals in logic pro?
Mix vocals by first cleaning up the recording with noise reduction and trimming unwanted parts. Use EQ to remove muddiness and enhance clarity, typically cutting lows below 100 Hz and boosting presence around 3–6 kHz. Add compression to control dynamics, setting a moderate ratio like 3:1 and adjusting attack and release for natural sound. Use reverb and delay subtly to create space without drowning the vocals, and automate volume for consistent levels.
How to play drums like a pro?
Playing drums like a pro in Logic Pro involves combining Drummer with MIDI editing. Start with a Drummer track to generate realistic grooves, then customize the pattern using the XY pad and adjusting complexity. Use Drum Kit Designer to select or tweak drum sounds. For more control, convert Drummer tracks to MIDI and edit velocities and timing to add human feel. Practicing with Logic’s tools helps develop better rhythm and dynamics.
How to use drums in logic pro?
In Logic Pro, you can use drums by creating a Drummer track or adding a software instrument track with drum plugins. The Drummer track offers genre-specific, style-adaptive drum patterns that you can customize with the XY pad and fills settings. Alternatively, load third-party drum plugins on software instrument tracks for unique drum sounds. Layering Drummer with these plugins can create fuller, more complex drum arrangements.
How to use drummer in logic pro x?
To use Drummer in Logic Pro X, create a new Drummer track by clicking the '+' button and selecting Drummer. Choose a drummer profile matching your genre, then adjust the performance using the XY pad for loudness and complexity. Customize drum sounds with Drum Kit Designer, and add fills or edits in the Drummer Editor. You can also combine Drummer with external drum plugins for richer textures.
What This Guide Doesn’t Cover
This guide focuses on Logic Pro’s Drummer and its integration with popular third-party drum plugins to help you create professional drum tracks within this environment. It doesn’t cover advanced drum programming using external MIDI controllers or workflows involving non-Apple digital audio workstations. If you rely heavily on custom drum programming or use hardware drum machines, exploring dedicated drum software or hardware-specific tutorials will be more beneficial.
To take your drum production further, the most useful next step is to experiment with layering Drummer tracks alongside carefully chosen third-party drum plugins. Pay close attention to phase alignment and dynamic balancing, and use track stacks in Logic Pro to organize your drum elements efficiently. This hands-on approach will give you a clearer understanding of how to blend different drum sources for a cohesive, polished mix.
See also: How to Tune Vocals with Flex Pitch in Logic Pro: Step-by-Step Guide