How to Adjust Image Colors in Preview: A Clear Step-by-Step Guide
Quickly fix image colors in Preview on your Mac by adjusting brightness, contrast, and saturation with simple built-in tools.
You’ve just opened a photo on your Mac and realize the colors don’t look quite right. Maybe the image appears too dark, too warm, or the background color seems off. If you want to correct these issues quickly without opening complex software, Preview has built-in tools that can help.
This article explains how to adjust image colors in Preview, guiding you step-by-step through accessing and using the native color adjustment features. You’ll learn how to tweak brightness, contrast, saturation, and even modify background colors with simple sliders and controls. By the end, you’ll know whether Preview’s tools meet your needs before deciding to try more advanced programs.
Key takeaways
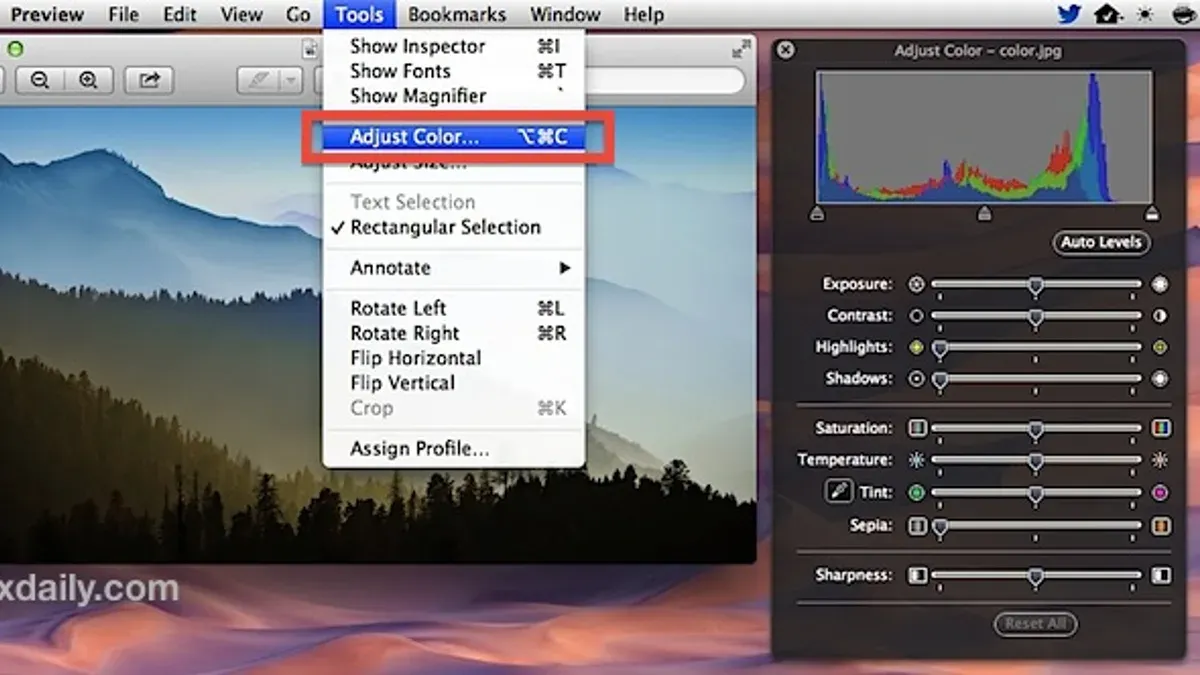
- Access color adjustment tools via Tools > Adjust Color in Preview’s menu bar.
- Use sliders for exposure, contrast, and saturation to improve overall image color.
- Adjust background colors by selecting and editing specific image areas.
- Preview changes in real-time to fine-tune settings effectively.
- Check your display calibration for accurate color representation before editing.
Before you start: What you need to adjust image colors in Preview
Preview is a default app on your Mac that supports many common image formats, including JPEG, PNG, and TIFF. To adjust image colors using Preview, you need to have your image saved locally on your Mac, as online or cloud-based images cannot be edited directly. Preview’s color adjustment tools focus on modifying the overall image attributes like exposure, contrast, saturation, and color balance. It does not support advanced features such as selective color replacement or layer-based editing found in professional software like Photoshop.
Make sure your Mac is running macOS where Preview includes color adjustment features; generally, this capability is available in macOS versions from Sierra onward. If your macOS version is older, some color adjustment options might not be accessible. Having your image locally saved and in a supported format ensures a smooth editing experience.
- Locate the image you want to edit on your Mac and confirm it is in a supported format (JPEG, PNG, TIFF). After this step, you should see the image file in Finder.
- Double-click the image to open it in Preview, which is the default viewer for these formats. If it opens in another app, right-click the file, select Open With, then choose Preview. The image will appear in a new Preview window.
- Confirm that your macOS version supports color adjustments by clicking Tools in Preview’s menu bar and checking if Adjust Color... is available. If this option appears, you are ready to proceed with color adjustments.
Open your image and access Preview’s color adjustment tools
- Locate the image file on your Mac, then double-click it. This action should open the image in Preview by default. If it does not, right-click the image, choose Open With, and then select Preview from the list of available applications. Once open, you should see your image displayed in the Preview window.
- To access the color adjustment tools, go to the menu bar at the top of your screen and click on Tools. In the dropdown menu, select Adjust Color. Alternatively, you can click the Adjust Color icon, which looks like a prism or a color wheel, located on the Preview toolbar if it is visible. After selecting this, a new panel will appear on the right side of the Preview window.
- The color adjustment panel contains several sliders, each controlling a specific aspect of the image’s color and tone. You will see controls labeled Exposure, Contrast, Highlights, Shadows, Saturation, Temperature, Tint, and Sepia. Moving these sliders will dynamically update the image preview, allowing you to observe the changes instantly.
This panel’s layout is designed to let you fine-tune your image’s color profile directly within Preview without needing additional software. The Exposure slider adjusts the overall brightness, while Contrast changes the difference between light and dark areas. Highlights and Shadows let you refine the brightest and darkest parts, respectively. Saturation controls color intensity, Temperature shifts colors between cool and warm tones, Tint adjusts color balance, and Sepia adds a vintage brownish effect.
How to adjust overall image color using Preview sliders
To effectively modify your image’s colors, Preview provides several sliders in the Adjust Color panel. Start with Exposure: moving this slider right brightens the image, while moving it left darkens it. For example, increasing exposure by a small amount can make a dim photo more visible without washing out details.
Next, use Contrast to control the tonal range. Increasing contrast makes dark areas darker and light areas lighter, adding punch to the image; decreasing it softens the image. A balanced contrast keeps details clear without harsh edges.
The Highlights and Shadows sliders let you fine-tune bright and dark regions. Lowering highlights recovers detail in bright spots like skies, while raising shadows reveals hidden details in darker areas. Adjust both subtly to avoid unnatural looks.
Saturation controls the intensity of all colors. Dragging it right makes colors more vivid; left moves toward grayscale. For example, a slight increase enhances a sunset photo’s colors, but too much saturation can look artificial.
The Temperature slider changes warmth: moving right adds yellows and reds for a warmer feel, while left adds blues for coolness. Tint adjusts green-magenta balance, useful for correcting color casts, like removing a greenish tint from fluorescent lighting.
Finally, the Sepia slider adds a vintage brown tone. Use it sparingly to create an aged look without overwhelming the original colors.
- Open the Adjust Color panel in Preview.
- Move the Exposure slider slightly right; the image brightens, revealing more details.
- Adjust Contrast to increase tonal depth; the image becomes more dynamic with clearer dark and light areas.
- Lower Highlights modestly to recover detail in bright parts such as clouds; the brightest areas should retain texture.
- Raise Shadows slightly to bring out details in dark parts like shaded objects.
- Increase Saturation gently to intensify colors; avoid saturating to an unnatural level.
- Shift Temperature slider right to warm the image (adds golden hues) or left for cooler blue tones.
- Fine-tune Tint to correct color shifts; for example, move slider left to reduce magenta if the image looks too pink.
- Optionally, move Sepia slider a little right for a subtle vintage effect.
Remember, subtlety is key. Each slider should be adjusted in small increments and checked visually to maintain a natural appearance. Overuse often causes colors to look unrealistic or distorted.
How to change image background color in Preview on Mac
Preview does not include a dedicated tool to replace or directly change the background color of an image like Photoshop does. However, you can use Preview’s Instant Alpha tool to remove the background, creating transparent areas that you can then adjust or combine with other images. This method works best for simple backgrounds with clear contrast from the subject.
To remove the background using Instant Alpha, select the tool from the Markup toolbar, click and drag on the background area to select it, and press Delete. This makes the selected background transparent, allowing you to add a new background color by combining images in another app, since Preview itself cannot add a colored layer behind the transparent areas.
For more complex background changes, Photoshop or similar software is better suited because they offer precise selection tools, layer management, and direct background color replacement. Preview’s capabilities are limited to simple background removal and color adjustments on visible image areas.
- Open your image in Preview and click the Markup toolbar button (the pencil icon) to show markup tools.
- Click the Instant Alpha tool (magic wand icon), then click and drag on the background to select the area to remove; you should see it highlight in red as you drag.
- Press the Delete key; the selected background becomes transparent if your image format supports transparency (PNG or TIFF).
- Save the image with transparency and open it in a graphic app like Keynote or Pages to place it over a colored shape that acts as your new background.
- Export the combined image from that app if you want a single file with the new background color.
How to preview image in Windows and compare with Preview on Mac
When you preview images on Windows, you generally use either Windows Photo Viewer or the Photos app. Both applications offer basic image viewing and some quick editing options, but they lack the detailed color adjustment sliders found in Preview on Mac. Windows apps focus more on applying filters or simple fixes like cropping and brightness adjustment rather than precise color manipulation.
To preview and perform basic color adjustments on Windows:
- Right-click your image file and select Open with > Photos. The image opens in the Photos app.
- Click the Edit image icon (a pencil symbol) at the top. You will see options like Crop, Rotate, and Filters.
- Choose Adjust to access sliders for brightness, contrast, and exposure. These are more limited compared to Preview’s full color adjustment panel.
- Modify these settings and click Save a copy to keep your edits separate from the original.
In contrast, Preview provides a dedicated Adjust Color panel with sliders for temperature, tint, saturation, shadows, highlights, and sepia. This allows you to fine-tune your image colors with greater precision without needing additional software.
| Feature | Preview (Mac) | Windows Photo Viewer / Photos |
|---|---|---|
| Color sliders | Yes – detailed sliders for temperature, tint, saturation, etc. | Limited – brightness, contrast, exposure only |
| Filters | No built-in filters; focus on manual color adjustment | Yes – preset filters available |
| Background color editing | Partial (Instant Alpha for removal) | Not supported |
| Saving edits | Overwrite or duplicate file | Save a copy or overwrite |
If you want more precise control over image colors without installing third-party software, using Preview on Mac is the better option. Windows apps offer fast, simple edits but lack the depth needed for fine color tuning.
How to adjust display colors to see accurate image colors
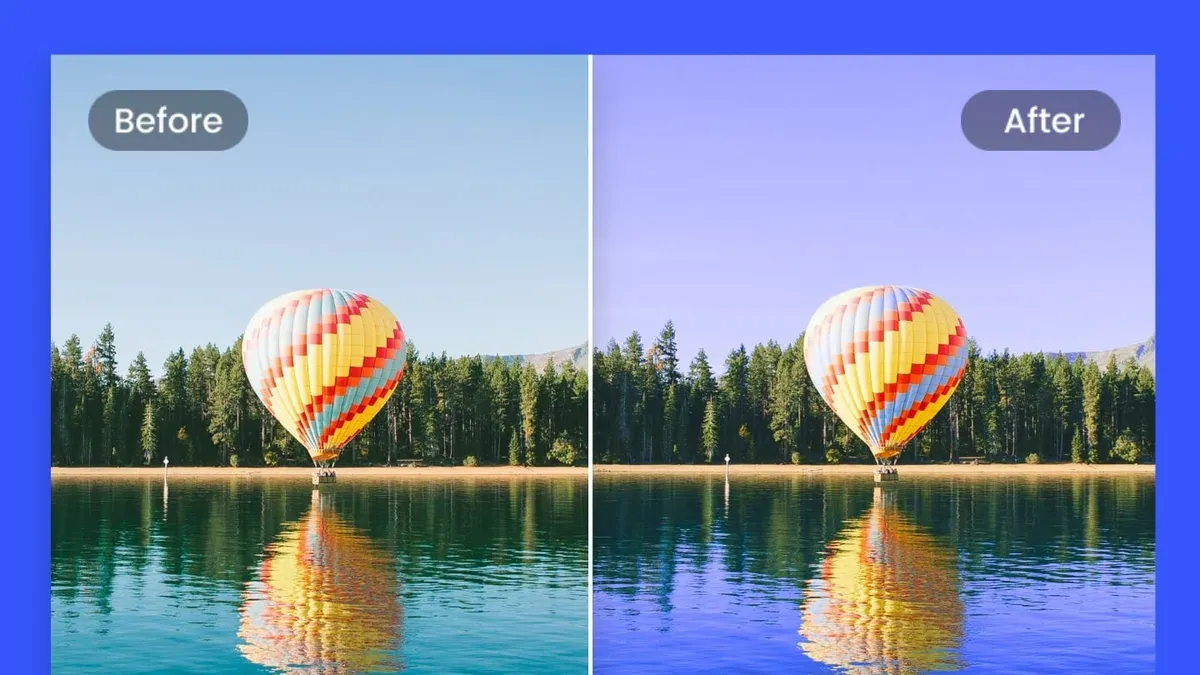
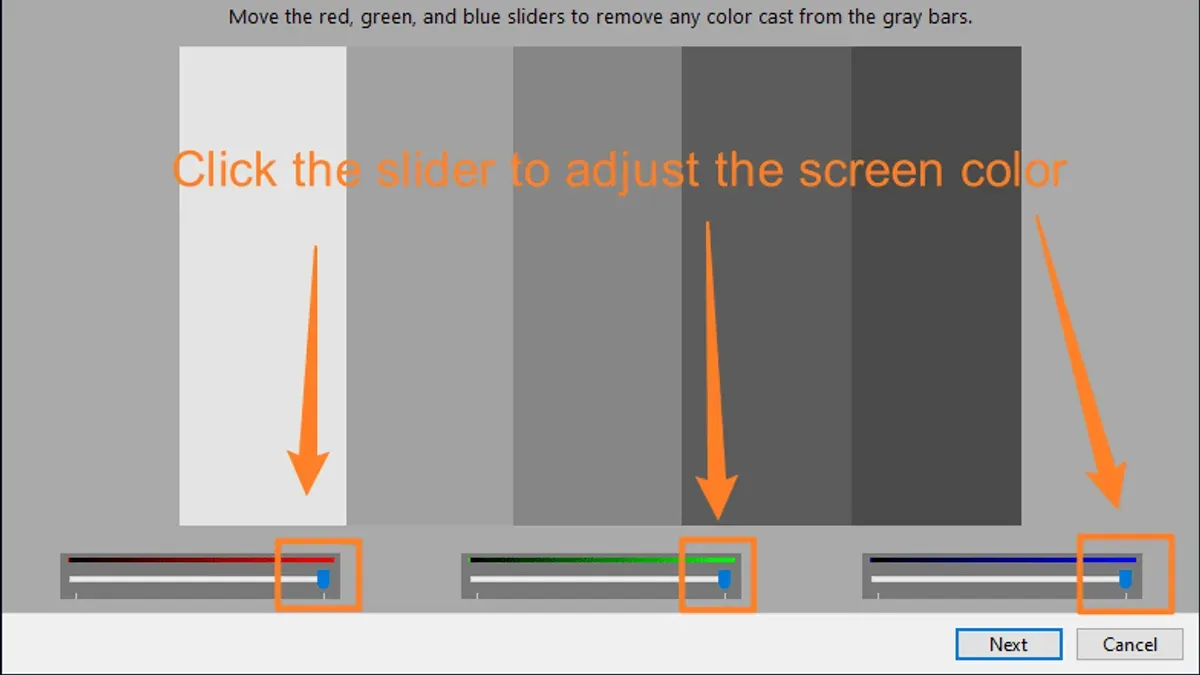
Accurate color perception is essential when adjusting image colors in Preview, as your display settings directly influence how colors appear. If your Mac's display is not properly calibrated, the colors you see might be misleading, leading to suboptimal edits. Calibrating your display ensures that the colors you adjust in Preview closely match the actual image colors, improving your editing outcomes.
To calibrate your Mac’s display color profile, follow these steps carefully:
- Open System Preferences and select Displays. You should see several tabs at the top of the window.
- Click the Color tab to view the list of available color profiles.
- Click the Calibrate... button to launch the Display Calibrator Assistant. This will guide you through the calibration process step-by-step.
- Follow the on-screen instructions, adjusting the gamma, white point, and native gamma settings as prompted. When finished, save the new profile with a descriptive name.
- Once the calibration is complete, select your newly created profile from the list to apply it. Your display will now use this calibrated profile.
Keep in mind that ambient lighting conditions and your display brightness also affect perceived colors. Working in a room with consistent, neutral lighting and adjusting your screen brightness to a comfortable level will help maintain color accuracy. Preview’s color adjustments depend on the display’s calibrated output, so these steps ensure your edits reflect true colors rather than distorted ones.
How to make your preview image larger and adjust resolution in Preview
To closely inspect the color changes you make in Preview, zooming in and out of your image is essential. You can use the toolbar’s zoom buttons, typically represented by a magnifying glass with plus and minus signs, or you can use trackpad gestures like pinching outward to zoom in and pinching inward to zoom out. Zooming helps you see fine details in color adjustments without altering the actual image size.
When you want to change the image resolution or size for saving or printing, you need to resize the image instead of just zooming. To do this, go to the menu bar and click Tools > Adjust Size. A dialog box will appear where you can enter new dimensions in pixels, inches, or centimeters. For example, reducing an image from 4000×3000 pixels to 1920×1440 pixels decreases the file size and can affect how colors look, sometimes making gradients appear smoother or less detailed.
Remember, resizing changes the actual pixel dimensions of your image, which is important for print quality or file size limits, while zooming only changes how the image is displayed on your screen. Scaling for print requires higher resolution (usually 300 dpi or more), while screen images often look good at 72 dpi. After resizing, review your image colors again in Preview to ensure the appearance remains as you expect.
- Open your image in Preview and use the Zoom In button on the toolbar or pinch out on your trackpad; you should see the image enlarge for detailed color inspection.
- Use the Zoom Out button or pinch inward to return to your preferred view; the image size on screen changes but the file remains the same.
- Click Tools > Adjust Size to open the resizing dialog; the current pixel dimensions will be displayed.
- Enter new values for width and height, for example, changing 4000×3000 pixels to 1920×1440 pixels; the preview updates to show the new size.
- Click OK to apply resizing; the image resolution and file size will now be smaller, which may slightly change color smoothness.
- Re-examine the image colors at the new size to confirm they meet your expectations before saving.
Troubleshooting common issues when adjusting image colors in Preview
If your color adjustments in Preview don’t seem to save, make sure you explicitly save the edited image by selecting File > Save or pressing Command + S. Without this step, your changes remain temporary and will be lost when you close the file.
If the image looks washed out or oversaturated after adjustments, try reverting to the original by selecting Tools > Revert to Original. Then, apply smaller, incremental changes to the sliders, adjusting exposure, contrast, or saturation gradually for more natural results.
When Preview won’t open your image or the Adjust Color panel is missing, verify the image file type. Preview supports JPEG, PNG, TIFF, and other common formats, but some proprietary or corrupted files may not open. Also, check your macOS version; older versions might lack certain color adjustment features.
Colors looking different on other devices is often due to color profile differences and display calibration. Preview uses macOS color profiles, so images may appear variably on Windows or uncalibrated screens. Calibrating your display and exporting images with an embedded sRGB profile can reduce discrepancies.
Frequently asked questions
How to adjust image color in photoshop?
In Photoshop, you adjust image color by opening the image and using the 'Adjustments' panel. Common tools include 'Hue/Saturation,' 'Color Balance,' and 'Levels,' found under Image > Adjustments. You can move sliders to modify colors precisely, and layers allow nondestructive editing. Remember to work on a duplicate layer to preserve the original image.
How to change colors in an image?
Changing colors in an image can be done by selecting the area you want to modify and then using color adjustment tools like Hue/Saturation or Replace Color. On Mac, Preview offers basic adjustments through its Color Adjustment panel. For more control, photo editing software with selection and brush tools helps target specific colors without affecting the whole image.
How to change the image color?
To change the overall color tone of an image, use color adjustment sliders such as Saturation, Contrast, and Temperature. In Preview, open the 'Show Markup Toolbar' and then click the 'Adjust Color' icon to access these sliders. Adjusting these affects the entire image's color balance, allowing you to warm up or cool down the photo quickly.
How to show image preview?
On a Mac, you can show an image preview by selecting the file and pressing the spacebar to open Quick Look, which displays the image without launching an app. Alternatively, double-clicking the image opens it in Preview, the default image viewer. Both options allow you to view the image quickly without editing.
How to change colors in pictures?
Changing colors in pictures involves using editing tools that let you adjust specific color ranges or the entire image. Preview on Mac provides sliders for exposure, contrast, saturation, and tint under 'Adjust Color.' For more targeted color changes, software with selection tools like Photoshop or Pixelmator is recommended.
Limits of Preview’s Color Adjustment Tools
Preview’s built-in color adjustment features are designed for basic and moderate edits, such as tweaking brightness, contrast, saturation, and overall tint. However, they do not support advanced selective color changes or complex background replacements. If you require precise color correction on specific parts of an image or need to remove or replace backgrounds seamlessly, dedicated photo editing applications like Adobe Photoshop, Affinity Photo, or Pixelmator will better serve those needs.
For users looking to perform detailed retouching, layer-based editing, or work with RAW files, Preview’s tools will be insufficient. Preview is ideal for quick adjustments and previewing images without the overhead of launching a full editing suite.
To take the next step, try adjusting the saturation and temperature sliders while viewing your image on a calibrated display. This combination often provides the most visible improvement and helps you understand how Preview’s tools affect color balance. Remember to save a copy of your original image before experimenting to avoid losing any detail.
See also: How to Crop an Image Easily Using Preview on Mac · How to Resize an Image in Preview on Mac: Step-by-Step Guide · How to Add Text to an Image in Preview: A Clear Step-by-Step Guide