How to Change Page Margins in Pages on Mac, iPad, and iPhone
Discover how to adjust page margins in Pages on Mac, iPad, and iPhone to tailor your document layout precisely to your needs.
You’re working on a document in Pages and realize the default margins don’t fit your needs. Maybe you want more space for notes or need to fit content precisely within a page. Knowing how to change page margins in Pages is essential for customizing your document layout across Mac, iPad, and iPhone.
This article guides you step-by-step through adjusting page margins on each device. It also covers changing page sizes and setting different margins for individual pages—helping you handle common formatting scenarios that aren’t always obvious. By following clear instructions tailored to your device, you’ll gain control over your document’s appearance and ensure your content looks just right.
Key takeaways
- On Mac, use the Document sidebar’s Margins section to adjust top, bottom, left, and right margins in inches.
- On iPad and iPhone, access margins via the Document Setup or Format menu within Pages.
- You can set different margins for specific pages by inserting section breaks and adjusting margins per section.
- Changing page size is done through Document Setup on all devices, affecting margins and layout.
- If margins won’t change, check for section breaks or locked objects restricting edits.
Before you start: What you need to know about Pages and margins
When working with Apple Pages, understanding how margins and page setup operate is essential for effective document formatting. Pages uses section-based formatting, meaning each section can have its own margin and page size settings. This affects how changes you make apply—modifying margins in one section won’t automatically update others unless they share the same formatting. Before adjusting margins, decide if your document needs uniform margins throughout or varying margins on specific pages, which requires inserting section breaks.
The interface for changing margins varies depending on whether you’re using Pages on a Mac, iPad, or iPhone. Some features available on Mac may be limited or arranged differently on iOS devices. Knowing your device helps you find the right controls quickly and make adjustments efficiently.
Preparing your document by identifying your margin needs and device will save time and prevent formatting issues. For example, if you want different margins on the first page or a chapter start, you will need to insert a section break to isolate that page's settings.
| Feature | Mac | iPad | iPhone |
|---|---|---|---|
| Set Uniform Margins | Yes, via Document sidebar > Document tab | Yes, via Document Setup > Margins | Yes, via Document Setup > Margins |
| Set Different Margins per Section | Yes, with section breaks and sidebar controls | Limited; can insert section breaks but margin control per section is less direct | Limited; section breaks possible but margin control per section is minimal |
| Change Page Size | Yes, via Document sidebar > Document tab | Yes, via Document Setup > Paper Size | Yes, via Document Setup > Paper Size |
- Open your Pages document on your Mac, iPad, or iPhone. You should see the document with its existing margins and layout.
- Identify whether your document requires uniform margins or different margins for specific pages. If different margins are needed, plan where to insert section breaks to separate those pages.
- Locate the margin controls on your device: on Mac, open the Document sidebar and select the Document tab; on iPad and iPhone, tap the More button (•••) then Document Setup.
- Check the current page size and margin values to understand the starting point before making changes.
- Prepare your document structure accordingly, so margin changes will apply as intended when you adjust settings in the following sections.
Change page margins in Pages on Mac
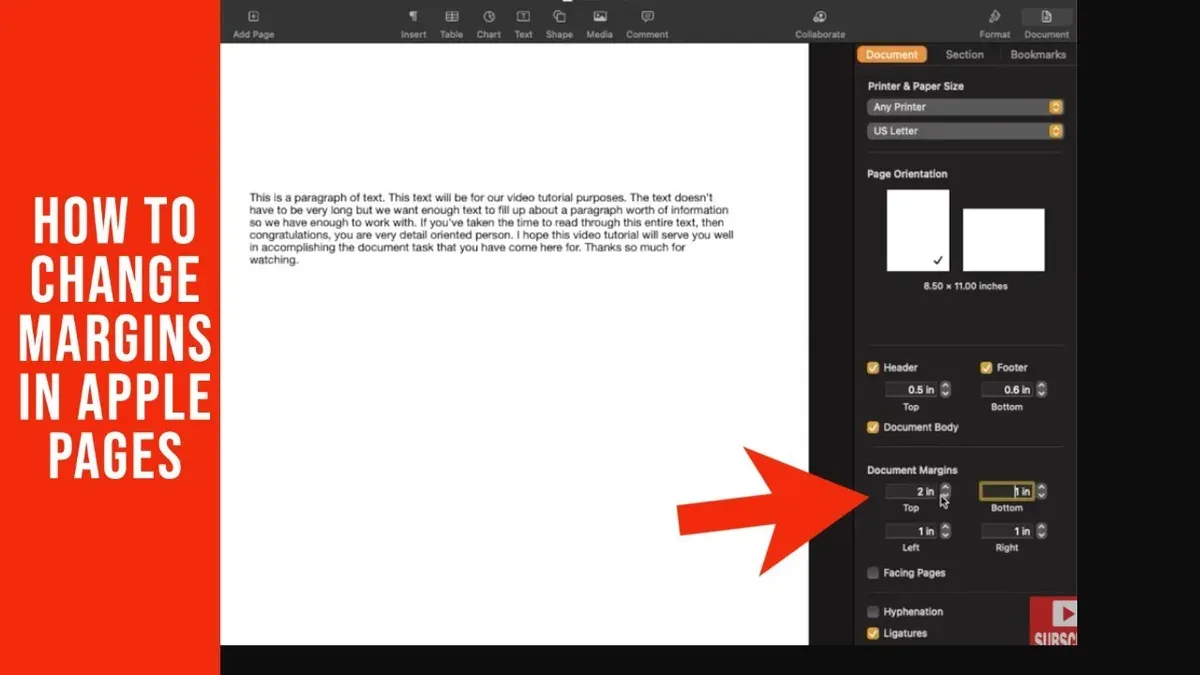
To adjust margins on your Mac, first open your document in Pages. Look to the right side of the window to find the Document sidebar. If it’s not visible, click the View menu and select Show Document Sidebar.
- Click the Document tab in the sidebar. Here you will see margin controls labeled Top, Bottom, Left, and Right.
- Adjust margins by either entering specific values in the number fields or by dragging the margin guides directly on the ruler above your document. For example, changing the left margin from 1 inch to 1.5 inches will shift your text accordingly.
- If you want to set different margins for specific pages, insert a Section Break where needed using Insert > Section Break. Then select the section and adjust its margins independently in the Document sidebar.
- After adjusting, scroll through your document to confirm that text and objects respect the new margins and that layout elements flow correctly.
- Use the ruler guides as a visual check; for instance, if the top margin is set to 1 inch, the ruler’s guide should align accordingly.
Before adjustment, your margin values might be 1 inch on all sides. After changing the right margin to 2 inches, you’ll see the text shift away from the edge, creating more white space. The Document sidebar clearly reflects these updated margin numbers as you edit.
By following these steps, you can precisely control your document’s margins on Mac, tailoring your layout to your needs with ease.
Change page margins in Pages on iPad
To adjust page margins on your iPad, start by opening your document in Pages. Tap the More button, represented by three dots in the upper-right corner, to access additional settings. From the menu that appears, select Document Setup. Here, you will find options related to page size and margins.
Within Document Setup, locate the margin settings. Unlike on Mac, Pages on iPad does not provide draggable margin guides. Instead, you adjust margins by entering numeric values or using the on-screen controls to increase or decrease the margins. For example, you might set the top margin to 1 inch by typing "1" in the corresponding field. When you enter a value, the page layout updates immediately to reflect your change.
Keep in mind that Pages on iPad applies margin settings to the entire section. If your document contains multiple sections and you want different margins on specific pages, you’ll need to create and manage these sections carefully. Insert section breaks where needed, then adjust margins for each section individually by repeating the steps above after selecting the appropriate section.
- Open your document in Pages on iPad. You should see your document ready for editing.
- Tap the More button (three dots) in the upper-right corner. A menu will appear.
- Select Document Setup from the menu. The page setup options will display.
- Find the margin fields, typically labeled as Top, Bottom, Left, and Right. Tap a field, then enter the desired margin value, such as 1 or 1.5 inches. The page preview will update.
- To set different margins on a specific page, insert a section break before that page by placing the cursor there, tapping the plus icon, and choosing Section Break. Then, adjust the margins for that section by repeating steps 2–4.
Change page margins in Pages on iPhone
Working with Pages on iPhone means adapting to a smaller screen and a streamlined interface. To change page margins, you will rely on numeric input rather than dragging margin guides, which aren’t available on this device. This method is quick and effective for making basic margin adjustments or last-minute edits when you're away from your Mac or iPad.
- Open your document in the Pages app on your iPhone. Once loaded, tap the More button (three dots) located at the top right corner of the screen. This opens a menu with additional options.
- From the menu, select Document Setup. This brings up the document formatting options including page size and margins.
- Locate the Margins section within Document Setup. You will see numeric fields for Top, Bottom, Left, and Right margins. Tap each field to enter the desired margin size manually. For example, set the Left margin to 1 inch and the Right margin to 0.75 inch.
- After adjusting the margin values, tap Done at the top right to apply your changes and exit Document Setup. The document page layout updates immediately to reflect the new margins.
This numeric approach is practical for quick margin tweaks or when you need to adjust the layout on the go. However, for detailed layout work or setting different margins for individual sections, you’ll find the Mac or iPad interfaces more flexible because they support dragging margin guides and managing sections with more precision.
For example, changing margins on iPhone is ideal when you want to quickly increase the top margin to add space for a header or reduce the bottom margin for fitting content before printing or exporting. Visual feedback after saving changes confirms the adjustment has taken effect.
Change page size in Pages across devices
Changing the page size in Pages affects both the margins available and the overall layout of your document. To modify the page size, you need to access Document Setup on your device. The options and interface differ slightly across Mac, iPad, and iPhone, but the process is straightforward on all.
- Open your document in Pages.
- On Mac, click File in the menu bar and select Page Setup. On iPad and iPhone, tap the More button (three dots), then tap Document Setup.
- Locate the Paper Size dropdown or section. On Mac, you’ll see a list of standard sizes such as Letter, A4, Legal, and others, plus the option to select Manage Custom Sizes to create your own dimensions. On iPad and iPhone, standard sizes appear similarly but with a simplified interface and no custom size creation.
- Choose your desired page size. For example, switching from Letter (8.5 x 11 inches) to A4 (8.27 x 11.69 inches) adjusts the document width and height accordingly. After selection, click or tap OK or close Document Setup to apply the change.
- Observe how the text and elements reflow to fit the new page dimensions. Margins may adjust automatically to fit the new size, or you might need to revisit margin settings to maintain your preferred layout.
- If you require consistent formatting across different page sizes, consider setting margins proportionally after resizing. For instance, when moving from Letter to A4, slightly increasing side margins can preserve text readability and appearance.
Example: On Mac, switching from Letter to Legal size expands the vertical space, allowing more lines per page without changing font size. On iPad, switching from A4 to smaller sizes reduces the visible text area, so text reflows to fewer lines per page. On iPhone, the smaller screen size means page size changes mainly affect print layout rather than on-screen appearance.
Remember, while Mac offers custom page size creation, iPad and iPhone limit you to preset sizes, which can restrict highly specific layout needs. Regularly preview your document after resizing to ensure margins and text flow meet your expectations.
Change margins for specific pages in Pages and Word
To apply different margins to individual pages in Pages, you need to use section breaks. Sections isolate parts of your document, allowing you to set unique margin values for each section. This is especially useful for documents like reports or books where certain pages, such as title pages or chapter openings, require distinct layouts.
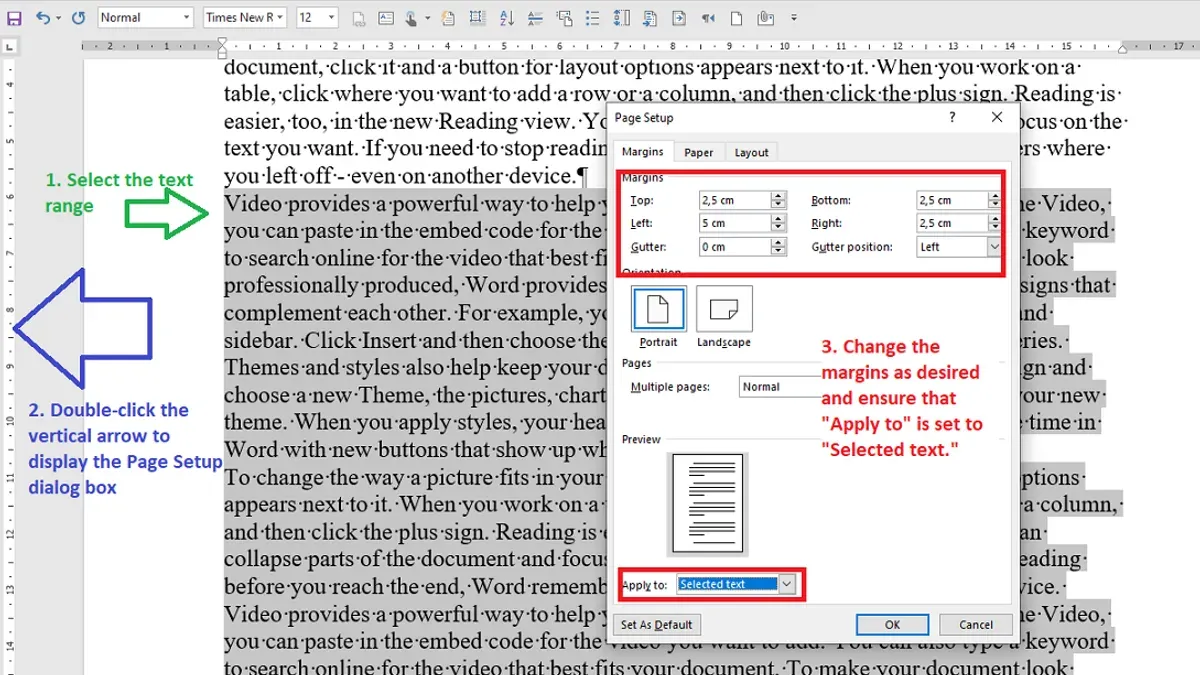
- Place your cursor at the end of the page before the one you want to have different margins. This marks where you will insert the section break.
- On Mac, go to the Insert menu and choose Section Break. On iPad, tap the More button (three dots), select Document Setup, then tap Add Section Break. You should see a new section start on the next page.
- With the cursor in the new section, open the Document sidebar on Mac or Document Setup on iPad, then adjust the page margins as needed. These margin changes will only affect the current section.
- To return to the original margins, place another section break after the pages with unique margins and adjust accordingly.
For example, you might have a first section with 1-inch margins for the main text, and a second section starting on page 5 with 0.5-inch margins for a table or image-heavy layout. Each section preserves its margin settings independently.
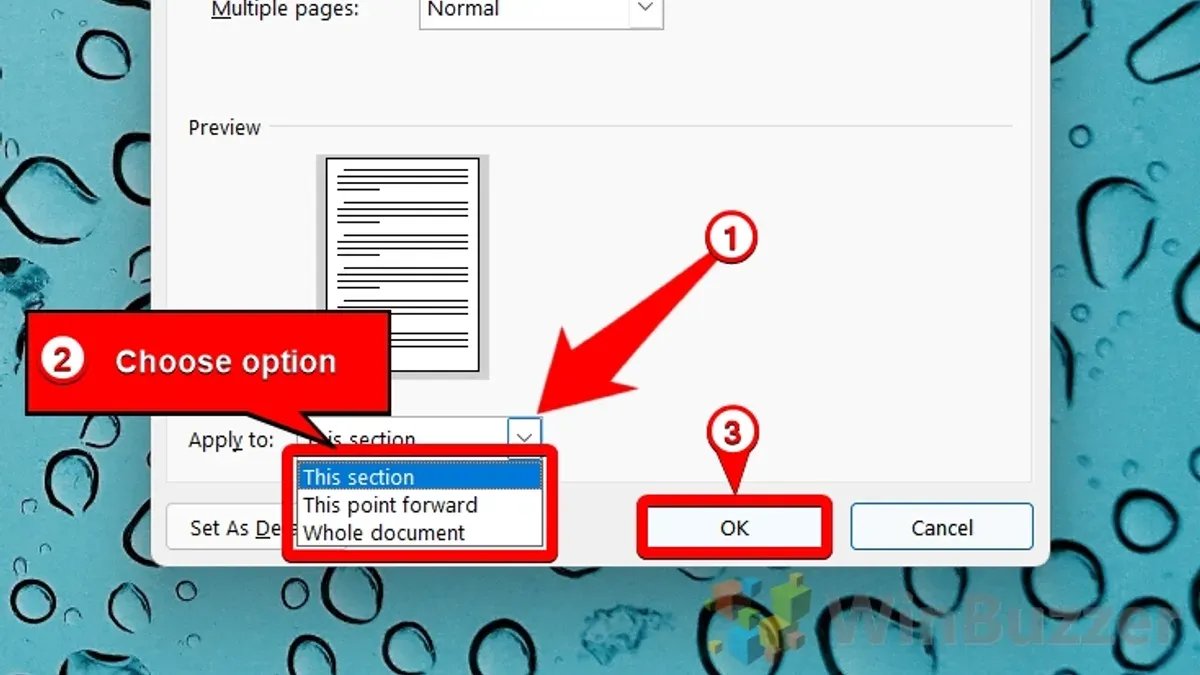
In Microsoft Word, changing margins for a single page also relies on section breaks, but Word provides a dialog where you can specify if margin changes apply to the whole document, this section, or from this point forward. This makes margin control slightly more direct but conceptually similar.
Using section breaks to control margins per page lets you customize your document layout flexibly without affecting the entire file, which is essential for professional and complex documents.
Troubleshoot common margin and page size issues in Pages
When margins don’t update as expected, the most common cause is missing or misplaced section breaks. Pages applies margin settings per section, so if you try to change margins without inserting a section break, the changes won’t affect the intended pages. Always verify your document’s sections by selecting View > Show Layout or toggling section breaks visible.
Changing page size can sometimes cause content overflow or unexpected layout shifts. This happens because the new page dimensions may be smaller or larger than the original, affecting text wrapping and image placement. After resizing, review your content carefully, adjusting text boxes or images as needed to prevent clipping or excessive white space.
On iPad and iPhone, you cannot drag margin guides, which can be confusing if you’re used to the Mac interface. Instead, use the numeric margin inputs in Document Setup for precise changes. If margin adjustments seem unresponsive, check that you’re editing the correct section and that no conflicting settings override your changes.
Pages behaves differently across Mac and mobile devices due to interface and feature variations. For example, the Mac allows dragging margin guides and more granular control, while iOS devices focus on numeric entry. Preview your document on each device when possible, especially before printing, to ensure consistent layout.
To preview and print correctly after margin or page size changes, use File > Print Preview on Mac or tap the More button > Print Preview on iPad and iPhone. This helps catch any unwanted layout issues before printing or exporting. Adjust margins or content placement as needed, then recheck the preview.
- Check for section breaks by selecting View > Show Layout. You should see section boundaries; if not, insert a section break where you want different margins. When done correctly, margin changes will apply only to that section.
- Change the page size and observe your content. If text or images overflow the page edges, resize or reposition them to fit. Successful adjustment means all content remains fully visible within the page boundaries.
- On iPad or iPhone, open Document Setup, enter exact margin values, and confirm changes. Since dragging is unavailable, numeric input must be precise. If margins update, you will see the text area shift accordingly.
- Preview your document using Print Preview after making margin or page size changes. The preview should match your intended layout without cutoff or unexpected spacing.
- If issues persist, revisit section breaks and margin settings to ensure no conflicting formats exist. Correct configuration results in consistent margins across your document’s sections.
Frequently asked questions
How to change page margins in docs?
To change page margins in Google Docs, go to File > Page setup. In the dialog box, you can enter new margin values for Top, Bottom, Left, and Right. After adjusting, click OK to apply the changes to the entire document.
How to edit page margins?
Editing page margins depends on the app you're using. Generally, you find margin settings under Page Setup or Document Setup. For example, in Pages on Mac, click the Document button, then adjust margins in the sidebar. Remember that margins affect the whole document unless you apply section breaks.
How to page down to change margins?
"Page down" typically refers to scrolling, not margin changes. To adjust margins, you don't use keyboard navigation but access margin settings via menus or sidebars. In Pages, open the Document settings and modify margins directly—no need to navigate pages first.
How to change page size in pages iphone?
On your iPhone, open the Pages document and tap the More (•••) button at the top right. Select Document Setup, then tap Paper Size. Choose a different size like Letter or A4, and the change applies immediately to your document.
How to change page margins in pages on ipad?
Open your document in Pages on iPad and tap the More (•••) icon, then select Document Setup. Scroll to the Margins section and adjust the Top, Bottom, Left, and Right margins by tapping and entering new values. This updates the margins for the entire document.
What This Guide Does Not Cover
This guide does not cover advanced document layout software beyond Pages and Word, nor does it address margin changes in PDFs or other file formats. Changing margins for specific pages requires careful management of section breaks; users unfamiliar with creating and handling sections may find this process challenging. Additionally, some margin adjustments on iPhone and iPad are more limited compared to Mac due to interface constraints and simplified menus.
The single most useful next step is to practice adjusting margins on a test document for your device, paying special attention to the Document sidebar on Mac or the Format pane on iPad and iPhone. Experiment with creating section breaks if you need different margins on specific pages, as mastering this will give you greater control over your document layout. This hands-on approach reveals details easily missed in menus and helps you confidently customize your Pages documents.
See also: How to Add Page Numbers in Pages: Step-by-Step for Mac, iPad, and iPhone · How to Add a Table of Contents in Pages: A Complete Step-by-Step Guide · How to Add Footnotes in Pages: A Step-by-Step Guide · How to Track Changes in Pages: A Clear Step-by-Step Guide