How to Convert PNG to JPG in Preview: A Step-by-Step Guide
Quickly convert PNG images to JPG using Preview on Mac with this easy step-by-step guide and understand when to use each format.
You have a PNG image that you need to convert to JPG quickly and without extra software. Maybe you're preparing images for a website or email where JPG files are preferred for their smaller size. Knowing how to convert PNG to JPG in Preview can save you time and keep your workflow smooth on your Mac.
This article guides you step-by-step through the process using Preview, the built-in macOS app. You'll also learn when to choose PNG or JPG based on their characteristics, helping you make confident decisions about image formats. By the end, converting images and understanding their differences will be straightforward.
Key takeaways
- Preview lets you convert PNG to JPG using the Export feature without extra apps.
- JPG files are generally smaller but use lossy compression, making them ideal for photos and web use.
- PNG supports transparency and lossless compression, better for graphics and images needing sharp edges.
- Always check Export settings to adjust image quality and format before saving.
Before you start: What you need to convert PNG to JPG in Preview
To convert PNG to JPG using Preview, make sure you have a Mac with the Preview app installed. Preview comes pre-installed on macOS, so you won’t need to download anything extra. Next, locate the PNG or JPG image file you want to convert. Knowing where your image is stored—whether on your desktop, in the Downloads folder, or elsewhere—will save time when you open it in Preview.
Understanding the differences between PNG and JPG formats will help you decide which format suits your needs best. PNG supports transparency and lossless compression, making it ideal for images needing clear backgrounds or sharp detail. JPG uses lossy compression, which reduces file size significantly but may result in some quality loss. This trade-off is important depending on how you plan to use the image.
Before converting, back up your original files to prevent accidental loss or overwriting. You can duplicate your image by right-clicking the file and selecting "Duplicate" or copying it to a different folder. This way, you always have the original version if you want to revert.
| Characteristic | PNG | JPG |
|---|---|---|
| Compression | Lossless (no quality loss) | Lossy (some quality loss) |
| Transparency | Supports transparent backgrounds | Does not support transparency |
| File Size | Usually larger | Usually smaller |
- Confirm your Mac has the Preview app (it is usually in the Applications folder). You should be able to open Preview from Launchpad or Spotlight search.
- Find the PNG or JPG image file you want to convert. When located, you should see the file icon and name clearly.
- Decide which format you want after conversion by reviewing the characteristics in the table above to match your needs.
- Create a backup by right-clicking the image file and selecting "Duplicate" or copying it to a safe folder. You’ll see a copy of the file appear in the same location or selected folder.
Open your image file in Preview
To begin converting your PNG to JPG, you first need to open the image file in Preview. Locate the image in Finder by navigating to the folder where your file is saved. This step ensures you select the correct file before proceeding.
- Find the PNG file you want to convert in Finder. When you see it, right-click (or Control-click) on the file.
- From the context menu that appears, hover over Open With, then click Preview. This action opens your image in Preview regardless of your default image viewer.
- If Preview is already set as your default app for images, simply double-click the file instead. The image should open directly in Preview.
- Once Preview opens the image, confirm it loaded correctly by checking the image is visible and appears without distortion or errors.
- To check the current format, go to the menu bar and select Tools > Show Inspector or press Command-I. In the inspector window, look under the General Info tab to see the file format listed (e.g., PNG).
Following these steps ensures you have the right file open in Preview and confirms its format before conversion. This careful start helps avoid confusion later in the process.
How to convert PNG to JPG in Preview
Once you have your PNG image open in Preview, converting it to JPG is straightforward. This process involves exporting your image in the new format while giving you control over the quality and file size.
- Click on the File menu at the top of your screen and select Export…. A dialog box will appear showing export options.
- In the export dialog, find the Format dropdown menu and select JPEG. This changes the file type from PNG to JPG.
- Adjust the Quality slider to balance image quality and file size. Moving the slider towards High preserves more image detail but results in a larger file. For example, at maximum quality, the JPG file might be several megabytes, while lowering quality to medium can significantly reduce the size with minimal visible loss.
- Choose the folder where you want to save the JPG file and enter a new file name if you don’t want to overwrite the original image.
- Click Save. Preview will create the JPG file in the chosen location.
- To confirm the conversion worked, locate the new JPG file in Finder and open it with Preview or another image viewer. Check that the image displays correctly and that the file size matches your expected quality setting.
By controlling the quality slider, you can optimize your JPG for web use or printing. Remember, JPG compresses images using lossy compression, so very low quality settings may introduce visible artifacts, while higher settings keep your image crisp but larger.
How to convert JPG to PNG in Preview
Converting a JPG image to PNG in Preview is straightforward and useful when you need lossless compression or transparency support. PNG files generally have larger file sizes than JPGs because they retain all image data without compression losses, but they are ideal for images requiring sharp edges or transparent backgrounds.
- Open your JPG image file in Preview. You should see the image displayed clearly without distortion.
- Click on the File menu at the top of your screen, then select Export… from the dropdown. This opens the export dialog.
- In the export window, click the Format dropdown menu and choose PNG. This sets the output file format.
- Optionally, adjust the Resolution or Alpha (if available) to include transparency if your image supports it. Transparency is a key advantage of PNG over JPG.
- Choose the destination folder and enter a new file name if you want to keep your original JPG.
- Click Save. Preview will create the PNG file, which you can verify by selecting it and choosing Get Info or checking the file extension.
Keep in mind that the PNG file will usually be larger than the original JPG because PNG uses lossless compression and preserves image details. This makes PNG ideal for graphics that require transparency or sharper detail, while JPG is better for photographs where smaller size is a priority.
How to convert PNG to JPG or PDF in Preview
After converting a PNG image to JPG using the export function, you might also want to save your PNG as a PDF, which is especially useful for sharing documents or combining images with text in a fixed layout. Preview makes converting to PDF straightforward and preserves the image quality without compression artifacts common in JPGs.
- Open your PNG image in Preview and confirm it displays correctly.
- Go to the menu bar and click File, then choose Export as PDF….
- In the dialog box, enter a file name and select the save location where you want to keep the PDF file.
- Click Save. The PNG is now saved as a PDF file.
- Double-click the new PDF file to open it in Preview and verify it looks as expected.
PDFs are ideal when you need a format that preserves image quality and layout for printing or sharing, such as scanned documents or images intended for professional use. Compared to JPG, PDFs typically create larger files but maintain crispness and support multiple pages if needed.
Choosing JPG is better for photos or images destined for web use where smaller file size and faster loading matter. PDFs suit cases where fidelity and consistent presentation across devices are priorities. With Preview, you can easily switch between these formats to meet your specific needs.
Troubleshooting common issues when converting images in Preview
Sometimes you may encounter problems while converting images in Preview. A frequent issue is Preview not opening certain image files. This often happens if the file is corrupted or in an unsupported format. To check, try opening the file with another app or verify the file extension. If you see an error like "The document could not be opened," the file might be damaged or not truly an image.
If the export options are greyed out, first ensure the file is not locked. You can check this by selecting the file in Finder, pressing Command + I to open Info, and confirming the "Locked" checkbox is unchecked. Also, Preview disables export options if the file is corrupted or if permissions prevent editing.
Another common confusion is when the quality setting during export does not seem to affect the output file size. Preview uses JPEG compression that balances quality and file size but may not reflect significant differences with small quality adjustments. For example, lowering quality from 90% to 85% might not noticeably reduce file size. Always check the exported file's properties to confirm.
If your converted file is larger than expected, remember that JPEG compression reduces size by losing some image details, but PNG compression preserves all data and can result in larger files. Converting a simple PNG with few colors to JPG usually reduces size, but complex images might behave differently depending on content and compression.
When you encounter error dialogs like "Failed to export the file," try saving to a different location or renaming the file to avoid conflicts. If problems persist, restarting Preview or your Mac can clear temporary glitches.
Understanding the difference between JPG and PNG formats for conversion
When deciding between JPG and PNG formats in Preview, understanding their core differences ensures you choose the best option for your needs. JPG uses lossy compression, which reduces file size significantly but sacrifices some image detail. This makes JPG ideal for photographs and images without transparency where smaller files are preferred. For example, a typical photo saved as JPG will be much smaller than the same photo saved as PNG.
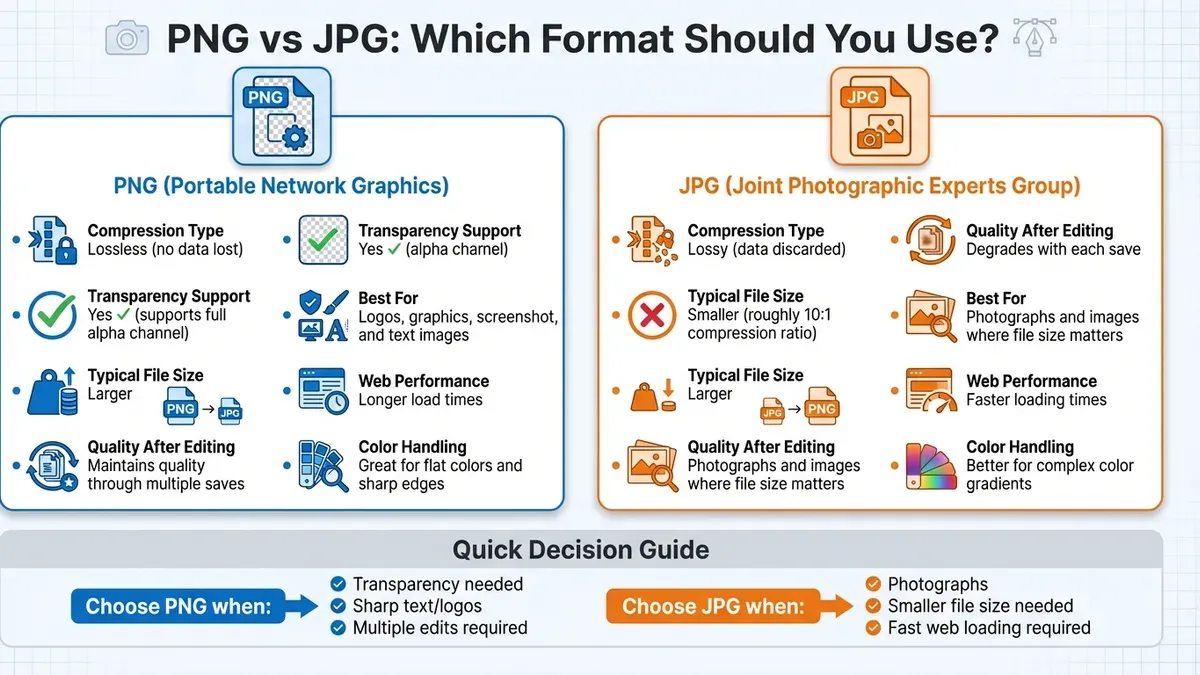
PNG, on the other hand, uses lossless compression, preserving all original image data, which results in larger file sizes. It also supports transparency and is excellent for graphics, logos, and images needing crisp edges. When you convert a JPG to PNG, the quality does not improve because the original compression loss cannot be reversed. Instead, the file size usually increases, so converting JPG to PNG is best only if you need transparency or editing flexibility.
Sometimes, sharing or printing your image might call for converting to PDF instead. PDF preserves layout and quality, making it suitable for documents or multi-page files where consistent appearance is important. Preview allows easy conversion to PDF for these scenarios, complementing JPG and PNG options.
| Format | Compression Type | Supports Transparency | Typical Use | File Size |
|---|---|---|---|---|
| JPG | Lossy | No | Photos, web images | Smaller |
| PNG | Lossless | Yes | Graphics, logos, images needing sharp edges | Larger |
Frequently asked questions
How to convert to png or jpg?
To convert an image to PNG or JPG using Preview, open your file, then go to the File menu and select Export. In the Format dropdown, choose either PNG or JPEG before saving. Adjust the quality slider for JPEG if needed, then click Save to complete the conversion.
When converting from jpg to png?
Convert from JPG to PNG when you need lossless compression, transparency support, or better quality for images with sharp edges or text. PNG preserves image details better than JPG, which uses lossy compression that can cause artifacts.
How to convert from jpg to png?
Open the JPG image in Preview, go to File > Export, and select PNG from the Format dropdown menu. Choose your destination and click Save. This creates a PNG copy without altering the original JPG file.
How to convert to jpeg or png?
In Preview, use File > Export to switch between JPEG and PNG formats. Pick JPEG for smaller file sizes and photos, or PNG for images requiring transparency or higher quality. Adjust JPEG quality on the slider before saving.
How to convert jpg image to png?
Simply open the JPG image in Preview, select File > Export, then choose PNG as the output format. Confirm the save location and click Save to create a PNG version of your JPG image.
What This Guide Doesn’t Cover
Preview does not support batch conversion of multiple images at once, so if you need to convert many files, you will have to convert them individually or use dedicated software designed for bulk image conversion. Additionally, converting a JPG to PNG does not restore any lost image quality because JPG uses lossy compression. The resulting PNG file will simply be larger but won’t regain any detail or sharpness.
If your workflow demands automation or maintaining the highest possible image quality during format changes, consider specialized tools like Adobe Photoshop or command-line utilities such as ImageMagick.
For your next step, try converting a PNG image to JPG in Preview on your Mac to see the settings for quality and file size firsthand. This hands-on practice will help you understand the balance between image clarity and file size, empowering you to make the best format choice for your needs.
See also: How to Annotate a PDF in Preview: A Clear Step-by-Step Guide · How to Sign a PDF in Preview: Step-by-Step Guide for Mac Users · How to Combine PDFs in Preview: A Clear Step-by-Step Guide