How to Format a USB Drive as exFAT Using Disk Utility
Step-by-step guide to formatting a USB drive as exFAT in Disk Utility for cross-platform compatibility between Mac and Windows.
You have a USB drive that you want to use with both Mac and Windows computers, but the current format isn't compatible with both systems. Formatting it as exFAT is often the best choice for cross-platform use, and Disk Utility on your Mac makes this process straightforward.
This article guides you step-by-step on how to format a USB drive as exFAT in Disk Utility, explaining each action clearly so you can follow along confidently. You'll also learn when exFAT is the right format to choose, helping you make an informed decision before erasing your drive.
Key takeaways
- exFAT works well for USB drives used on both Mac and Windows computers.
- Use Disk Utility's Erase function to format your USB drive as exFAT safely.
- Double-check the selected drive and format to avoid accidental data loss.
- Safely eject your USB drive after formatting to prevent corruption.
- Troubleshooting tips can help if you encounter errors during formatting.
Before You Start: What You Need to Format a USB Drive as exFAT
To format a USB drive as exFAT using Disk Utility, you first need to ensure you have the right tools and understanding. The USB drive must be compatible with exFAT, which is typically supported by most modern flash drives and external hard drives. Your Mac must have Disk Utility installed, which comes pre-installed on all macOS versions, so no extra downloads are necessary.
Before you begin, remember that formatting erases all data on the USB drive. It’s essential to back up any important files elsewhere to avoid permanent loss. Also, having a basic understanding of file systems helps you make an informed decision. exFAT is often preferred because it works seamlessly across macOS and Windows, making it ideal if you plan to use the drive on different operating systems.
Here is a checklist to prepare:
- Confirm your USB drive is connected and recognized by your Mac; you should see it in Finder or Disk Utility.
- Back up all data on the USB drive to another location to prevent data loss.
- Understand that exFAT supports large files and cross-platform use, unlike formats such as FAT32 which have file size limits.
- Ensure your Mac is running macOS with Disk Utility accessible via Applications > Utilities.
By meeting these requirements, you’ll be ready to proceed confidently to format your USB drive as exFAT.
Open Disk Utility and Select Your USB Drive
To begin formatting your USB drive, you first need to open Disk Utility. You can find this app by navigating to Applications > Utilities > Disk Utility. Once launched, the Disk Utility window will display a sidebar listing all available drives connected to your Mac.
In the sidebar, you'll see both internal drives and any external drives, including your USB device. Internal drives are typically listed under your Mac's name and often have several volumes nested beneath them. External drives appear separately, often labeled with their brand or the drive’s name.
Look carefully for your USB drive by checking its name, size, and connection type. For example, if you have a 32GB USB drive plugged in, it should appear with that approximate size and likely as an external device. Selecting the correct drive is critical: choosing the wrong one could erase important data from your Mac’s internal storage.
- Open Disk Utility via Applications > Utilities. You should see a list of drives on the left.
- Identify your USB drive by its name and size—for instance, a 32GB external USB stick named “MyUSB”.
- Click on the USB drive itself, not any volumes listed beneath it, to select the entire device. When selected, its details appear on the right side of the window.
- Confirm you have the correct drive by verifying size and connection type shown under the drive name.
Erase the Drive and Choose exFAT Format
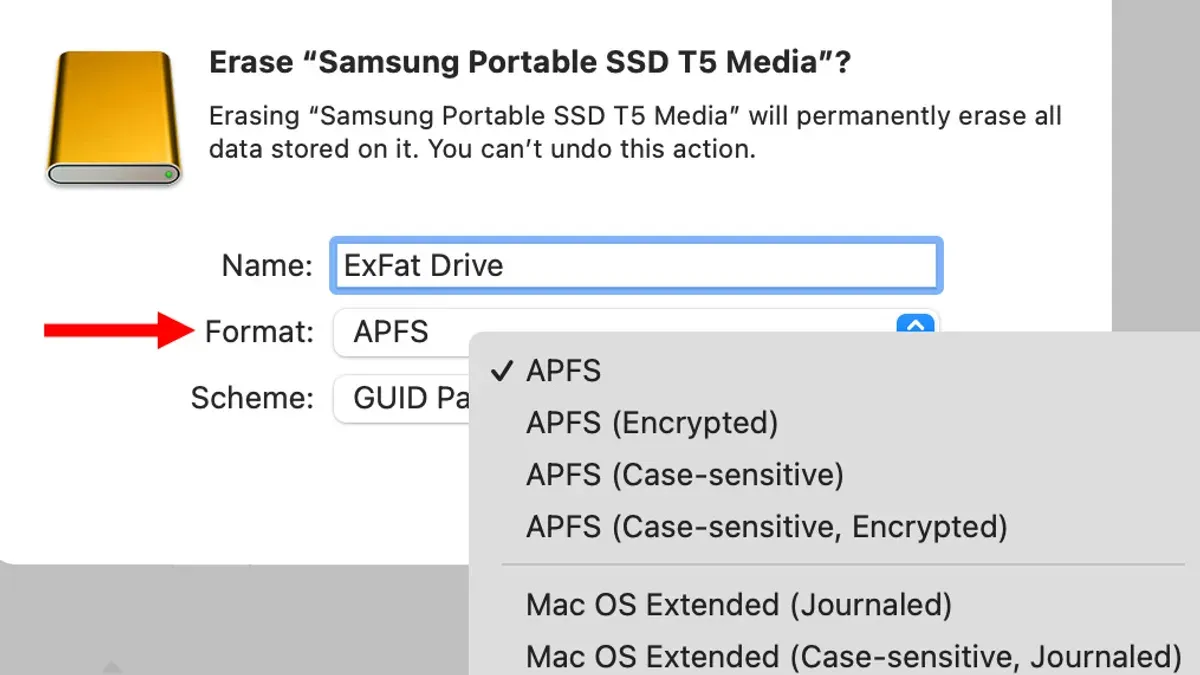
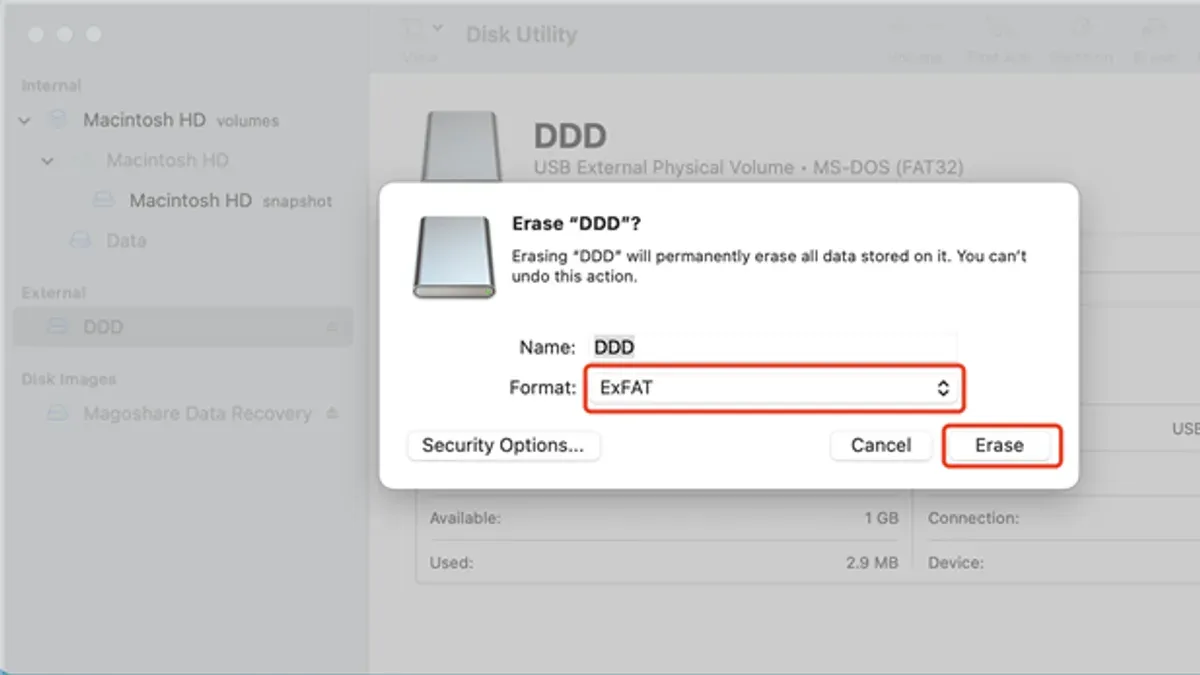
- Click the Erase button at the top of the Disk Utility window. This opens the erase dialog, where you can configure how the drive will be formatted.
- In the Name field, enter a clear and descriptive name for your USB drive. This is the label that will appear when you connect the drive to your Mac or other devices.
- Next, click the Format dropdown menu and select exFAT. This format is ideal for drives you want to use with both Mac and Windows systems, supporting large files and volumes.
- Under the Scheme dropdown, choose the partition scheme that fits your needs. GUID Partition Map is recommended for most users, especially if you plan to use the drive mainly with Macs or modern PCs. Master Boot Record (MBR) is suitable if you need compatibility with older Windows PCs or certain devices like some gaming consoles.
- Review your settings carefully, then click Erase to start the process. Disk Utility will reformat the drive accordingly, and you’ll see a progress indicator. Once complete, the drive will be ready to use with the exFAT format.
Partition Scheme Compatibility
| Partition Scheme | Best For | Compatibility |
|---|---|---|
| GUID Partition Map | Macs, modern Windows PCs, large drives | Wide Mac and Windows support; required for bootable macOS drives |
| Master Boot Record (MBR) | Older Windows PCs, some gaming consoles | Limited to smaller drives; less support for macOS booting |
Verify the USB Drive Is Formatted as exFAT
After formatting your USB drive, it’s essential to confirm that the process was successful and that the drive is ready to use. You can do this easily within Disk Utility by checking the drive’s information panel. This panel displays the format and partition scheme, which should show exFAT as the file system. Additionally, you can verify that the drive mounts correctly in Finder, as this confirms your Mac recognizes and can access the formatted drive.
- Open Disk Utility from the Utilities folder in Applications.
- Select your USB drive from the sidebar. Avoid selecting any internal drives.
- Click the Info button (an i icon) or press Command + I.
- In the info panel, look for the File System entry; it should read exFAT. You may also see the partition scheme, such as GUID Partition Map.
- Close Disk Utility and open Finder. Check that your USB drive appears in the sidebar under Locations. Clicking it should show an empty or accessible drive with no errors.
- For advanced users, open Terminal and type
diskutil info /Volumes/YourDriveName(replace YourDriveName with your drive’s actual name). The output will include a line like File System Personality: exFAT, confirming the format.
Here is an example snippet from Disk Utility’s info panel:
File System: exFAT
Partition Map Scheme: GUID Partition Map
And an example Terminal output:
File System Personality: exFAT
Type (Bundle): exfat
By following these steps, you ensure that your USB drive is correctly formatted as exFAT and ready for file transfers across different operating systems.
Safely Eject Your USB Drive After Formatting
After formatting your USB drive as exFAT, it's crucial to eject it properly to prevent data corruption or loss. The safest way to do this is through Finder, which ensures all read/write operations finish before you remove the drive.
- Open a Finder window and locate your USB drive under "Locations" in the sidebar. You should see the drive's name displayed here.
- Click the eject icon next to your USB drive's name. Alternatively, you can right-click (or Control-click) the drive and select "Eject" from the context menu.
- Wait for the drive to disappear from the Finder sidebar. This indicates the drive has unmounted and is safe to remove.
- Physically unplug the USB drive from your Mac only after it has fully unmounted.
If you remove the USB drive without ejecting it first, ongoing data transfers may be interrupted. This can lead to corrupted files or even damage the file system, requiring you to reformat the drive again. Taking a moment to eject correctly protects your data and prolongs the life of your USB drive.
Troubleshoot Common Issues When Formatting as exFAT
If your USB drive doesn’t appear in Disk Utility, first disconnect and reconnect it, then try a different USB port. If it still doesn’t show, restart your Mac and check again. Persistent invisibility may indicate hardware failure or a damaged drive that Disk Utility cannot recognize.
When you encounter erase failures or format errors such as “Erase process has failed” or “Unable to write to the device,” run First Aid from Disk Utility on the USB drive before formatting. To do this, select your drive, click the First Aid button, and wait for the process to complete. Successful First Aid repair will allow you to proceed with formatting.
Keep in mind that exFAT has limitations: some very old USB drives or devices with hardware faults may not support exFAT formatting. If errors persist after First Aid, consider testing the USB drive on another Mac or using alternative formatting tools. If the drive is physically damaged, replacement might be necessary.
- Disconnect and reconnect your USB drive, then check Disk Utility for its appearance. If visible, proceed; if not, restart your Mac and check again.
- If the drive appears but erase fails, select the drive in Disk Utility, click First Aid, and run the repair. You should see a confirmation that the disk appears to be OK.
- After First Aid, attempt to erase and format as exFAT again. If successful, you will see your USB drive listed with exFAT as the format.
- If errors continue, test the USB drive on another Mac or consider that hardware issues might prevent formatting.
Frequently asked questions
What is the difference between exFAT and other file systems like FAT32 or APFS?
exFAT is designed for compatibility across different operating systems and supports large files over 4GB, unlike FAT32 which has a 4GB file size limit. APFS is optimized for macOS with features like snapshots and encryption but is not natively supported by Windows. Choosing exFAT provides a good balance when you need cross-platform use and large file support.
Can I use an exFAT formatted USB drive on both Mac and Windows computers?
Yes, exFAT is fully compatible with both macOS and Windows, making it ideal for sharing files between these systems. Unlike APFS, which is Mac-specific, exFAT allows you to read and write files on USB drives without additional software on either platform.
Will formatting a USB drive as exFAT erase all my data?
Yes, formatting a USB drive will erase all existing data on it. Before you start, make sure to back up any important files because the process deletes everything on the drive to prepare it for the new file system.
What should I do if Disk Utility fails to format my USB drive as exFAT?
If Disk Utility cannot format your USB drive as exFAT, first try ejecting and reconnecting the drive, then restart Disk Utility. If problems persist, check the drive for physical issues using First Aid in Disk Utility or try formatting the drive on another Mac or Windows PC. In some cases, the drive may be faulty or write-protected, requiring replacement or unlocking before formatting.
What This Guide Does Not Cover and Who Should Seek Other Options
This guide does not cover data recovery after formatting; if you need to preserve existing data on your USB drive, make sure to back it up before proceeding. The exFAT format is best suited for external USB drives that require compatibility between macOS and Windows systems; it is not optimized for SSDs or internal drives, so avoid using exFAT for those purposes. Also, formatting options and the Disk Utility interface can vary slightly depending on your macOS version. This guide focuses on the most common layout and settings, but some details might differ on your machine.
Now that your USB drive is formatted as exFAT, the most useful next step is to test the drive by copying a variety of files to it and then accessing them on both your Mac and, if applicable, a Windows PC. This practical check confirms the drive works as expected and ensures the format suits your needs for cross-platform file sharing.
See also: How to Erase a Drive in Disk Utility: A Clear Step-by-Step Guide · Step-by-Step Guide to Partitioning a Drive Using Disk Utility