How to Run First Aid in Disk Utility: A Step-by-Step Guide
This guide shows you how to run First Aid in Disk Utility to quickly diagnose and repair common disk errors on your Mac.
You notice your Mac is running slower than usual or some files won’t open properly. It could be due to disk errors that need repairing. Learning how to run First Aid in Disk Utility can help you diagnose and fix many common disk problems quickly and safely.
This article guides you through the process step-by-step, showing you exactly where to find and activate First Aid on your Mac. You’ll also understand what happens when you run First Aid, how to interpret its results, and what to do if it encounters problems. Whether you’re working with internal drives, external disks, or APFS volumes, this guide will build your confidence to troubleshoot disk issues effectively.
Key takeaways
- First Aid checks and repairs disk errors using Disk Utility’s built-in tools.
- Access First Aid from the Disk Utility app or macOS Recovery for deeper repairs.
- Interpreting First Aid results helps decide if further action or backups are needed.
- Running First Aid on external drives and APFS volumes follows similar steps but requires selecting the correct volume.
- Troubleshooting common failures often involves restarting in Recovery mode or using Terminal commands.
Before you start: What you need and why
First Aid in Disk Utility is designed to check your Mac’s storage devices for errors and attempt basic repairs. It's a helpful tool when you notice issues such as slow performance, unexpected crashes, or if your Mac displays a message like “The disk you inserted was not readable by this computer.” However, First Aid is not a data recovery tool, so it won’t restore lost files but focuses on fixing disk integrity problems.
Before running First Aid, ensure you have a Mac with access to Disk Utility, which is found in the Utilities folder within your Applications. It’s strongly recommended to back up important data beforehand, as repairing disk errors can sometimes cause data loss if the disk is severely damaged.
You should consider running First Aid when you receive system alerts about disk problems, notice unusual behavior related to file storage, or after your Mac has experienced an improper shutdown. For example, if you see an error like “Disk verification failed” or “The volume Macintosh HD could not be repaired,” these are clear signals to run First Aid.
- Locate Disk Utility using Spotlight search or by navigating to Applications > Utilities > Disk Utility. When you open it, you should see a list of your connected disks and volumes.
- Identify the disk or volume you want to check, such as “Macintosh HD” for your startup disk. Selecting it will show details on the right pane.
- Confirm you have a recent backup of your data, either through Time Machine or another backup method, before proceeding with any repairs.
How to run First Aid in Disk Utility on your Mac
- Open Disk Utility: Navigate to Applications > Utilities and double-click Disk Utility. The app window will open, showing a sidebar with your disks and volumes listed.
- Select the disk or volume: In the sidebar, click the specific disk or volume you want to check. You should see its details appear in the main panel, including capacity, format, and status.
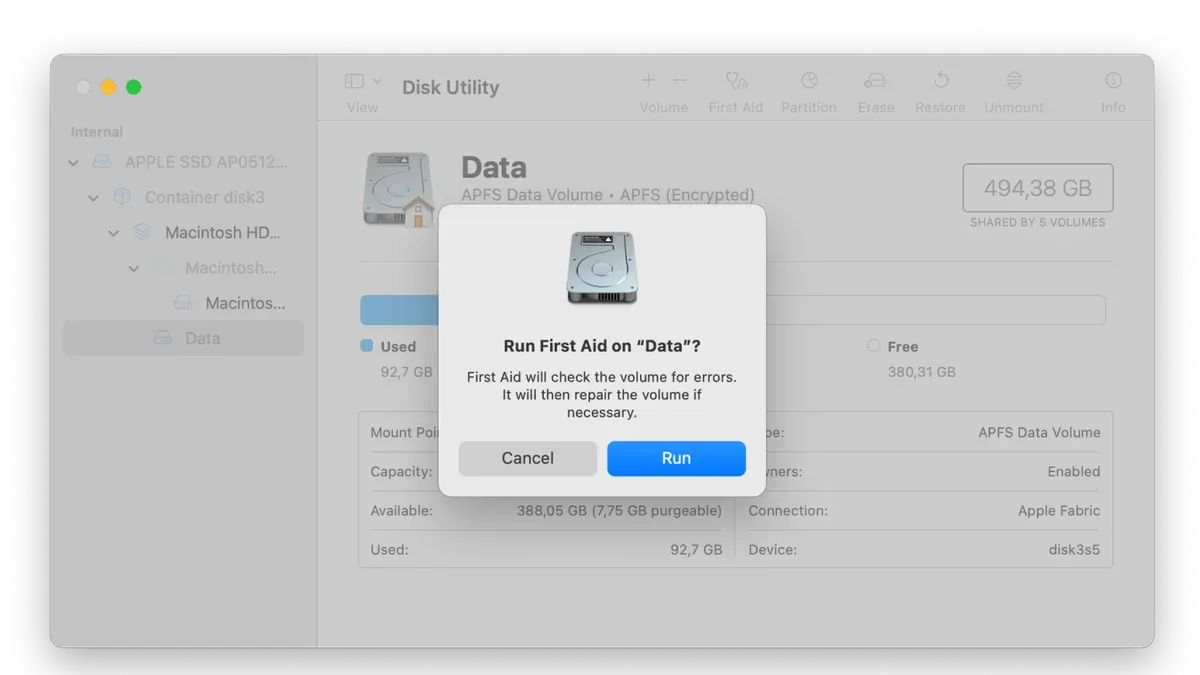
- Run First Aid: Click the First Aid button in the toolbar, then confirm by clicking Run in the prompt that appears. This starts the disk checking and repair process.
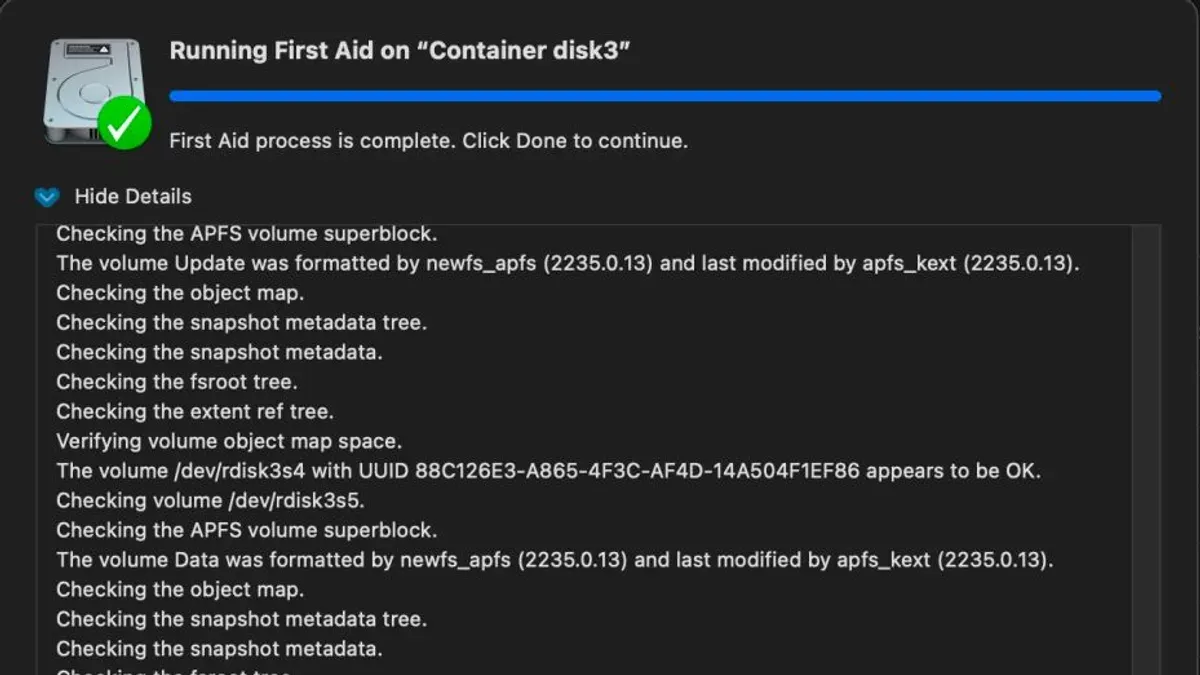
- Wait for completion: A progress bar and status messages will appear. Messages like "Checking file system" or "Verifying volume" indicate ongoing diagnostics. When finished, you’ll see a summary of the results.
- Review the results: If First Aid reports that the disk appears to be OK, no further action is needed. If issues were found and repaired, it will say so. If errors remain, it will advise additional steps, such as running First Aid again or using macOS Recovery.
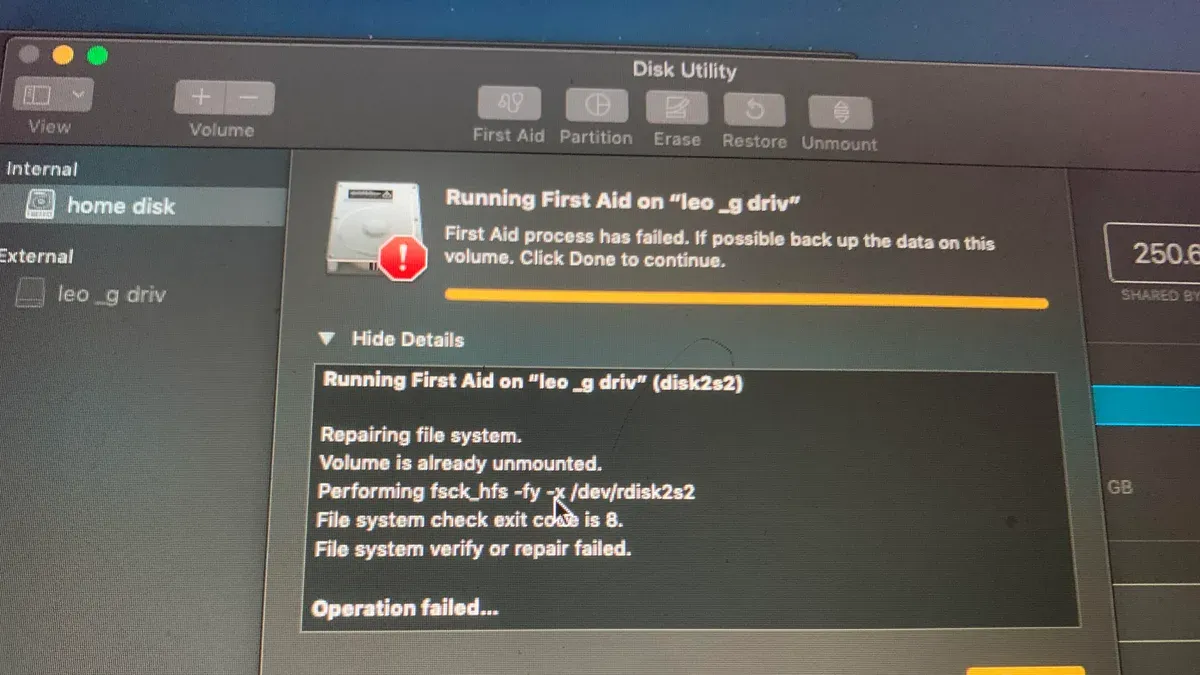
For example, after a successful check, you might see: "The volume Macintosh HD appears to be OK." For a partially repaired disk, a message like "File system check exit code is 8" may appear, indicating some corruption was fixed but further repairs might be necessary.
How to run Disk Utility First Aid from macOS Recovery
When your Mac won’t start up normally or disk problems prevent you from accessing Disk Utility through macOS, you can use macOS Recovery to run First Aid. macOS Recovery is a special startup mode that provides tools to repair your disk, reinstall macOS, and more, even if the main system is unbootable.
- Shut down your Mac completely. For Intel-based Macs, press the power button and immediately hold down Command (⌘) + R until you see the Apple logo or a spinning globe, indicating you’ve entered Recovery mode. For Apple silicon Macs, press and hold the power button until you see the startup options window, then click Options and Continue to enter Recovery.
- When the macOS Utilities window appears, select Disk Utility and click Continue. This opens Disk Utility in Recovery mode, where you can access all your internal and external volumes.
- Choose the disk or volume you want to check from the sidebar. Then click the First Aid button in the toolbar and confirm to start the check and repair process. You’ll see progress indicators and messages showing if any errors are found and fixed.
- After First Aid completes, quit Disk Utility. Then select Restart from the Apple menu to boot normally. Check if the disk issue is resolved by using your Mac as usual.
This approach helps when disk problems are severe enough to prevent normal startup or disk access. The Recovery interface is minimal but includes familiar Disk Utility controls. Typical screenshots show the macOS Utilities window with disk-related options and Disk Utility’s interface with the sidebar and First Aid button prominently displayed.
What does running First Aid in Disk Utility do?
When you run First Aid in Disk Utility, it performs a thorough check on your disk’s file system and directory structure. This process involves verifying the integrity of key components like the catalog files, allocation maps, and volume headers to detect inconsistencies or corruption. If any errors are found, First Aid attempts to repair them to restore the disk’s logical structure to a healthy state.
First Aid focuses on logical disk problems such as corrupted files, directory issues, and mismatched file system metadata. It uses underlying technology similar to the Unix-based fsck (file system consistency check) tool, which inspects and corrects file system errors. However, First Aid does not address hardware failures like bad sectors or physical damage, nor does it recover deleted files or lost data.
To illustrate, imagine the file system as a library’s catalog: before First Aid runs, the catalog might list books at incorrect shelf locations or have missing entries, causing confusion. After First Aid repairs, the catalog is reorganized correctly, making it easier for your Mac to find and access files smoothly. This verification and repair process helps maintain the overall health and performance of your storage device.
How to interpret First Aid results and next steps
After running First Aid in Disk Utility, you will see a message summarizing the outcome. Understanding these messages helps you decide what to do next. The most common results are:
- No errors found: This means your disk's file system is healthy. You can continue using your Mac normally, but keep regular backups to stay safe.
- Errors repaired: First Aid found and fixed issues. It's advisable to rerun First Aid one more time to confirm no further problems remain.
- Errors found but not fixed: First Aid detected problems it couldn't resolve. This can indicate more serious disk corruption or hardware issues.
If First Aid reports failure or cannot repair the disk, consider these next steps:
- Back up your data immediately if you haven't already. Copy important files to an external drive or cloud storage.
- Rerun First Aid to see if repeated attempts improve the situation.
- If problems persist, try running First Aid from macOS Recovery to access disk repair tools outside your main system.
- Use other disk management tools like Terminal’s fsck command for advanced users, or third-party disk repair utilities.
- If none of these steps help, consult a professional Apple technician or authorized service provider to diagnose potential hardware failures.
First Aid result dialogs often show messages such as “The volume [name] appears to be OK,” “File system check exit code is 0,” or “The underlying task reported failure.” These cues indicate success or failure and guide your response. Always review the detailed report in Disk Utility’s window to understand the specific issues found.
Troubleshooting common Mac Disk Utility First Aid failures
Sometimes, First Aid fails to complete successfully due to various reasons. One frequent cause is that the disk or volume is currently in use or locked, preventing repairs. In such cases, running First Aid from macOS Recovery mode often resolves the problem because the disk is not actively mounted or used by the system.
You may encounter specific error messages such as "First Aid process has failed," "Unable to repair the disk," or "The underlying task reported failure." These messages typically indicate more serious file system corruption or issues Disk Utility cannot fix automatically. When this happens, running the Terminal command fsck (file system consistency check) can be a helpful next step. This command allows manual repair attempts on unmounted volumes.
If repeated attempts with First Aid and fsck do not succeed, it might point to hardware failure such as a failing hard drive or SSD. In these cases, backing up data immediately and considering disk replacement or professional repair is necessary.
Steps to troubleshoot First Aid failures
- Restart your Mac and boot into Recovery mode by holding Command + R during startup. You should see the macOS Utilities window.
- Open Disk Utility from the Utilities menu and select the problematic disk or volume. Click First Aid and wait for it to complete. Success means the disk is repaired or confirmed healthy.
- If First Aid still fails, open Terminal from the Utilities menu in Recovery mode.
- Type
diskutil listand press Enter to identify the disk identifier (e.g., disk2s1) for the target volume. - Run
fsck_apfs -y /dev/disk2s1(replace with your disk identifier) to start the manual repair. The-yoption allows automatic fixes. - If fsck reports the volume is repaired, rerun First Aid in Disk Utility to confirm.
- If errors persist or hardware issues are suspected, back up your data immediately and consult Apple Support or a certified technician for drive replacement options.
How to run First Aid on external drives and APFS volumes
First Aid in Disk Utility works on both internal and external drives, including USB and Thunderbolt-connected disks. When you connect an external drive, it appears in the sidebar of Disk Utility alongside your internal disks. To run First Aid on an external drive, select that drive or one of its volumes, then click the First Aid button. When successful, Disk Utility will confirm the disk’s file system is verified or repaired.
APFS-formatted disks present a slightly different structure in Disk Utility. Instead of just volumes, you’ll see an APFS container that holds one or more APFS volumes. Each volume operates independently, so running First Aid on the container alone doesn’t always check every volume inside. You should run First Aid separately on each volume to ensure all are error-free.
- Connect your external USB or Thunderbolt drive to your Mac and open Disk Utility. You should see the drive listed in the sidebar under External.
- Select the external drive or an individual volume within the drive. For APFS disks, expand the container to see all volumes.
- Click the First Aid button in the toolbar.
- Confirm you want to run First Aid if prompted. Disk Utility will check the selected disk or volume.
- Wait for the process to complete. If Disk Utility reports no issues or successfully repairs errors, you’re done for that volume or disk.
- For APFS containers, repeat steps 2–5 on each volume to ensure all are checked.
Unlike HFS+ volumes where the disk and volume are typically the same, APFS's multi-volume design requires more targeted checks. This approach helps catch issues isolated to a single volume without affecting others. If First Aid finds errors that cannot be repaired on any external volume, consider backing up data and reformatting the drive.
Alternatives and complements to Disk Utility First Aid
If First Aid does not resolve your disk problems, consider other tools and approaches to diagnose and repair your Mac’s storage. Third-party disk repair utilities such as Drive Genius, DiskWarrior, or TechTool Pro offer advanced diagnostics and recovery features beyond what Disk Utility provides. These tools can handle complex directory repairs or detect issues that First Aid might miss, especially on severely corrupted volumes.
Sometimes restoring from a recent backup is a better option than repeatedly attempting repairs. If the disk errors persist despite multiple repair attempts, restoring from Time Machine or another backup ensures you have a clean, stable system state without risking further data corruption.
Using Safe Mode can help isolate software conflicts that might mimic disk problems. To enter Safe Mode, restart your Mac and hold the Shift key until the login window appears. If your Mac operates normally in Safe Mode, a software issue may be causing the symptoms. You can also try reinstalling macOS without erasing your disk, which refreshes system files while preserving your data.
Keep in mind that First Aid does not fix hardware failures or severe disk corruption. In such cases, professional diagnosis or disk replacement may be necessary. Knowing when to switch from software repairs to hardware solutions prevents wasted time and potential data loss.
Frequently asked questions
How to run first aid in mac?
To run First Aid on your Mac, open the Disk Utility app found in the Utilities folder within Applications. Select the disk or volume you want to check from the sidebar, then click the First Aid button in the toolbar. Confirm by clicking Run, and Disk Utility will check and attempt to repair any detected disk errors.
How to use first aid in disk utility?
Using First Aid in Disk Utility involves selecting the target disk or volume, clicking the First Aid button, and following the on-screen prompts. First Aid will verify the disk’s file system integrity and repair issues if possible. You should allow the process to complete fully without interrupting it for best results.
What is run first aid in disk utility?
Running First Aid in Disk Utility is a process that checks the health of your disk’s file system and attempts to fix directory and partition map errors. It helps maintain disk reliability by repairing logical issues that might cause data corruption or prevent your Mac from functioning properly.
How to run first aid for mac?
To run First Aid on a Mac, launch Disk Utility from the Utilities folder, select the disk or volume, and click First Aid. When prompted, confirm to start the process. If you experience issues or cannot boot normally, you can also run First Aid from macOS Recovery mode by restarting your Mac while holding Command-R.
How to run first aid on disk utility?
Open Disk Utility, choose the disk or volume needing repair, then click the First Aid button. Confirm by clicking Run in the dialog that appears. Wait for the verification and repair to finish before closing Disk Utility to ensure any detected problems are addressed properly.
What Running First Aid Does Not Cover
While First Aid in Disk Utility is a valuable tool for diagnosing and repairing certain disk errors, it cannot fix every problem. It does not address hardware failures, such as a failing hard drive or SSD, and it cannot recover lost or deleted files. If you suspect physical damage or data loss, you should seek professional help or use specialized recovery software. Think of First Aid as one step in a broader troubleshooting plan rather than a guaranteed fix for all disk issues.
Additionally, some disk problems may require more advanced tools or reformatting, which First Aid alone cannot perform. If you encounter repeated errors or persistent failures, consider backing up your data and consulting Apple Support or an authorized technician.
Take the Next Step: Regular Backups
After running First Aid and confirming your disk’s health, the most useful next step is to set up or maintain a reliable backup system. Use Time Machine or another trusted backup method to protect your data against future disk problems. Regular backups ensure that even if disk issues arise later, you can restore your important files without stress or data loss.
See also: How to Restore an Entire Mac Using Time Machine: Step-by-Step Guide