How to Erase a Drive in Disk Utility: A Clear Step-by-Step Guide
This guide explains how to erase a drive in Disk Utility with clear steps to safely prepare, erase, and troubleshoot your Mac drives.
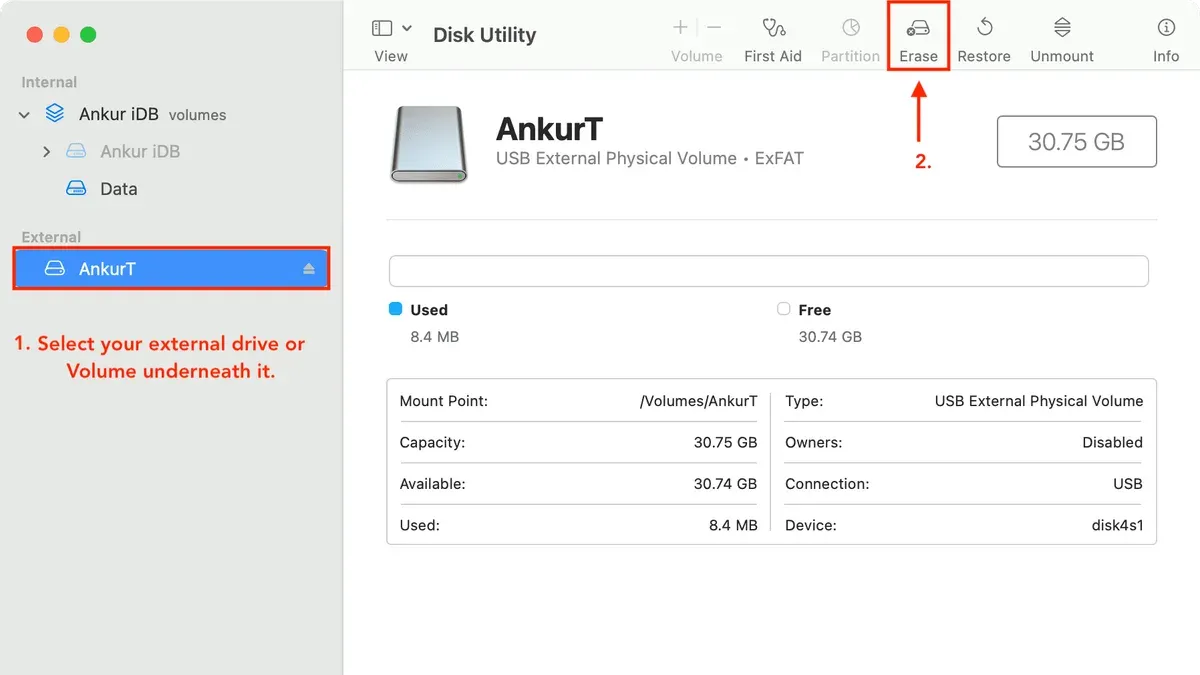
You’ve decided it’s time to erase a drive on your Mac, whether to free up space, prepare the drive for a new use, or securely wipe all data before selling or recycling. But the process can seem risky or confusing if you’re not sure exactly which steps to follow or what options to choose.
This article guides you through how to erase a drive in Disk Utility with clear, step-by-step instructions. You’ll learn how to prepare your Mac and the drive, navigate Disk Utility’s interface, confidently erase the drive, and troubleshoot common issues that might block the process. By the end, you’ll understand important decisions like choosing the right format and security options without risking data loss or confusion.
Key takeaways
- Prepare your Mac by backing up important data before erasing any drive.
- Use Disk Utility’s sidebar to select the correct drive, not just a volume.
- Choose the appropriate format and security options based on your needs.
- Unlock or unmount drives that can’t be erased initially to avoid errors.
- Understand differences when erasing drives on Windows compared to macOS.
Prepare your Mac and drive before erasing
Before you erase a drive using Disk Utility, backing up important data is crucial. Erasing a drive removes all stored data permanently, which cannot be undone. Use Time Machine for a comprehensive backup: connect an external drive, open System Preferences > Time Machine, and select your backup disk. Alternatively, manually copy essential files to an external drive or cloud storage. After backing up, verify you have the correct drive identified for erasure to avoid accidental loss.
Understanding which drive you want to erase is essential—distinguish between internal and external drives. Internal drives often contain your macOS system and critical files, so erasing them requires extra caution or may need you to boot into Recovery Mode. External drives are typically easier and safer to erase without affecting your system.
Drive formats matter. Disk Utility shows formats like APFS, Mac OS Extended (Journaled), exFAT, and others. Erasing a drive reformats it, replacing the existing file system. This is different from simply deleting files, which only removes pointers and can leave recoverable data. Erasing ensures the entire drive is clean and ready for new use.
Finally, ensure your Mac is connected to power and is not running on battery alone to prevent interruptions during the erase process. A sudden shutdown during erasure can corrupt the drive. Close all other applications to reduce the risk of system slowdowns or errors.
- Back up your data using Time Machine or copy files manually. Successful backup means you can restore files if needed.
- Open Disk Utility and carefully identify the drive you intend to erase; verify by checking its name, size, and location.
- Check the drive format displayed under each drive in Disk Utility to understand what format will be replaced.
- Connect your Mac to a power source and close other applications to prepare for a smooth erase process.
Open Disk Utility and locate the drive to erase
To erase a drive, you first need to open Disk Utility and find the correct drive in its sidebar. You can quickly open Disk Utility by clicking the Spotlight icon (magnifying glass) in the top-right corner of your screen, typing Disk Utility, and pressing Enter. Alternatively, you can open Launchpad from the Dock, navigate to the Other folder, and select Disk Utility there.
Once Disk Utility is open, you’ll see a sidebar on the left. This sidebar lists all the drives and volumes connected to your Mac. It’s important to distinguish between volumes and physical drives. Volumes are partitions or logical sections of a drive, often indented below the physical drive name. Physical drives represent the entire hardware device.
If you don’t see all drives listed, click the View menu at the top-left of the Disk Utility window and choose Show All Devices. This reveals the full device hierarchy, making it easier to select the entire drive rather than just a volume.
- Open Disk Utility via Spotlight or Launchpad. You should see the Disk Utility window with a sidebar on the left.
- Look at the sidebar to identify your drive. Physical drives appear as main entries; volumes appear indented beneath them.
- If some drives or devices are missing, click View and select Show All Devices. The sidebar will refresh to show all connected drives and volumes.
- Confirm the drive you want to erase by checking its name, size, and connection type (e.g., internal SSD or external USB).
Ensuring you select the correct physical drive instead of a single volume prevents accidental data loss on the wrong device. Take your time to verify this before proceeding.
Screenshot tip: The sidebar clearly distinguishes physical disks with device icons and bold names, while volumes appear indented with volume icons. The View menu option to toggle visibility is in the toolbar at the top left.
Erase the drive using Disk Utility’s Erase function
Once you have selected the physical drive (not just a volume) in Disk Utility’s sidebar, you are ready to erase it. Click the Erase button at the top of the window. This will open a dialog where you must specify three key settings: Name, Format, and Scheme.
Name is simply the label your drive will have after the erase process finishes. Choose a clear, recognizable name depending on your use.
Next, select the Format. The most common options are APFS (Apple File System) and Mac OS Extended (Journaled). Use APFS for SSDs and newer Macs, as it offers better performance and features like snapshots. Choose Mac OS Extended (Journaled) if the drive will be used on older Macs or for mechanical (spinning) hard drives.
For Scheme, you’ll pick the partition map: GUID Partition Map is the modern standard and required for Intel and Apple Silicon Macs to boot. Master Boot Record (MBR) is mostly for compatibility with Windows systems or older hardware, while Apple Partition Map (APM) is for very old Macs and rarely used today.
- Select the physical drive in the sidebar. You should see the entire disk, not an indented volume.
- Click Erase. The Erase dialog opens.
- Enter a Name for your drive.
- Choose the Format based on your drive type and intended use: APFS for SSDs/new Macs, Mac OS Extended (Journaled) for older compatibility.
- Select the appropriate Scheme: GUID Partition Map for modern Macs, MBR for Windows compatibility, or APM for legacy Macs.
- Click Erase to confirm. Disk Utility will begin wiping and reformatting the drive.
- When the process completes, the drive will mount with the new format and name, ready for use.
During the erase process, Disk Utility securely removes the file system information and optionally rewrites the drive depending on your security settings (covered later). Confirming your choices carefully is crucial because erasing will delete all data on the drive irreversibly.
How to completely erase a drive for security
When you erase a drive using Disk Utility, the default option is often a quick erase, which removes the directory information but leaves the actual data on the disk until overwritten. This means data could still be recovered using specialized software. For stronger security, you can use secure erase options that overwrite the data with random patterns, making recovery extremely difficult.
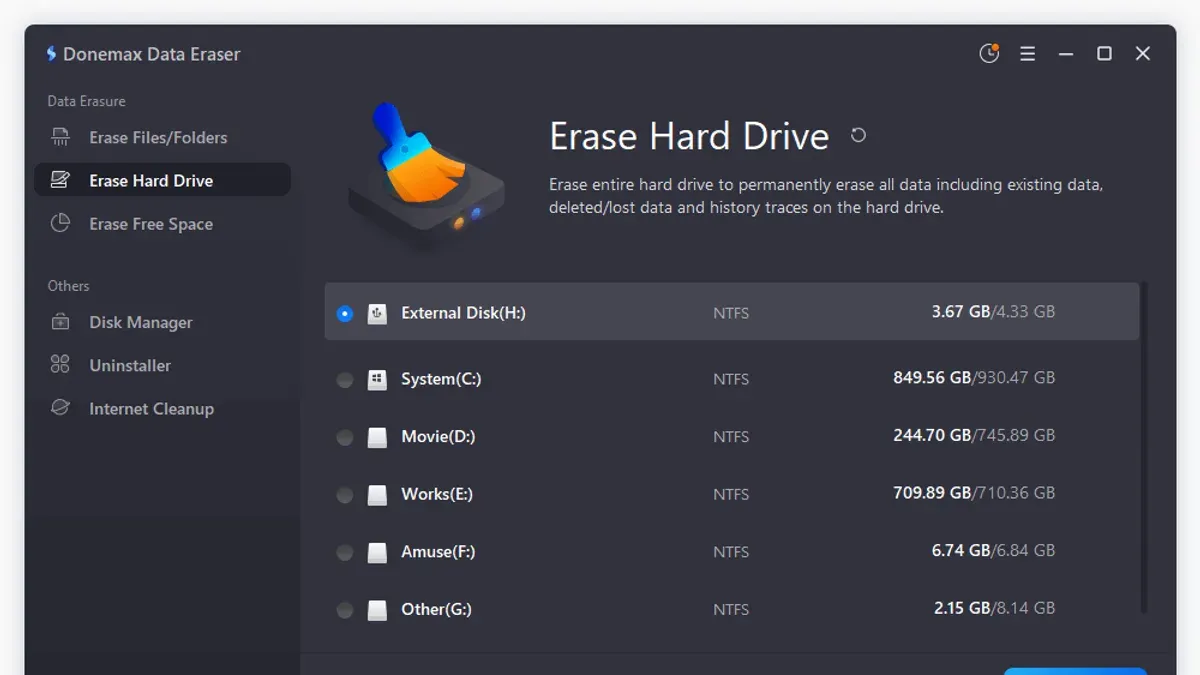
To access these options in Disk Utility, select the physical drive, click "Erase," then click "Security Options" if available. You will see a slider offering different levels of data overwriting—from a single pass of zeros (faster but less secure) to multiple passes (slower but more secure). Choose the level based on your security needs.
Note that secure erase options are typically available for traditional hard disk drives (HDDs) but not for solid-state drives (SSDs). SSDs use different storage technology, and repeated overwriting can reduce their lifespan. For SSDs, the best security method is to enable built-in encryption before erasing or use the manufacturer’s dedicated secure erase tools.
If Disk Utility lacks the secure erase feature for your drive type, consider third-party applications specialized in secure data destruction. These can provide methods like cryptographic erase or multiple overwriting passes tailored for your hardware.
| Erase Method | Security Level | Typical Use | Availability in Disk Utility |
|---|---|---|---|
| Quick Erase | Low | General use when data recovery risk is low | Yes |
| Single-pass Overwrite | Medium | Basic secure erase for HDDs | Yes, via Security Options |
| Multiple-pass Overwrite | High | High security erase for sensitive data on HDDs | Yes, via Security Options |
| Built-in SSD Secure Erase | High | SSD-specific secure erasure | No (use manufacturer tools) |
| Third-party Secure Tools | Variable | Custom secure erase for HDDs and SSDs | Outside Disk Utility |
Fix common issues when you can’t erase a Mac hard drive in Disk Utility
If the Erase button is grayed out or unavailable, this often means the drive is currently in use or locked by macOS. For example, trying to erase your startup disk while booted into it will disable the erase option. In such cases, you must restart your Mac in macOS Recovery Mode to proceed. To enter Recovery Mode, restart your Mac and hold down Command (⌘) + R until the Apple logo appears. Once in Recovery Mode, open Disk Utility from the Utilities menu, and you should be able to erase the startup disk without restrictions.
External drives that refuse to erase may be locked or have corrupted partitions. Before attempting to erase, select the drive and click First Aid. Running First Aid can repair disk errors that prevent erasure. If First Aid reports errors it cannot fix, consider reformatting the drive in Recovery Mode or using Terminal commands for deeper repair.
Common error messages like “Couldn’t unmount disk” indicate the system still uses the drive. Ensuring no apps or processes are accessing the drive helps, but if that fails, Recovery Mode bypasses normal system locks. In extreme cases, using Terminal’s diskutil command-line tool inside Recovery Mode can force unmount and erase operations.
- Restart your Mac and hold Command (⌘) + R to enter Recovery Mode.
You should see the macOS Utilities window. - Choose Disk Utility from the menu and select the drive you want to erase.
The Erase button should now be active. - If Erase is still unavailable, run First Aid on the drive.
First Aid completes successfully or reports unfixable errors. - If First Aid fails, open Terminal from Utilities and run
diskutil listto identify the drive.
You see a list of disks and partitions. - Use
diskutil unmountDisk force /dev/diskX(replace diskX with your drive) to force unmount.
Disk unmounts successfully. - Return to Disk Utility and try erasing again.
Erase completes without error.
Erase a drive on Windows: key differences you should know
Disk Utility is a tool exclusive to macOS, so it is not available on Windows systems. If you're using Windows and need to erase a drive, you will use different tools such as Windows Disk Management or third-party software. Each platform has its own approach to formatting, partitioning, and securely erasing drives, so understanding these differences helps avoid confusion.
Windows Disk Management provides a straightforward way to erase drives by formatting or deleting partitions. However, unlike Disk Utility, it does not include built-in secure erase options that overwrite data multiple times. For enhanced security on Windows, you might need third-party tools designed specifically for secure erasure.
How to erase a drive using Windows Disk Management
- Open Disk Management by right-clicking the Start button and selecting "Disk Management." You should see a list of all connected drives and their partitions.
- Locate the drive you want to erase in the bottom pane. Make sure you select the correct drive to avoid data loss.
- Right-click the desired partition or the entire disk (if unallocated) and choose "Format" or "Delete Volume." Formatting will erase data and allow you to set a new file system, while deleting removes partitions entirely.
- If formatting, select the file system (NTFS, exFAT, FAT32), allocation unit size, and provide a volume label. Then click "OK" to proceed. You should see the partition formatted and ready to use.
- To securely erase the drive, consider using third-party tools like CCleaner, DBAN, or manufacturer utilities, as Windows Disk Management lacks built-in secure erase features.
Comparison of erase features: Disk Utility vs Windows Disk Management
| Feature | Disk Utility (macOS) | Windows Disk Management |
|---|---|---|
| Basic erase (format/delete) | Yes, with options for format and partition scheme | Yes, format and delete volumes |
| Secure erase (multiple overwrites) | Available for HDDs with security options in Erase dialog | Not available; requires third-party tools |
| File system options | APFS, Mac OS Extended, exFAT, MS-DOS (FAT) | NTFS, exFAT, FAT32 |
| Partition scheme selection | GUID Partition Map, Master Boot Record, Apple Partition Map | Limited; generally MBR or GPT based on disk initialization |
| Drive unmounting during erase | Automatic in Disk Utility | May require manual volume dismount or system restart if in use |
Understanding these differences helps you choose the right tool and method for erasing drives depending on your operating system. For secure erasure on Windows, plan to use dedicated utilities beyond Disk Management.
Format a hard drive using Disk Utility for specific needs
Formatting a drive in Disk Utility is related to, but distinct from, erasing. While erasing removes all data and resets the drive, formatting specifically sets the file system and structure without necessarily wiping data securely. You might format a drive to change its compatibility or optimize it for a particular device without altering the drive’s overall partition scheme.
Disk Utility offers several format options tailored to different use cases. For example, APFS is ideal for modern Macs running macOS with features like snapshots and encryption, whereas Mac OS Extended (Journaled) supports older macOS versions. For drives shared with Windows or other devices, exFAT and MS-DOS (FAT32) are common choices—the latter has a 4GB file size limit but wider compatibility.
You might format a drive when preparing an external disk for media transfer, repurposing a USB stick, or adjusting the file system after partitioning. This process updates the file system without necessarily deleting all partitions or securely erasing data.
- Open Disk Utility and select the volume (not the entire physical drive) you want to format in the sidebar. You should see the volume highlighted.
- Click the Erase button at the top of the window. A dialog will appear with options to rename and format the volume.
- Choose the desired Format from the dropdown menu, such as APFS, Mac OS Extended (Journaled), exFAT, or MS-DOS (FAT). You will see brief descriptions or compatibility notes for each format.
- Confirm the volume name if you want to change it. This name will appear when the drive is mounted.
- Click Erase to apply the formatting. Disk Utility will reformat the selected volume, and once complete, the volume will mount with the new format.
Remember, formatting a volume affects that specific partition, not the entire disk structure. If you need to change partition schemes or fully reset the disk, erasing the entire physical drive is necessary.
Remove a disk drive safely from your Mac after erasing
Once you have erased your drive, it’s crucial to eject it properly to avoid data corruption or hardware issues. For external drives, always use the Finder or Disk Utility to eject before physically disconnecting the device. This ensures that any cached data is written to the disk and the system safely disengages the drive.
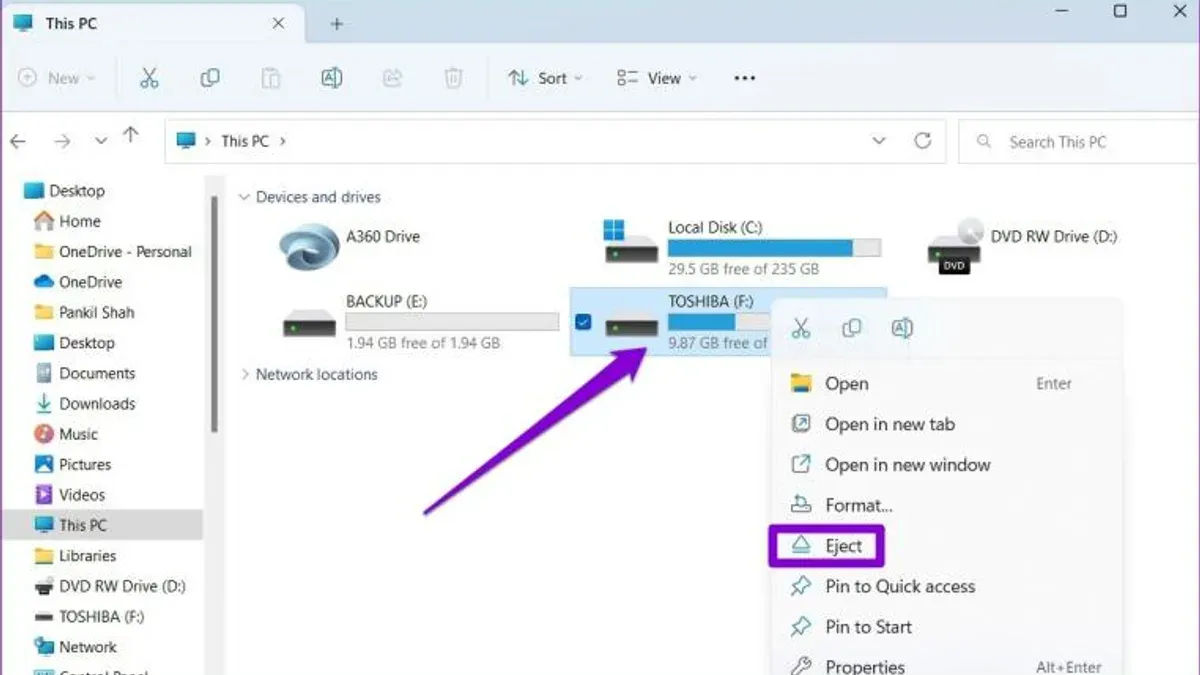
- In Finder, locate the drive icon on the Desktop or in the sidebar. Right-click it and select Eject. You should see the icon disappear from the Desktop or sidebar, indicating the drive is safely unmounted.
- If the drive doesn’t eject, close any apps or files that might be using it. If you still get an error message saying the disk is in use, try restarting your Mac and attempt ejecting again.
- If the drive still won’t eject, open Disk Utility, select the drive, and click the Unmount button. When the drive becomes grayed out, it is unmounted and safe to remove physically.
- Physically disconnect the external drive only after the system confirms it is unmounted. Avoid unplugging while the drive is still mounted to prevent file system damage.
For internal drives, removal is more complex and generally not recommended unless you are an experienced user or technician. Internal drives require shutting down your Mac completely and following device-specific disassembly instructions. Improper removal can cause hardware damage or data loss.
In any case, if you encounter persistent issues ejecting a drive, check for background processes accessing it via Activity Monitor or consider using Terminal commands like diskutil unmountDisk for advanced troubleshooting.
Frequently asked questions
How to erase a drive?
To erase a drive on your Mac, open Disk Utility from the Utilities folder. Select the drive you want to erase in the sidebar, then click the Erase button. Choose the format (such as APFS or Mac OS Extended) and provide a name for the drive. Confirm by clicking Erase, and wait for the process to complete before using the drive again.
How to delete a disk drive?
Deleting a disk drive in Disk Utility means erasing its contents rather than physically removing it. Select the drive in Disk Utility, click Erase, and choose the desired format and scheme. Confirm the action to clear all data. For physical removal, you need to eject the drive first and then disconnect it safely.
How to remove a disk drive?
To safely remove a disk drive from your Mac, first eject it by selecting the drive in Finder or Disk Utility and clicking the Eject icon. Wait until the drive disappears from the sidebar or Finder window. Only then physically unplug the drive to avoid data corruption or hardware issues.
How to erase a drive on windows?
On Windows, open Disk Management by right-clicking the Start button and selecting Disk Management. Locate the drive you want to erase, right-click it, and choose Format to clear data. For more secure erasing, use third-party tools that overwrite data multiple times, since Windows’ native format only deletes the file system references.
Can't erase mac hard drive in disk utility?
If Disk Utility won’t erase your Mac hard drive, it might be because the drive is in use, locked, or contains the startup volume. Restart your Mac in Recovery mode by holding Command + R during startup, then try erasing the drive from Disk Utility there. Also, check for any FileVault encryption or disk errors that may need to be repaired first.
Understand the Limits of This Guide
This guide does not cover data recovery after erasing a drive; once erased, data is typically unrecoverable without specialized services. If you need to recover lost files, professional data recovery experts or dedicated software tools should be your next step. Additionally, secure erase options in Disk Utility are limited on SSDs due to their hardware design and wear-leveling features; for highly sensitive data, consider encrypting the drive before erasure to add an extra layer of security. Erasing internal startup drives requires booting into macOS Recovery Mode, which carries more risk and complexity. If you are not comfortable managing system-level operations or do not have recent backups, seek professional help to avoid data loss or system issues.
To move forward confidently, start by verifying that your important data is fully backed up, then carefully follow the step-by-step instructions to erase your drive safely. Ensuring a current backup is the most crucial step many overlook and will save you from unintended data loss.
See also: How to Delete Old Backups in Time Machine: A Clear Step-by-Step Guide