How to Make Two Columns in Pages: A Clear Step-by-Step Guide
This guide shows you how to make two columns in Pages on Mac, iPad, and iPhone with simple steps to enhance your document layout.
You’re working on a document in Pages and want to improve its layout by splitting text into two columns. Whether you're preparing a newsletter, brochure, or report, making two columns can help organize content and improve readability. Understanding how to make two columns in Pages will save you time and ensure your document looks professional.
This article guides you through setting up two columns in the Pages app on Mac, iPad, and iPhone, with clear step-by-step instructions. It also compares the process to how you would do it in Word and HTML, helping you decide which tool best fits your needs. By the end, you’ll know not only how to format columns but also how to troubleshoot common issues and use multiple columns effectively.
Key takeaways
- In Pages on Mac, use the Format sidebar’s Layout tab to set exactly two columns with adjustable spacing.
- On iPad and iPhone, access columns via the paintbrush icon, then Layout, for simple two-column setup.
- Word offers more flexible column options, including partial page columns, unlike Pages’ whole-section approach.
- HTML columns use CSS styles like column-count, which differ significantly from Pages’ visual formatting.
- Common issues include unwanted column breaks and spacing, which can be fixed by adjusting section breaks and column settings.
Before you start: What you need to know about columns in Pages
Pages allows you to create multiple columns in the body text of your documents, but this feature is not available in every template. For example, some pre-designed templates might restrict column formatting, so starting with a blank or basic template often provides the best flexibility. Keep in mind that columns in Pages apply to entire text boxes or sections rather than to selected parts of a page, which means you cannot split only a portion of a page into columns.
The user interface and available column features differ between the Mac app and the iPad or iPhone versions. On Mac, you have more detailed control over column width, spacing, and the ability to add columns to specific sections. The iPad and iPhone apps offer a simplified interface, where columns can be quickly applied but with fewer customization options. This distinction is important depending on which device you are working on.
Compared to Word or HTML, Pages offers less flexibility in managing columns. Word allows partial-page columns and complex layouts, while HTML columns can be styled with CSS for precise control. Pages focuses on straightforward column layouts applied at the section level, making it ideal for many basic document designs but less suited for intricate multi-column arrangements.
| Feature | Pages on Mac | Pages on iPad/iPhone |
|---|---|---|
| Apply columns to whole text boxes/sections | Yes | Yes |
| Partial page columns | No | No |
| Adjust column width and spacing | Yes | Limited |
| Column controls in UI | Advanced sidebar options | Simple format menu |
| Templates supporting columns | Varies, best with blank/basic | Same |
How to make two columns in Pages on Mac
- Open Pages and select an existing document or create a new one with body text. You should see your text ready for formatting.
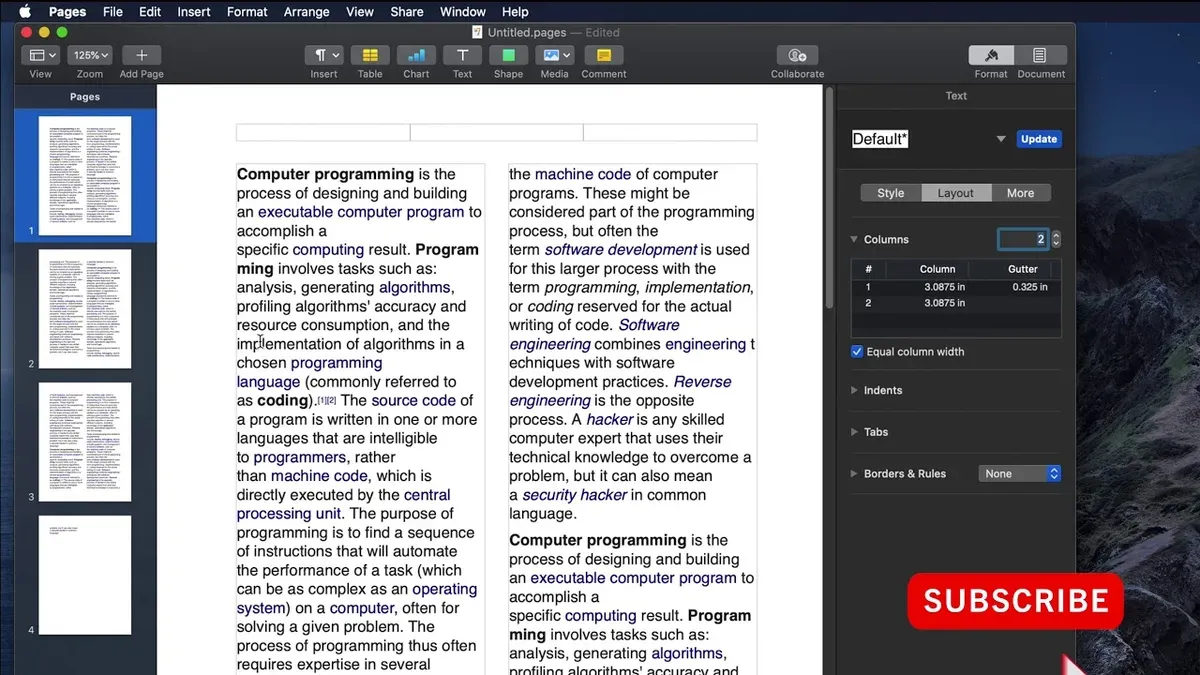
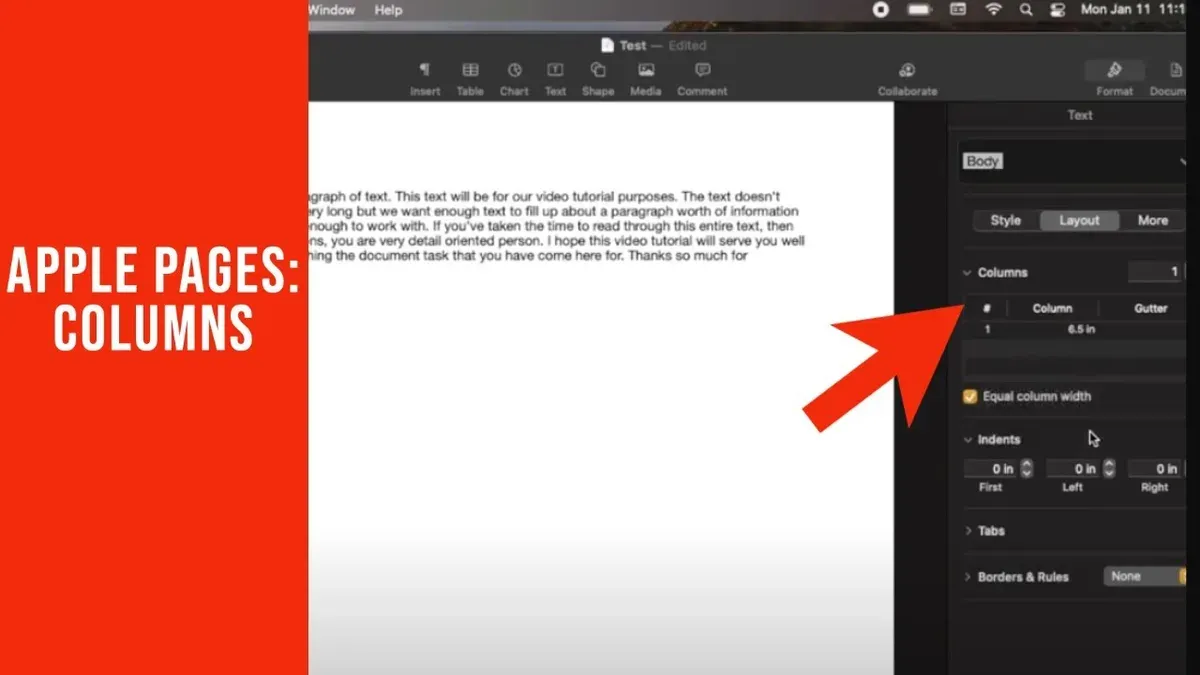
- Click the Format button on the top right to open the sidebar. This sidebar contains settings for text, layout, and more.
- In the sidebar, locate and click the Layout tab. Here, you will find the Columns section where you can control how text flows.
- Set the number of columns to 2. Your text will immediately reflow into two columns on the page. You will see the text split vertically with a gap in between.
- Adjust the spacing between columns by changing the Spacing value. Increasing spacing adds more white space between the columns, which can improve readability depending on your layout.
- To add or remove columns later, simply return to the Columns setting and change the number. Text automatically adjusts to fill the new layout.
- If you want to adjust column width, modify the Margins or use the ruler to drag column edges if visible. Pages does not offer direct column width controls, so margin adjustments help balance column size.
- When working with images or tables inside columns, insert them as inline objects so they stay within the column flow. Floating objects may overlap or disrupt the column layout.
Following these steps lets you efficiently create and customize two-column text layouts in Pages on your Mac, with clear control over spacing and content flow.
How to make two columns in Pages on iPad and iPhone
- Open the Pages app on your iPad or iPhone and select the document you want to format. Once your document is loaded, you will see your text ready for editing.
- Tap the paintbrush icon at the top of the screen to access the formatting options. This icon opens the menu where you can adjust layout and style settings.
- In the formatting menu, tap Layout. Here you will find the column settings for your selected text or section.
- Choose the option for two columns. Your text will immediately reflow into two columns on the page, showing the split layout.
- Adjust the column spacing if available by dragging the slider or entering a value to control the gap between columns. Note that on iPad and iPhone, this option may be more limited than on Mac.
- Preview your document by scrolling through the pages to see how the columns appear on smaller screens. Editing remains straightforward—tap any text to adjust content within columns, although fine-tuning margins and column width is less flexible compared to the Mac app.
Keep in mind that Pages on iPad and iPhone offers fewer customization features for columns than the Mac version. For example, you can't independently adjust margins or create columns within only part of a page. However, the process is simple and effective for quickly applying two columns across your document.
Using the column layout on mobile devices keeps your document readable and professionally formatted, even on smaller screens. If you need more precise control, you may want to switch to the Mac version, but for many users, the iPad and iPhone options offer a good balance of ease and functionality.
How to make two columns in Word (and differences from Pages)
Creating two columns in Microsoft Word is straightforward and offers more flexibility compared to Pages. On desktop, you start by selecting the text or placing the cursor where you want the columns. Then, go to the Layout tab and click Columns. Choose Two to split the selected area or the entire document section into two columns. On mobile devices, tap the editing icon, select Layout, and then tap Columns to pick two columns.
- Select the text you want to format or place the cursor where columns should start. You should see the selection highlighted or the cursor blinking.
- On desktop, click the Layout tab on the ribbon to reveal page setup options.
- Click Columns, then choose Two. The text area updates immediately to show two columns.
- To apply columns to only a part of the page, select More Columns and check This point forward or Selected text. This allows precise control over which text is divided into columns.
- Insert column breaks by placing the cursor and selecting Breaks > Column under the Layout tab to control text flow between columns.
Unlike Pages, which applies columns to entire sections without the option for partial-page columns, Word lets you create columns in any part of the document. Word’s column breaks give you more control over how text flows between columns, which Pages lacks. This makes Word a better choice when you need complex layouts, such as mixing single- and multi-column text on the same page.
| Feature | Pages | Word |
|---|---|---|
| Apply columns to | Entire text sections only | Whole document, sections, or selected text |
| Column breaks | No explicit column breaks; text flows automatically | Supports manual column breaks for precise control |
| Customization | Basic spacing and margin adjustments | Advanced options including width, spacing, and unequal columns |
| Device support | Mac, iPad, iPhone (limited options on iOS) | Desktop, mobile apps with consistent options |
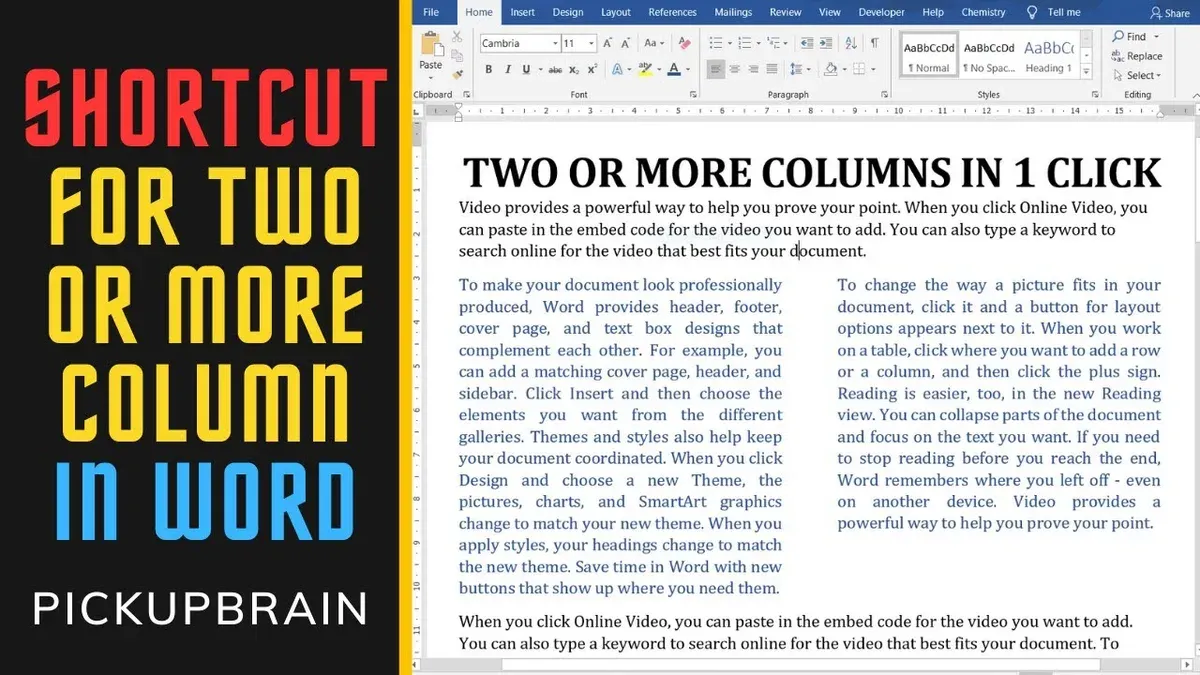
Example screenshots show Word’s column settings dialog offering customization for width and spacing, while Pages’ Format sidebar presents a simpler interface focused on column count and spacing.
How to make two columns in HTML for web pages
Creating two columns in HTML involves using CSS to define how content is arranged visually. Unlike Pages or Word, where columns apply to document text sections, HTML columns are layout tools that offer greater flexibility and control, especially for responsive design.
- Control responsiveness and spacing: Use relative units like
fror percentages in grid or flexbox to adapt to different screen sizes. Adjustpaddingorgapto create space between columns for readability. - Understand the differences from document app columns: HTML columns are part of webpage layout and can include any content type, while Pages or Word columns apply primarily to text and flow differently. HTML allows for dynamic resizing and complex layouts unlike static document columns.
- When to use HTML columns: Choose HTML columns if your content is for the web and requires responsive design or mixed media. Use document editors like Pages or Word for print or static documents with simpler column needs.
Use CSS Grid for precise control: Define a grid container with two columns and control gaps easily:
<div style="display: grid; grid-template-columns: 1fr 1fr; gap: 20px;">
<div>Column 1 content</div>
<div>Column 2 content</div>
</div>
This method also results in two columns with a 20-pixel gap between them, adjusting automatically to the container's width.
Use Flexbox for a simple two-column layout: Wrap your content in a container with display: flex;. Assign each column a width of 50% to split the space evenly. For example:
<div style="display: flex;">
<div style="flex: 1; padding: 10px;">Column 1 content</div>
<div style="flex: 1; padding: 10px;">Column 2 content</div>
</div>
When done, you should see two side-by-side columns each occupying half the container.
How to make two columns on one page in Word (partial page columns)
In Word, unlike Pages, you can format just part of a page into two columns while keeping the rest of the page in a single column. This is useful when you want a section of your document to have a different layout without affecting the entire page or document. To do this, you need to use section breaks to isolate the text you want to format into columns.
- Place your cursor at the beginning of the text you want to appear in columns.
- Go to the Layout tab and click Breaks. Under Section Breaks, select Continuous. You’ll see a section break inserted without starting a new page.
- Now, place your cursor at the end of the text you want in columns and repeat the step to insert another Continuous section break.
- Select the text between the two section breaks, which is the area you want in two columns.
- With the text selected, go to Layout > Columns and choose Two. The selected text will now be formatted into two columns, while the rest of the page stays single-column.
- Adjust column width and spacing by clicking Columns > More Columns for finer control.
Pages does not support partial page columns because it applies columns to entire text sections only. This limitation means you cannot mix column layouts within a single page in Pages as fluidly as in Word. If your document requires mixing column and non-column text on the same page, Word offers more flexibility.
When mixing layouts in Word, keep an eye on your section breaks to avoid affecting surrounding text unintentionally. Also, use the Show/Hide ¶ button to view breaks clearly. This approach helps maintain clean formatting especially in longer documents with varied layouts.
Below is an example screenshot showing a Word document where only the middle portion of the page is split into two columns, with the text above and below remaining single column. This visual confirms how section breaks isolate the column formatting effectively.
Troubleshooting common issues when making two columns in Pages
Sometimes, you may find the column option grayed out or missing. This often happens if your text is inside a text box or shape, as columns can only be applied to body text or text in placeholders. To fix this, select the text outside of any text boxes and check the Format sidebar under Layout for the Columns setting.
If your text doesn’t flow correctly between columns, it may be due to manual line breaks or paragraph breaks that interrupt the flow. Remove extra returns and avoid inserting manual page or section breaks. Instead, let Pages manage the flow naturally to ensure smooth column transitions.
Images, tables, or other objects can disrupt column layouts by forcing text to wrap oddly or break columns. To handle this, try adjusting the object’s text wrap settings to Inline or None, or reposition the object to avoid breaking the column flow. You can also place images or tables in dedicated sections outside the columned text.
When saving or exporting documents with columns, especially to PDF or Word format, check the layout carefully. Some formatting may shift, so use the Export To menu and preview the output. If columns appear distorted, try exporting as PDF rather than Word for better preservation of the layout.
- Select text that is not inside any text box or shape. In the Format sidebar, click Layout and ensure the Columns option is available and set to two. You should see your text split into columns.
- Remove any manual line or page breaks by selecting the text and pressing Delete or Backspace. The text should then flow smoothly across the columns without interruptions.
- Click on any images or tables disrupting columns and open the Arrange tab in the Format sidebar. Set Text Wrap to Inline or None. The text will realign within the columns, avoiding awkward breaks.
- Export your document via File > Export To > PDF. Open the exported PDF to confirm columns appear as expected. If issues persist, adjust your layout before exporting again.
Tips for using multiple columns effectively in Pages
Adjusting column width and spacing is key to creating visually appealing multi-column layouts. For example, setting column spacing to around 10 to 15 points often improves readability by preventing text from feeling cramped. Narrow columns can make reading difficult, so aim for widths that allow 40 to 60 characters per line. You can adjust these settings in the Layout section of the Format sidebar on Mac or in the Layout tab on iPad and iPhone.
Columns work well for newsletters, brochures, and reports where segmented content improves flow. Users often find multi-column layouts help organize information clearly, especially when paired with headings and images. However, if your layout requires precise placement of elements or mixed content types, tables or text boxes may offer better control and flexibility than columns.
Accessibility should guide your use of columns. Screen readers may struggle with multi-column text, so keep columns simple and avoid nesting columns within columns. Also, ensure font sizes and contrast remain high enough for easy reading. One user noted that “keeping consistent column widths and spacing made the document much easier to follow.”
By balancing spacing, layout choice, and accessibility, you can enhance both the look and usability of your Pages documents with columns.
Frequently asked questions
How to make columns in pages?
To make columns in Pages, select the text or place the cursor where you want the columns. Then open the Format sidebar, click the Layout tab, and adjust the Columns setting by increasing the number to your desired count, such as two. You can also customize spacing and divider lines between columns here.
How to make 2 columns in word?
In Word, go to the Layout tab and click Columns in the Page Setup group. Choose Two to split your text into two columns. For more control, select More Columns to adjust width, spacing, or apply columns to part of the document.
How to.make two columns in pages app?
On the Pages app for iPad or iPhone, tap the paintbrush icon to open the formatting options. Under the Layout tab, find the Columns section and tap the plus button to increase columns to two. You can adjust column spacing and add a line between columns if needed.
How to make 2 columns?
Making two columns depends on the app you use. In Pages, use the Layout tab in the Format sidebar or formatting menu to set columns to two. In Word, use the Columns option in the Layout tab. On the web, CSS properties like column-count: 2; create two columns.
How to make multiple columns in pages?
To create multiple columns in Pages, select your text and open the Format sidebar. Under the Layout tab, increase the Columns number beyond two as needed. Adjust spacing and consider adding a column divider line to improve readability.
What This Guide Does Not Cover
This guide focuses on creating two-column layouts within the Pages app and offers comparisons with Word and HTML methods. It does not cover advanced desktop publishing software such as Adobe InDesign or Affinity Publisher, which provide much more control over multi-column layouts, spacing, and complex magazine-style designs. If your project requires detailed control over typography, text flow, or professional print layouts beyond basic column formatting, consider using specialized tools designed for those purposes.
For most users working on documents, newsletters, or simple layouts, Pages offers sufficient column formatting options combined with ease of use. However, if you regularly create complex, multi-column publications or need precise layout features, exploring dedicated desktop publishing software will be more effective.
To get started with two columns in Pages, the most useful next step is to open your document and access the Format sidebar. From there, select the Layout tab, then adjust the Columns setting to two. Pay attention to the spacing and divider options to ensure your text flows clearly and looks balanced across both columns.
See also: How to Change Page Margins in Pages on Mac, iPad, and iPhone · How to Add Page Numbers in Pages: Step-by-Step for Mac, iPad, and iPhone · How to Add a Table of Contents in Pages: A Complete Step-by-Step Guide · How to Add Footnotes in Pages: A Step-by-Step Guide