
How to Move Notes Between Folders in the Notes App: A Step-by-Step Guide
Discover easy ways to move notes between folders in the Notes app to keep your ideas and projects neatly organized on any device.
You have a growing collection of notes in the Notes app, but they’re scattered across different folders or accounts. Maybe you want to consolidate your ideas, organize your work projects, or just tidy up your personal lists. Understanding how to move notes between folders in Notes app will help you keep everything organized exactly where you want it.
This guide walks you through every common method for moving notes, from dragging a single note to selecting multiple notes at once. You’ll learn how to handle notes stored in different accounts, use the Share or Move menu options, and troubleshoot common issues that may arise. Each step is explained clearly so you can choose the best method for your device and needs.
Key takeaways
- Drag and drop a note within the app to move it quickly to another folder.
- Use multi-select mode to move several notes at once without repeating steps.
- Notes synced across accounts may require moving via the app’s move menu to avoid sync conflicts.
- Access the Share or Move options from the note’s menu for alternative ways to relocate notes.
- Check folder permissions and internet connection if notes won’t move as expected.
Before You Start: What You Need to Move Notes Between Folders
First, confirm that the Notes app is installed and updated on your device, whether it’s an iPhone, iPad, or Mac. Having the latest version ensures you have access to all current features and smoother performance. Next, understand that notes must be moved between folders within the same account—either iCloud or a local account on your device. Moving notes across different accounts is handled differently and may have limitations.
Check whether your notes are synced with iCloud or stored locally on your device. iCloud syncing provides access to your notes across devices but could affect how folders and notes appear. Local notes are stored only on the device and may have fewer folder management options. Lastly, ensure that the destination folder exists before moving notes. You can create a new folder in the Notes app if needed; otherwise, the move won’t be possible.
| iCloud-Synced Notes | Local Notes | |
|---|---|---|
| Folder Management | Supports folders and subfolders synced across devices | Folders exist only on the device and are not synced |
| Availability | Accessible on all devices signed in to the same iCloud account | Accessible only on the device where created |
| Moving Notes | Can move notes between folders within iCloud account | Can move notes only among local folders |
- Open the Notes app on your device. You should see your list of notes and folders.
- Check the account section or folders list to identify if your notes are under iCloud or On My Device (local) accounts.
- Verify that your destination folder already exists in the same account where your notes are stored.
- If the folder is missing, create it by tapping the “New Folder” button or folder icon, then enter a name for the new folder.
- Confirm that your device has the latest update of the Notes app—usually done via the App Store or system software update.
Select and Move a Single Note Using Drag-and-Drop
Moving a single note is straightforward using drag-and-drop, a method that lets you quickly organize your notes without opening menus. Start by opening the Notes app and navigating to the folder where your note currently resides. You will see a list of notes within that folder.
- Tap and hold (on iPhone or iPad) or click and hold (on Mac) the note you want to move. On iOS devices, after a brief hold, the note will lift slightly, indicating it is ready to be moved.
- Drag the note toward the sidebar or folder list where your folders are displayed. On iPhone or iPad, the sidebar may appear when you swipe right or tap the folder icon to access it.
- Hover the note over the target folder. The folder will highlight to show it is ready to receive the note.
- Release your finger or mouse button to drop the note into the highlighted folder.
- Confirm the note has been moved by opening the target folder and checking for its presence.
On Mac, drag-and-drop usually feels more direct as the sidebar is always visible, allowing you to move notes quickly with a click and drag. On iPhone and iPad, the sidebar may be hidden and requires an extra step to reveal it, but the drag-and-drop gesture remains intuitive once you access the folder list.
This method is ideal for moving individual notes when you want a quick, visual way to organize without opening menus or dialogs.
Move Multiple Notes at Once Using Multi-Select
When you need to move several notes quickly, multi-select mode lets you do this efficiently, saving time compared to moving notes one by one. To start, open the folder containing the notes you want to move. On iOS or iPadOS, tap the Edit button at the top right; on a Mac, you can press Command and click each note to select multiple items.
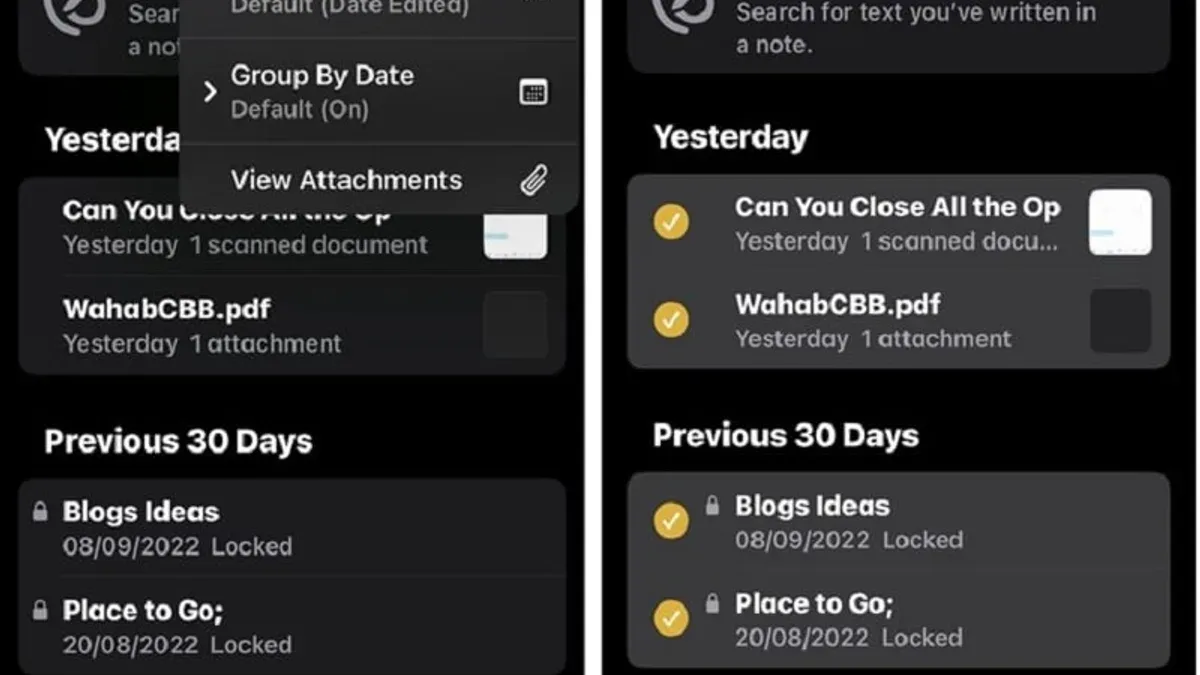
- Tap or click Edit (or use Command-click on Mac) to enter multi-select mode. You should see checkmarks appear next to each note.
- Select all notes you want to move by tapping or clicking on them. For example, picking 5 notes will highlight them simultaneously.
- Tap or click the Move option, usually found at the bottom of the screen or in the toolbar.
- Choose the destination folder from the list that appears.
- Confirm the move and then check that all selected notes now appear in the new folder.
For example, moving 5 notes this way is faster than dragging each note individually because you only perform the move action once instead of five times. However, multi-select requires extra taps or clicks to select notes, so if you only have one or two notes, drag-and-drop might feel more straightforward. For large batches, multi-select is more efficient and reduces repetitive actions.
Move Notes Between Accounts or External Sources
Moving notes directly between different accounts, such as from iCloud to a Gmail account, is not supported natively by the Notes app. This means you cannot simply drag and drop or use a built-in move function to transfer notes across accounts. Instead, you need to use manual methods like copying and pasting the content or exporting notes.
To transfer a note, open it in the source account, select all the content, copy it, then switch to the target account and create a new note by pasting the content. Alternatively, you can export notes as PDFs or text files and then import or save them in the destination account. Be aware that these methods will not preserve metadata such as creation dates, attachments, or embedded media, which means some information could be lost during the process.
Here is a comparison of what is possible natively versus what requires manual effort:
| Action | Native Support | Manual Effort | Example |
|---|---|---|---|
| Move notes within same account | Yes | None | Drag-and-drop or multi-select move in iCloud folders |
| Move notes between iCloud and Gmail accounts | No | Copy and paste note content or export/import files | Copy note text from iCloud and create new note in Gmail account |
| Preserve attachments and metadata | Only within same account | Not possible when manually copying | Attachments lost when copying text manually |
Follow these steps to move notes manually between accounts:
- Open the Notes app and navigate to the note you want to move in the source account. You should see the full content of the note.
- Select all the content within the note by using the Edit menu or tap and hold to select text, then choose Copy. You should see the content copied to your clipboard.
- Switch to the target account by selecting the appropriate folder or account in the Notes app sidebar or folder list. The target folder should be visible.
- Create a new note in the target folder by tapping the New Note button or using the menu option. A blank note should open.
- Paste the copied content into the new note using the Paste command. The content should now appear in the new note.
- Review the new note to ensure all text and visible elements are present. Add any missing attachments manually if needed.
While this workaround requires extra steps and some manual effort, it is currently the only way to move notes between different accounts or non-iCloud sources without losing content entirely.
Use the Share or Move Menu to Relocate Notes
If you have a note open and want to move it without going back to the folder view, you can use the app's built-in share or options menu. This method is especially useful when working with individual notes, providing a straightforward way to relocate them without dragging or selecting multiple items.
- Open the note you want to move. On iPhone, tap the Share icon, which looks like a square with an arrow pointing up. On Mac, click the Options menu button, often represented by three dots or a gear icon.
- From the menu that appears, select Move. This option may be labeled slightly differently depending on your device, sometimes as Move Note.
- Choose the destination folder from the list that appears. The folders shown will be those within the same account as the note.
- After selecting the folder, the note will be moved immediately. You should see the note disappear from the current folder and appear in the destination folder when you navigate to it.
On iPhone, the share menu combines many actions, so the Move option might be in a submenu labeled Actions or near the bottom of the list. On Mac, menu layouts can vary slightly between Notes app versions, but the Move option is usually prominent in the note's context or options menu.
This menu-based method is ideal if you prefer tapping through clear options rather than dragging notes or if you are less comfortable with multi-select gestures. It also works well when you have just one note open and want to quickly place it somewhere else without leaving the current view.
Troubleshoot Common Issues When Moving Notes
If you find that notes are not moving as expected, several common issues might be causing the problem. Locked or password-protected notes, for example, cannot be moved until you unlock them. You will often see a message like “This note is locked” if you try to move it while secured.

Another frequent issue is the destination folder being missing or greyed out. This often happens due to sync problems with your account, especially with iCloud. To verify your iCloud sync status, go to Settings > [your name] > iCloud and ensure Notes is toggled on. If syncing is paused or there are connection issues, folders may not appear correctly.
Sometimes, notes seem to disappear or do not show in the new folder after moving. This is usually caused by sync delays or the app needing a refresh. Restarting the Notes app or your device can resolve many temporary glitches.
- Check if the note is locked by opening it and looking for a lock icon. If locked, tap Unlock Note and enter your password or use Face/Touch ID.
- Verify your iCloud sync status by opening Settings, tapping your name, then iCloud, and confirming Notes is enabled and syncing without errors.
- Force close the Notes app and reopen it. You should see your notes appear correctly in the new folder.
- If issues persist, restart your device to clear any temporary system glitches.
- Finally, check the App Store for any Notes app updates, as outdated versions may cause unexpected behavior.
Maintain Organization: Best Practices After Moving Notes
After moving your notes, it's helpful to keep your Notes app organized for quick access and efficient management. Start by renaming folders with clear, descriptive titles that reflect their contents, such as "Project Ideas," "Meeting Notes," or "Receipts." This makes locating notes faster and reduces confusion.
Use tags alongside folders to enhance searching capabilities. For example, tagging notes with keywords like "urgent," "reference," or "travel" allows you to filter notes across folders, complementing your folder structure. Regularly reviewing folder contents helps you identify outdated or unnecessary notes, preventing clutter and maintaining a streamlined workspace.
Backing up your notes periodically is wise, especially before major reorganizations. You can export notes or ensure your iCloud sync is active and up to date, safeguarding against accidental data loss. Moving notes is just one part of a broader organization strategy that combines meaningful folder names, consistent tagging, and routine maintenance to keep your notes accessible and useful.
- Rename folders by tapping Edit in the folder list, then the folder name; enter a new name and tap Done. You should see the updated folder name immediately.
- Apply tags by editing a note, tapping the tag icon or typing hashtags in the note body. Tagged notes will appear when you tap the tag in the sidebar.
- Review folders monthly by opening each and deleting or archiving irrelevant notes. Your folders will stay concise and relevant.
- Backup notes by confirming iCloud sync is enabled under Settings > [your name] > iCloud > Notes or by exporting notes via the Share menu. Your data will be secure for future access.
Frequently asked questions
Can I move notes between different devices automatically?
Yes, if you use iCloud to sync your Notes app, changes you make on one device, including moving notes between folders, will automatically update across all your devices signed in with the same Apple ID. Make sure iCloud syncing for Notes is enabled in your device settings under your Apple ID > iCloud > Notes. Without iCloud or another syncing service, notes won’t move automatically between devices.
What happens to shared notes when I move them to a new folder?
Shared notes retain their sharing settings regardless of which folder you move them to. Moving a shared note to a different folder doesn’t change who can access it or its sharing permissions. However, if the folder is part of a different account or device, syncing issues might temporarily affect visibility for collaborators until fully updated.
Is it possible to undo moving a note if I make a mistake?
The Notes app doesn’t have an explicit undo button for moving notes between folders. However, you can manually move the note back to its original folder by repeating the move process. If you catch the mistake immediately, using the drag-and-drop gesture or multi-select to relocate the note again is the quickest fix.
How do I move notes if I don’t see the destination folder?
If the folder you want isn’t visible, first check that you’re viewing the correct account in the Notes app, as folders are account-specific. You might need to create a new folder by tapping the 'New Folder' button or refreshing the app by closing and reopening it. Also, ensure your device is connected to the internet if syncing folders from iCloud or other services.
What This Guide Does Not Cover
This article does not cover exporting notes to third-party apps or converting notes to other formats, which require separate workflows and tools. If you need to back up your notes outside the Notes app or use them in different applications, consider exploring dedicated export or conversion methods specific to your device or software. Additionally, this guide does not address recovering deleted notes or managing notes stored exclusively in cloud services like iCloud or Google Drive beyond moving them within the Notes app itself.
The single most useful next step is to regularly review and organize your folders after moving notes. Keeping folders clearly labeled and periodically archiving or deleting outdated notes makes it easier to find what you need and prevents clutter from building up again. Setting a weekly or monthly reminder to tidy your Notes app can maintain the smooth organization you achieve by following the moving methods outlined here.
See also: How to Pin a Note in the Notes App: Step-by-Step Guide



