How to Add an APFS Volume in Disk Utility: A Step-by-Step Guide
This guide explains how to add an APFS volume in Disk Utility to organize your Mac storage efficiently without risking existing data.
You're looking to organize your Mac's storage more efficiently and have heard about adding APFS volumes for better flexibility. Maybe you've opened Disk Utility and wondered exactly how to add an APFS volume in Disk Utility without risking your existing data.
This guide walks you through the process step by step, ensuring you understand what an APFS volume is, why you might want to add one instead of creating a new partition, and how it interacts with your Mac and Windows systems. By the end, you'll confidently manage your storage setup and know how to troubleshoot common issues related to APFS volumes.
Key takeaways
- APFS volumes share storage space within a container, allowing flexible space management.
- You add an APFS volume via Disk Utility by selecting the container and clicking the Add Volume button.
- APFS offers features like snapshots and encryption not available in traditional partitions.
- Windows cannot natively read APFS volumes; third-party software is required for access.
- Always back up important data before modifying volumes to avoid accidental loss.
Before you start: What you need to add an APFS volume
To add an APFS volume, you need a Mac running macOS with access to Disk Utility. This built-in app manages your storage, including APFS containers and volumes. Ensure that the drive or container where you plan to add the volume is already formatted as APFS or is compatible with APFS. This is essential because APFS volumes reside within an APFS container; they cannot be added to a non-APFS formatted disk.
Understanding the difference between APFS containers, volumes, and partitions will help you decide whether adding a volume is the right choice. An APFS container acts like a storage pool that can hold multiple volumes sharing the container's total space dynamically. Unlike partitions, which allocate fixed space, volumes within a container share space flexibly, which can save storage and prevent wasted space.
Before modifying disk structures, always back up your data. Adding volumes is generally safer than partitioning or erasing because it doesn’t require fixed space allocation or data deletion, but backups protect you from unexpected issues. For example, if you want a separate volume for work files without reducing space available to other volumes, adding an APFS volume is preferable to creating a new partition.
- Open Disk Utility from your Applications > Utilities folder. You should see your drives and containers listed on the sidebar.
- Identify the APFS container where you want to add a volume; it will show as a container with existing APFS volumes inside.
- Confirm that the container has enough free space to support an additional volume without resizing partitions.
- Back up your important data using Time Machine or another backup method to avoid loss during changes.
Understand what an APFS volume is and why you might add one
An APFS volume exists within an APFS container, which is a storage space that can hold multiple volumes sharing the container’s total capacity. Unlike traditional partitions that allocate fixed storage sizes, APFS volumes dynamically share free space, allowing you to add or remove volumes without repartitioning the drive. This flexible space sharing means you don’t have to guess upfront how much space each volume needs.
APFS volumes also benefit from advanced features like fast directory sizing, which makes browsing file sizes quicker, and native compression that helps save disk space without impacting performance. Additionally, APFS supports snapshots, enabling you to capture the state of a volume at a specific point in time for easy recovery.
You might add APFS volumes to separate different data types—such as work documents and personal files—or to manage multiple macOS installations on one drive. They are also useful for testing configurations safely without affecting your main data.
| Feature | APFS Volume | Traditional Partition |
|---|---|---|
| Space Allocation | Flexible, shared within container | Fixed size, pre-allocated |
| Resize | Dynamic and instant | Requires repartitioning |
| Compression | Built-in and automatic | Not supported natively |
| Snapshots | Supported for backups and recovery | Not supported |
| Use Cases | Multiple macOS installs, data separation, testing | Separate OS or data with fixed space |
Add an APFS volume in Disk Utility: Step-by-step instructions
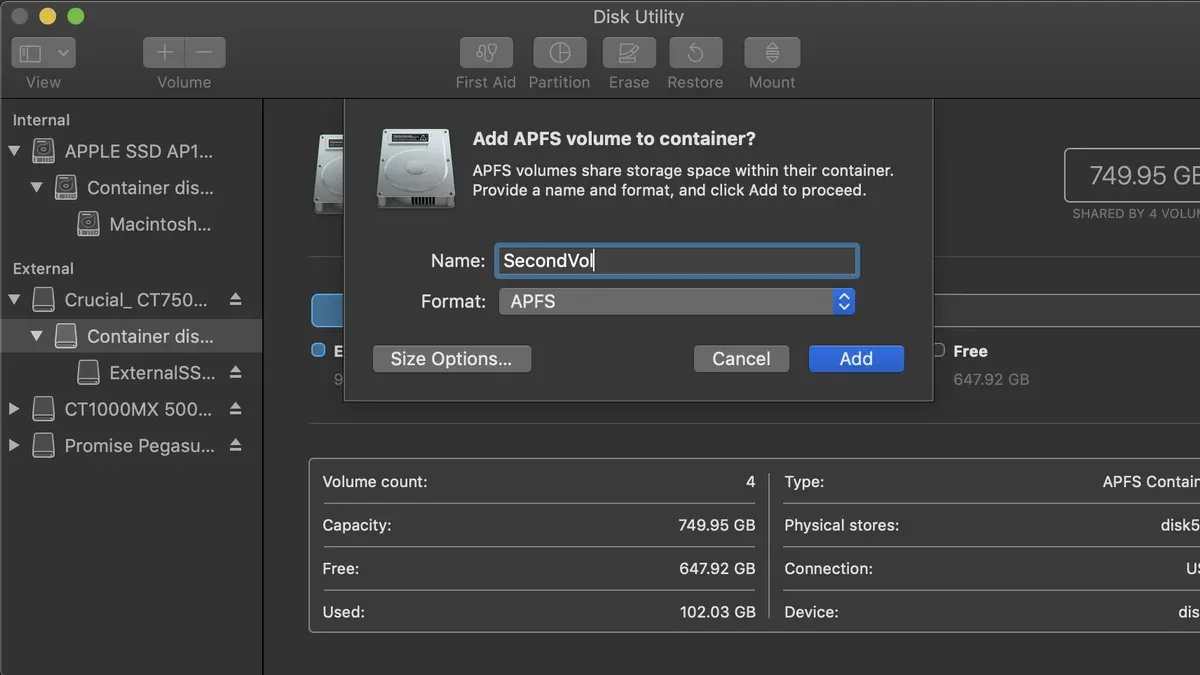
- Open Disk Utility from your Applications > Utilities folder. When it launches, locate the sidebar and select the APFS container or the APFS-formatted drive where you want to add the new volume. You should see the container’s name and existing volumes listed.
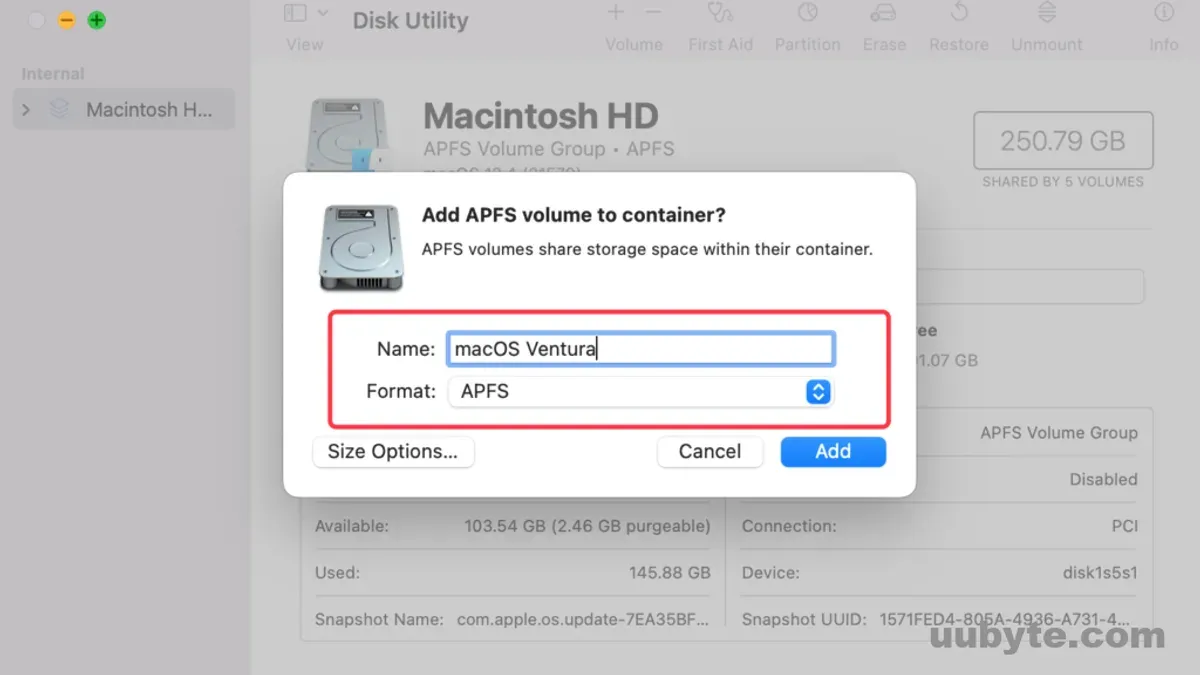
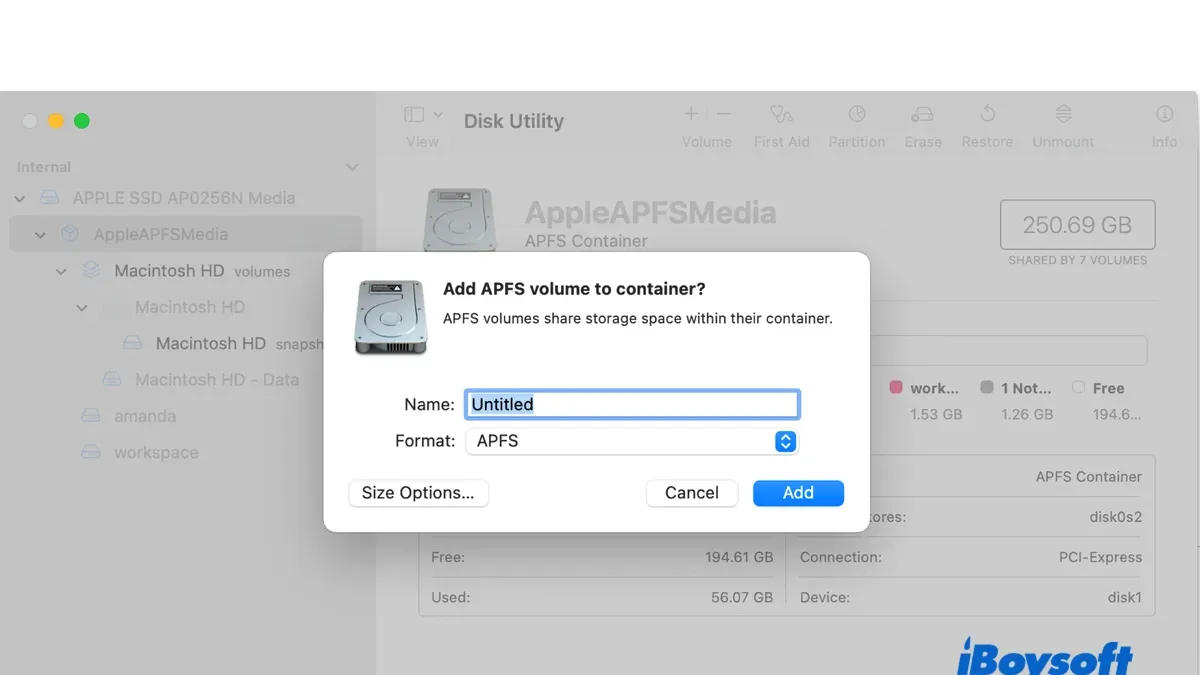
- Click the Add Volume (+) button in the toolbar above the volume list. This opens a dialog box asking for the new volume’s details.
- Enter a name for your new APFS volume in the text field. This name will appear in Finder and Disk Utility.
- Ensure the Format dropdown is set to APFS. You can also choose APFS (Encrypted) if you want to secure the volume with a password.
- If you want to manage storage more precisely, click Size Options. Here you can set a Quota to limit the maximum space the volume can use or a Reserve to guarantee a minimum amount of space. For example, setting a 50 GB quota means the volume cannot grow beyond 50 GB, preserving space for other volumes.
- Click Add to create the volume. Disk Utility will process the request; this usually takes a few seconds as it allocates space within the container.
- Once created, the new volume appears in the sidebar under the container. Click it to verify it mounts correctly and shows available space. You can also open Finder to confirm the volume is accessible for your files.
By using quotas, you can control how much space each volume uses within the shared container without repartitioning the drive. This flexibility helps organize your storage efficiently while maintaining easy management through Disk Utility.
How to format a hard drive or USB drive to APFS using Disk Utility
You might need to format an entire hard drive or USB device to APFS before adding volumes, especially if the drive currently uses an incompatible or older file system. Formatting prepares the drive for APFS’s advanced features like space sharing and compression, which can reduce storage usage. Keep in mind that formatting erases all data on the drive, so backing up important files beforehand is essential.
APFS offers two main formatting options in Disk Utility: APFS, which provides the standard file system benefits, and APFS (Encrypted), which adds built-in encryption for enhanced security. Choose encrypted if you want automatic data protection but remember that this requires a password to access the drive.
- Open Disk Utility from your Applications > Utilities folder.
- In the sidebar, select the entire drive or USB device you want to format (not just an existing volume).
- Click the Erase button at the top of the window.
- In the dialog, set the Name for your drive as you prefer.
- Click the Format dropdown and choose either APFS or APFS (Encrypted) depending on your security needs.
- Ensure the Scheme is set to GUID Partition Map for macOS compatibility.
- Click Erase to begin formatting. When complete, Disk Utility will show the newly formatted APFS drive ready for use.
Formatting is often necessary when repurposing a USB stick or external drive for Mac-only use or when optimizing a drive’s structure to take advantage of APFS features such as snapshots and efficient space management.
How to read and access APFS volumes on Windows
Windows does not natively support APFS, Apple's file system, which means you cannot directly access APFS volumes without additional software. This limitation requires third-party tools to read, and sometimes write, to APFS-formatted drives on Windows machines. When choosing software, you’ll find both paid and free options, each with different features and usability.
Popular paid tools like Paragon APFS for Windows and MacDrive offer reliable read and write access, including support for encrypted volumes. Paragon APFS for Windows is praised for stable performance and seamless integration with Windows Explorer but requires a license after a trial period. MacDrive also supports APFS volumes with a user-friendly interface but is generally more expensive. Free alternatives, such as APFS for Windows by UFS Explorer, provide read-only access, which is suitable if you only need to copy files from APFS drives.
Accessing APFS volumes on Windows comes with limitations: write support is often restricted to paid solutions, and encrypted APFS volumes may require additional password entry or may not be supported fully. To safely transfer files between APFS volumes and Windows, copy data to a compatible format or use network sharing methods rather than attempting direct edits on the APFS drive. This approach minimizes data corruption risks and ensures smooth interoperability.
Troubleshoot common problems when adding or accessing APFS volumes
If your APFS volume does not appear in Disk Utility or you see errors like "This volume is not formatted as APFS," start by verifying the container and volume structure. Sometimes volumes are hidden due to system glitches or incomplete formatting. Refresh Disk Utility or restart your Mac to check if the volume appears afterward.
When you encounter mounting or permission issues, use Disk Utility's First Aid to check and repair the volume. Follow these steps:
- Open Disk Utility and select the problematic APFS volume.
- Click the First Aid button and confirm by clicking Run.
- Observe the output messages; a successful repair typically ends with "The volume appears to be OK." If errors persist, First Aid will suggest further actions.
If a volume won’t format or add, it could indicate issues with the drive or the APFS container. For example, the drive might have corrupted sectors or incompatible partition schemes. In such cases, erase the drive and reformat it as APFS after backing up your data, or test the drive with Apple Diagnostics or third-party utilities.
In summary, troubleshooting involves checking volume visibility, running First Aid to repair file system errors, resolving mount or permission problems, and verifying drive health if formatting fails. Following this flow reduces common APFS volume issues efficiently.
Frequently asked questions
What is an apfs volume?
An APFS volume is a storage container within an APFS container that shares space dynamically with other volumes. It allows you to organize data efficiently without partitioning your drive into fixed sizes. APFS volumes support features like snapshots and fast directory sizing, making them ideal for modern Mac storage management.
How to read apfs drives in windows?
Windows does not natively support APFS drives, so you need third-party software to read them. Tools like Paragon APFS for Windows or MacDrive can provide read-only or full access to APFS volumes on a Windows PC. Without such software, Windows will not recognize or allow access to APFS-formatted drives.
How to format hard drive to apfs?
To format a hard drive to APFS, open Disk Utility on your Mac, select the drive in the sidebar, then click Erase. Choose APFS or one of its variants (APFS, APFS (Encrypted), APFS (Case-sensitive)) from the Format dropdown menu, name the volume, and confirm. This will erase all data on the drive and prepare it with the APFS file system.
How to format apfs on windows?
Windows does not provide native tools to format drives as APFS. To format a drive as APFS on a Windows machine, you must use third-party applications that support APFS formatting, though such tools are rare and often limited. The most reliable method is to connect the drive to a Mac and use Disk Utility to format it.
How to access apfs in windows?
Accessing APFS volumes in Windows requires specialized software like Paragon APFS for Windows or MacDrive. These programs enable Windows to mount APFS drives, allowing you to browse and transfer files. Without such software, APFS volumes will appear as unrecognized or unformatted disks in Windows.
What This Guide Does Not Cover
This guide does not cover advanced APFS features like encrypted volumes or Fusion Drive setups, which require additional steps and considerations beyond basic volume management. Also, accessing APFS volumes on Windows depends on third-party tools that can have limitations, security risks, or compatibility issues. Always verify the credibility of any software you choose to use for this purpose and consider the potential risks before proceeding. If you need advanced encryption or integration with Fusion Drive, or require reliable cross-platform access, you might want to consult specialized resources or professional support.
The single most useful next step is to open Disk Utility on your Mac and explore the existing APFS containers and volumes. Familiarizing yourself with the interface before adding or formatting volumes helps you avoid common mistakes and understand how storage is organized on your Mac. Take your time to identify your current disks and volumes, then proceed with adding a new APFS volume as described earlier to better organize your data.
See also: Step-by-Step Guide to Partitioning a Drive Using Disk Utility · How to Erase a Drive in Disk Utility: A Clear Step-by-Step Guide