How to Export and Convert QuickTime Videos to MP4 Format
This guide shows how to export and convert QuickTime videos to MP4 format for better sharing and compatibility.
You’ve just finished editing a video in QuickTime Player on your Mac, and now you want to share it easily or upload it to a platform that prefers MP4 format. However, the default QuickTime file is often a MOV, which might not be compatible everywhere. If you’re wondering how to export as MP4 in QuickTime Player or convert your MOV files to MP4, this guide will walk you through both processes step by step.
We’ll cover how to use QuickTime’s built-in export options to save your video directly as an MP4, and what to do when that option isn’t available. You’ll also learn about reliable third-party tools for conversion and get tips on choosing the best settings for sharing and editing without losing quality.
Key takeaways
- You can export MP4 directly from QuickTime Player using the "Export As" menu and selecting "Movie to MPEG-4" if available.
- If direct MP4 export isn’t an option, converting MOV files with third-party apps like HandBrake or VLC is a straightforward alternative.
- Choosing the right export resolution and quality settings helps balance file size and playback compatibility.
- QuickTime Player can play MP4 files, but exporting ensures better compatibility across devices.
- Common export issues often relate to codec support or file permissions, which can be resolved by checking settings or using conversion tools.
Before you start: What you need to export MP4 from QuickTime Player
QuickTime Player is a versatile video tool on Mac, but its export capabilities depend on the version you have and the macOS you’re running. Older versions of QuickTime Player primarily export videos in MOV or QT formats, which are Apple’s default containers. Direct MP4 export became available in macOS Catalina and later with QuickTime Player 10.5 and above. Confirming your macOS version is essential to know if direct MP4 export is supported.
Check your macOS version by clicking the Apple menu > About This Mac. If your macOS is Mojave or earlier, QuickTime Player does not allow exporting directly as MP4, so you will need to convert files afterward. On macOS Catalina or later, QuickTime Player offers an option to export videos as MP4 directly, simplifying the process.
Identify your source video file format before exporting. Common QuickTime files use.MOV or.QT extensions, both compatible with QuickTime Player. Your target use case—such as sharing on social media, playback on non-Apple devices, or editing in other apps—determines whether MP4 is necessary. MP4 is widely supported across devices like Windows PCs, Android phones, and web platforms, while MOV files may have limited compatibility outside Apple environments.
It’s important to understand the difference between exporting and converting here. Exporting MP4 from QuickTime Player means saving your video directly in MP4 format using the app’s built-in features. Converting involves changing a video file from MOV or QT to MP4 using additional software when direct export isn’t available or ideal.
- Open QuickTime Player and load your video file. You should see the video controls and file name at the top of the window.
- Check your macOS version via Apple menu > About This Mac to confirm system compatibility.
- Look at your video’s file extension in Finder (e.g.,.MOV,.QT). This identifies your source format.
- Decide your output goal: sharing, editing, or compatibility with other devices. This clarifies if MP4 is the best choice.
- Confirm your QuickTime Player version by selecting QuickTime Player > About QuickTime Player, noting if it supports direct MP4 export (generally 10.5 or higher).
Here is a brief compatibility overview: MOV works best on Macs and iOS but may not play correctly on Windows or some Android devices. MP4 offers broader compatibility, playing smoothly on most platforms and devices. Knowing this helps you choose whether to export MP4 directly or convert later.
How to export MP4 from QuickTime Player using the built-in export options
To export an MP4 file directly from QuickTime Player, you first need to open the video file you want to convert. QuickTime Player supports direct export to MP4 if your macOS and QuickTime versions are up to date, and your source file is compatible.
- Open your video file: Launch QuickTime Player and select File > Open File… from the menu bar. Choose the video you want to export. Once opened, you will see the video playback window.
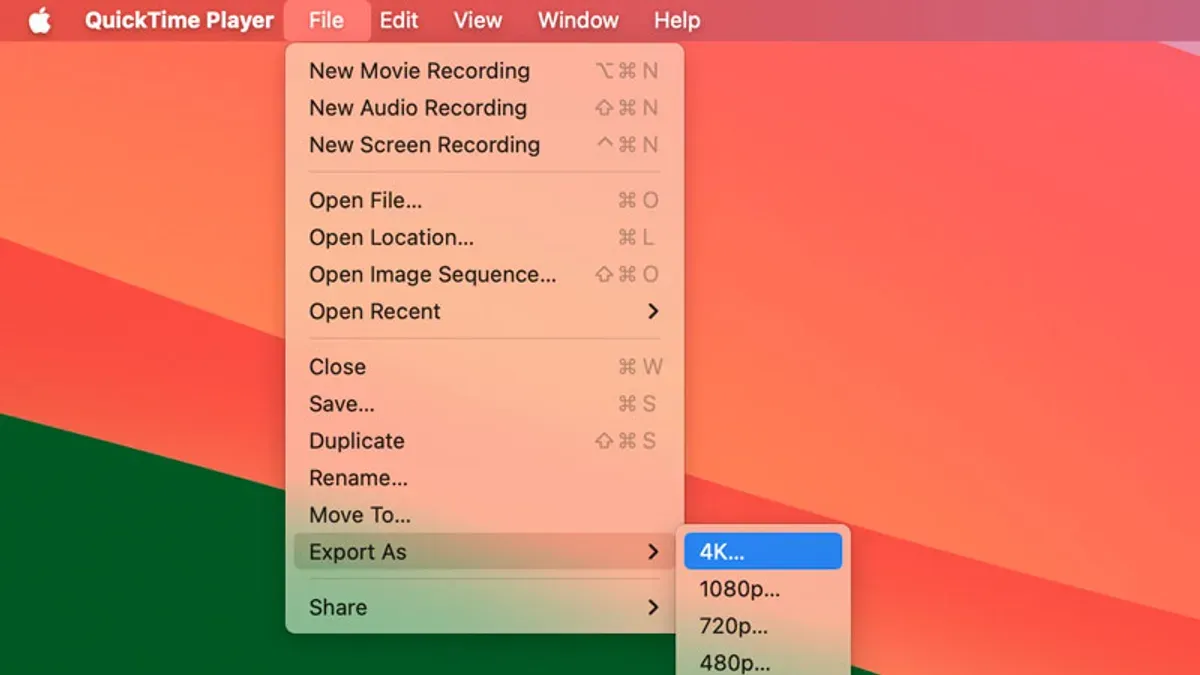
- Access the Export menu: Click on File > Export As. A submenu will appear with resolution options such as 4K, 1080p, 720p, and 480p. These options correspond to common MP4 output presets that QuickTime uses.
- Choose the export resolution: Select the resolution that fits your needs. For example, if you want a balance between quality and file size, choose 1080p. QuickTime exports the file as an MP4 container with H.264 video codec by default at this step.
- Name and save the file: After choosing the resolution, a dialog box will prompt you to name the file and select the destination folder. Click Save. QuickTime will then export the video, showing a progress bar.
- Verify the output format: When the export finishes, locate the saved file in Finder. Right-click and select Get Info. Under Kind, you should see MPEG-4 video, confirming the file is in MP4 format.
Typically, exporting at 1080p results in a file size that is moderate and suitable for most uses, while 4K exports will be much larger but maintain higher quality. If you select 720p or 480p, you reduce file size at the expense of resolution. QuickTime’s built-in export is convenient because it automatically handles encoding settings to produce widely compatible MP4 files without needing additional software.
Remember, if the Export As menu does not show these resolution options or exports to MOV only, you may need to convert the file using a different method covered later in this article.
How to convert QuickTime video to MP4 when direct export isn’t available
Some versions of QuickTime Player do not provide a direct option to export videos as MP4 files. In such cases, you first export your video as a MOV file, which QuickTime supports natively. Once you have the MOV file, you can convert it to MP4 using free tools like HandBrake or reliable online converters.
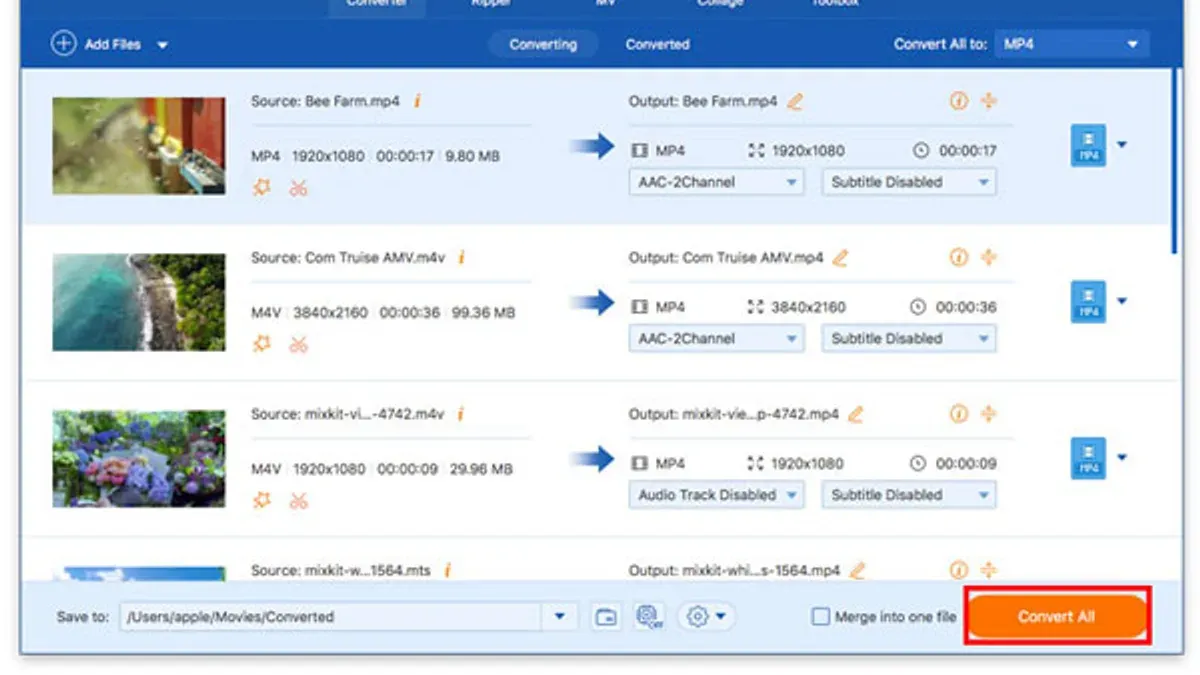
HandBrake is a popular open-source converter that offers precise control over quality and compression. To convert your MOV to MP4 with HandBrake, follow these steps:
- Open HandBrake and click "Open Source" to select your MOV file. You should see your video information load in the main window.
- Under the "Summary" tab, choose "MP4" as the format. Ensure "Web Optimized" is checked for better streaming compatibility.
- Go to the "Video" tab. Set the video codec to "H.264 (x264)" for wide device support and good compression.
- Adjust the "Quality" slider between 20 and 23 for a balance between file size and visual quality. Lower numbers mean higher quality and larger files.
- Optionally, in the "Audio" tab, confirm the audio codec is AAC and bitrate is set to around 160 kbps for good sound quality.
- Choose a destination folder and file name, then click "Start Encode". You will see encoding progress; when complete, your MP4 is ready.
Maintaining video quality during conversion depends on selecting appropriate settings. For example, a MOV file of 500 MB might convert to an MP4 around 300-350 MB with minimal visible quality loss using the recommended settings. Metadata like creation date and title may not always transfer; check your converted file's properties and add metadata with additional tools if needed.
| Setting | Recommended Value | Purpose |
|---|---|---|
| Format | MP4 | Widely compatible output container |
| Video codec | H.264 (x264) | Good compression and device support |
| Quality | 20-23 RF | Balance between quality and file size |
| Audio codec | AAC | Good audio quality and compatibility |
| Audio bitrate | 160 kbps | Clear sound without large files |
Using online converters is a quicker alternative but can be limited by file size, upload speed, and privacy concerns. HandBrake remains the preferred choice when you want full control over output quality and compression.
How to change QuickTime movie to MP4 on Mac with third-party converters
If you need to convert multiple QuickTime MOV files to MP4 or want advanced control over output settings, third-party converters offer powerful alternatives. Popular options include HandBrake, Movavi Video Converter, and Wondershare UniConverter. These apps support batch processing, customizable compression, and format presets tailored for various devices.
Below is a comparison chart highlighting key pros and cons, typical speed performance, and output quality levels for these converters.
| Converter | Pros | Cons | Speed | Output Quality |
|---|---|---|---|---|
| HandBrake | Free, open-source, detailed controls, batch conversion | Interface less intuitive for beginners | Moderate, depends on settings | High, supports H.264 and H.265 codecs |
| Movavi Video Converter | User-friendly, fast, presets for many devices | Paid software, trial limits | Fast, optimized for Mac hardware | Very good, customizable bitrate |
| Wondershare UniConverter | Comprehensive toolkit, easy batch processing | Subscription-based, resource intensive | Fast, GPU acceleration | High, maintains quality well |
To convert QuickTime MOV files to MP4 using a popular third-party app like HandBrake, follow these steps:
- Open HandBrake and click "Open Source" to select one or multiple MOV files. You should see your files loaded in the queue.
- Under "Format," choose "MP4 File." This ensures your output will be in MP4 format.
- Adjust video settings like codec (H.264 recommended), quality slider, and resolution if needed. You can use the "Fast 1080p30" preset for balanced quality and speed.
- Set the destination folder where the converted MP4 files will be saved.
- Click "Start Encode." Progress bars will show conversion status for each file. When complete, check your folder for the MP4 videos.
Compared to QuickTime’s built-in export, third-party converters often provide faster batch processing and greater output customization. However, they may require more initial setup and learning. When choosing software, prioritize apps from reputable developers and download from official sites to avoid malware risks. Also, check privacy policies to ensure your video files aren’t uploaded without permission.
Can QuickTime Player play MP4 files? Understanding playback compatibility
QuickTime Player supports MP4 files that use specific codecs, primarily H.264 or H.265 (HEVC) for video and AAC or ALAC for audio. These codecs are widely used and ensure smooth playback within QuickTime without additional software. However, some MP4 files might contain less common codecs, such as VP8, VP9, or AC-3 audio, which QuickTime Player cannot decode natively. In these cases, you may encounter playback errors or the video may not play at all.
To check the codec information of your MP4 file, you can use QuickTime Player itself or macOS’s built-in tools. In QuickTime Player, open the file, then go to the menu bar and select Window > Show Movie Inspector. This opens a window displaying detailed information about the video and audio codecs used. Alternatively, right-click the MP4 file in Finder, choose Get Info, and look under More Info for codec details.
If QuickTime Player cannot play your MP4 file, a reliable alternative is VLC Media Player, which supports a wider range of codecs and containers. VLC can handle MP4 files with unusual codecs without additional conversion. Using VLC ensures you can view your videos even if QuickTime shows compatibility issues.
- Open your MP4 file in QuickTime Player. If it plays smoothly, your file uses compatible codecs like H.264/AAC.
- If playback fails, open Window > Show Movie Inspector in QuickTime to view codec details.
- Note the video and audio codec listed. If they are not H.264, H.265, AAC, or ALAC, QuickTime may not support playback.
- Try opening the MP4 file in VLC Media Player to confirm if it plays properly there.
- If VLC plays the file, consider converting it to a QuickTime-compatible format for seamless playback within QuickTime Player.
How to export QuickTime as MP4 with optimal settings for sharing and editing
Choosing the right export settings in QuickTime Player or third-party converters helps you balance video quality, file size, and compatibility. For social media sharing, selecting a resolution like 1080p (1920x1080) with a moderate bitrate around 5 Mbps usually provides clear visuals while keeping the file size manageable. Email attachments often require smaller files, so reducing resolution to 720p (1280x720) and lowering bitrate to about 2-3 Mbps helps ensure the file sends quickly without severe quality loss.
When preparing videos for editing software, prioritize quality by selecting higher resolutions and bitrates. Exporting at 4K or 1080p with a constant quality mode, if available, maintains consistent visual fidelity, which is crucial for color grading or effects. Constant quality encoding adjusts bitrate dynamically to preserve detail, unlike average bitrate which fixes file size but may sacrifice scenes with complex motion.
QuickTime Player’s built-in presets often label options as "1080p", "720p", or "480p" under the Export As menu. These presets apply recommended bitrate and resolution combos optimized for typical use cases. Third-party tools like HandBrake provide presets such as "Fast 1080p30" or "Very Fast 720p30", simplifying selection. Adjusting encoding mode between constant quality (e.g., RF 20-23) and average bitrate depends on whether you want consistent quality or precise file size control.
- Open your video in QuickTime Player and go to File > Export As.
- Select a preset based on your target use: 1080p for social media or 720p for email.
- Check the file size preview shown below; larger files indicate higher bitrate and quality.
- If using a third-party converter, pick a preset like "Fast 1080p30" and set encoding to constant quality with RF 20 for balanced quality and size.
- Export the video and compare the output by playing it and checking the file size in Finder to confirm it meets your needs.
For example, exporting a 5-minute video at 1080p with constant quality RF 20 typically produces a file around 150-200 MB, offering sharp visuals suitable for editing. The same video at 720p and average bitrate 3 Mbps might be under 100 MB, ideal for quick sharing but with slightly reduced clarity. Side-by-side playback shows the 1080p version retains detail in fast motion scenes better than the lower settings.
Troubleshooting common problems when exporting or converting QuickTime files to MP4
When you encounter errors during export or conversion, start by identifying the exact message or symptom. Common QuickTime Player errors include “Export failed” or sudden crashes without messages. These often indicate insufficient system resources or corrupted source files. Closing other applications to free up memory and restarting your Mac can resolve transient issues. If the problem persists, check the source file’s integrity by playing it fully in QuickTime; failure to play smoothly suggests file corruption.
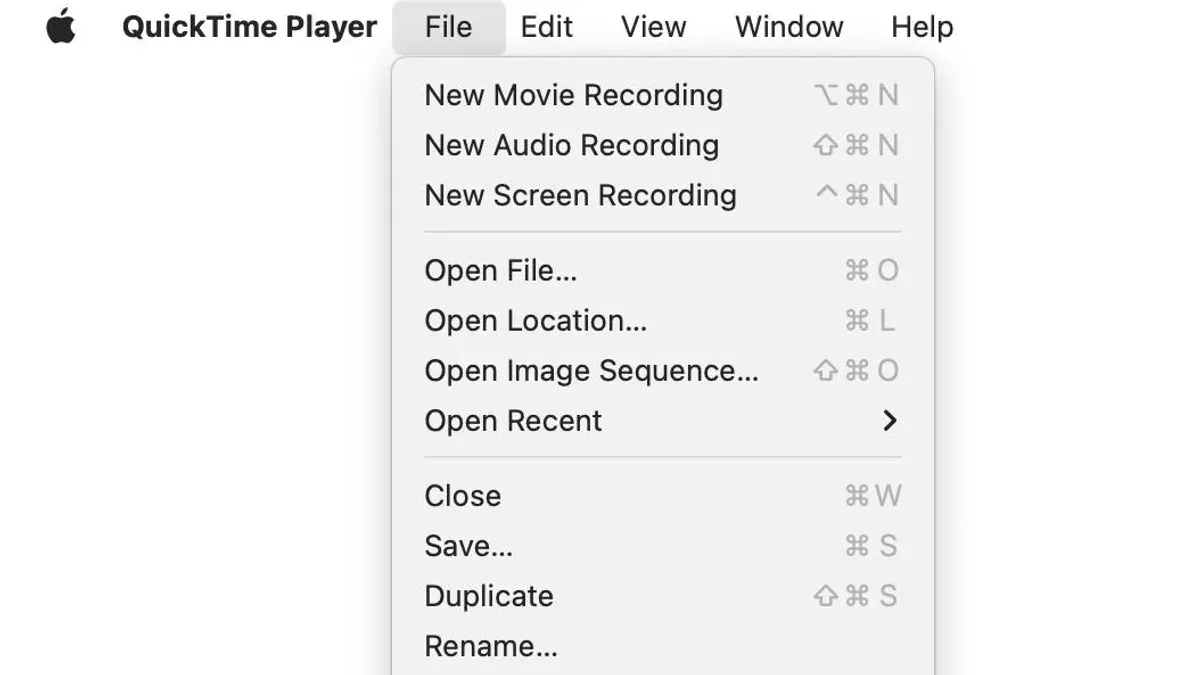
Corrupt or unsupported source files may trigger errors like “The file is not a movie file” or “Cannot open file.” In such cases, try re-saving the file using QuickTime’s “Save As” or “Duplicate” option to create a fresh copy. If that fails, use a third-party repair tool or convert the file using HandBrake, which can sometimes bypass minor corruption.
After conversion, audio and video may become out of sync. This usually results from incorrect frame rate settings during export or conversion. To fix this, ensure the frame rate in your converter matches the original video’s frame rate exactly, typically 24, 25, or 30 fps. In HandBrake, check the “Video” tab for frame rate options and select “Same as source.”
Playback errors such as black screens, no audio, or unsupported codec messages are often due to incompatible codec settings in the MP4 output. Verify that your export or conversion uses H.264 video codec and AAC audio codec for maximum compatibility. If errors persist, try playing the file in VLC, which supports a wider range of codecs.
When you see error logs like “Error -11810” or “Error -50” in QuickTime, these typically indicate file format issues or permission problems. Confirm that you have read/write access to the file and destination folder. Also, avoid exporting directly to network drives or external devices, which can cause interruptions.
- Restart your Mac and try exporting again; if successful, the issue was likely temporary system resources.
- Play the source file fully in QuickTime; if it fails, duplicate it using “File > Duplicate” and try exporting the duplicate.
- If export fails, convert the file using HandBrake with the settings: Video codec H.264, audio codec AAC, frame rate “Same as source.”
- Check the MP4 file by playing it in QuickTime and VLC to confirm playback and sync; if audio/video sync is off, adjust frame rate settings and reconvert.
- If errors persist, verify file and folder permissions, and avoid exporting to external or network locations.
Frequently asked questions
Should i export in quicktime or mp4?
Choosing between exporting in QuickTime (.mov) or MP4 depends on your needs. QuickTime format preserves higher quality and supports features like alpha channels, making it ideal for editing. MP4 offers wider compatibility for sharing and playback on various devices, usually with smaller file sizes. If you want seamless playback across platforms, export as MP4; for professional editing, QuickTime might be better.
How to convert quicktime to mp4?
You can convert QuickTime (.mov) files to MP4 using QuickTime Player’s built-in export feature by selecting File > Export As > 720p or 1080p, then choosing the “Movie” format which outputs MP4. Alternatively, use third-party converters like HandBrake if the export options are limited. The process involves opening the.mov file and saving or exporting it as an MP4 format.
How to convert quicktime movie to mp4?
To convert a QuickTime movie file (.mov) to MP4, open it in QuickTime Player, then go to File > Export As and pick a resolution like 1080p or 720p. QuickTime Player exports the video as an MP4 by default in these options. If this option isn’t available, use a third-party app such as HandBrake to convert the.mov file to MP4 by selecting MP4 as the output format.
Can quicktime play mp4?
Yes, QuickTime Player can play MP4 files, especially those encoded with H.264 video and AAC audio, which are standard for MP4 videos. However, some MP4 files with uncommon codecs may not be supported. In such cases, you might need to convert the file to a compatible format or use another media player.
How to convert quicktime player to mp4 on mac?
To convert a video opened in QuickTime Player on Mac to MP4, select File > Export As and choose a resolution like 1080p or 720p. These export options save the file in MP4 format. If these options are missing, export as MOV first, then use a third-party converter app to change the format to MP4.
Limits of This Guide
This article does not cover professional-level video encoding software beyond consumer-grade tools and QuickTime Player capabilities. If you require advanced editing, detailed compression controls, or specialized format support, dedicated video editing software like Final Cut Pro or Adobe Premiere Pro will better suit your needs. Additionally, some older versions of QuickTime Player do not support exporting directly to MP4, so in those cases, you will need to rely on third-party conversion tools as described here.
For your next step, try exporting a short video clip using QuickTime Player’s Export As > 480p or 720p option, then check the resulting MP4 file’s quality and compatibility on your intended devices. This hands-on practice helps you understand the balance between file size and video quality, ensuring your exports meet your sharing or editing goals effectively.
See also: How to Join Two Videos in QuickTime Player: Step-by-Step Guide · How to Screen Record with Internal Audio in QuickTime Player