
How to Embed a Video in Keynote: A Step-by-Step Guide
Master embedding videos in Keynote to enhance your presentations with local files or online content for a professional touch.
You’re preparing a Keynote presentation and want to add a video to illustrate your point or engage your audience. Whether the video is stored on your Mac or hosted online, knowing how to embed a video in Keynote can make your slides more dynamic and professional.
This guide walks you through the process of adding videos from various sources, including local files, YouTube, and Vimeo. You’ll learn when to embed videos directly into your presentation and when to link them, plus how to adjust playback settings for smooth viewing. Step by step, you’ll gain the confidence to enhance your Keynote presentations with video content suited to your setup and goals.
Key takeaways
- Embed videos from your Mac by dragging files directly into your slide or using the Insert menu.
- Use a web video’s embed code or link to insert YouTube and Vimeo videos into Keynote.
- Choose between embedding videos for offline playback or linking for smaller file sizes and easier updates.
- Adjust playback options such as automatic start, looping, and volume control within Keynote’s Format sidebar.
- Prepare for potential playback issues by testing videos on the presenting device before your presentation.
Before you start: What you need to embed a video in Keynote
Embedding videos in Keynote requires preparation to ensure smooth integration and playback. First, you need to have video files in formats that Keynote supports for local embedding. According to Apple's official documentation, Keynote accepts common video formats such as.mov,.mp4,.m4v, and.avi. Keep in mind that local video files can vary widely in size; for example, a typical 2-minute HD video might be around 100 to 200 MB, so plan your file sizes accordingly to avoid large presentation files.
For embedding online videos from platforms like YouTube and Vimeo, you must have a stable internet connection during your presentation to stream the content. While you don't necessarily need an account just to embed or play videos, having one may be helpful for accessing certain videos or managing playlists. Remember that these videos are linked rather than embedded locally, which means the video content streams from the web rather than being stored inside your presentation file.
Before adding any videos, verify that your Keynote app is up to date and compatible with media embedding features. Keynote’s media permissions should be enabled, allowing the app to access your files and the internet. You can check this in System Preferences under Security & Privacy, then the Privacy tab, ensuring Keynote has the necessary permissions for Files and Folders as well as Network access.
- Check your video file format by selecting the file in Finder and pressing Command + I. The format is listed under "Kind". Confirm it is.mov,.mp4,.m4v, or.avi. If it is not, convert it using a video converter. When successful, you should see the correct format listed.
- Ensure your Mac is connected to the internet if you plan to embed YouTube or Vimeo videos. Open a browser and load the video page to confirm your connection is stable and the video plays.
- Open Keynote, then go to Keynote > Preferences > General, and check that media embedding options are enabled. You should be able to insert media files and links without restriction.
- Verify Keynote’s permissions by opening System Preferences > Security & Privacy > Privacy tab. Scroll to "Files and Folders" and "Network" sections, and make sure Keynote is checked. If checked, Keynote has the access needed to embed and play videos.
Understanding the difference between embedding local videos and linking online videos helps you decide which method fits your needs. Embedded local videos increase your presentation file size but play reliably offline. Linked online videos keep your file size smaller but require internet access to play during your presentation.
How to add videos to Keynote from your Mac
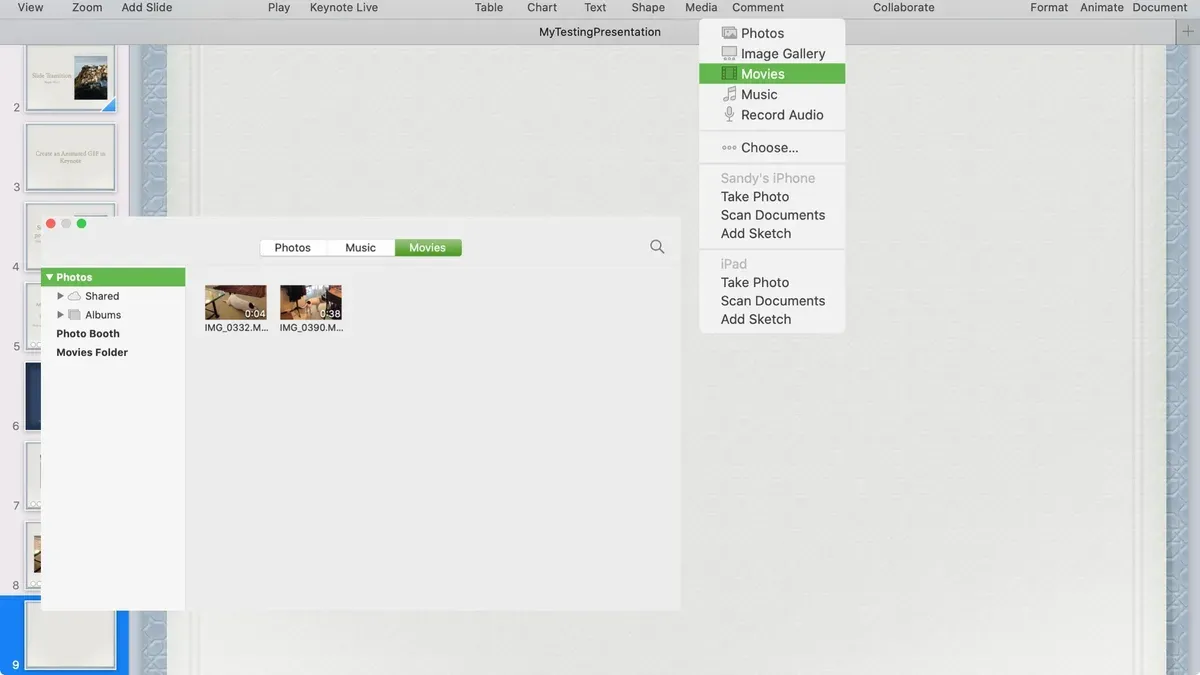
Embedding a video from your Mac directly into a Keynote slide is a straightforward process that lets you control playback without relying on an internet connection. Here's how you can add a local video file, such as an MP4, to your presentation and customize its appearance and behavior.
- Open your Keynote presentation and select the slide where you want to add the video. You should see the slide highlighted in the sidebar.
- Click on the Media button in the toolbar, then choose Choose from the dropdown menu. A file browser window will appear.
- Navigate to the location of your MP4 video file on your Mac, select it, and click Insert. The video will appear on your selected slide.
- Resize the video by dragging its corners to fit the slide layout. Move it to the desired position by clicking and dragging the video frame. The blue bounding box indicates the video is selected.
- With the video selected, open the Format sidebar on the right and click the Movie tab to access playback options.
- Adjust playback settings such as Start Movie to On Click or Automatically, enable Loop if you want the video to repeat, and choose whether to Mute Audio or show playback controls.
- To keep your presentation smooth, optimize video file size beforehand by using a compressed MP4 format with H.264 encoding. Large video files can cause lag during playback.
After these steps, play your slide show to confirm the video appears correctly and plays as expected. If the video doesn’t play, verify the file format and check your Keynote version supports it.
How to embed a YouTube video in Keynote on Mac
Embedding a YouTube video in Keynote involves inserting a web video link rather than a video file. This means the video will stream from the internet during your presentation, so a stable internet connection is essential for smooth playback. Before you begin, locate the YouTube video you want to use and copy its URL from the browser’s address bar.

- Open your Keynote presentation and navigate to the slide where you want to add the YouTube video. You should see the slide appear in the main editing window.
- Go to the Insert menu at the top of the screen and select Web Video. A dialog box will appear prompting you to enter a video URL.
- Paste the YouTube video URL into the field and click Insert. The video placeholder will appear on your slide, showing the video thumbnail or a loading icon.
- Resize or reposition the video placeholder as needed by dragging its edges or moving it on the slide. This lets you fit the video into your slide layout effectively.
- To test playback, switch to Play mode and click the embedded video. It should start streaming from YouTube within your presentation.
Remember, this method links to the YouTube video rather than embedding the actual file. Without an internet connection, the video won’t play. For offline presentations, consider downloading the video legally and adding it as a local file instead. Also note that playback controls and buffering depend on YouTube’s streaming performance and your network speed.
By following these steps, you can easily add YouTube videos to your Keynote slides and enhance your presentation with dynamic content from the web.
How to embed a Vimeo video in Keynote
Embedding a Vimeo video in Keynote works similarly to embedding a YouTube video and requires an active internet connection for streaming playback. If the Vimeo video is private, you will need to ensure you have access rights and may need to sign in to your Vimeo account within the browser-based player Keynote uses.
- Open your Vimeo video in a web browser and copy its URL from the address bar. You should see the URL format like https://vimeo.com/yourvideoID.
- Go to your Keynote slide where you want to embed the video. Click the Insert menu and choose Web Video. A dialog box will appear.
- Paste the Vimeo URL into the Web Video URL field and click Insert. You should see a placeholder frame appear on the slide representing the embedded video.
- Position and resize the placeholder as needed. When presenting, Keynote will stream the video directly from Vimeo.
- If the video doesn't play during the presentation, check your internet connection and verify the video is not restricted or private without proper access. Logging in to Vimeo on your Mac beforehand can help resolve access issues.
Compared to YouTube, Vimeo videos often offer higher quality playback and fewer advertisements, which can enhance the viewing experience in presentations. However, YouTube embedding tends to have broader compatibility and slightly higher playback reliability due to its larger infrastructure and caching.
| Feature | Vimeo | YouTube |
|---|---|---|
| Video Quality | Typically higher, with professional-grade options | Good quality, varies by uploader |
| Advertisements | None or minimal | Ads may appear during playback |
| Playback Reliability | Good but can be affected by privacy settings | Very high due to global CDN and caching |
| Privacy Controls | Robust, supports private videos and domain-level restrictions | Limited to unlisted or private videos |
If you encounter playback issues, try refreshing the slide, checking your network, or re-inserting the video URL. For private videos, confirm your Vimeo account permissions are up to date and that you are logged in before presenting. These steps ensure smooth video playback and integration within your Keynote presentation.
How to use a picture on Keynote and create video-like notes
Combining images with embedded videos in Keynote can enhance your presentation by adding engaging visual storytelling. To start, insert a picture by clicking Insert in the menu bar, then Choose your image file. Once inserted, you can resize or move the picture by dragging its corners or the image itself. This flexibility helps you position the image alongside your video for a balanced slide layout.
Using images in conjunction with videos lets you highlight key points or add context. For example, placing a photo next to an embedded video clip can reinforce the message or provide background information. You can also overlay text boxes on images to create visually rich slides that guide your audience through your narrative.
To create video-like notes, you can leverage Keynote’s animation and build features. By animating images and text notes to appear in sequence, you simulate a dynamic video effect within your slide. However, Keynote does not convert notes or images into standalone video files internally, so this approach is best for live presentations rather than exporting video segments.
Here is a simple way to combine an image, embedded video, and notes on one slide:
- Insert your chosen picture and position it on one side of the slide.
- Embed your video on the opposite side, adjusting size to maintain balance.
- Add text boxes with notes below or next to the picture to explain or emphasize details.
- Use the Animate panel to add builds or transitions to each element for smooth, staged delivery.
- Preview your slide in presentation mode to ensure the timing and layout feel natural and engaging.
This method produces a rich, multimedia slide that mimics video storytelling without actual video editing. Remember, while you can create a video-like experience, Keynote’s capabilities focus on live presentation effects rather than producing exportable video files from notes or images.
How to make a Keynote presentation with embedded videos
Creating a seamless Keynote presentation with embedded videos involves careful slide organization and syncing your content effectively. Begin by grouping video slides logically, such as clustering all related videos together or spacing them to support your narration flow. This approach helps maintain audience engagement and avoids abrupt transitions.
Next, sync your presenter notes or narration with video playback. Use the build order panel to time video starts with your speaking points or animations. If you narrate live, practice starting videos at key moments to reinforce your message. Presenter notes can include reminders to trigger videos or highlight important timestamps in longer clips.
Testing your presentation on different devices is crucial. Export your Keynote file and run it on Macs with different screen sizes and system versions to ensure videos play smoothly and maintain quality. Check for internet connectivity when streaming content and confirm embedded videos remain linked without errors.
When exporting, choose File > Export To > QuickTime to create a video file preserving all embedded videos and playback settings. Alternatively, export as a Keynote file to keep editing capabilities intact. In the export dialog, select Include presenter notes if needed and verify the resolution matches your display requirements.
- Organize your slides so video content supports your narrative flow; you should see a clear, logical sequence enhancing understanding.
- Use the Build Order panel to time videos with your narration; videos should start and pause according to your scripted points.
- Test the presentation on multiple Macs or devices; videos should play without lag or missing links.
- Export your presentation via File > Export To > QuickTime to preserve video playback; the output video file should include all embedded clips playing correctly.
Troubleshooting common issues when embedding videos in Keynote
If your video won’t play or shows errors like “The file can’t be opened” or “Unsupported format,” the first step is to verify the video format. Keynote supports formats such as.mp4 (H.264),.mov, and.m4v. If your video uses an incompatible codec, convert it using tools like QuickTime Player or a trusted video converter. After conversion, reinsert the video and check playback.
Playback lag or poor video quality often results from large file sizes or insufficient system resources. To fix this, reduce the video resolution or bitrate before embedding. Additionally, closing other apps can free up memory. In Keynote’s Format sidebar, under Movie settings, ensure “Optimize video for playback” is checked to help improve performance.
For linked videos, offline playback limitations are common. If you see a message such as “Video not found,” it means Keynote cannot locate the original file. To avoid this, embed the video rather than linking it, or ensure the linked file remains in its original location on your Mac. Moving or deleting the source video breaks the link and disables playback during presentations.
Compatibility issues between Keynote versions can cause video errors. For example, a video embedded in a newer Keynote version might not play correctly if opened in an older version. Updating Keynote to the latest version via the App Store often resolves this. Also, check for macOS updates to support the latest multimedia features.
- Open your Keynote presentation and locate the problematic video slide. You should see either the video thumbnail or an error message.
- Check the video format by selecting the video and looking under the Format sidebar > Movie tab. Confirm it is a compatible format like.mp4 or.mov.
- If incompatible, convert the video using QuickTime Player: open the video, choose File > Export As, select 1080p or 720p, and save a new file.
- Replace the old video in Keynote: delete it, then drag the converted file into the slide. Verify the video thumbnail appears correctly.
- Play the slide in presentation mode. If the video plays smoothly without errors, the issue is resolved.
Frequently asked questions
How to embed a video in onenote?
To embed a video in OneNote, you can insert a video file directly by selecting the Insert tab and choosing "File Attachment" or "Online Video" if you want to embed a video from a web link. OneNote supports embedding videos from platforms like YouTube by pasting the video URL, which will display an embedded player. Note that playback depends on your internet connection and the video source's availability.
How to put to keynote?
To add content to Keynote, such as videos or images, open your presentation and select the slide where you want to add the media. Use the Insert menu and choose "Choose" to select a file from your Mac, or drag and drop files directly onto the slide. For videos, you can add local files, or embed online videos via links using the web view or by converting them to compatible formats first.
Can you put videos in keynote?
Yes, you can put videos in Keynote presentations by inserting video files stored on your Mac or by embedding videos from online sources like YouTube and Vimeo. Keynote supports common video formats such as MOV, MP4, and M4V. Videos can be either embedded directly into your presentation or linked, depending on your preference and file size considerations.
How to embed a video link in keynote?
To embed a video link in Keynote, you can insert a web video by copying the URL from YouTube or Vimeo, then using the "Insert" menu and selecting "Web Video" or by adding a hyperlink to an image or text. This method streams the video during the presentation and requires an active internet connection. Alternatively, download the video and insert it as a local file for offline playback.
Can you put videos in Keynote presentations?
Yes, Keynote allows you to include videos within your presentations. You can insert videos stored on your Mac or embed online videos by pasting their URLs. Ensure your videos are in a compatible format and consider embedding videos directly if you want to avoid playback issues related to internet connectivity.
Honest Limits of This Guide
This guide focuses on embedding videos in Keynote on Mac and does not cover Windows or iOS versions in detail. If you primarily use Keynote on iPad or iPhone, or if you want to embed videos on a Windows machine, you should look for instructions specific to those platforms. Embedding online videos like YouTube or Vimeo requires a stable internet connection during playback; if you expect to present offline, using local video files is the more reliable choice. Also, Keynote supports common video formats such as.mp4 and.mov but has limits on file size and format compatibility to maintain performance and smooth playback.
To get the most out of embedding videos in your Keynote presentation, the single most useful next step is to organize your media files carefully before importing. Keeping videos in a dedicated folder on your Mac and naming them clearly helps Keynote manage linked files efficiently and reduces the risk of broken links. This preparation allows you to focus on fine-tuning playback settings for each video, ensuring your presentation runs smoothly and looks professional.
See also: How to Record a Presentation in Keynote: A Step-by-Step Guide · How to Add Animations in Keynote: A Step-by-Step Guide · How to Export Keynote to PowerPoint: Step-by-Step Guide



