How to Create a Checklist in the Notes App: Step-by-Step Guide
Discover how to create a checklist in the Notes app on your iPhone or iPad with clear steps and tips for better task management.
You have a busy day ahead and want to keep track of tasks efficiently. Creating a checklist can help you organize your to-dos and stay focused. If you’ve wondered how to create a checklist in Notes app on your iPhone or iPad, this guide will walk you through the process step by step.
This article covers checklist creation not only in Apple’s Notes app on iPhone and iPad but also compares it with Microsoft OneNote and the basic Notepad app. By understanding the unique features and limitations of each tool, you can decide which fits your workflow best. You’ll get clear instructions for each platform along with tips and troubleshooting advice to make your checklists effective and easy to manage.
Key takeaways
- Apple Notes on iPhone and iPad offers a simple built-in checklist feature accessible via the toolbar.
- Microsoft OneNote supports more flexible checklist options with tagging and integration across devices.
- Basic Notepad lacks native checklist support but can be adapted with manual symbols like brackets or dashes.
- Choosing the right app depends on your needs for syncing, formatting, and task management.
- Common issues like syncing delays or checklist formatting are solvable with simple troubleshooting steps.
Before you start: What you need to create a checklist
To create checklists efficiently, you need the right devices and updated apps. For Apple Notes, you’ll need an iPhone or iPad running at least iOS 13 or iPadOS 13, as checklist features are not available in earlier versions. Microsoft OneNote works on Windows 10 or later and macOS 10.14 or later. You must have the latest OneNote app installed to access all checklist capabilities. Notepad is a basic text editor available on any Windows device but does not include built-in checklist functions.
OneNote requires you to sign in with a Microsoft account to sync your checklists across multiple devices, such as your PC, Mac, or mobile apps. This syncing feature is essential if you want your checklists updated everywhere automatically. Apple Notes uses iCloud for syncing, so an iCloud account with Notes enabled is necessary if you want your checklists available on all your Apple devices.
Notepad, by contrast, does not support syncing or checklist formatting natively. It only handles plain text, so any checklist you create there will be manual—using symbols like dashes or brackets. Understanding these differences helps you prepare before starting your checklist creation.
- Check your device’s operating system version: On iPhone or iPad, go to Settings > General > About to find the iOS or iPadOS version. You should see 13 or higher for checklist support. If your device is compatible, continue.
- Open the App Store and verify that Apple Notes, OneNote, or your preferred app is updated to the latest version. Updates ensure all checklist features are available.
- If you plan to use OneNote, sign in with your Microsoft account in the app’s settings to enable syncing. You should see your notebooks appear across devices once signed in.
- For Apple Notes syncing, ensure iCloud Notes is enabled via Settings > [your name] > iCloud > Notes. This allows your checklists to stay current on all Apple devices.
- If using Notepad, prepare to create checklists manually as plain text without interactive checkboxes. Open Notepad and type checklist items using symbols like "-" or "[ ]" to simulate checkboxes.
How to make a checklist in iPhone Notes
- Open the Notes app on your iPhone and either create a new note by tapping the compose icon or open an existing note where you want the checklist. You should see your note ready for editing.
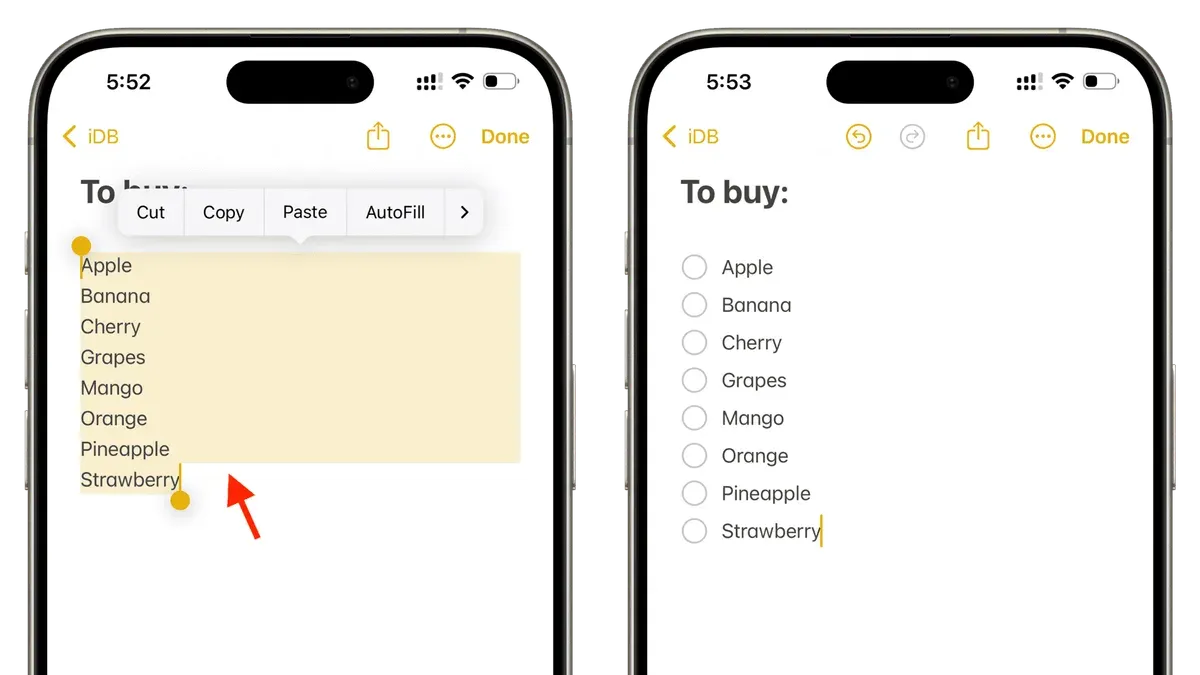
- Tap the checklist icon, which looks like a circle with a checkmark, located above the keyboard in the formatting toolbar. This action inserts a checklist item with an empty circle at the start of a new line.
- Type the first item on your checklist and then tap Return on the keyboard to add the next checklist item line by line. Each new line will automatically have an empty circle to mark the item.
- To mark an item as done, tap the empty circle next to it. The circle will fill with a checkmark and the text will appear struck through, visually indicating completion.
- If you want to rearrange checklist items, tap and hold the three horizontal lines (drag handle) next to an item, then drag it up or down to the desired position. Release your finger to drop the item in place.
- To delete a checklist item, tap at the end of the item text and use the backspace key to remove it. If the entire line is deleted, that checklist item will be removed.
- You can quickly add checklist items using Siri by saying "Add [item] to my note" if you direct Siri to your note or use keyboard shortcuts like holding the Command key and pressing Return on compatible keyboards to quickly insert checklist lines.
Following these steps helps you build and manage checklists efficiently in the iPhone Notes app, keeping your tasks neatly organized and easy to update.
How to create a checklist in Apple Notes on iPad
To create a checklist on your iPad, start by opening the Notes app and either create a new note or open an existing one. The iPad interface resembles the iPhone app but offers additional ways to interact with your checklist, making the process more flexible.
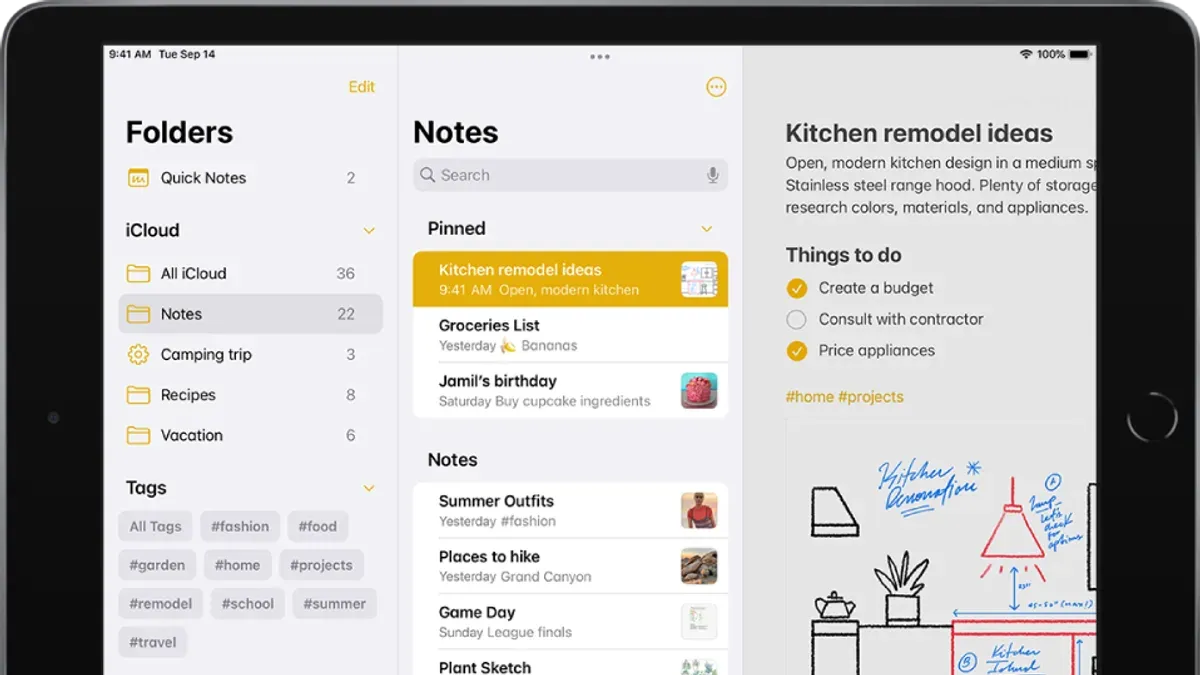
- Tap the note where you want to add a checklist. You will see the formatting toolbar appear above the keyboard or at the top of the screen.
- Tap the checklist button, which looks like a circle with a checkmark inside. This inserts the first checklist item with an empty circle ready for your input.
- Type your checklist item using the on-screen keyboard or, if you prefer, use an Apple Pencil to write or tap to activate handwriting recognition.
- Press Return on the keyboard or tap below the current item to add another checklist item. Each new item will have its own check circle.
- To reorder checklist items, touch and hold the three horizontal lines icon on the right side of an item, then drag it up or down. You will see the list adjust as you move the item.
- If you use an external keyboard with your iPad, you can quickly add items using keyboard shortcuts such as Return and Tab for nesting checklist items.
- Your checklist syncs automatically with iCloud, so you can access and edit it seamlessly on all your Apple devices signed in with the same Apple ID.
Using touch and the Apple Pencil on the iPad allows more natural interaction, like quickly dragging items or handwriting checklist points. This makes managing lists more intuitive compared to the iPhone.
How to create a checklist in OneNote
Creating checklists in Microsoft OneNote offers flexibility across desktop and mobile versions, with organized note-taking and task tracking. OneNote uses "To Do" tags to create interactive checklists, allowing you to mark items as complete and keep track of progress. Unlike Apple Notes, OneNote supports more detailed organization by letting you place checklists within sections and pages, making it easier to manage multiple projects or topics.
- Open OneNote and select the notebook and page where you want to add your checklist. You should see the page ready for editing.
- Click or tap the To Do Tag button, which looks like a checkbox, located on the Home tab in the desktop app or in the formatting toolbar on mobile. A checkbox appears where your cursor is.
- Type your first checklist item next to the checkbox, then press Enter to add the next item automatically with a new checkbox.
- To mark an item as completed, click or tap the checkbox next to the item. The box will fill, and the item will be visually crossed out.
- Organize your checklist by adding section headers or creating separate pages for different lists. This helps keep related tasks grouped and accessible.
- Ensure you are signed in with your Microsoft account so that your notebooks and checklists sync across all devices, allowing you to update and review your checklists anywhere.
Using tags in OneNote lets you customize your checklist beyond simple tick boxes, including flags and priority markers. For example, you might tag some items as "Important" or "Question" to differentiate task types, which is a feature not available in Apple Notes. Overall, OneNote checklists are well suited for users who want detailed task management embedded within their notes.
How to make a checklist in Notepad
Notepad is a simple plain text editor without built-in checklist features. You cannot create interactive checkboxes or mark items completed automatically. Instead, you can manually type your checklist using symbols to represent each item.
- Open Notepad from your Start menu or by searching "Notepad." A blank text document will appear.
- Type your checklist items, starting each line with a symbol such as a square bracket pair with a space inside: [ ] or a dash: -. For example:
[ ] Buy groceries
[ ] Call the bank
[ ] Finish report - Save your document using File > Save or Ctrl+S to keep your checklist accessible later.
- When you complete an item, edit the line to mark it done by replacing the empty brackets with an X or another mark, for example:
[X] Buy groceries
This manual approach means you must edit your checklist entries yourself to reflect progress. Notepad does not support syncing, reminders, or interactive checkboxes. If you need advanced checklist features like automatic check marks, sorting, or cloud syncing, consider using apps like Apple Notes or Microsoft OneNote instead.
How to make a checklist in Microsoft Notes
There is often confusion about "Microsoft Notes" because Microsoft does not offer a dedicated app by that exact name. Instead, the closest Microsoft app designed for note-taking with checklist capabilities is Microsoft OneNote, which you have already learned about earlier in this guide. OneNote allows you to create interactive checklists with To Do tags, organize them across notebooks, and sync them across devices.
Besides OneNote, Microsoft also provides the Microsoft To Do app, which focuses exclusively on task and checklist management. To Do is optimized for creating, scheduling, and tracking to-do lists with reminders and task prioritization. This makes it a strong alternative if your main goal is checklist and task management rather than comprehensive note-taking.
The key difference between OneNote and Microsoft To Do is their purpose: OneNote is a versatile note-taking tool that supports checklists as part of broader notes, while To Do is designed specifically for managing tasks and checklists efficiently. Depending on your workflow, you might prefer OneNote for detailed notes with embedded checklists or Microsoft To Do for focused task tracking.
If you want to create checklists within Microsoft’s ecosystem and are unsure where to start, follow these steps to use Microsoft To Do for checklist creation:
- Open the Microsoft To Do app on your device. You should see your task lists or an option to create a new list.
- Tap the + New List button to create a new checklist. Name your list appropriately, such as "Grocery Shopping" or "Project Tasks." You will see a blank list ready for tasks.
- Tap Add a task and type the item you want on your checklist. Press Enter or tap Add to save it. Repeat this for all checklist items.
- As you complete tasks, tap the checkbox next to each item. Completed tasks will be marked off and can be hidden or shown based on your preference.
- Use the menu options to set due dates, reminders, or categorize tasks with tags if needed. This enhances checklist management beyond basic note-taking.
By understanding these distinctions and options, you can choose the Microsoft app that best fits your checklist needs.
Tips for making effective checklists with notes templates
Using templates for your checklists can save you time and maintain consistency, especially when you frequently create similar lists. In Apple Notes, you can create a reusable checklist template by duplicating an existing note that contains your checklist. This approach lets you quickly start a new checklist without rebuilding it from scratch.
- Open the note with your checklist template in Apple Notes.
- Tap the More Options button (three dots) in the top-right corner.
- Select Duplicate from the menu.
- A copy of the note appears in your notes list; open it to update or start using the checklist.
In OneNote, you can speed checklist creation by duplicating pages or using built-in templates. To duplicate a page, right-click the page tab and select Duplicate. This copies the entire page, including checklists, allowing you to modify it for a new task. OneNote also offers templates for different purposes, which can be accessed through the Insert > Page Templates menu to find checklists for projects, meetings, or shopping lists.
Adding notes or brief instructions alongside checklist items helps clarify each task’s purpose. For example, in a grocery list, include reminders such as "Buy organic if available" or for a project task, add "Confirm deadline with client." This extra context enhances checklist usability and reduces confusion.
Organize your checklist templates by category for easy access. Create folders or sections named "Grocery Lists," "Work Tasks," or "Project Planning" in your notes app or OneNote to keep templates structured. This organization ensures you can quickly find the right template when you need it, making your checklist process more efficient.
Troubleshooting common issues when creating checklists in Notes and OneNote
If you find the checklist icon missing or disabled in the Notes app, first confirm your device is compatible and that your app is updated to the latest version. Older iOS or iPadOS versions may not support checklist features fully. On OneNote, missing checklist options often relate to syncing errors or outdated app versions.
Sync issues are common when checklists fail to appear across devices. In Apple Notes, ensure you are signed into iCloud with Notes syncing enabled under Settings > [your name] > iCloud > Notes. For OneNote, verify that your Microsoft account is signed in and syncing is active by checking File > Info > Account.
When checklists do not save or disappear, check app permissions in your device settings and confirm there is enough storage space. Permissions should allow Notes or OneNote to access storage and network. Lack of permissions or low storage can cause data loss.
Formatting problems often arise because plain text editors like Notepad do not support interactive checklist features. In Notes and OneNote, avoid copying rich text from incompatible sources, which can disrupt checklist formatting. Use built-in checklist tools exclusively for best results.
To recover unsaved checklist data, look for automatic backups or recently deleted notes in the app’s folder or recycle bin. In Notes, the Recently Deleted folder holds deleted notes for 30 days. OneNote has a version history accessible via View > Version History, allowing you to restore previous note states.
- Check your device and app versions; update if needed. You should see the checklist icon enabled in the formatting toolbar.
- Confirm iCloud or Microsoft account is signed in and syncing is enabled. Changes should reflect across your devices.
- Verify app permissions and storage in device settings. The app should save notes without errors.
- Use the built-in checklist feature only to avoid formatting issues. Your checklist items should be interactive and checkable.
- If data is lost, open the Recently Deleted folder or OneNote’s Version History. You should be able to restore missing checklist items.
Frequently asked questions
How to create checklist in iphone notes?
Open the Notes app on your iPhone and select or create a new note. Tap the checklist button, which looks like a circle with a checkmark, located above the keyboard. Start typing your first item, then tap return to add more checklist items. Each item will have a tappable circle to mark it complete.
How to make checklist in microsoft notes?
Microsoft Notes is often confused with OneNote, but if you mean the basic Windows Notepad app, it does not support interactive checklists. Instead, you can manually type items with symbols like "- [ ]" for checkboxes, but these won’t be clickable. For interactive checklists, consider using OneNote or Microsoft To Do instead.
How to make checklist on iphone notes?
To make a checklist on iPhone Notes, open or create a note, then tap the checklist icon above the keyboard. Enter your list items one by one, pressing return after each. You can tap each circle to check off completed tasks, making it easy to track progress directly in the note.
How to make a checklist in onenote?
In OneNote, open a page and place your cursor where you want the checklist. Click or tap the “To Do Tag” button, often represented by a checkbox icon in the toolbar. Type each item and press enter to add more. You can check off items by clicking the box, and OneNote syncs these changes across devices.
How to make a checklist on notes?
Creating a checklist in the Notes app involves opening a note and tapping the checklist button above the keyboard. Your items will appear with check circles next to them, which you can check off as you complete tasks. This feature is available on both iPhone and iPad, making it convenient for quick task management.
What This Guide Does Not Cover
This guide does not cover advanced project management or collaborative checklist tools beyond basic note-taking apps. If you require features like task assignment, progress tracking, or team collaboration, dedicated project management software may better suit your needs. Notepad is limited to plain text and does not support interactive checklists, so it serves best for very simple lists without automation or check-off functionality. Additionally, some features described for Apple Notes and Microsoft OneNote may vary depending on app updates or device models, so checking the latest official support resources is advisable if you encounter differences.
The next best step is to try creating a checklist in the app you use most frequently. Experiment with adding, checking off, and organizing items to get comfortable with the workflow. Once you understand how checklists behave in your chosen app, you can tailor your process to maximize productivity and keep your tasks clearly tracked.
See also: How to Share a Note to Collaborate in the Notes App · How to Lock a Note with Password in Notes App: Step-by-Step Guide · How to Export All Notes from Your Notes App: A Clear Step-by-Step Guide · How to Move Notes Between Folders in the Notes App: A Step-by-Step Guide