
How to Add Background Music in iMovie: A Step-by-Step Guide
Discover how to add background music in iMovie on Mac, iPhone, and iPad with easy steps to import, sync, and customize your audio tracks.
You have a video project ready but it feels incomplete without the right soundtrack. Adding background music can dramatically improve the mood and engagement of your video, but knowing how to do it correctly in iMovie can be confusing if you’re not familiar with the app’s features.
This article shows you how to add background music in iMovie on your Mac, iPhone, and iPad. You’ll learn not only how to import and place music tracks but also how to sync the music to your video length and choose soundtracks that fit your project’s tone. Step-by-step instructions will guide you through each device’s interface, helping you customize your videos effectively.
Key takeaways
- Import music using the Media Browser on Mac or the Audio tab on iPhone and iPad.
- Drag and drop tracks into the timeline to set background music in your project.
- Trim and adjust the audio clip length to match your video duration smoothly.
- Use built-in soundtracks or add custom songs from your library or files.
- Balance background music volume to ensure dialogue and effects remain clear.
Before you start: What you need to add music in iMovie
To add background music in iMovie, first ensure you have a compatible Apple device and the correct version of iMovie installed. iMovie works on iPhone, iPad, and Mac, but the interface and some features differ slightly. Make sure your device runs a supported iOS, iPadOS, or macOS version that allows audio importing. Having the latest iMovie update helps avoid compatibility issues.
Next, know which audio file formats iMovie supports across devices. Common formats include MP3, AAC, and WAV, but support can vary slightly. For example, all devices handle MP3 and AAC files well, while WAV files are fully supported on Mac and iPad but may have limited support on iPhone. Below is a quick comparison:
| Audio Format | Mac | iPad | iPhone |
|---|---|---|---|
| MP3 | Supported | Supported | Supported |
| AAC | Supported | Supported | Supported |
| WAV | Supported | Supported | Limited Support |
For music sources, avoid using Apple Music tracks directly in iMovie due to DRM restrictions. Instead, use royalty-free music libraries or free background music websites like Free Music Archive, Incompetech, or Bensound. Always download and save your audio files locally or ensure they are accessible via the Files app on your device before importing them into iMovie.
Follow these steps to prepare your music for iMovie:
- Verify your device and iMovie version are compatible. Open the App Store and check for updates.
- Download or transfer your audio files in supported formats (MP3, AAC, WAV) to your device or iCloud Drive accessible via the Files app.
- Confirm the files play correctly using the native Music or Files app to avoid import errors later.
- If using a Mac, organize your music files in a dedicated folder for easy access during import.
- Keep in mind DRM-protected files from Apple Music or other streaming services cannot be imported directly into iMovie.
By preparing your device, software, and audio files appropriately, you’ll have a smoother experience adding background music to your projects.
Import music into iMovie on Mac
To add background music in iMovie on your Mac, start by opening your existing project or create a new one. Once your project is open, locate the media library on the upper-left side of the interface, where you will manage your video clips and audio files.
- Click on the Import Media button, which looks like a downward arrow, or go to File > Import Media from the menu bar. This opens a Finder window where you can browse for your music files.
- Select the desired audio files from your local storage or external drives and click Import Selected. These files will appear in the media library alongside your video clips.
- Drag the imported music file from the media library onto the timeline below your video clips. Position it in the audio track area to set it as background music.
- To adjust the music length, click and drag the right edge of the audio clip in the timeline until it matches your video duration. If the music is shorter, you can loop it by duplicating the clip or choose a longer track.
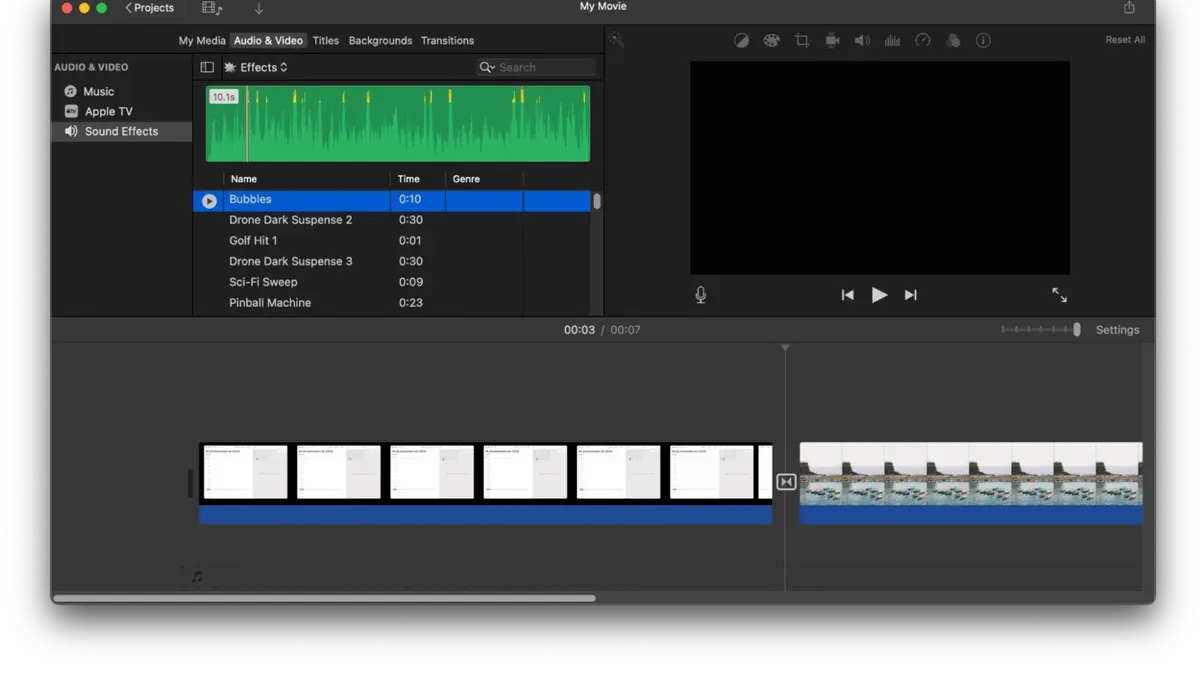
- For built-in sounds, click the Audio tab in the media library, then select Sound Effects or Music categories. Preview sounds by clicking on them, and drag your preferred track directly into the timeline.
- After adding music, you can fine-tune volume and fade effects by selecting the audio clip and using the volume slider or fade handles displayed on the clip in the timeline.
Visually, your timeline will show the video clips on top and the music track as a green bar beneath them, indicating its position and length relative to your video.
Add background music in iMovie on iPhone
To add background music in iMovie on your iPhone, start by launching the iMovie app and opening the project you want to edit. Once your project is open, tap the + button to access the media options. Here, select Audio to browse available soundtracks.

In the Audio section, you can choose from built-in soundtracks, music stored in your Apple Music library, or audio files saved in the Files app. Tap Soundtracks for preloaded music suited to various moods, or select My Music to choose songs from your Apple Music library. To use custom audio files, tap Files and navigate to the desired track.
After selecting your music, tap the + icon next to the track to add it to your project timeline as background music. You will see the audio track appear below your video clips. To adjust its length, drag the ends of the audio clip horizontally until it matches your video length.
To balance the music with your video's original sound, tap the audio clip in the timeline, then tap the Volume button. Use the slider to decrease the music volume so it doesn’t overpower dialogue or important sounds. For example, setting the music volume between 20% and 40% often works well to maintain clarity of voice.
If you notice audio conflicts, consider lowering the original video's volume slightly or using the Detach Audio feature to edit sounds separately. These adjustments help ensure your background music enhances rather than disrupts your video’s audio.
How to add background music in iMovie on iPad
Adding background music on iPad in iMovie shares similarities with the iPhone but utilizes the larger screen and touch interface for easier editing. Start by opening iMovie and selecting your project from the Projects browser to access the timeline. Unlike on Mac, the iPad version integrates touch gestures for trimming and adjusting audio clips directly on the timeline.
- Tap the + button above the timeline to open the media browser. You will see options for Videos, Photos, and Audio.
- Choose Audio, then select either Soundtracks for iMovie’s built-in music or Files to import audio from the Files app. When you pick a soundtrack, a preview will play automatically.
- Tap the desired audio track, then tap the Use button. The music appears below your video clips on the timeline as a green audio bar.
- Drag the ends of the audio clip to trim it so the music length matches your video duration. You can split the audio by positioning the playhead and tapping the Actions button, then selecting Split to cut the track into sections.
- To apply fade effects, tap the audio clip, then tap the Volume icon. Enable Fade In and Fade Out by adjusting the sliders. This smooths the music’s start and end, blending it naturally with your video.
- Adjust the volume slider to balance the music with any dialogue or effects in your video.
This process on iPad combines intuitive touch controls and clear editing tools, making it easy to incorporate and customize background music tailored to your video’s pace and mood.
Example: Applying fade-in and fade-out to a music track on iPad helps avoid abrupt starts or stops, creating a seamless audio experience.
How to add custom soundtracks to iMovie projects
Using your own music files in iMovie allows you to personalize your videos beyond the default soundtracks. First, locate your audio files on your device. On Mac, you can find them in Finder; on iPhone or iPad, check the Files app or your music library. If your audio file isn’t in a compatible format like MP3, AAC, or WAV, you’ll need to convert it before importing.
To convert unsupported files, use a free app or online converter to change formats, for example, converting a FLAC file to MP3. After conversion, the file will be ready for iMovie. On Mac, drag the converted audio file directly into your project’s media library or timeline. On iPhone or iPad, tap the “+” button, choose “Audio” > “Files,” then select your custom soundtrack.
Once imported, place the custom soundtrack on the timeline where you want it to start. Use the trim handles to adjust length so it syncs with your video content. You can split the track or add fade effects to blend smoothly with other audio. For example, if your video is 2 minutes long, trim your soundtrack to match or loop it thoughtfully.
For better audio preparation, consider using external tools to normalize volume levels or remove silence before import. This ensures consistent sound quality inside iMovie. The timeline should show your custom soundtrack as a green audio bar below the video clips, confirming successful addition.
- Locate your custom audio file on your device and confirm its format.
- If needed, convert the file to MP3, AAC, or WAV using an external converter app or website.
- Open your iMovie project and import the audio: on Mac, drag it into the media library or timeline; on iPhone/iPad, tap “+” > “Audio” > “Files” and select it.
- Place the audio track on the timeline and trim or split it to sync with your video length.
- Apply fade-in/fade-out effects if desired to smooth transitions between clips and audio.
- Play back your project to ensure the custom soundtrack fits well with your video content.
Set photos to music with iMovie
Creating a slideshow of photos synced to background music in iMovie can enhance your presentation by matching visuals to the rhythm and mood of your soundtrack. Start by importing your photos into a new iMovie project where each image appears as a clip on the timeline. Then, add your chosen background music to the timeline below the photos to set the audio foundation.
Next, adjust the duration of each photo clip to align with the music length. For example, if your music is 60 seconds long and you have 12 photos, set each photo’s duration to about 5 seconds. This timing ensures the slideshow ends with the music, maintaining a seamless flow. You can change photo durations by selecting the photo clip and entering the desired time in the clip duration field.
Use smooth transitions like Cross Dissolve or Fade to Black between photos to complement the soundtrack without distracting from it. These transitions help create a polished effect that matches the pacing of your music. Apply transitions by dragging them from the Transitions browser onto the spaces between photo clips.
Once you are satisfied with the timing and flow, export your slideshow by clicking the Share button and choosing your preferred export option. The final video will display your photos progressing in sync with the music, offering a cohesive and engaging viewing experience.
- Open iMovie and create a new project; import your photos so they appear as clips on the timeline. You should see all photos laid out sequentially.
- Add your background music by dragging it from the media browser to the audio track below the photos on the timeline. The music waveform will appear under the photo clips.
- Calculate the photo duration by dividing the total music length by the number of photos; select each photo clip and set the duration to this value (e.g., 5 seconds per photo for 12 photos in a 60-second track). The timeline will adjust to show these durations.
- Open the Transitions browser, drag a transition like Cross Dissolve between each photo clip. You will see small transition icons between photos on the timeline.
- Click the Share button, select Export File, choose your settings, and save the slideshow. The exported video will play your photos timed perfectly to the music.
Troubleshoot common issues adding music in iMovie
When adding background music in iMovie, you might face some common problems. One frequent issue is music not importing or not showing up in your project. This often happens if the audio format is unsupported or the file is corrupted. Look for error messages like “The file is not compatible” or “Audio format not supported.” To fix this, convert your audio file to a supported format such as MP3 or AAC using a trusted converter before importing it again.
Another problem is low or overpowering music volume compared to your original video audio. To balance sound levels, select the audio clip in the timeline, then adjust the volume slider in the audio inspector. If your music is too loud, lowering it by 10-20% often helps without losing presence. Conversely, raise the volume gradually and listen to ensure dialogue or important sounds remain clear.
Sometimes, music does not sync properly with your video length, causing awkward cuts or mismatched timing. You can trim or split your music track by selecting it and using the trim handles or the split tool (Command+B on Mac, or the scissors icon on iPhone/iPad). Drag edges to align the track's end with your video’s length. Applying fade-in and fade-out effects also smooths transitions.
If iMovie crashes or freezes when adding audio, try these steps: close other apps to free memory, restart iMovie, and update to the latest software version. Corrupted files can cause instability, so test with a different audio file. If crashes persist, deleting iMovie preferences by pressing Option+Command while launching the app can reset settings without deleting projects.
- Check the audio file format. Supported types include MP3, AAC, WAV, and AIFF. If unsupported, convert your file and re-import it. You should see the track appear in the media browser after import.
- Adjust audio levels by selecting the music clip in the timeline and using the volume slider. The waveform will update to reflect volume changes.
- Trim or split your audio clip to fit the video length. After trimming, playback should show music ending exactly when your video does.
- If iMovie freezes, quit the app and restart your device. Relaunch iMovie, then try adding audio again. The app should function normally without freezing.
- Reset iMovie preferences if crashes continue by holding Option+Command while launching iMovie. A prompt appears confirming reset; accept it. Your projects remain safe, and the app should work more reliably.
By following these steps, you can resolve most issues related to importing and syncing background music in iMovie effectively.
Frequently asked questions
How to add background sound on imovie?
To add background sound in iMovie, import your audio file into the project by clicking the "Import Media" button on Mac or selecting the plus icon on iPhone and iPad. Then drag the audio clip to the timeline below your video clips. Adjust its length and volume by trimming or using the volume controls to ensure it complements your video without overpowering dialogue or other sounds.
How to add music to imovie video?
Add music to your iMovie video by first importing the track into your project. On Mac, drag the music file from the media browser into the timeline beneath your video clips. On iPhone and iPad, tap the plus icon, choose "Audio," then "My Music" or "Soundtracks," and tap the song to add it. You can then trim and reposition the music to sync with your video.
How do i put music to imovie?
Putting music into iMovie involves importing the audio and placing it in the timeline. On Mac, use the "Import Media" option, then drag the music to the timeline. On mobile devices, tap the plus button, select "Audio," and pick a track from your library or iMovie’s built-in soundtracks. Adjust the duration and volume to match your video’s flow.
How to add music in imovie?
To add music in iMovie, import your desired audio file through the media browser or the plus icon depending on your device. Place the music clip into the timeline below your video clips. Use the trimming handles and volume slider to fine-tune the soundtrack, ensuring the music fits the video length and maintains a balanced sound.
How to add songs to imovie?
Adding songs to iMovie requires importing the song file into your project. On Mac, click "Import Media," locate your song, and drag it into the timeline. On iPhone or iPad, tap the plus icon, navigate to "Audio," then select "My Music" to find songs synced to your device, or choose from iMovie’s soundtracks. Once added, adjust the song’s placement and volume as needed.
What This Guide Does Not Cover
This guide does not cover advanced audio mixing techniques or the use of third-party audio plugins. Such features require professional software outside of iMovie, like Final Cut Pro or dedicated audio editing programs. If you need precise control over multi-track mixing, noise reduction, or audio effects beyond what iMovie offers, consider exploring specialized tools designed for those purposes.
For users aiming to create complex sound designs or commercial-quality audio production, this step-by-step guide will not provide the necessary depth. Instead, focus on mastering iMovie’s built-in capabilities first, as it is designed to simplify video and audio integration for most casual and semi-professional projects.
Your Next Step
Now that you know how to add and customize background music across all your Apple devices using iMovie, the most useful next step is to experiment with syncing your soundtrack precisely to the pacing of your video. Try trimming or looping your audio clip and using the fade-in and fade-out controls found under the audio adjustment options. This will help your project feel more polished and cohesive, enhancing the viewing experience without distracting from your visuals.
See also: How to Add Text Titles in iMovie: A Step-by-Step Guide · How to Crop a Video in iMovie: Step-by-Step Guide for iPhone, iPad, and Mac



