Step-by-Step Guide to Partitioning a Drive Using Disk Utility
Learn how to partition a drive in Disk Utility to create separate volumes and manage your Mac storage effectively.
You’ve just connected a new external drive to your Mac, or you want to organize your existing storage better. Maybe you need separate spaces for work files and personal media, or you want to install another operating system. Knowing how to partition a drive in Disk Utility lets you divide your storage into distinct sections without needing multiple physical drives.
This article walks you through the entire process: understanding what partitions are and why they matter, preparing your Mac and drives safely, step-by-step instructions for creating and modifying partitions, and how this compares to partitioning on Windows. You’ll also learn about common pitfalls, useful free utilities if Disk Utility doesn’t fit your needs, and when partitioning might not be the best choice.
Key takeaways
- A partition divides a physical drive into separate logical sections, each appearing as its own volume.
- Back up your data before partitioning to avoid accidental loss, especially when resizing existing partitions.
- Disk Utility can resize partitions without erasing data, but only if there is sufficient free space.
- Partitioning on Mac differs from Windows in formatting options and system compatibility; consider this if you use both systems.
- Don’t partition drives used for Time Machine backups or critical system volumes to avoid complications.
Understand what a drive partition is and why you might need one
A drive partition is a logical division of a physical storage device, such as a hard drive or SSD. It splits the drive into separate sections, each treated by your Mac as an independent volume. This allows you to organize your data more effectively or run multiple operating systems on the same physical disk.
Common reasons to partition a drive include separating your personal files from work data, creating a dedicated space for backups, or installing another operating system like Windows using Boot Camp. For example, you might partition a 1TB drive into two equal parts: 500GB for macOS and 500GB for Windows. This setup lets you switch between macOS and Windows without needing two separate drives.
Partitioning has advantages such as improved data management and the ability to isolate system files from personal data. However, it can also introduce complexity in managing space, and creating too many partitions may impact drive performance slightly. It's different from formatting or erasing because partitioning divides the drive into sections, whereas formatting prepares a partition or drive to store data, and erasing removes data entirely.
Compared to using external drives for different purposes, partitioning keeps everything on one physical device, which can be more convenient but also means that a hardware failure affects all partitions. Deciding whether to partition depends on your workflow and whether you prefer managing multiple volumes on one disk or separate physical drives.
Prepare your Mac and drive before partitioning
Before you start partitioning a drive using Disk Utility, it’s essential to take preparatory steps to avoid data loss and interruptions. First, back up any important data on the drive. Partitioning operations can sometimes fail or lead to unexpected results, so having a backup protects your information.
Next, confirm the type of drive you want to partition. Disk Utility supports both internal and external drives, but external drives should be properly connected and powered. Check the drive format to ensure it is compatible with partitioning. Common formats accepted by Disk Utility include APFS, Mac OS Extended (Journaled), and ExFAT. If the drive uses an unsupported format, you may need to reformat it, which erases data.
Additionally, verify there is enough free space on the drive for creating a new partition. Disk Utility generally requires at least several gigabytes of free space—aim for at least 10 GB to be safe. You can check free space by selecting the drive in Disk Utility and viewing its information panel.
Finally, close any applications that might be using the drive, such as file browsers, backup software, or media players. Open files or processes can interfere with partitioning and cause errors.
- Back up all important data from the drive using Time Machine or manual copying; after backup, confirm your files are accessible on the backup device.
- Open Disk Utility (Applications > Utilities > Disk Utility) and select the drive you want to partition; confirm its type (internal or external) and format appears under the drive name.
- Check the available free space shown in Disk Utility; ensure at least 10 GB is free before proceeding.
- Quit all applications that might use the drive; verify no files from the drive are open by checking Finder windows or app interfaces.
How to partition a drive in Disk Utility on Mac
Start by opening Disk Utility, which you can find in the Utilities folder inside Applications or by searching with Spotlight. Once open, look closely at the sidebar to select the correct drive — choose the physical drive, not just a volume underneath it. The physical drive usually appears at the top and includes the drive’s capacity and manufacturer.
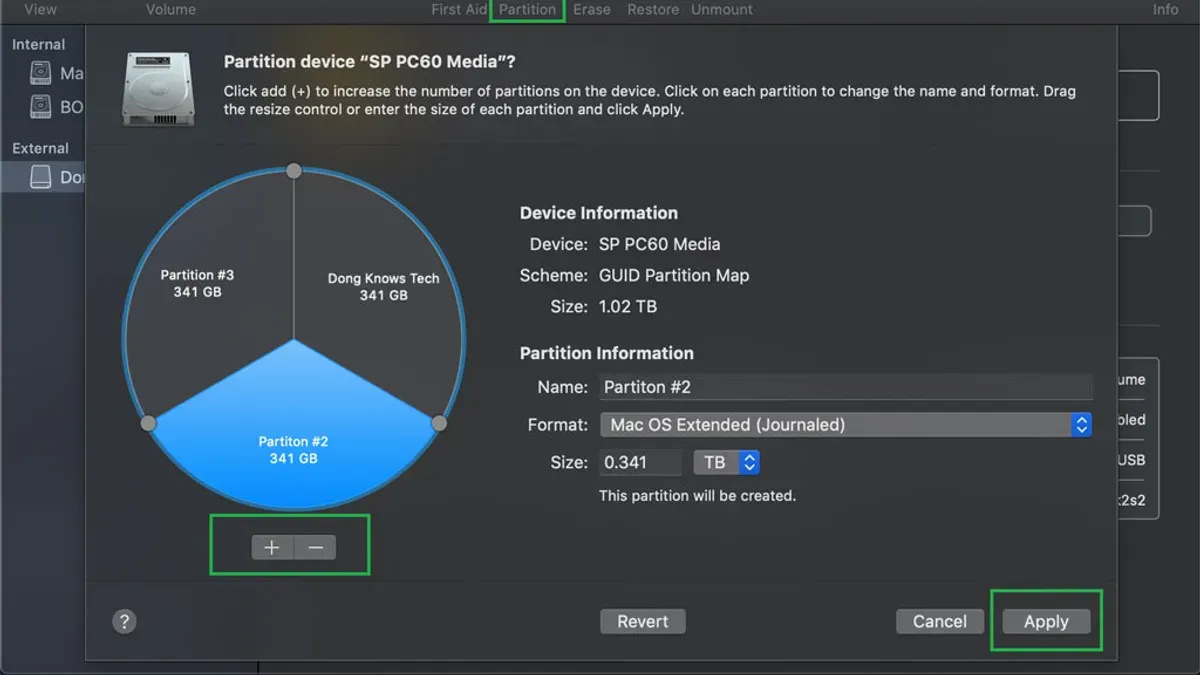
With the drive selected, click the Partition button in the toolbar. This opens a graphical partition map showing the current layout of your drive. You’ll see a pie chart or segmented bar representing existing partitions.
- Click the + button below the partition map to add a new partition. A new segment will appear on the chart.
- Name the new partition by typing in the Name field. Choose a clear, descriptive name to help identify the partition later.
- Set the size of the partition by dragging the resize handle on the graphical map or entering an exact size in the Size field. Make sure to leave enough space for other partitions.
- Choose the format for the partition from the Format dropdown menu. For most uses, APFS or Mac OS Extended (Journaled) are appropriate, depending on your macOS version and needs.
- After configuring, click Apply. Disk Utility will show a summary of the changes it will make.
- Confirm the changes by clicking Partition in the dialog. The process may take a few moments; do not interrupt it.
When finished, the partition map updates to show your new layout. The new partition appears as a separate volume in Finder and Disk Utility. If the drive was previously unpartitioned, you’ll now have multiple volumes with independent names and formats.
Keep an eye out for any warning messages during this process, as they can indicate potential issues such as insufficient space or incompatible formats. Successfully partitioning a drive in Disk Utility lets you organize your storage exactly as you need it.
How to partition an existing drive without erasing data
When working with a drive that already contains data, Disk Utility allows you to resize existing partitions or add new ones without erasing the entire drive, but this depends on specific conditions. You can safely adjust partitions if there is contiguous free space following the partition you want to resize. However, if the data layout does not allow for this or the partition format is incompatible, Disk Utility may require erasing the drive to repartition.
Using Disk Utility’s resize handle, you can drag the edge of a partition to shrink or expand it. This operation moves the partition boundary and adjusts the size without deleting data inside the resized partition. You should see the partition size update in the sidebar and on the graphical map, reflecting the change. Keep in mind this process can take several minutes, during which your Mac might appear unresponsive.
Before resizing or adding partitions, back up your data thoroughly. Even though Disk Utility is designed to preserve data during resizing, unexpected errors — such as power loss or file system corruption — can lead to data loss. If resizing is not possible, Disk Utility will prompt you to erase the drive, which means you must restore data from backup afterward.
- Open Disk Utility and select the drive or volume you want to partition. You should see the current partitions and their sizes in the sidebar and the pie chart.
- Click the Partition button in the toolbar to enter partition mode. The pie chart will become interactive with handles around each partition.
- Click the partition you want to resize to select it. Drag the resize handle (small circle on the edge of the partition) inward to shrink the partition and create free space, or outward to grow it if free space is available. The size indicator updates as you drag.
- To add a new partition in the freed space, click the “+” button below the pie chart. A new partition appears, and you can assign it a name, format (usually APFS or Mac OS Extended), and size.
- Click Apply to commit the changes. Disk Utility will verify the operation and then begin resizing and repartitioning. You should see a progress bar, and once complete, the new partition layout will appear.
Attempting to resize partitions when free space is fragmented or insufficient often triggers errors such as “Partition failed” or “Unable to resize volume.” In these cases, Disk Utility might require erasing the disk, so having a backup is essential to recover your data safely.
How to partition a drive on Windows vs Mac Disk Utility—key differences
Both Windows and Mac offer built-in tools to partition drives, but their interfaces, supported file systems, and workflows vary. Windows uses the Disk Management utility, accessible via Disk Management in the Control Panel or by right-clicking the Start menu. Mac users rely on Disk Utility found in the Utilities folder within Applications. While both tools allow you to create, resize, and delete partitions, they differ in format support and ease of use.
| Feature | Windows Disk Management | Mac Disk Utility |
|---|---|---|
| Interface style | Graphical layout with right-click context menus and wizard dialogs | Graphical sidebar with action buttons and drag handles |
| Supported file systems | NTFS, FAT32, exFAT, and limited support for others | APFS, Mac OS Extended (HFS+), exFAT, FAT32 |
| Partition resizing | Supports shrinking and expanding volumes without erasing data when possible | Supports resizing but may require erasing if space is fragmented |
| Creating bootable partitions | Supports Windows boot partitions and some Linux setups | Supports macOS boot partitions and APFS containers |
| Handling external drives | Fully supported with ability to format and partition | Fully supported including APFS for SSDs |
If you prepare a drive on Windows for use on a Mac, format the partition as exFAT or FAT32 to ensure compatibility. Mac-formatted drives (APFS or HFS+) generally require third-party software to be read on Windows. For dual-boot systems, you typically partition the drive first in Windows Disk Management to create space, then install macOS on the free partition or vice versa.
- Open Disk Management on Windows or Disk Utility on Mac.
- Create or shrink a partition to free up space, ensuring you have a compatible format for your target OS.
- On Mac, use Disk Utility to create an APFS or Mac OS Extended partition; on Windows, format with NTFS or exFAT as needed.
- Install the second operating system on the designated partition.
- Use the Mac Startup Manager or Windows Boot Manager to select the boot volume at startup.
Understanding these differences helps you plan drive partitioning effectively whether sharing drives between systems or setting up multi-boot environments.
Use free disk partition utilities if Disk Utility does not meet your needs
While Disk Utility handles most partitioning tasks on a Mac, you might encounter situations where its features fall short. For example, complex resizing that involves non-contiguous free space, managing unsupported file systems like NTFS or ext4, or recovering partitions can require more specialized tools. In these cases, free third-party utilities offer extended capabilities and flexibility.
Popular free partition utilities for Mac include GParted, a powerful open-source tool that supports a wide range of file systems and advanced resizing options, and Disk Drill, which combines partition management with data recovery features. On Windows, tools like MiniTool Partition Wizard Free and EaseUS Partition Master Free provide user-friendly interfaces and advanced partition operations beyond the built-in Disk Management.
Using third-party tools comes with trade-offs: they can offer more control but may carry higher risks if misused, such as data loss or system instability. Always download software from official sites, check user reviews, and ensure compatibility with your operating system before proceeding. For safety, back up your data before attempting partition changes with any tool.
In practical terms, when Disk Utility cannot resize a partition without erasing it or fails to recognize certain file systems, utilities like GParted can resize partitions non-destructively and handle diverse formats, making them invaluable for advanced users or dual-boot setups.
Troubleshoot common issues when partitioning drives in Disk Utility
If Disk Utility refuses to partition or resize an existing partition, it often means the free space is not contiguous or the drive has file system inconsistencies. You might see an error like "Partition failed" or "Couldn’t modify partition map." To fix this, first run First Aid from Disk Utility on the drive: select the drive, click First Aid, then Run. If errors are repaired, try partitioning again.
When you encounter partition map errors or the drive fails to mount after partitioning, it usually indicates corruption in the partition scheme. The message might read "The disk isn’t readable by this computer." Use First Aid on both the drive and its partitions. If First Aid cannot fix the issue, you may need to back up your data and erase the drive to reformat the partition map.
Permissions issues or "disk is in use" messages appear when apps or processes actively use the drive. To resolve this, close all apps accessing the drive, eject any disk images, and quit Finder windows pointing to it. If the message persists, restart your Mac and try again.
If Disk Utility suggests erasing the drive is the only option, it means the current partition layout cannot be modified safely without data loss. Before proceeding, ensure your backup is current. Erasing will recreate the partition map, so you will lose existing data. After erasing, you can repartition the drive as needed.
- Open Disk Utility from Applications > Utilities. You should see your drive listed in the sidebar.
- Select the drive (not just a volume) and click First Aid then Run. Wait for the process to complete successfully.
- Attempt the partition or resize operation again. If it still fails, note any error messages.
- If errors persist, close all apps, eject all volumes on the drive, and restart your Mac.
- Upon restart, try partitioning again. If Disk Utility insists on erasing the drive, verify your backup and proceed with erasing before repartitioning.
Know the limits and when not to partition a drive
Partitioning can be a useful tool, but there are situations where it may cause more harm than good. If your drive contains critical data that you cannot afford to lose, partitioning risks—including accidental data loss or corruption—may outweigh the organizational benefits. In such cases, consider other data management strategies.
External drives dedicated to Time Machine backups should generally remain unpartitioned. Time Machine expects a single continuous volume, and partitioning can lead to backup conflicts or failures, reducing the reliability of your backups.
Older hard drives and many SSDs can suffer from reduced performance or accelerated wear when partitioned. SSDs, in particular, have a limited number of write cycles, and dividing the drive into multiple partitions can increase write amplification, potentially shortening their lifespan. Experts often recommend using a single partition on SSDs to maintain optimal health and performance.
If you are unsure whether partitioning is suitable for your drive, or if your needs involve complex setups, seeking professional help is advisable. Alternatively, organizing data through folder structures or external drives might be safer and more effective.
Frequently asked questions
How to partition a disk drive?
To partition a disk drive, start by opening your computer’s disk management tool—Disk Utility on Mac or Disk Management on Windows. Select the drive you want to partition, then choose the option to add or create a new partition. Specify the size and format for the new partition, and apply the changes. Always back up your data before modifying partitions to prevent data loss.
How to partition a drive in windows?
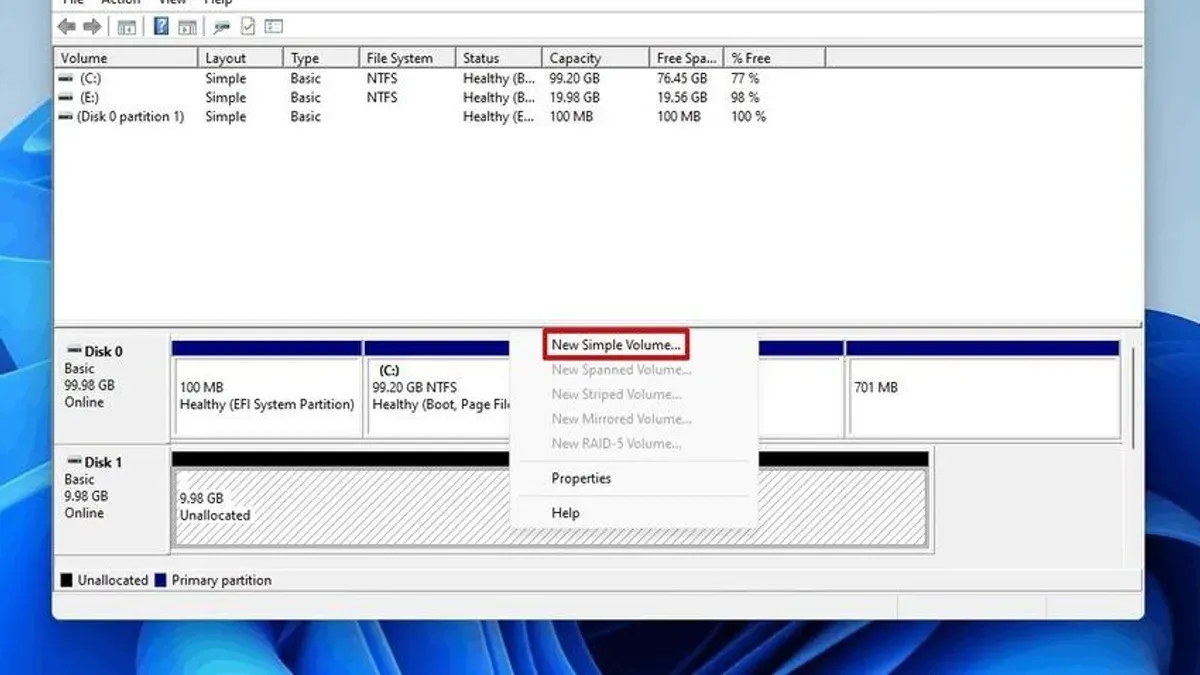
In Windows, open Disk Management by searching for "Create and format hard disk partitions". Right-click the drive you want to partition and select "Shrink Volume" to free up space. After shrinking, right-click the unallocated space and choose "New Simple Volume" to create a new partition. Follow the wizard to assign a drive letter and format the partition, typically using NTFS.
How to partition a disk?
Partitioning a disk involves dividing a physical drive into separate sections that the operating system treats as individual drives. You can do this using built-in tools like Disk Utility on Mac or Disk Management on Windows. Choose the drive, decide on partition sizes, and format each partition with the appropriate file system.
How to do drive partition?
Drive partitioning is done by accessing your system’s disk management tool, selecting the target drive, and creating new partitions by resizing existing ones or using unallocated space. You specify the partition size and file format during this process. Make sure to backup important data before proceeding, as improper partitioning can cause data loss.
What is a drive partition?
A drive partition is a logical division of a physical hard drive or SSD into separate sections. Each partition behaves like an independent drive, allowing you to organize data, install multiple operating systems, or improve system management. Partitions are formatted with file systems that the OS can read and write.
Know the limits and when not to partition a drive
This guide does not cover data recovery if partitioning causes data loss, so always back up your data before making any changes to your drives. If your data is mission-critical or you’re unsure about the process, consulting a professional is the safest choice. Additionally, not all drives or file systems support multiple partitions well—especially external drives formatted for specific devices or older Macs. Partitioning can also complicate system updates or backups if not managed carefully, so avoid partitioning if you do not have a clear use case or are uncomfortable with disk management tasks.
The most useful next step is to create a complete backup of your Mac using Time Machine or a similar tool before you start partitioning. This ensures you can restore your data if anything goes wrong and gives you the confidence to proceed safely. Once your backup is ready, follow the step-by-step process in Disk Utility to create or modify partitions, paying close attention to the sizes and formats you select to fit your needs.
See also: How to Erase a Drive in Disk Utility: A Clear Step-by-Step Guide