How to Share Your iPad Screen in Zoom Using a Mac
This guide shows you how to share your iPad screen in Zoom using your Mac, covering setup, permissions, and troubleshooting for smooth meetings.
You have a Zoom meeting scheduled, and you want to show a presentation or app running on your iPad. You’re wondering whether to share your iPad screen directly from the device or through your Mac for a smoother experience. Knowing how to share iPad screen in Zoom on Mac can help you decide the best method and avoid common technical hiccups.
This article guides you step-by-step through sharing your iPad screen during Zoom meetings using your Mac. You’ll learn both direct iPad sharing and Mac-facilitated sharing options, how to manage permissions, and how to troubleshoot connection issues that might interrupt your presentation.
Key takeaways
- Connect your iPad and Mac via USB or Wi-Fi to share your screen on Zoom.
- Enable Screen Recording and Accessibility permissions on your Mac for Zoom to work smoothly.
- Use Zoom’s built-in iPad screen sharing when sharing directly from the iPad.
- Check your network and device settings if you encounter freezing or lag during sharing.
- Understand the differences between wired and wireless sharing to pick the best option for your setup.
Before You Start: What You Need to Share Your iPad Screen in Zoom on Mac
To share your iPad screen in Zoom using your Mac, you need to prepare both your devices and software settings carefully. First, ensure your Mac has the latest Zoom client installed and updated; older versions may lack necessary features or compatibility. Your iPad should be running a recent iOS version that supports screen sharing, typically iOS 12 or later, and have the Zoom app installed if you plan to share directly from the iPad.
For wired connections, have a Lightning or USB-C cable ready to connect your iPad to your Mac. For wireless sharing, confirm that both devices are on the same stable Wi-Fi network to reduce lag and connection drops. On your Mac, you must enable permissions for screen recording and allow Zoom access under System Preferences > Security & Privacy > Privacy tabs.
Lastly, understand your Zoom meeting role. To share screens, you generally need to be the host or have the host’s permission. Without these permissions, screen sharing options may be limited or disabled.
- Update Zoom on your Mac: Open Zoom > Click your profile icon > Check for Updates. You should see a confirmation that Zoom is up to date.
- Check your iPad’s iOS version: Go to Settings > General > About > Software Version. Confirm it is iOS 12 or higher.
- Ensure Zoom is installed on your iPad: Locate the Zoom app on your home screen. If missing, download it from the App Store.
- Prepare your connection method: For wired, connect your iPad to Mac using the proper cable; for wireless, verify both devices are on the same Wi-Fi network.
- Enable screen recording permissions on your Mac: Go to System Preferences > Security & Privacy > Privacy > Screen Recording, ensure Zoom is checked.
- Verify Zoom meeting permissions: Confirm you are the host or the host has granted screen sharing rights in the meeting controls.
How to Share Your Screen on Zoom Mac
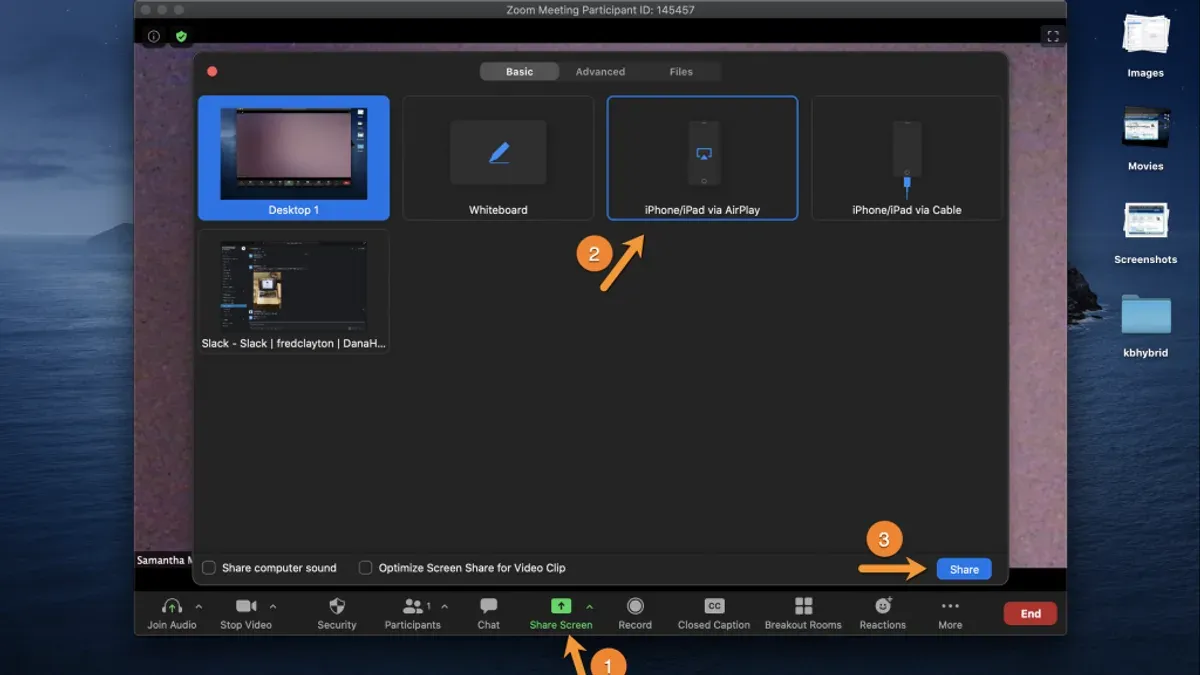
To start sharing your screen on Zoom using your Mac, first open the Zoom application and either join an existing meeting or start a new one. Once you are in the meeting, locate the Share Screen button, which is usually found at the bottom center of the Zoom window. Clicking this button opens a selection window showing all the available sharing options.
- Click the Share Screen button during the meeting. You should see a window with several options such as your entire desktop, individual application windows, and browser tabs.
- Select what you want to share: your entire desktop to show everything on your screen, a specific window like a particular app, or a browser tab if you are using a web-based presentation. After selecting, the chosen screen or window will be highlighted.
- Before confirming, check the options at the bottom of the selection window. You can choose to Share computer sound if you need participants to hear audio from your Mac, and Optimize Screen Sharing for Video Clip if you plan to share video content for smoother playback.
- Click the Share button to begin sharing. Once active, Zoom will display a green border around the shared content, indicating what participants can see.
- To end sharing, move your mouse near the top of the screen to reveal the Zoom menu bar and click Stop Share. This will return you to the regular meeting view.
Following these steps ensures you share exactly what you intend, with options to include sound and optimize video. This basic screen sharing process sets the foundation for more specialized sharing, such as using your iPad screen through your Mac.
How to Share Your iPad Screen on Zoom Directly from the iPad
Sharing your iPad screen directly in Zoom is straightforward and useful when you want to show apps or presentations without involving your Mac. First, open the Zoom app on your iPad and join the meeting where you want to share your screen. Once connected, you will see a toolbar at the bottom or top of the screen depending on your orientation.
- Tap the Share Content button, typically represented by an upward arrow inside a square. When the menu appears, select Screen as the content to share.
- A prompt to start the broadcast will appear. Tap Start Broadcast. You should see a countdown of three seconds, after which your iPad screen will be shared with audio to all Zoom participants.
- While sharing, you can navigate between different apps just as usual by pressing the Home button or swiping up to access the app switcher. Your Zoom broadcast will continue uninterrupted, allowing you to display any content you want.
- To stop sharing, return to the Zoom app or tap the red status bar at the top of your iPad screen and select Stop. You will then return to the Zoom meeting without screen sharing.
By following these steps, you can confidently present anything from your iPad during Zoom meetings. The interface is designed to give you clear feedback when you are sharing and when you stop, helping you avoid accidental broadcasts.
How to Share Your iPad Screen to Zoom on Mac Using a Wired Connection
Sharing your iPad screen to Zoom through your Mac using a wired connection offers a stable and low-latency experience, minimizing lag or disconnections common in wireless setups. To do this, you will connect your iPad to your Mac using a Lightning or USB-C cable and use QuickTime Player to mirror the iPad screen on your Mac. Then, you share the QuickTime Player window in Zoom.
- Connect your iPad to your Mac with the appropriate Lightning or USB-C cable. Your iPad should appear as connected and trusted if prompted.
- Open QuickTime Player on your Mac. From the menu bar, select File > New Movie Recording. A recording window will open with your Mac's camera active by default.
- Next to the record button, click the dropdown arrow and choose your connected iPad under the Camera section. The iPad screen will now be mirrored in the QuickTime window.
- If you want to share audio from your iPad, select it under the Microphone section in the same dropdown menu.
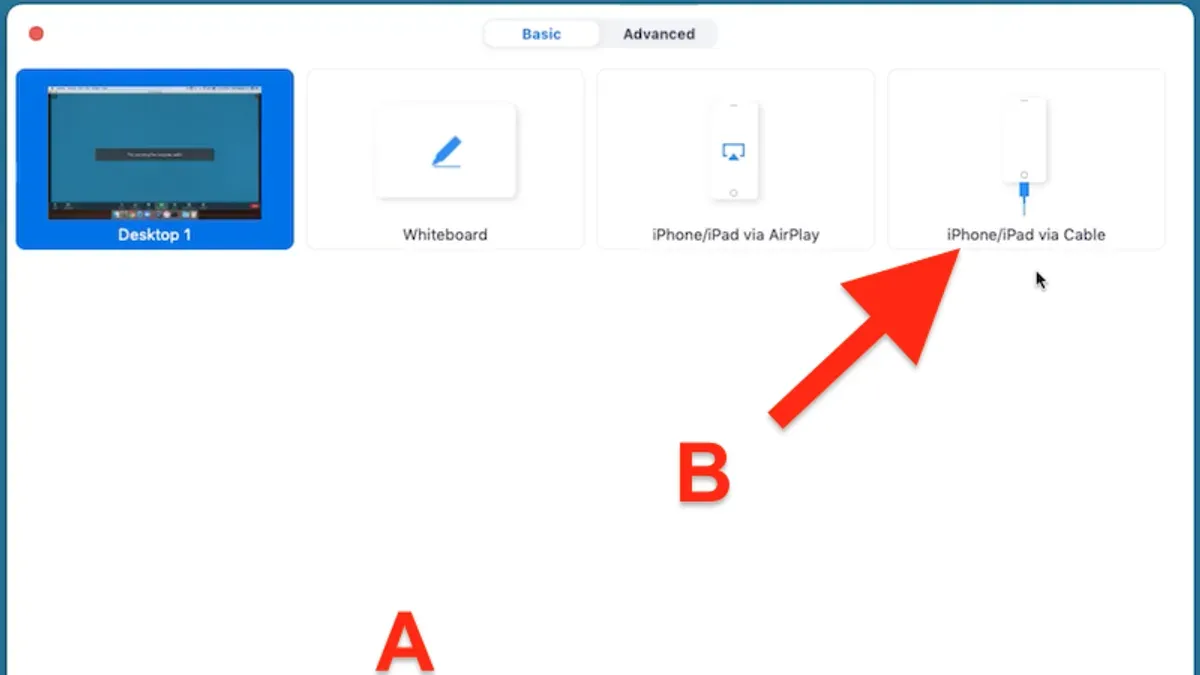
- In Zoom on your Mac, click Share Screen and select the QuickTime Player window showing your iPad screen. Then click Share.
- You should now see your iPad screen visible to all Zoom participants. This method provides more consistent video quality and faster response times compared to wireless sharing.
Using a wired connection reduces interference and maintains a reliable connection, which is especially beneficial for presentations or demonstrations requiring smooth navigation and timely reactions.
How to Share Your iPad Screen to Zoom on Mac Wirelessly
Sharing your iPad screen wirelessly to your Mac for Zoom meetings is convenient and cable-free. If your Mac supports AirPlay, you can use it to mirror your iPad screen directly. Otherwise, third-party apps offer reliable wireless mirroring options. Be aware that wireless sharing can introduce latency or quality drops, so a strong Wi-Fi network is essential for smooth performance.
- Ensure both your iPad and Mac are connected to the same Wi-Fi network. When connected, your Mac should appear as an AirPlay destination on your iPad.
- On your iPad, open Control Center by swiping down from the top-right corner. Tap the Screen Mirroring button. A list of available devices appears.
- Select your Mac from the list. You will see your iPad screen begin to mirror on the Mac desktop, usually opening in a resizable window.
- In Zoom on your Mac, click Share Screen, then choose the window or desktop showing your mirrored iPad screen. Click Share to begin transmitting your iPad content to Zoom participants.
- If your Mac does not support AirPlay or you want alternative options, install reputable apps like Reflector, AirServer, or LetsView. These apps create a virtual AirPlay receiver on the Mac to mirror your iPad screen wirelessly.
- Open the chosen third-party app on your Mac and follow its instructions to enable mirroring. Then, use the iPad’s Screen Mirroring menu to connect to the app’s virtual receiver.
- Once mirrored, share the app’s window in Zoom just as you would with AirPlay. Adjust window size or resolution if needed to optimize quality.
- To reduce latency and improve image quality, ensure your Wi-Fi network is stable with minimal interference. Using a 5 GHz band Wi-Fi network often provides better performance than 2.4 GHz.
Wireless sharing offers flexibility but may occasionally lag or show lower resolution compared to wired methods. Monitoring your network conditions and closing other bandwidth-heavy applications can help maintain a smooth sharing experience.
How to Allow Mac to Share Screen with Zoom and Fix Permission Issues
When Zoom cannot share your screen or your iPad screen is not visible during a meeting, it is often due to missing permissions on your Mac. To ensure Zoom can capture and share your screen, you need to grant specific access rights in System Preferences.
- Open System Preferences and go to Security & Privacy.
- Select the Privacy tab, then click Screen Recording in the sidebar.
- Check the box next to zoom.us to allow screen recording. If it’s unchecked, Zoom cannot capture your screen. After enabling, you may see a prompt to quit Zoom; proceed to restart Zoom for changes to take effect.
- Next, click Accessibility in the same Privacy tab and ensure zoom.us is checked. This permission helps Zoom control your Mac for screen sharing functions.
- Optionally, if you encounter persistent issues, go to Full Disk Access and add Zoom by clicking the + button and selecting Zoom from the Applications folder.
- After adjusting these permissions, restart your Mac to make sure all settings apply properly.
Common error messages include “Screen recording permission required” or “Zoom cannot capture screen.” These typically indicate that Screen Recording permission has not been granted or Zoom needs to be restarted. Checking for Zoom updates in the app’s menu can also resolve compatibility issues that prevent screen sharing.
Following these steps ensures your Mac is configured correctly for Zoom screen sharing, reducing interruptions and improving your iPad screen sharing experience via your Mac.
Troubleshooting Common Issues When Sharing iPad Screen on Zoom via Mac
If Zoom does not show your iPad screen on Mac despite having granted all necessary permissions, the first step is to quit Zoom completely and restart both your Mac and iPad. This often resolves temporary glitches that prevent screen sharing. After restarting, open Zoom and try sharing your screen again; if it works, you should see your iPad’s display mirrored in the Zoom window.
- Ensure your iPad screen is unlocked and awake. A locked or sleeping iPad will not transmit its screen, so unlock it and keep it active during sharing.
- Check that “Share computer sound” is enabled in Zoom’s screen sharing options. Without this, audio from your iPad won’t be heard by meeting participants. When enabled, you should see a checkbox labeled “Share computer sound” at the bottom of the screen sharing selection window.
- If you experience lag or choppy video, try switching to a wired connection between your iPad and Mac using a Lightning or USB-C cable. This typically reduces delay and improves video quality compared to wireless methods.
- If a wired connection is not feasible, improve your Wi-Fi network by moving closer to the router or minimizing other network traffic to reduce latency.
- Verify Zoom’s permissions again in System Preferences under Security & Privacy to make sure Screen Recording and Accessibility are enabled specifically for Zoom. Missing these can silently block sharing functionality.
- As a final step, if problems persist, fully quit Zoom, restart your Mac and iPad, then relaunch Zoom. This refreshes network connections and permissions, often clearing persistent issues.
Following these steps should resolve the most common problems encountered when sharing your iPad screen on Zoom via Mac, ensuring a smooth presentation or collaboration experience.
How to Use Zoom on iPad Beyond Screen Sharing
Zoom on iPad offers several features that enhance your meeting experience beyond just sharing your screen. You can use the chat and reactions to interact without interrupting the speaker. Tap the “Chat” button during a meeting to send messages to everyone or specific participants. Use the “Reactions” button to quickly express yourself with emojis like thumbs up or clapping, which appear briefly on your video tile.
Adjusting video and audio settings during a meeting is straightforward. Tap the screen to reveal the controls, then select the “More” (…) icon. From here, you can switch between the front and rear cameras to show different views. This is especially helpful if you want to demonstrate something physically in the room without disconnecting.
When sharing your screen, Zoom on iPad lets you use annotation tools to highlight or draw on the content you’re sharing. After starting screen sharing, tap “Annotate” to access pens, text, and shapes. This makes explanations clearer and more engaging.
Joining meetings is easier with calendar integration. If you allow Zoom access to your calendar in iPad Settings, upcoming meetings appear on the app’s home screen. Tap a meeting to join instantly without entering meeting IDs or passwords manually.
Frequently asked questions
How to share screen on zoom mac?
To share your screen on Zoom using a Mac, click the green Share Screen button in the meeting controls. Choose the window or your entire desktop you want to share, then click Share. If this is your first time, make sure Zoom has Screen Recording permission in System Preferences > Security & Privacy > Privacy.
How to share screen on zoom iphone?
On an iPhone, open the Zoom app and join a meeting. Tap Share Content, then select Screen. You’ll be prompted to start broadcasting your screen via the Control Center. Make sure Zoom has permission to record your screen in Settings if you don’t see this option.
How to share zoom on mac?
Sharing Zoom itself on a Mac usually means sharing the Zoom app window during a meeting. Click Share Screen, then select the Zoom window from the available apps. This works well if you want to show chat, participant lists, or Zoom settings live.
How to share ipad screen on zoom?
You can share your iPad screen directly during a Zoom meeting by tapping Share Content and choosing Screen. Follow the prompts to start Screen Broadcast. Alternatively, connect your iPad to a Mac and share the iPad screen from the Mac's Zoom app for more control.
How to share ipad screen to zoom on mac?
To share your iPad screen to Zoom on a Mac, connect the iPad with a Lightning or USB-C cable, then open Zoom on the Mac. Click Share Screen and select your iPad from the options. You can also do this wirelessly via AirPlay by selecting your Mac as the AirPlay receiver and then sharing that screen in Zoom.
What This Guide Does Not Cover
This article does not cover advanced third-party mirroring hardware solutions or enterprise-level Zoom configurations that require IT administrator access. If your organization has strict security policies or uses custom Zoom deployments with special settings, you should consult your IT department for guidance tailored to your environment. Additionally, this guide focuses on native features and built-in macOS and iPadOS capabilities rather than external apps or devices that mirror screens in more complex ways.
Before you share your iPad screen on Zoom through your Mac, ensure your devices are updated to the latest compatible system versions and that Zoom has all required permissions in macOS System Preferences under Security & Privacy, especially in Screen Recording and Accessibility. The most common step users miss is enabling Screen Recording permission for Zoom, which prevents your screen from being shared properly.
To take the next step confidently, open Zoom on your Mac and check its permission settings right now. This simple action often resolves many sharing issues and sets you up for smooth iPad screen sharing during your Zoom meetings.
See also: How to Record Zoom Meeting Locally on Mac: Step-by-Step Guide · How to Fix Zoom No Audio on Mac: Step-by-Step Troubleshooting · How to Use Virtual Background in Zoom on Mac: Step-by-Step Guide