How to Sort by Due Date in Reminders on Mac: A Clear Step-by-Step Guide
Discover how to sort your tasks by due date in the Reminders app on Mac for better deadline management and productivity.
You have a growing list of tasks in the Reminders app on your Mac, but finding what’s due soon feels overwhelming. When reminders pile up, knowing how to sort by due date in Reminders on Mac becomes essential for staying on top of deadlines efficiently.
This guide walks you through setting due dates on your reminders, sorting them by those dates within the app, and then taking it further by showing how to display and even add reminders to Apple Calendar. You’ll also learn how to export your reminders for backup or use in other applications. Each section builds on the last, helping you create a smooth workflow to manage your tasks and calendar seamlessly.
Key takeaways
- Set due dates clearly when creating reminders to enable sorting.
- Use the Reminders app’s built-in sorting option to order tasks by due date.
- Enable the Reminders calendar in Apple Calendar to visualize tasks alongside events.
- Add reminders directly to Apple Calendar for combined scheduling.
- Export reminders via iCloud for backup or use in other apps.
Before you start: What you need to sort reminders by due date
To effectively sort your reminders by due date on Mac, you need a few essentials in place. First, confirm that your Mac is running the latest version of macOS that supports the current Reminders app features. You can check this by clicking the Apple menu > About This Mac > Software Update. When up to date, the Reminders app will have the necessary sorting options.
Next, ensure that your reminders actually have due dates assigned. Sorting by due date only works if tasks include these dates; without them, the app cannot organize items chronologically. You can add or verify due dates when creating or editing a reminder.
Also, verify that both Reminders and Calendar apps are properly synced with iCloud or your preferred account. This synchronization allows your reminders and calendar events to stay consistent across devices and makes it possible to view reminders within the Calendar app. Check this by opening System Settings > Apple ID > iCloud and confirming that Reminders and Calendar toggles are enabled.
Finally, familiarize yourself with the basic navigation of the Reminders app on your Mac. Locate your reminder lists in the sidebar, and understand how to select and view individual reminders. This foundational knowledge will help you follow the sorting steps smoothly.
- Open the Apple menu and select About This Mac. You should see your macOS version displayed. If an update is available, click Software Update and install it. Once updated, open Reminders and confirm you see multiple sorting options under the View menu.
- Open the Reminders app and select any reminder. Click the i button or double-click the reminder to edit it. If no due date is set, add one by choosing a date and time. Reminders with due dates will later appear sorted accordingly.
- Go to System Settings > Apple ID > iCloud. Ensure that the toggles next to Reminders and Calendars are switched on. This confirms syncing is active, enabling integration between these apps across your devices.
- Launch the Reminders app and review the sidebar on the left. Identify your reminder lists and click one to see its contents. Confirm you can open and browse reminders without issues. If the sidebar is hidden, click View > Show Sidebar.
How to set reminders on Mac with due dates
- Open the Reminders app on your Mac. When it launches, you will see your existing lists on the left sidebar or the main window if no list is selected.
- Create a new reminder by clicking the plus button (+) next to a list name or by selecting a list and pressing the Return key. The new reminder will appear in the list, ready to be named.
- Type the reminder's title. To add a due date, click the small calendar icon that appears when you select the reminder or press the space bar after typing the title to activate natural language input.
- Use the date picker to choose a specific date or type phrases like "tomorrow at 3 pm" directly into the reminder field. The Reminders app will recognize this and automatically set the due date and time.
- Optionally, set a precise time by clicking the time field in the date picker. This allows your reminder to alert you at the exact moment you specify.
- Organize reminders into lists before sorting by due date. Creating separate lists for different projects or contexts helps you manage tasks more clearly and makes sorting more effective.
For example, a reminder titled "Submit report" without a due date will appear in your list but won’t be prioritized by due date sorting. When you set a due date, such as "Submit report due October 15," the Reminders app can then sort this task accordingly, placing it in chronological order with other dated reminders.
How to sort reminders by due date in the Reminders app on Mac
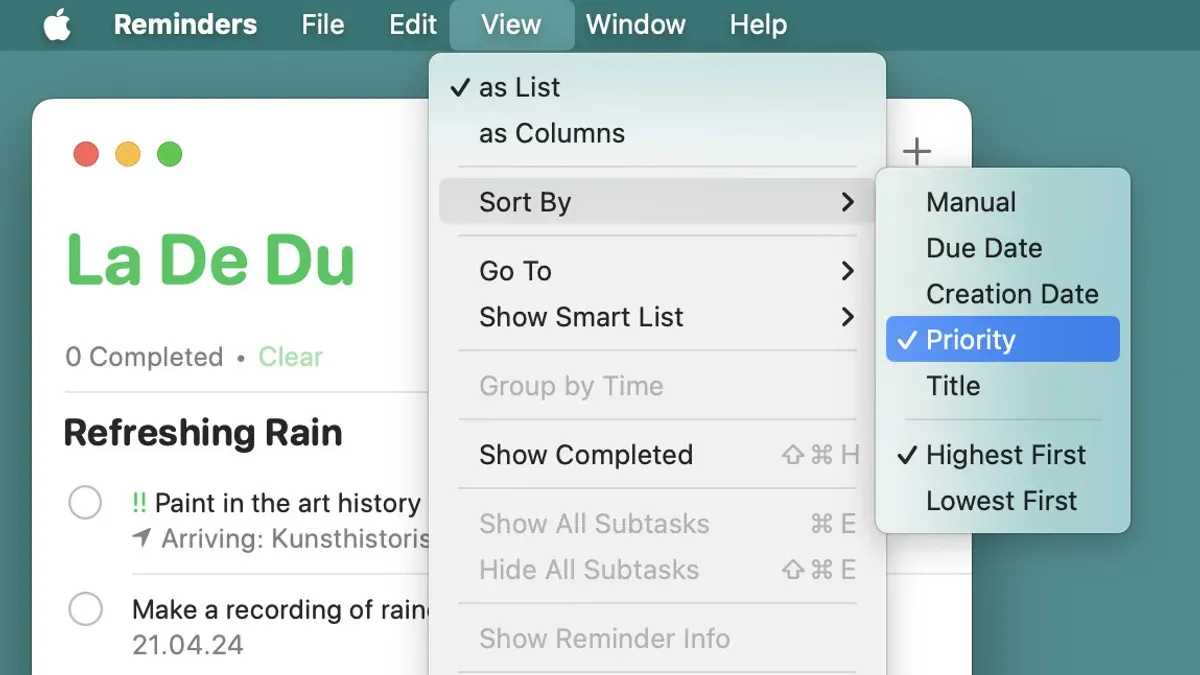
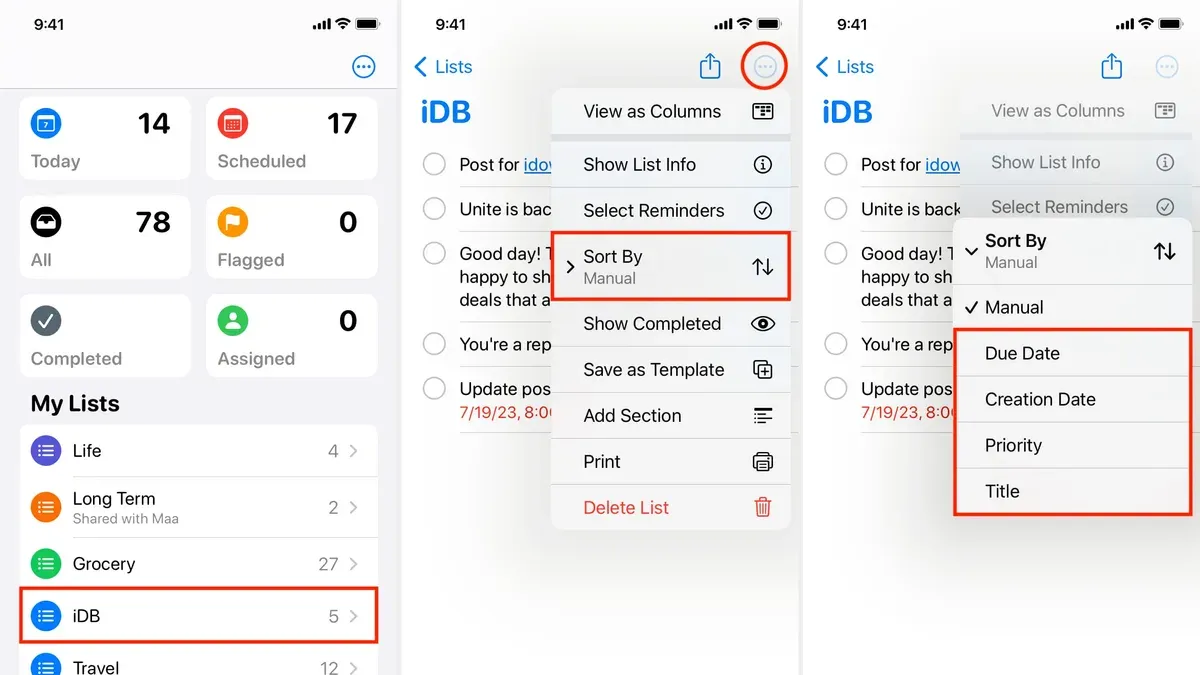
To organize your reminders efficiently, start by opening the Reminders app and selecting the specific list you want to sort. Once inside the list, look for the sorting options at the top or within the View menu. You can choose to sort your reminders by clicking on View > Sort By > Due Date. This will reorder your reminders so those with the earliest due dates appear first, making it easier to prioritize your tasks.
If you want automatic sorting without manually adjusting each list, consider using Smart Lists. These lists dynamically filter and sort reminders based on criteria like due date, helping you keep track of upcoming tasks. Since you’ve already learned how to create Smart Lists, this feature complements manual sorting well.
Sometimes, sorting options may not appear due to app glitches or if the list is a shared one with limited controls. In such cases, try quitting and reopening the Reminders app or checking for macOS updates. If sorting remains unavailable, a practical workaround is to create a new list and move reminders there, then apply sorting.
Here’s a clear step-by-step process to sort by due date:
- Open the Reminders app on your Mac.
- Click the list you want to organize; the reminders in that list will appear.
- Go to the menu bar and select View.
- Hover over Sort By and choose Due Date.
- Observe that reminders reorder with the nearest due dates at the top.
Before sorting, reminders may appear in manual order, which you can adjust by dragging items. After sorting by due date, manual rearrangement is disabled, ensuring the list stays correctly ordered. This trade-off helps maintain a clear timeline of your tasks.
How to show reminders on Apple Calendar
To view your reminders in the Apple Calendar app, you need to enable the Reminders calendar. This calendar displays your tasks with due dates as entries on the corresponding days, helping you see your reminders alongside scheduled events. Keep in mind that reminders appear as all-day entries without specific times, distinguishing them from timed calendar events.
- Open the Apple Calendar app on your Mac.
- In the left sidebar under "Calendars," look for the "Reminders" calendar. If you don't see the sidebar, click the "Calendars" button in the toolbar to reveal it.
- Check the box next to "Reminders" to enable it. Once enabled, reminders with due dates will show up on their due dates as all-day entries.
- Switch calendar views (Day, Week, or Month) using the buttons at the top of the window to find the view that best displays your reminders alongside events. Month view often provides a clear overview of both.
- Click on a reminder entry to see its details, which will include the reminder title and due date but no start or end times.
For example, if you set a reminder titled "Submit report" with a due date of October 15, it will appear on October 15 in Apple Calendar as an all-day item under the Reminders calendar. This integration helps you visualize deadlines without mixing them with timed events.
How to add reminders to Apple Calendar
Reminders and Calendar events are designed for different purposes, so they remain distinct even though their due dates can overlap visually. When you want a reminder to appear on Apple Calendar, the most straightforward method is to enable the Reminders calendar within the Calendar app. This shows due dates as all-day entries but does not convert reminders into event-type entries.
To create a calendar event that mimics a reminder, you can add an event directly in the Calendar app with the same title and due date as your reminder. This event is fully manageable within Calendar, including setting alerts, durations, and invitees, unlike reminders, which focus on task completion and checklists.
- Open the Calendar app and click the “+” button or double-click the date you want.
- Enter a title matching your reminder’s task and set the start time and end time if needed.
- Adjust alerts to get notifications similar to reminders.
- Save the event, which will now appear alongside your other calendar entries.
Keep syncing enabled via iCloud to maintain consistency of reminders and calendar events across all your devices. Remember, while reminders sync their completion status and notes, calendar events offer richer scheduling options but don’t link back to the Reminders app directly.
| Feature | Reminder | Calendar Event |
|---|---|---|
| Purpose | Task management with completion tracking | Scheduling with time blocks and invitations |
| Due Date Display | Shown as all-day in Calendar when Reminders calendar enabled | Shown at specific times in Calendar |
| Alerts | Simple alert with snooze | Multiple customizable alerts |
| Cross-device Sync | Yes, with status and notes | Yes, with full event details |
| Integration | Within Reminders app only | Within Calendar and invitees |
How to export Apple Reminders for backup or use in other apps
Apple’s Reminders app does not provide a direct export option to common file formats like CSV or Excel. However, you can use workarounds involving third-party tools or manual methods to export and manage your reminders data externally. Exporting your reminders allows you to create backups or track due dates in spreadsheet applications for deeper analysis.
One effective method is to export reminders via the Apple Calendar app, which syncs your reminders as all-day events and supports exporting calendar data in the standard.ics format. You can then convert this.ics file into CSV using online converters or dedicated apps.
Here’s a step-by-step example to export your reminders and import them into Excel for due date tracking:
- Open the Calendar app on your Mac and ensure the Reminders calendar is visible under “Calendars.” When enabled, reminders with due dates appear as all-day events.
- Go to File > Export > Export… and save your calendar data as an.ics file.
- Use an online.ics to CSV converter or a third-party app to convert the.ics file to CSV format. This CSV will include event titles and dates corresponding to your reminders.
- Open the CSV file in Excel. You should see columns for event names (your reminder titles) and start dates (due dates), which you can sort, filter, or analyze as needed.
- Note that some finer details like notes or priority levels may not export fully, so verify the data fidelity after conversion.
Alternatively, third-party apps like “Reminder Exporter” or automation tools such as AppleScript or Shortcuts can export reminders directly to CSV or JSON formats, offering more control but requiring additional setup.
Using exported reminders data in desktop calendar apps or task managers can help you integrate your to-dos across platforms and customize your workflow beyond the Reminders app itself.
Troubleshooting common issues with sorting and syncing reminders
Sometimes, you may notice reminders not sorting correctly or the sorting options missing entirely. This often happens if reminders lack due dates, as items without due dates will not appear in a due date sort. To fix this, add due dates to those reminders or use Smart Lists that filter reminders with due dates only.
If your reminders do not show in Apple Calendar despite enabling the Reminders calendar, first check the Calendar app’s sidebar to ensure the Reminders calendar is visible and selected. If it is enabled but reminders still don’t appear, try restarting the Calendar app or your Mac to refresh the connection.
Sync delays are another common issue. iCloud syncing can sometimes lag, causing reminders and calendar entries to be out of date. To force a sync, open System Settings, go to your Apple ID, and toggle iCloud Reminders off and on again. After this, you should see your latest reminders reflected correctly across devices.
Here is a step-by-step to resolve these issues:
- Verify all reminders have due dates by opening each or checking the list; reminders without due dates won’t sort as expected.
- Ensure the Reminders calendar is checked in the Calendar app sidebar; if unchecked, reminders won’t display.
- Restart the Calendar app and your Mac to resolve minor glitches; you should see reminders appear after reopening.
- Force iCloud sync by toggling iCloud Reminders off and then on in System Settings under your Apple ID; syncing should complete within a few minutes.
- If sorting options are missing, click on View in the Reminders menu and verify if Sort By > Due Date is available; if not, update macOS or the Reminders app.
By following these steps, you can resolve most common issues with sorting and syncing reminders, ensuring your task management stays efficient and reliable.
Frequently asked questions
How to set reminders on apple phone?
To set reminders on your Apple phone, open the Reminders app and tap the + button to create a new reminder. Enter your task, then tap the info (i) icon to add details like due date, time, location, or priority. Finally, tap Add to save the reminder with your specified settings.
How to use apple reminders?
Apple Reminders helps you organize tasks by creating lists and setting due dates or alerts. You can add new reminders, assign priorities, and group tasks into different lists. Use notifications to stay on track, and sync reminders across your Apple devices for seamless task management.
How to remove reminders from apple calendar?
To remove reminders from Apple Calendar, open the Calendar app and locate the reminder’s event. Right-click or control-click the reminder, then select Delete from the menu. Alternatively, disable the Reminders calendar under the Calendars list to hide all reminders from view without deleting them.
how to set reminders on apple phone
On your Apple phone, launch the Reminders app and tap the + icon to add a new reminder. Input the task name, then tap the details button to set a due date and time if needed. Save the reminder to have it appear on your device and synced across your Apple ID.
how to remove reminders from apple calendar
Open the Calendar app, find the reminder event you want to delete, then click or tap it to open details. Choose Delete Event to remove it permanently. If you want to stop seeing all reminders, uncheck the Reminders calendar in the calendar list to hide them without deletion.
What This Advice Does Not Cover and Who Should Look Elsewhere
This guide focuses specifically on sorting reminders by due date within Apple’s native Reminders app and integrating them with Apple Calendar. It does not cover advanced automation workflows using Shortcuts or third-party reminder and task management apps, which offer more complex scheduling and sorting options. If your needs include detailed project planning, recurring task dependencies, or team collaboration, consider specialized apps beyond Apple Reminders.
Sorting by due date only works effectively if your reminders have due dates set. Any reminders without due dates will not appear in due date order and may seem out of place when sorting. Additionally, exporting reminders is somewhat limited by Apple’s current ecosystem, so backing up or moving reminders to other platforms might require manual exporting as a file or using third-party tools.
Your Next Step: Set Due Dates for All Important Reminders
To make the most of sorting reminders by due date, start by reviewing your existing reminders and adding due dates where they’re missing. This simple step ensures your task list stays organized and that your reminders appear correctly in both the Reminders app and Apple Calendar. Once all critical reminders have due dates, you’ll find it easier to manage deadlines and keep your task workflow smooth and efficient.
See also: How to Set Location Reminders in Reminders on Mac: A Step-by-Step Guide · How to Share a Reminders List in Reminders on Mac · How to Create a Grocery List in Reminders on Mac: Step-by-Step Guide