How to Use AI Denoise in Lightroom Classic on Mac: Step-by-Step Guide
Step-by-step guide to using AI Denoise in Lightroom Classic on Mac to improve photo clarity and reduce noise effectively.
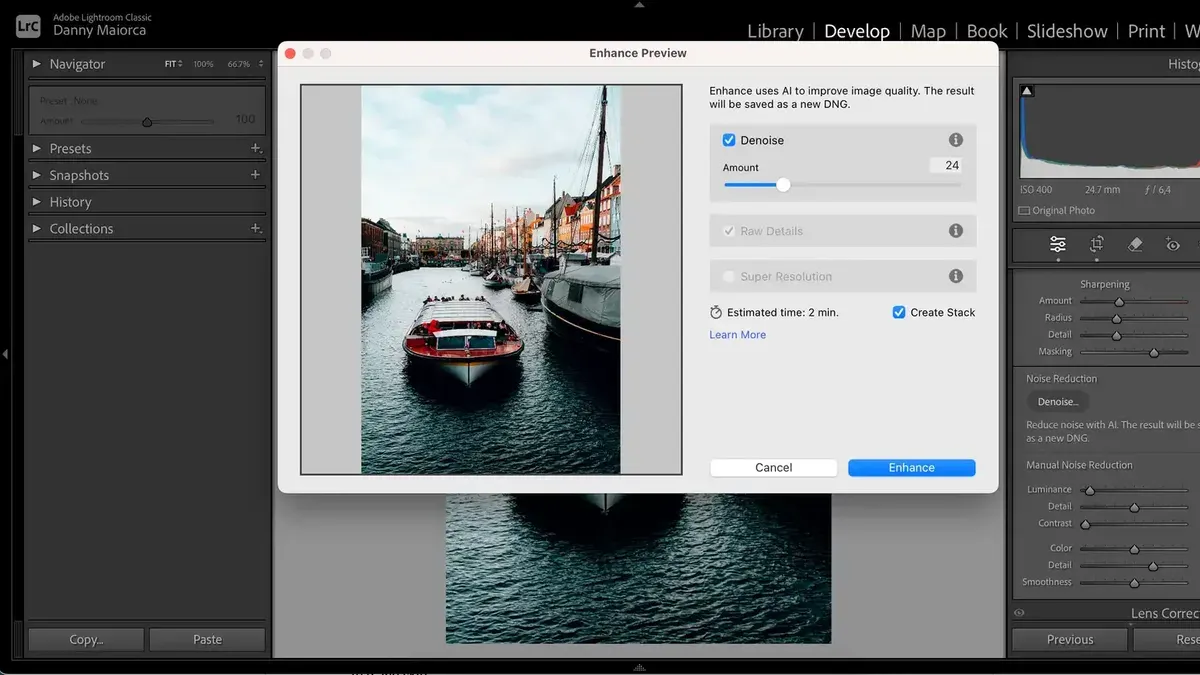
You're editing a low-light photo in Lightroom Classic on your Mac and notice distracting grain that reduces image quality. You want to improve the clarity without losing important details or slowing your workflow.
This article explains how to use AI Denoise in Lightroom Classic on Mac, guiding you through accessing the feature, optimizing settings for different images, troubleshooting common issues, and understanding when AI Denoise is most effective or when alternative methods might be better.
Key takeaways
- AI Denoise is accessed via the Detail panel under Noise Reduction in Lightroom Classic's Develop module.
- Adjust AI Denoise strength carefully to balance noise removal with detail preservation, typically starting around 25-50.
- Use the masking slider to protect fine details from over-smoothing.
- Common issues include slow processing times and artifacts, often resolved by updating Lightroom or adjusting AI Denoise intensity.
- For images with minimal noise or high detail, traditional noise reduction or selective editing may outperform AI Denoise.
Before you start: what you need for AI Denoise in Lightroom Classic on Mac
To use AI Denoise effectively in Lightroom Classic on Mac, you must first ensure your software and hardware meet Adobe's requirements. AI Denoise features are available in Lightroom Classic versions starting with the 2023 release updates; verify you have the latest version installed by checking Help > About Lightroom Classic.
Your Mac should have a multicore CPU (Intel i5 or better, or Apple Silicon M1/M2), at least 16GB of RAM, and a dedicated GPU or integrated graphics capable of Metal acceleration for optimal processing speed and smooth previews.
Supported image formats include RAW files from most major camera brands, DNG, JPEG, TIFF, and PSD files. AI Denoise works best with standard RGB color profiles like Adobe RGB or sRGB; ensure images are not in unusual or proprietary profiles that might cause unexpected results.
Before applying AI Denoise, back up your catalog and original files. This preserves your originals in case you want to revert changes or experiment without risk.
- Open Lightroom Classic on your Mac. You should see your current version listed under Help > About Lightroom Classic. Confirm it supports AI Denoise.
- Check your Mac’s hardware specifications by clicking the Apple menu > About This Mac. Verify CPU, RAM, and GPU meet or exceed recommended specs.
- Import or select an image in a supported format (RAW, DNG, JPEG, TIFF, PSD) with a standard color profile.
- Create a backup of your catalog via File > Export as Catalog and save original files to a secure location.
How to access and apply AI Denoise in Lightroom Classic on Mac
- Open Lightroom Classic on your Mac and import the photo you want to edit. You should see the photo appear in the Library module's grid view.
- Switch to the Develop module by clicking "Develop" in the top right corner or pressing the shortcut key "D." Your selected photo will display in the main preview area.
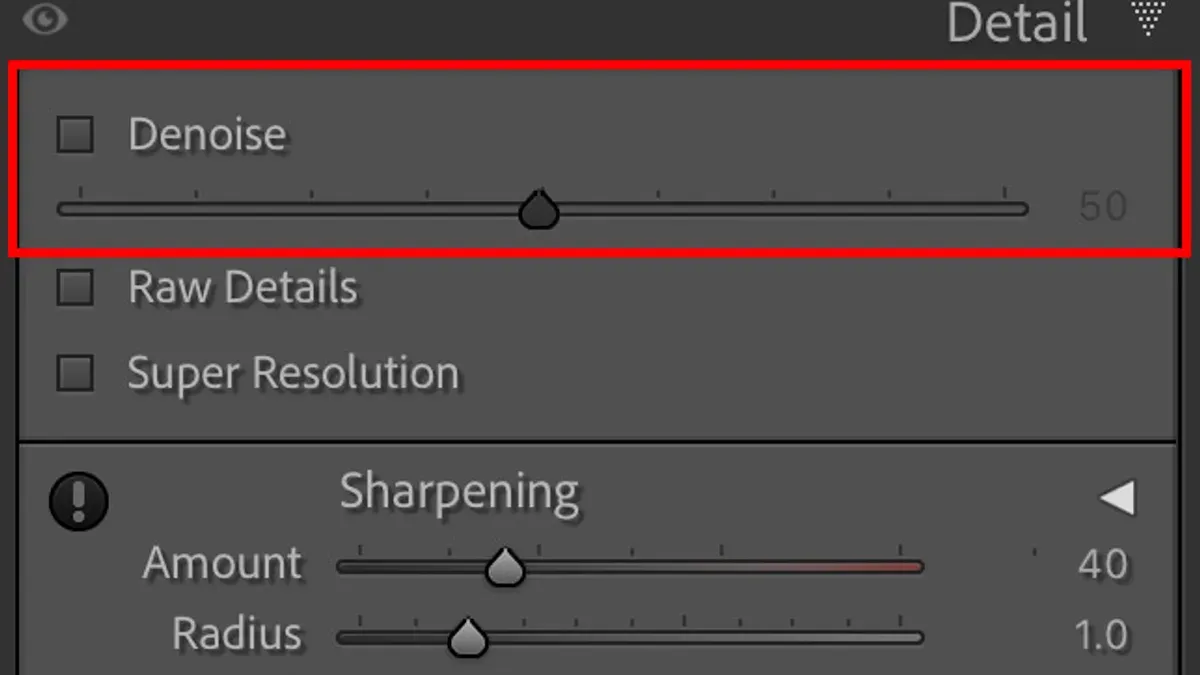
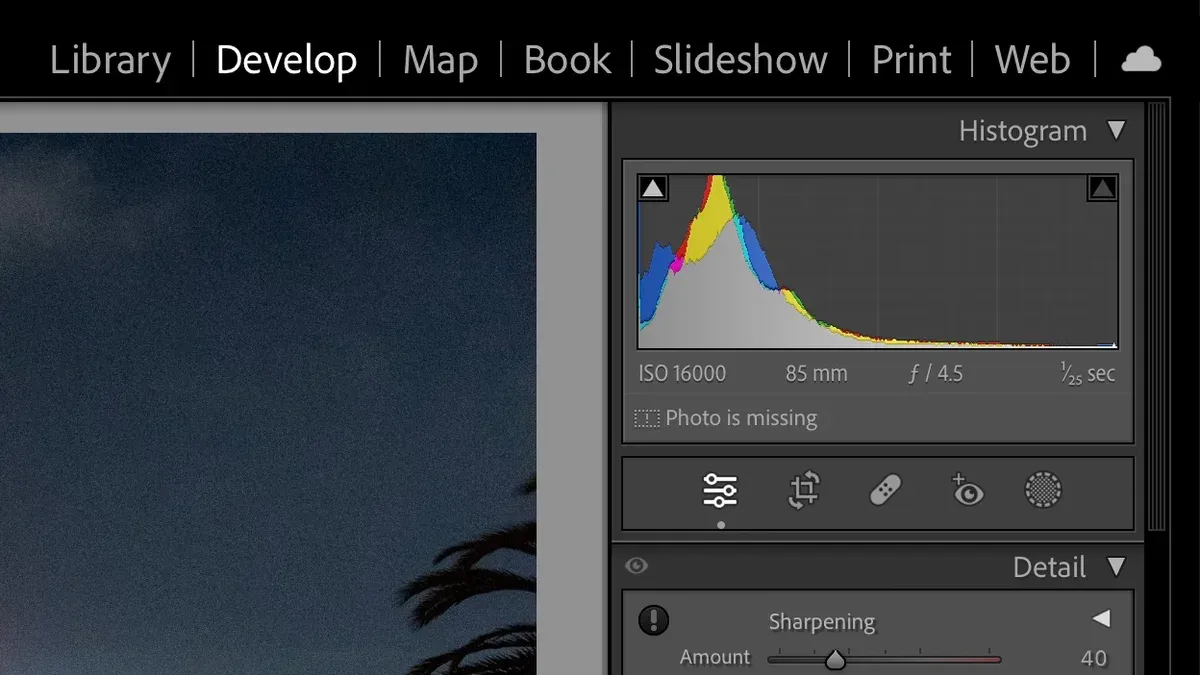
- In the right-hand panel, scroll down to locate the "Detail" section. This is where noise reduction controls are grouped.
- Within the Detail panel, find the "Noise Reduction" options. Look for the AI-powered denoise toggle or slider, which may be labeled "AI Denoise" or integrated as an enhanced noise reduction slider.
- Enable the AI Denoise feature if it is off. Then, adjust the slider incrementally, moving it slowly while observing the preview. Watch for a balance between noise reduction and detail preservation in the image preview.
- Use the preview window's zoom feature to examine fine details and textures, comparing before and after states by toggling the "Before/After" view (shortcut key "\").
- Once satisfied, save your edits by either exporting the image through "File > Export" or syncing the changes if using Lightroom Classic’s cloud features.
Screenshots or screen recordings at each step help you verify you are in the correct module and adjusting the right controls. Before and after comparisons clearly demonstrate the effect AI Denoise has on minimizing image noise without overly blurring details.
Optimizing AI Denoise settings for best results
- Adjust the Denoise Strength slider carefully: increase it for images with heavy noise, but reduce it if you notice loss of fine detail or unnatural smoothing. When set correctly, you should see less grain without a plastic appearance.
- Use the Masking option to apply denoising selectively, protecting edges and textured areas. Increase masking to preserve sharpness on subjects like hair or foliage while reducing noise in flatter regions. Successful masking keeps detail intact where needed.
- Fine-tune the Detail slider to control how much texture AI Denoise preserves. A higher value retains more detail but may leave some noise, while a lower value smooths more aggressively. Aim for a balance where noise is reduced yet textures remain natural.
- Adjust Contrast and Sharpening to recover perceived sharpness after denoising. Increasing contrast slightly can enhance depth, and sharpening helps restore edge clarity. Watch for halos or oversharpening artifacts as you tweak these.
- Compare AI Denoise results side-by-side with traditional noise reduction sliders in Lightroom’s Detail panel. AI Denoise often achieves cleaner noise removal with less detail loss, but in subtle noise scenarios, traditional sliders may suffice or complement AI settings.
For example, setting Denoise Strength to around 60% with Masking at 40% can effectively reduce noise on a night portrait while preserving skin texture. Conversely, a landscape with fine details may need lower strength (30-40%) and higher masking (50-60%) to maintain natural textures. Use Lightroom’s Before/After view to evaluate changes clearly.
Common issues when using AI Denoise and how to fix them
AI Denoise option not appearing or greyed out: This usually occurs if your image format is unsupported or your Lightroom Classic version is outdated. To resolve this, ensure your photo is in a supported format like RAW or TIFF. Also, check for Lightroom updates via Help > Updates. Restart Lightroom after updating, and the option should become available.
Performance lag or slow response during denoising: AI Denoise can be resource-intensive. Close other applications to free memory and check Lightroom’s Preferences > Performance to enable GPU acceleration if your Mac supports it. If lag persists, reduce preview quality or work on smaller image sizes temporarily.
Loss of fine details or unnatural smoothing: Overapplying AI Denoise can cause this. Lower the Strength slider incrementally and increase the Detail slider to preserve texture. Use the Masking slider to protect edges from excessive smoothing.
Incompatibility with certain image formats or color settings: AI Denoise may not work correctly on images in ProPhoto RGB or non-standard color profiles. Convert your image to Adobe RGB or sRGB in Lightroom’s Edit > Convert to Profile before applying AI Denoise.
Following these steps should resolve common issues and improve your workflow efficiency.
When AI Denoise is not the best choice
AI Denoise excels at reducing moderate to heavy noise but offers limited benefit for images with very low noise levels. Applying AI Denoise to such photos can result in unnecessary processing time without visible improvement.
For images requiring critical detail preservation, like architectural shots or fine art photography, AI smoothing may soften edges or textures, compromising image quality. Manual noise reduction methods, such as targeted adjustments with the Detail and Masking sliders or using selective noise reduction via the Adjustment Brush, often yield more precise control in these cases.
Alternative noise reduction tools like Adobe Camera Raw’s manual sliders or third-party plugins may perform better for specific noise characteristics or creative intents.
Hardware limitations on older Macs with limited GPU or CPU power can cause sluggish performance or processing failures when using AI Denoise. In such cases, manual noise reduction is more reliable and less resource-intensive.
Performance benchmarks indicate AI Denoise requires a capable Mac with a recent processor and sufficient RAM for smooth operation. If your system struggles, consider reducing image resolution or using simpler noise reduction techniques.
Tips for integrating AI Denoise into your Lightroom Classic workflow on Mac
- Use batch processing to apply AI Denoise to multiple images simultaneously. Select all images in the Library or Develop module, then apply AI Denoise settings before exporting. This can reduce editing time by up to 50% compared to denoising images individually, but monitor your Mac’s CPU and RAM usage as intensive batch denoising may slow down other tasks.
- Create and save custom presets that include AI Denoise settings tailored to your common shooting conditions. Applying these presets speeds up your workflow by avoiding manual adjustments on each photo, while maintaining consistent noise reduction quality.
- Adjust export settings to complement AI Denoise effects. For example, exporting images in TIFF or high-quality JPEG formats preserves the benefits of denoising, whereas aggressive compression can reintroduce artifacts. Preview exports to ensure noise reduction remains effective in final files.
- Monitor Mac system resources during heavy AI Denoise use. Lightroom Classic can consume significant CPU and memory when processing large batches. Use Activity Monitor to track resource consumption and pause batch operations if your system becomes unresponsive, allowing you to balance workflow efficiency with stability.
- How to Speed Up Import in Lightroom Classic on Mac: Step-by-Step Guide
- How to Move Your Lightroom Classic Catalog to a New Mac
- How to Speed Up Photoshop Performance on Mac: Step-by-Step Guide
- How to Use Generative Fill in Photoshop on Mac: A Step-by-Step Guide
Frequently asked questions
What versions of Lightroom Classic support AI Denoise on Mac?
AI Denoise is available starting with Lightroom Classic version 12.4 and later on Mac. Ensure your software is updated through the Creative Cloud app to access this feature. Older versions do not include AI-powered noise reduction options.
Can AI Denoise remove all types of noise from photos?
AI Denoise effectively reduces luminance and color noise commonly found in low-light or high-ISO images. However, it may not fully eliminate noise caused by sensor defects or extremely high ISO settings without some loss of detail. For certain noise types, combining AI Denoise with manual adjustments can yield better results.
Does AI Denoise slow down Lightroom on Mac significantly?
Applying AI Denoise requires more processing power than traditional noise reduction, which can cause temporary slowdowns, especially on older Macs or large RAW files. On recent Mac models with Apple Silicon or updated CPUs, the impact is generally moderate and manageable within typical editing workflows.
How do I know if AI Denoise is better than manual noise reduction?
Compare results by toggling AI Denoise on and off while adjusting manual noise sliders such as Luminance and Color Noise. AI Denoise often preserves more detail automatically, but manual control may be preferable for images requiring tailored noise treatment. Evaluate based on image quality and workflow speed to decide which method suits your needs.
Limits of this guide
This guide focuses exclusively on using AI Denoise within Lightroom Classic on Mac. It does not cover AI denoising in Lightroom CC or mobile versions, which feature different user interfaces and noise reduction capabilities. If you primarily work on mobile devices or in the cloud-based Lightroom ecosystem, consider exploring resources specific to those platforms. Additionally, this article does not address third-party noise reduction plugins or standalone applications that may offer alternative approaches.
The next practical step is to experiment with the Noise Reduction sliders under the Detail panel after applying AI Denoise. Adjust the Luminance and Detail sliders incrementally to find the best balance between noise removal and detail preservation for your specific image. This fine-tuning often makes a crucial difference in achieving a natural, high-quality result without over-smoothing textures.