
How to Use Magic Move in Keynote: Step-by-Step Guide to Smooth Transitions
Discover step-by-step how to use Magic Move in Keynote to create smooth, eye-catching slide transitions with matching objects.
You’re preparing a presentation and want to create smooth, eye-catching transitions between your slides. Instead of simple fades or wipes, you’re interested in animations that move objects seamlessly from one slide to the next.
This article explains how to use Magic Move in Keynote, showing you step-by-step how to apply this transition effect. You’ll also learn how Magic Move works behind the scenes, how to name and edit objects for best results, and how to troubleshoot common issues that may arise.
Key takeaways
- Magic Move animates matching objects between consecutive slides based on their names and properties.
- To apply Magic Move, select the slide transition and ensure objects have consistent names across slides.
- Editing Magic Move notes helps customize animation timing and easing.
- If Magic Move isn’t working, check object names, layers, and supported properties.
- You can save and reuse Magic Move setups for consistent animations across presentations.
Before you start: What you need to use Magic Move in Keynote
To use Magic Move in Keynote, you need a compatible device and the correct software version. Magic Move is available on Mac computers running macOS and iPads with iPadOS that have the Keynote app installed. Specifically, you should have Keynote version 10.0 or later to access this feature.
Magic Move works by matching objects between two consecutive slides based on their names or visual characteristics like shape and size. To prepare, your slides should contain objects such as text boxes, shapes, images, or charts that you want to animate smoothly from one slide to the next. Assigning consistent names to objects across slides helps Magic Move recognize them and create seamless transitions.
You should also be familiar with Keynote’s slide editing interface, including how to select, name, and arrange objects on your slides. This basic knowledge will make it easier to set up Magic Move correctly and troubleshoot if needed.
- Open Keynote on your Mac or iPad and create a new presentation or open an existing one. You should see the slide navigator and editing workspace.
- Add an object like a shape or text box to your first slide. For example, insert a blue circle.
- Use the Arrange tab to name this object, such as "BlueCircle". This name will help Magic Move track the object between slides.
- Duplicate the slide to create the next slide with the same object. When you move or resize "BlueCircle" on the second slide, Magic Move will animate the change during the transition.
What is Magic Move in Keynote and how does it work?
Magic Move is a powerful transition in Keynote that automatically animates changes between two slides. It works by detecting objects on consecutive slides that share the same unique name and then animates their differences in position, size, opacity, and style. This means you can create smooth, dynamic effects like moving a photo across the screen, resizing a shape, or fading an element in or out without manually creating complex animations.
To function correctly, Magic Move relies on matching object names. If an object is not named or if its name differs between slides, Keynote treats it as a new object rather than a continuation, and no animation will occur for that element. This matching system allows Magic Move to understand exactly which objects to animate and how they change from one slide to the next.
For example, imagine you have a circle on slide one named “Circle1.” On slide two, if you rename a square to “Circle1,” Magic Move will animate the shape transitioning from a circle to a square, moving it smoothly across the slide. However, if the square’s name is different or left blank, Magic Move will simply fade the circle out and fade the square in without any morphing effect. Understanding this behavior helps you plan your slides so that Magic Move produces seamless animations.
How to add Magic Move transition in Keynote
Adding a Magic Move transition between two slides in Keynote is a straightforward process. Follow these steps carefully to apply the transition and customize its timing for the smoothest effect.
- Select the slide you want to transition from in the slide navigator on the left side of the Keynote window. This is the slide that precedes the one where your objects will move or change.
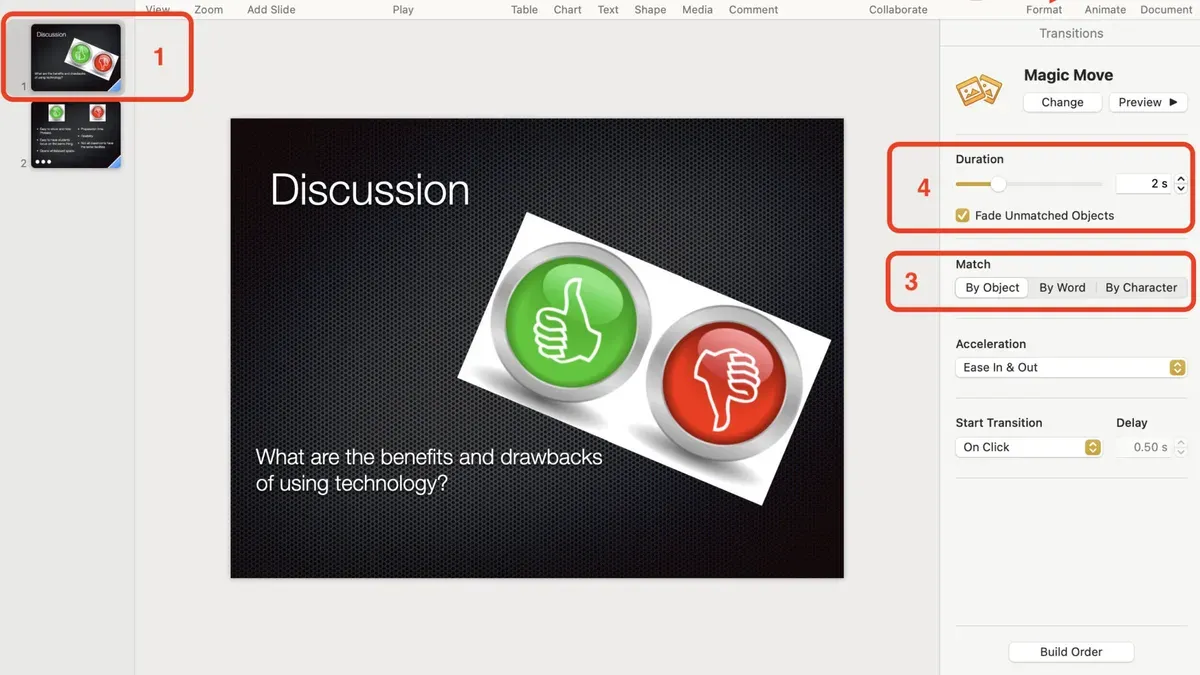
- Open the Transitions pane by clicking the Animate button in the upper right toolbar. Alternatively, you can choose Animate from the top menu bar to reveal transition options.
- Choose Magic Move from the list of available transitions that appears in the Transitions pane. It is usually near the top of the list under "Magic" category. When selected, Keynote automatically applies Magic Move between the selected slide and the one immediately after it.
- Adjust the transition duration and easing options below the transition list. The duration slider lets you set how long the transition takes, typically ranging from 0.5 to 5 seconds. For example, a duration of 2 seconds creates a moderate speed that is smooth and noticeable without being too slow. Easing options like "Ease In" or "Ease Out" control how the animation accelerates or decelerates, affecting the natural feel of the movement.
- Preview the transition by clicking the Play button in the Transitions pane. Watch how the objects animate from their positions on the first slide to their new states on the next. If the effect is too fast or abrupt, return to the duration and easing settings to refine it.
By following these steps, you will successfully add a Magic Move transition that enhances your presentation with smooth, animated object changes.
How to use Magic Move effectively: Naming and editing objects
To control how Magic Move animates between slides, you must assign the same name to matching objects on both slides. This is done in the Arrange sidebar, where you can find the Object Name field near the bottom. Select the object on the first slide, open the Arrange sidebar, then type a clear, unique name—such as "Logo" or "TitleShape". Repeat this exact name on the corresponding object in the second slide.
You can name shapes, images, text boxes, and even groups. Naming groups allows you to animate multiple objects as one unit, which is useful if you want them to move or transform together. Remember that if you group objects after naming them individually, Magic Move will treat the group as a new object, so you may need to rename accordingly.
Once objects share the same name across slides, Magic Move animates changes in position, size, color, and opacity. For example, if a blue circle named "Circle1" moves from the left side on slide one to the right side on slide two, Magic Move smoothly transitions it. Changing the circle’s fill color from blue to green or adjusting its opacity will also animate automatically.
- Select an object on the first slide. Open the Arrange sidebar, locate the Object Name field, and enter a unique name (e.g., "Logo"). You should see the name appear in the sidebar.
- Go to the second slide and select the matching object. Enter the exact same name in the Object Name field. Confirm that both objects have identical names.
- Adjust properties like position, size, or color on the second slide. When you run the presentation, Magic Move animates these changes smoothly.
- To animate multiple objects together, group them by selecting all desired objects, right-clicking, and choosing "Group." Then assign a single name to the group in the Arrange sidebar on both slides.
- If an object doesn’t animate as expected, double-check that the names match exactly and that you didn’t accidentally group or ungroup objects inconsistently between slides.
By carefully naming and editing objects, you gain precise control over Magic Move animations and can create professional, seamless transitions.
How to access and edit Magic Move notes
The term "Magic Move notes" can cause some confusion because Magic Move does not have a separate notes feature. What many users refer to as "Magic Move notes" usually means the object names or any animation-related notes that influence how Magic Move transitions behave. Magic Move relies entirely on the properties of slide objects—especially their names—to create smooth animations.
To control Magic Move effectively, you need to access and edit object names and properties rather than looking for a dedicated note area. These names tell Magic Move which objects on consecutive slides correspond to each other, allowing it to animate their changes.
It's also important to distinguish Magic Move from Presenter Notes. Presenter Notes are for your reference during a presentation and do not affect transitions or animations, so editing them will not impact Magic Move.
- Select the object on your slide whose name you want to check or change. You will see a selection border around it.
- Open the Format sidebar on the right, then click the Arrange tab.
- Look for the Name field near the bottom of the Arrange pane. This shows the object's current name.
- Click into the Name field and type the exact name you want. Matching this name on the corresponding object of the next slide links them for Magic Move.
- Press Enter or click outside the field to save the name. You should see the new name reflected immediately.
Editing object names here directly influences how Magic Move matches and animates objects between slides. There are no separate editable notes specifically for Magic Move, so focusing on accurate and consistent naming in the Arrange pane is key.
How to troubleshoot when Magic Move is not working
If Magic Move isn’t animating as expected, systematically check common issues to identify the problem. The first and most frequent cause is object naming. Ensure that every object you want to animate has exactly the same name on both slides, including capitalization and spaces. Even a minor difference will prevent the animation.
Next, verify that the objects exist on both slides. Magic Move cannot animate objects that are newly added or deleted between slides; these will simply appear or disappear without animation. Also, confirm the object types are supported. Magic Move works well with text boxes, shapes, and images, but complex groups or certain masks can break the animation.
If you use grouping, ungroup complex groups or simplify masks before applying Magic Move. This often resolves issues where animations fail or behave unpredictably. Additionally, check your transition settings in the Slide Navigator to confirm Magic Move is actually selected and not replaced by another transition.
If none of these steps fix the issue, try restarting Keynote or testing the presentation on another device. Sometimes persistent bugs or corrupted files cause Magic Move to malfunction.
- Open the slide pair with the problematic transition. Check and match the object names in the Arrange pane exactly. When done, you should see the same names for corresponding objects on both slides.
- Confirm that each named object appears on both slides. If an object exists only on one slide, remove or duplicate it on the other slide. Successful verification means all named objects exist on both slides.
- Inspect the objects’ types. Ungroup any complex groups and remove masks or effects that aren’t supported. After simplification, Magic Move should animate those objects properly.
- Go to the Slide Navigator, select the transition between slides, and ensure Magic Move is selected in the Transitions panel. The transition preview should reflect Magic Move animation.
- If problems persist, save your work, quit Keynote, and reopen your file. Alternatively, try opening the presentation on another Mac or iPad. If Magic Move works there, the problem is likely device-specific.
| Supported Objects | Unsupported or Problematic |
|---|---|
| Text boxes | Complex grouped objects |
| Shapes (rectangles, circles) | Objects with certain masks and effects |
| Images | New or deleted objects between slides |
Following these steps helps you pinpoint and fix common Magic Move issues, ensuring your transitions run smoothly.
Tips to enhance your Magic Move animations
To create polished Magic Move transitions, use gradual changes in size and position between slides. Avoid abrupt jumps by resizing objects stepwise and shifting them smoothly across the slide. This technique gives a natural flow to your animation that viewers will appreciate.
Combine Magic Move with Keynote’s other animation effects for layered transitions. For example, apply a "Fade In" or "Move In" build to text while Magic Move animates related images. This layering adds depth and highlights specific content without overwhelming the viewer.
Leverage opacity and color changes to add subtle emphasis to objects. Adjust the opacity slightly or change fill color between slides to draw attention during the transition. These nuanced shifts work well for highlighting or de-emphasizing elements dynamically.
Group related objects to animate them collectively while keeping their individual names consistent across slides. Grouping simplifies managing multiple items and ensures Magic Move treats them as one unit, but each named object inside the group must remain identically named on consecutive slides for the transition to work.
Experiment with the transition duration and easing curves found in the "Animate" sidebar. For example, extending the duration to 2–3 seconds with an "Ease In Ease Out" curve produces a smooth, natural movement. Short durations with linear easing can feel abrupt. Before-and-after screenshots often show how easing changes impact the fluidity of animations, making timing adjustments crucial for professional results.
How to save and reuse Magic Move setups
Duplicating slides with Magic Move transitions is the simplest way to preserve and reuse your animations within a presentation. When you duplicate a slide that has a Magic Move transition applied to the following slide, the duplicated slide pair will retain the transition and all associated object animations seamlessly. This allows you to replicate complex effects without rebuilding them.
Using master slides or templates with pre-named objects is an efficient strategy for consistent animations across multiple presentations. By setting up master slides that include objects named exactly as required by Magic Move, you ensure that any new slides created from these masters will be ready for smooth transitions. This approach saves time and reduces errors in naming objects manually each time.
When exporting your Keynote presentation, Magic Move transitions are preserved only if you export in Keynote format or as a PDF with static slides. However, exporting to formats such as PowerPoint does not support Magic Move animations. In these cases, transitions will be lost, so plan accordingly if you need to share your presentation outside the Keynote environment.
- Select the slide with the Magic Move transition and choose Edit > Duplicate Slide. You should see an exact copy of that slide and its transition appear in your slide navigator.
- To reuse Magic Move across presentations, open a presentation with master slides set up with pre-named objects. Create new slides from these masters by clicking + > Choose Master Slide. The objects will be ready for Magic Move animations.
- Save your presentation regularly in the Keynote format to preserve all Magic Move setups intact. When exporting, choose File > Export To > Keynote to maintain transitions.
- Note that exporting to PowerPoint via File > Export To > PowerPoint will remove Magic Move effects, so use this only if animation loss is acceptable.
Frequently asked questions
How to access magic notes?
Magic Notes in Keynote are accessed by selecting a slide that uses the Magic Move transition. Then, open the Inspector panel and go to the "Animate" tab. Here, you will find a section labeled "Magic Move Notes," where you can view and edit any notes tied to the Magic Move animation.
How do magic notes work?
Magic Notes provide additional information or instructions linked specifically to the Magic Move transition between slides. They do not appear on the slides themselves but serve as reminders or guides for you during editing. They help clarify how objects will animate or what changes are expected in the transition.
How to use magic notes?
To use Magic Notes, first add them in the "Animate" tab under the Magic Move section for the slide with the transition. Write clear, concise notes explaining any custom behaviors or object changes you want to remember. These notes assist in troubleshooting or refining the animation and are visible when you revisit the Magic Move settings.
How to use magic move transition in keynote?
Apply Magic Move by selecting the slide where you want the transition, then click the "Animate" button and choose "Add an Effect." Select "Magic Move" from the list. Keynote will automatically detect matching objects on consecutive slides and animate their changes smoothly during the transition.
How to get magic notes?
Magic Notes are not a separate feature to install but part of the Magic Move transition settings in Keynote’s Animate panel. To get Magic Notes, first add a Magic Move transition between slides, then look in the Animate tab where you can add or view notes linked to that transition.
What This Guide Does Not Cover
Magic Move requires careful object naming and matching for smooth animations. It does not automatically animate all changes between slides and may struggle with complex grouped objects or certain unsupported slide elements, such as embedded videos or some charts. If your presentation demands highly customized animations or effects beyond what Magic Move offers, you might need to explore advanced scripting options or third-party plugins, which are beyond the scope of this guide.
For users working with intricate animations or requiring fine-grained control over timing and effects, dedicated animation software or more advanced Keynote techniques may be more suitable.
Next Step: Practice Naming and Matching Objects
The single most useful step to improve your Magic Move transitions is mastering consistent and precise object naming across your slides. Before adding the transition, ensure each object you want to animate shares the exact same name in the Format sidebar under the Arrange tab. This attention to detail directly affects how smoothly Magic Move detects and animates changes. Spend time practicing this with simple slides to build confidence, then gradually apply it to more complex presentations for seamless, professional results.
See also: How to Add Animations in Keynote: A Step-by-Step Guide · How to Embed a Video in Keynote: A Step-by-Step Guide · How to Record a Presentation in Keynote: A Step-by-Step Guide



