How to Add a Shared Mailbox in Outlook on Mac: Step-by-Step Guide
This guide explains how to add a shared mailbox in Outlook on Mac, covering permissions, setup steps, and troubleshooting for smooth email collaboration.
You’re collaborating with your team on a project, and accessing a shared mailbox would streamline communication. However, figuring out how to add a shared mailbox in Outlook on Mac can be confusing, especially when dealing with different Outlook environments and permission settings.
This article guides you through the process step-by-step, covering how to open and add a shared mailbox in the native Outlook Mac app and Outlook web. You’ll also learn how to handle permission challenges, add shared mailboxes without a password, and troubleshoot common issues to ensure smooth email collaboration.
Key takeaways
- You need appropriate permissions from your administrator before adding a shared mailbox.
- In Outlook for Mac, use the Preferences > Accounts > Delegation tab to add shared mailboxes.
- Adding a shared mailbox without a password requires delegated access granted by the mailbox owner or admin.
- Outlook web on Mac allows adding shared mailboxes via the folder pane by opening another mailbox.
- Common issues include permission errors and mailbox syncing delays, which can be resolved by re-adding the mailbox or restarting Outlook.
Before you start: What you need to add a shared mailbox in Outlook on Mac
A shared mailbox in Outlook allows multiple users to read and send email from a common email address, improving team collaboration. To access a shared mailbox, you must have specific permissions granted by your Microsoft 365 administrator or the mailbox owner. Without these delegation rights, you won’t be able to add or view the shared mailbox in Outlook.
Before you proceed, confirm that your Outlook account is either Exchange or Microsoft 365 type, as shared mailboxes are not supported with POP or IMAP accounts. The shared mailbox feature works with the Microsoft 365 subscription Outlook app for Mac, Outlook for Mac standalone versions, and Outlook on the web (OWA). Knowing your Outlook version helps ensure you follow the correct steps for your environment.
You generally do not need the shared mailbox password to access it. Instead, the mailbox owner or admin assigns you access permissions, such as Full Access or Send As rights. These permissions are managed in the Microsoft 365 admin center under Groups > Shared mailboxes or directly via Exchange admin settings.
- Verify your Outlook account type by going to Outlook > Preferences > Accounts. Look for Exchange or Microsoft 365 under Account Type. If you see POP or IMAP, shared mailboxes won’t be supported.
- Request access from your Microsoft 365 administrator or the mailbox owner. They must grant you the appropriate delegation permissions.
- Confirm the Outlook app version you are using: Microsoft 365 subscription app or standalone. This helps you follow the correct setup process.
- Check that you can sign in to Outlook on the web (https://outlook.office.com) with your account. Shared mailbox access here confirms your permissions are active.
- Review your permissions in the Microsoft 365 admin portal if you have admin access, under Groups > Shared mailboxes. You should see your user listed with delegated rights.
How to open a shared mailbox in Outlook Mac app
To access a shared mailbox in the Outlook app on your Mac, you need to add it through your account settings rather than setting it up as a separate account. This ensures the shared mailbox appears alongside your primary mailboxes in the folder pane, allowing smooth navigation and management.
- Open Outlook on your Mac and go to the Tools menu at the top of your screen, then select Accounts. The Accounts window will open, showing your current mail accounts.
- In the Accounts window, select your Exchange or Microsoft 365 account from the list on the left. Then, click on the Delegation and Sharing tab on the right side.
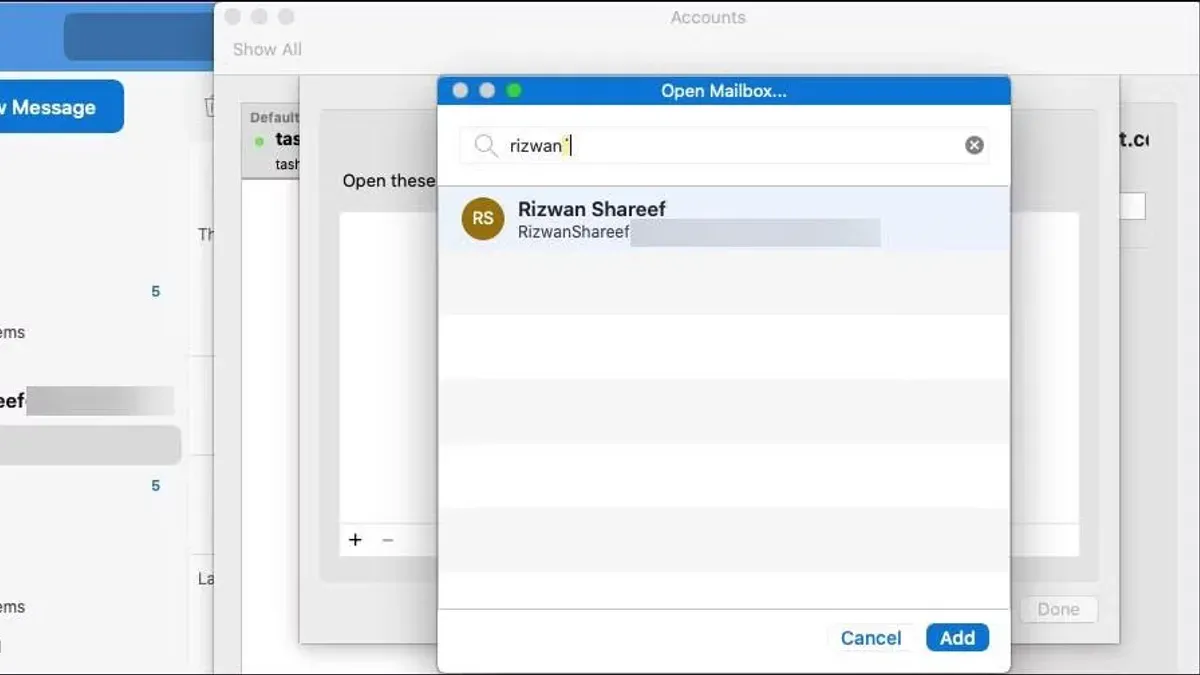
- Under the Open these additional mailboxes section, click the plus (+) button to add a shared mailbox.
- Type the email address or name of the shared mailbox you want to open, then press Enter. The shared mailbox should appear in the list below.
- Close the Accounts window and return to the main Outlook window. Look at the folder pane on the left side; the shared mailbox should now be listed below your primary mailbox folders.
- If the shared mailbox does not appear immediately, quit Outlook completely and restart the app. This refreshes the connection and usually resolves display delays.
Remember, adding a shared mailbox through this method is different from adding a new account. The shared mailbox uses your existing login and permissions, so no additional password is required. This integration helps keep your mailbox list organized and avoids confusion with multiple account profiles.
Once added, you can expand the shared mailbox folders to access its inbox, sent items, and other folders just like your own mailbox. If you don't see expected folders, check with your administrator to confirm you have the right permissions.
Example folder pane: Your primary mailbox will display at the top, with the shared mailbox listed underneath, indented slightly to indicate it is an additional mailbox linked to your account.
How to add a shared mailbox to my Outlook on Mac
If the usual method of adding a shared mailbox doesn’t work or isn’t available, you can manually add it through your account settings using the “Open these additional mailboxes” option. This approach requires you to enter the shared mailbox’s email address directly, bypassing the automatic addition typically done by a Microsoft 365 admin.
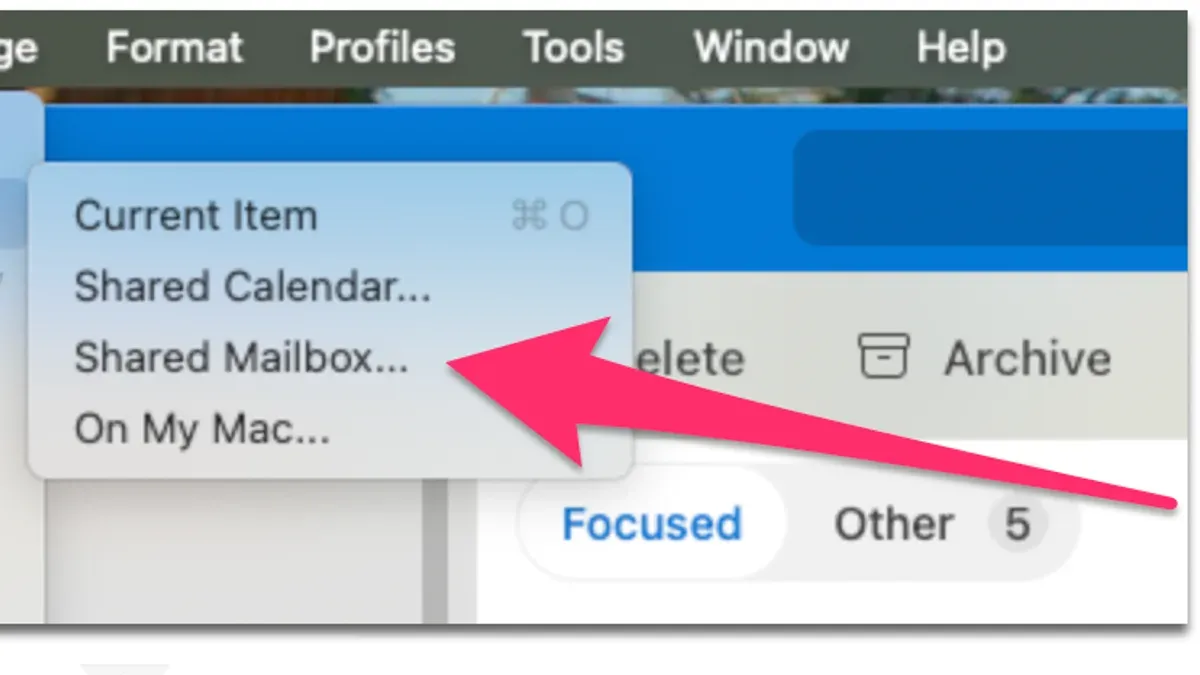
- Open Outlook on your Mac and go to the Tools menu, then select Accounts. You should see your email accounts listed.
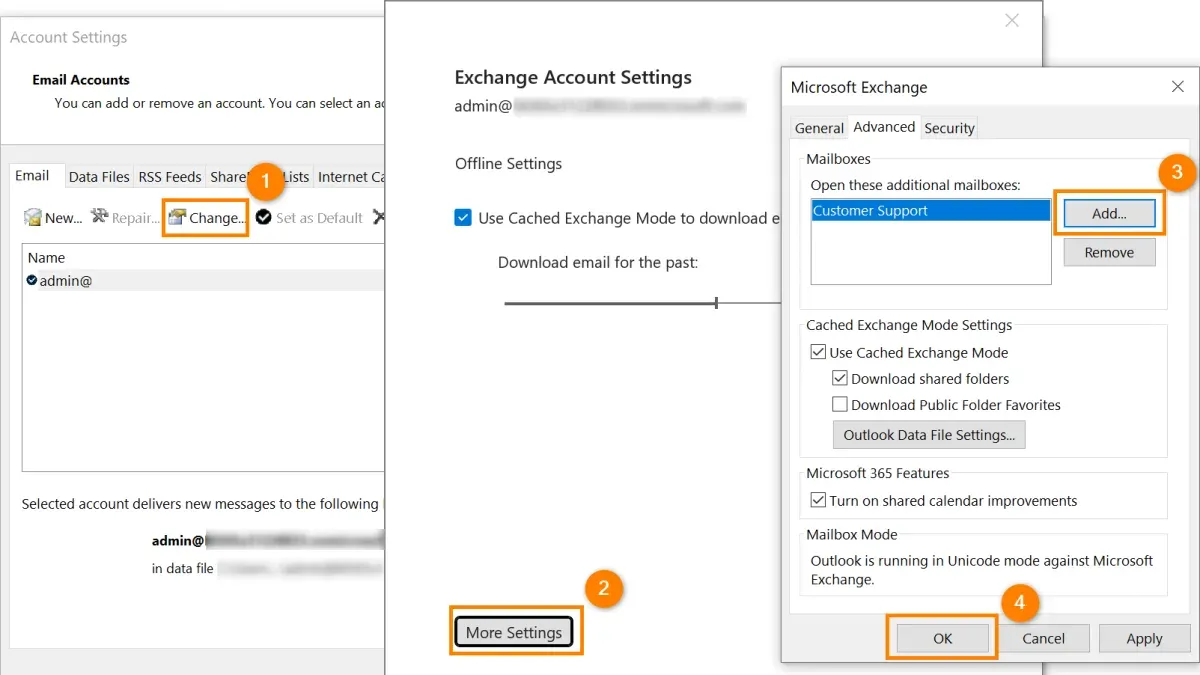
- Select your Exchange or Microsoft 365 account from the list, then click Advanced in the bottom right corner of the window.
- Navigate to the Delegates tab. Under the section labeled “Open these additional mailboxes,” click the + button.
- Type or paste the email address of the shared mailbox you want to add, then press Enter. The mailbox should now appear in the list.
- Close the Accounts window to save changes. Outlook will begin syncing the newly added shared mailbox. You should see it appear in your folder pane shortly.
- To check syncing status, look for a spinning sync icon next to the mailbox name or folders. If syncing stalls, try clicking Send/Receive from the toolbar or restarting Outlook.
This manual method differs from the automatic addition where the shared mailbox appears immediately after admin delegation because it requires explicit entry and confirmation on your side. It offers a reliable alternative when automatic syncing is delayed or incomplete. Remember, syncing times may vary depending on your network and mailbox size.
How to add shared mailbox in Outlook app on MacBook without password
Shared mailboxes in Outlook on Mac use delegate permissions rather than separate passwords. This means you don’t need the shared mailbox’s password to add or access it. Instead, Outlook authenticates your access through your own primary account credentials linked to the mailbox permissions granted by the mailbox owner or your administrator.
Before attempting to add the shared mailbox, ensure you have the correct permissions. You can request access by asking the mailbox owner or your IT administrator to assign you delegate permissions. A typical permission request email might say: "Please grant me full access and send-as permissions to the shared mailbox [Mailbox Name] to streamline our team’s email collaboration."
Once permissions are set, Outlook will recognize your access based on your sign-in credentials, securely connecting you without needing the shared mailbox’s password. This approach aligns with Microsoft’s security guidelines, which recommend using delegated access to minimize password sharing and reduce security risks.
- Sign in to your Outlook app on Mac with your primary account credentials. You should land on your main mailbox view.
- Go to Tools in the menu bar, then select Accounts.
- Choose your Exchange or Microsoft 365 account, then click Advanced.
- Select the Delegates tab, then under "Open these additional mailboxes," click the + (plus) button.
- Enter the name or email address of the shared mailbox, then click Add. If you have the correct permissions, the mailbox will appear in your folder pane.
- Close the Accounts window and return to the main Outlook view. The shared mailbox folders should now be accessible without entering any new password.
Using delegate permissions is more secure because it limits access to authorized users without sharing mailbox passwords. If you encounter access issues, double-check with the mailbox owner or IT admin that your permissions are correctly configured.
How to add someone to a shared mailbox in Outlook Mac
Adding users to a shared mailbox is not done directly through the Outlook Mac app. Instead, this task is managed by Microsoft 365 administrators or the shared mailbox owners via the Microsoft 365 admin center or Exchange admin portal. You will need to request access for others through these admin tools, as Outlook Mac only allows you to use shared mailboxes once permissions are granted.
There are three main permission levels to understand when adding users: Full Access lets someone open and read the shared mailbox and its contents. Send As allows sending emails that appear to come directly from the shared mailbox address. Send on Behalf lets a user send mail on behalf of the mailbox, with a message showing it is sent by the delegate for the mailbox owner.
To add someone to a shared mailbox, an admin or mailbox owner typically follows these steps:
- Sign in to the Microsoft 365 admin center at admin.microsoft.com. You should see the admin dashboard.
- Go to Groups > Shared mailboxes. Locate and select the shared mailbox you want to modify.
- Click on Members or Manage mailbox delegation. Here you can add users by searching their names or email addresses.
- Assign the appropriate permissions: Full Access, Send As, or Send on Behalf. Each permission can be granted independently.
- Save the changes. Users added with proper permissions should appear in the members or delegation lists.
To verify if someone has been added correctly, ask them to restart Outlook on their Mac and check if the shared mailbox appears automatically or can be added manually. You can also revisit the admin center to confirm their permissions are listed under the shared mailbox settings.
Remember, changes may take a few minutes to propagate. If access issues persist, double-check the specific permission levels or consult your Microsoft 365 admin for further troubleshooting.
How to add shared mailbox in Outlook web on Mac
Accessing a shared mailbox through Outlook on the web is straightforward and lets you manage shared emails without using the desktop app. First, sign in to your Microsoft 365 or Exchange account at outlook.office.com using your Mac browser. Ensure you have been granted the necessary permissions to the shared mailbox by your administrator.
- After signing in, look at the left-hand folder pane. Right-click your primary mailbox name, which is usually your email address, and select Add shared folder. A dialog box will appear.
- Enter the name or email address of the shared mailbox you want to add. As you type, Outlook web will suggest matches from your organization. Select the correct shared mailbox and click Add. You should now see the shared mailbox appear in your folder list.
- To open the shared mailbox in a new browser tab, click your profile icon in the top right corner, then select Open another mailbox. Type the shared mailbox address, then click Open. This opens the mailbox in a separate tab, allowing focused access.
- If the shared mailbox does not appear or you get an error, verify with your administrator that you have at least Full Access permission assigned. Unlike the desktop app, Outlook web requires explicit permissions to add and open shared mailboxes.
- Once added, you can manage the shared mailbox's emails alongside your own. Use the folder pane to navigate, and the reading pane to preview messages. You can also create rules or folders within the shared mailbox if you have the appropriate permissions, helping organize shared communications efficiently.
This method keeps your shared mailbox accessible across devices without extra setup, offering flexibility for managing collaborative emails directly from your Mac browser.
Troubleshooting common issues when adding a shared mailbox in Outlook on Mac
If the shared mailbox doesn’t appear after you have added it, start by restarting Outlook to refresh the connection. Sometimes, the mailbox takes a few minutes to sync and show up in your folder pane. If it still doesn’t appear, verify that you added the mailbox correctly via Delegation and Sharing or the manual mailbox addition method.
If you encounter an access denied message, it usually means your permissions are not correctly set. Confirm with your administrator that you have either Full Access or Send As permissions assigned in the Microsoft 365 admin center. Without these, Outlook will block your access to the shared mailbox.
Syncing delays or missing emails can result from network issues or outdated Outlook versions. Check your internet connection and update Outlook to the latest version by going to Help > Check for Updates in the app menu. Also, confirm your account type is Exchange or Microsoft 365, as shared mailboxes are not supported with POP or IMAP accounts.
Common error messages include "You do not have permission to open this shared folder" and "Cannot expand the folder." These indicate permission or syncing problems. When these occur, follow a troubleshooting checklist:
- Restart Outlook and your Mac; the shared mailbox should appear in the folder list.
- Check your permissions with your IT admin; you should see the mailbox folders accessible.
- Update Outlook to the latest version; errors related to account type should disappear.
- Confirm you are signed into the correct Exchange or Microsoft 365 account.
- Clear the Outlook cache by going to Outlook > Preferences > Accounts > Advanced > Delegates and removing then re-adding the shared mailbox.
If these steps do not resolve the issue, contact your IT administrator or Microsoft Support for further assistance. They can verify backend settings and troubleshoot server-side problems that affect mailbox access.
Frequently asked questions
How do i add a shared mailbox in outlook for mac?
To add a shared mailbox in Outlook for Mac, go to the Tools menu and select Accounts. Choose your primary account, then click Advanced. Under the Delegates tab, find the section labeled "Open these additional mailboxes" and click the plus (+) button to add the shared mailbox address. Close and restart Outlook to see the shared mailbox appear in your folder list.
How to open a shared mailbox in Outlook Mac app?
In the Outlook Mac app, open the Tools menu and select Accounts. Select your account and click Advanced. Under Delegates, add the shared mailbox under "Open these additional mailboxes." After adding, restart Outlook, and the shared mailbox will display alongside your own mailbox for easy access.
How to add shared mailbox in Outlook Mac without password?
You can't add a shared mailbox in Outlook for Mac without the necessary permissions, but you don’t need the mailbox's password. You must have delegate access granted by the mailbox owner or administrator. Once permission is given, add the shared mailbox via the Delegates tab in your account settings without entering a password.
How do I add a shared mailbox in Outlook for Mac?
Adding a shared mailbox involves opening Outlook’s Accounts settings, selecting your account, clicking Advanced, and then using the Delegates tab to add the shared mailbox under "Open these additional mailboxes." Restart Outlook to view and access the mailbox alongside your primary account.
How to add shared mailbox in Outlook web Mac?
In Outlook on the web, click your profile picture or initials in the top right corner, then select "Open another mailbox." Enter the shared mailbox email address and click Open. The shared mailbox will open in a new tab or window, allowing you to manage emails without adding it to your primary mailbox list.
What This Guide Does Not Cover
This article does not cover adding shared mailboxes to non-Exchange or non-Microsoft 365 accounts, as shared mailboxes require specific server support and permissions that those account types do not provide. If your email is hosted on IMAP, POP, or other third-party services without Exchange support, this setup process will not work. For these accounts, consider alternative collaboration tools or consult your IT administrator for options tailored to your environment.
Additionally, this guide assumes you have the necessary permissions granted by your Exchange or Microsoft 365 administrator. If you do not see or cannot access a shared mailbox after following the steps, you may need to request access or have your permissions updated by your IT department.
Next Step: Verify Permissions to Ensure Smooth Access
The single most useful next step is to double-check that you have been granted delegate or full access permissions to the shared mailbox. Without the correct permissions, Outlook on Mac will not be able to display or allow you to add the mailbox properly. Contact your Exchange or Microsoft 365 administrator to confirm or update your access rights before proceeding with the setup steps. This upfront check helps avoid common frustrations and ensures your shared mailbox integration works smoothly.
See also: How to Switch Back to Legacy Outlook in Outlook on Mac: Step-by-Step · How to Fix Microsoft Word Not Responding on Mac: Step-by-Step Guide · How to Print Gridlines in Excel on Mac: A Clear Step-by-Step Guide