How to Print Gridlines in Excel on Mac: A Clear Step-by-Step Guide
Discover step-by-step how to print gridlines in Excel on Mac and troubleshoot common issues for perfectly printed spreadsheets.
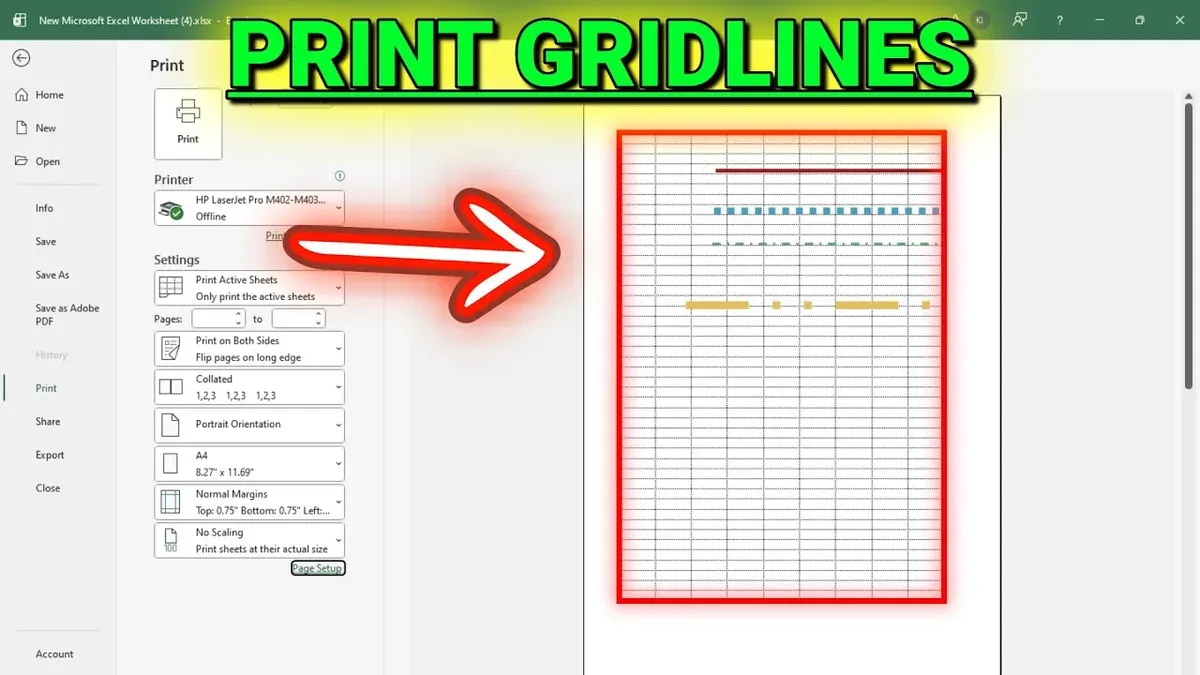
You're preparing an important report in Excel on your Mac and want to ensure the printed version includes gridlines for clarity. You notice that despite gridlines showing on screen, they don’t appear when you print the spreadsheet.
This article explains precisely how to print gridlines in Excel on Mac, covering the specific steps and settings you need to adjust. You will learn how to enable gridlines for printing through both the Excel interface and Page Setup, what to do if gridlines don’t print as expected, and how to use conditional formatting as an alternative. We’ll also cover troubleshooting tips and how to handle printing gridlines for multiple sheets or large ranges, so your printed spreadsheets look exactly as intended.
Key takeaways
- Enable gridlines for printing via the Excel menu: View > Show > Gridlines and Page Layout > Sheet Options > Print.
- Use Page Setup to confirm "Print" under Gridlines is checked before printing.
- If gridlines don’t print, add thin borders or use conditional formatting as a reliable alternative.
- Check for background colors or cell fills that can hide gridlines when printing.
- For multiple sheets, verify print settings individually to ensure gridlines appear on each.
Before you start: What you need to print gridlines in Excel on Mac
Before you begin printing gridlines in Excel on your Mac, it's essential to confirm that you have Microsoft Excel installed. This could be either the Office 365 subscription version or a standalone version of Excel for Mac. Both versions support printing gridlines, but interface elements may vary slightly. Next, ensure your spreadsheet is prepared and that gridlines are visible on your screen. Gridlines on screen are subtle grey lines that separate cells, distinct from manually added cell borders, which are more prominent and customizable.
Understanding the difference between gridlines and cell borders is important because Excel prints only gridlines if enabled, but cell borders always print unless removed. Sometimes users confuse the two, leading to unexpected print results. It's also critical to check your printer’s readiness and the default print settings, as some printers or settings might ignore light gridlines or default to settings that do not print them clearly.
When you preview your print, notice whether gridlines appear as faint lines on the print preview page. For example, on sample spreadsheets tested with Excel for Mac (Office 365 and standalone), gridlines showed clearly on screen but sometimes appeared faint or absent in print preview, depending on printer and Excel settings. Common printer models tested include HP LaserJet and Canon inkjets, which have different default print quality settings affecting gridline visibility.
- Open your Excel spreadsheet on your Mac and verify that gridlines are visible on the worksheet. You should see faint grey lines separating cells.
- Check your Excel version by clicking the Excel menu and selecting About Excel. Confirm you are running Office 365 or a recent standalone version.
- Connect your printer and ensure it is powered on with paper loaded. Open System Preferences > Printers & Scanners to confirm the printer is selected.
- Go to File > Print and look at the print preview. You should see faint lines representing gridlines on your spreadsheet pages.
- If gridlines do not appear in the preview, be aware that default printer or Excel print settings may need adjustment, which you will address in later steps.
How to get Excel to print gridlines on Mac
To print gridlines in Excel on your Mac, you need to enable the correct setting within your worksheet. This starts by opening the Excel workbook and selecting the specific worksheet where you want gridlines to appear on the printed page. Ensuring you are on the right sheet avoids confusion when printing multiple sheets.
- Open your Excel workbook and click the worksheet tab you want to print with gridlines. You should see the gridlines on your screen in that worksheet.
- Navigate to the Page Layout tab in the Excel ribbon at the top of your screen. This tab contains key print and layout settings.
- Within the Page Layout tab, locate the Sheet Options group. Here, you will find checkboxes for visual and print gridline settings.
- Under Gridlines, check the box labeled Print. This tells Excel to include gridlines when printing your worksheet.
- To verify the setting, go to File > Print or press Command + P to open Print Preview. You should see the gridlines displayed on the preview page. If they are visible here, they will print on paper as expected.
If gridlines do not appear in the print preview, double-check that you enabled the Print checkbox under Sheet Options. Sometimes it can be overlooked, especially when working with multiple worksheets or complex formatting.
How to print with gridlines on Excel for Mac using Page Setup
Another reliable way to ensure your gridlines print correctly in Excel on Mac is through the Page Setup dialog. This method gives you direct control over print options, including gridline visibility, and helps when the standard Sheet Options method doesn’t yield the desired result.
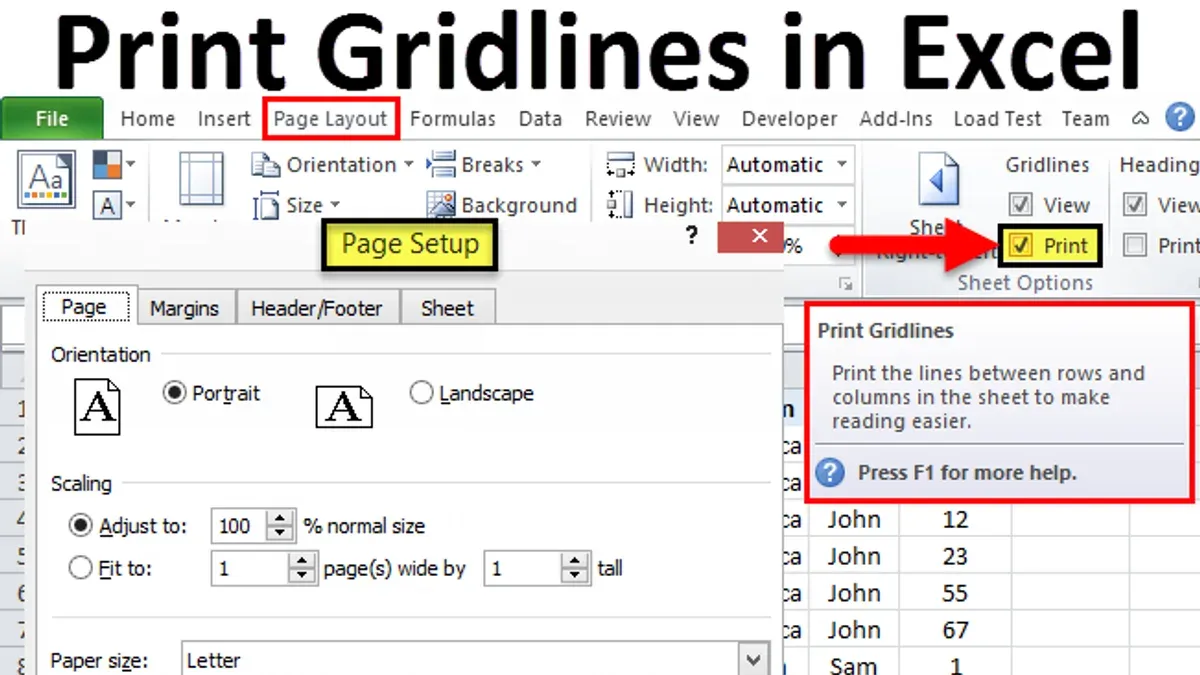
- Open your Excel spreadsheet and go to the File menu, then select Print. This opens the Print dialog where you will see a preview of your sheet.
- In the Print dialog, click the Page Setup button located near the bottom. The Page Setup window will appear with multiple tabs.
- Click on the Sheet tab within the Page Setup dialog. Here, you will find a section labeled Print with several checkboxes.
- Check the box labeled Gridlines. This option explicitly instructs Excel to include gridlines when printing your sheet.
- Before closing Page Setup, consider adjusting the scaling options if your gridlines look faint or are missing in the preview. For example, try selecting Fit to 1 page wide by 1 page tall under Scaling to ensure the entire sheet fits on one page without losing gridline clarity.
- Click OK to save your settings and return to the Print dialog. Review the print preview to confirm gridlines are visible and clear compared to before.
- Proceed to print your document. If gridlines are still faint, revisit Page Setup and experiment with scaling or print quality settings, as some printers affect how fine lines appear.
Using Page Setup’s Sheet tab offers a straightforward, alternative path to guarantee gridlines print. It also highlights the difference in print preview when the gridlines option is toggled on versus off—without this setting, gridlines may not print even if visible on screen.
How to add gridlines in Excel when printing if they don’t show
Sometimes, even after enabling gridlines to print, you might find they still don’t appear on your printed page. This happens because gridlines are a screen display feature and can be faint or invisible on printouts depending on your printer settings. A reliable workaround is to add cell borders, which behave like gridlines but are more consistently visible when printed.
Gridlines are the light dotted lines you see on your worksheet, while borders are customizable lines you apply to cells. Borders are part of the cell formatting, so they print exactly as you set them. To add borders that mimic gridlines, follow these steps carefully.
- Select the range of cells you want to print with visible lines. You should see the selected cells highlighted.
- Go to the Home tab on Excel’s ribbon, then locate the Borders tool, which looks like a square with four small boxes.
- Click the Borders dropdown arrow, and select All Borders. This applies thin borders around each selected cell, visually similar to gridlines.
- Check the Print Preview (File > Print or Command + P) to confirm that the borders appear clearly around the cells you selected.
Comparing printouts, default gridlines are often lighter and can be faint or missing, especially on budget printers. Borders, however, print darker and sharper, ensuring your data is neatly separated. The trade-off is that borders add a bit more ink usage and slightly change the worksheet’s look, but they provide consistent print clarity.
How to show gridlines in Excel when printing on Mac with conditional formatting
Conditional formatting allows you to simulate gridlines by adding borders or shading to cells, which can make gridlines more visible when printing. This method is useful when default gridlines are faint or not printing as expected. You create a rule that applies a border color or subtle fill to the cells, enhancing the printed appearance without altering your worksheet content.
- Select the range of cells you want to print with enhanced gridlines. This can be your entire worksheet or a specific area.
- Go to the Format menu and choose Conditional Formatting. A dialog box will appear.
- In the dialog, set the rule type to “Classic” or “Use a formula to determine which cells to format”, depending on your Excel version.
- Enter a formula that always returns TRUE, such as =TRUE, to apply the formatting to all selected cells.
- Click Format and navigate to the Border tab. Choose a thin line style, preferably light gray or black, and apply borders to all four edges.
- Confirm the settings and close the dialog. You should see borders appear around the selected cells on screen.
- Use Print Preview to check how these conditional borders look when printed. They should clearly mimic gridlines, improving visibility on paper.
- Print a test page to verify that the conditional formatting borders print as expected, providing a consistent gridline appearance even if default gridlines fail to print.
This approach gives you control over gridline appearance and can be customized with different colors or shading to suit your document style.
How to troubleshoot if Excel is not printing gridlines on Mac
When Excel on Mac does not print gridlines as expected, it usually stems from overlooked settings or printer-related issues. Begin by confirming that the "Print" option for gridlines is activated in both the Page Layout tab under Sheet Options and the Page Setup dialog's Sheet tab. Sometimes gridlines appear on screen but are disabled for printing in one of these places.
Next, check if the cells have any fill color applied. Even a white fill color can hide gridlines in print. Removing or setting the fill to "No Fill" often restores visible gridlines. Additionally, outdated or incompatible printer drivers can cause printing anomalies, so verify your printer settings and update drivers if necessary.
If these steps don’t resolve the problem, restart Excel and your Mac to clear any temporary glitches affecting printing. To isolate whether the issue is with the printer hardware, try printing the spreadsheet to a PDF file. If gridlines show correctly in the PDF, the printer or its settings may be the cause.
- Open your spreadsheet and go to the Page Layout tab; ensure the Print checkbox under Gridlines is checked. You should see gridlines in the print preview if successful.
- Open File > Page Setup, navigate to the Sheet tab, and confirm that Gridlines is selected. Check print preview again for gridline visibility.
- Select all cells (Cmd+A), then go to the Home tab, open the fill color menu, and choose No Fill. Gridlines should become visible in print preview.
- Check your printer driver by opening System Preferences > Printers & Scanners and updating or reinstalling the printer if needed.
- Close Excel and restart your Mac, then reopen the file and check if gridlines print correctly.
- Print the spreadsheet to PDF by choosing File > Print, then selecting Save as PDF. If gridlines appear in the PDF but not on paper, the issue likely lies with the printer.
How to print on Excel with gridlines for Mac when using multiple sheets or large ranges
When printing multiple sheets or large ranges in Excel on your Mac, ensuring gridlines appear consistently requires setting print areas for each worksheet. This controls which cells print and helps maintain gridline visibility across pages. Without defined print areas, Excel might print unwanted blank spaces or cut off parts of your data, causing gridlines to appear uneven or missing.
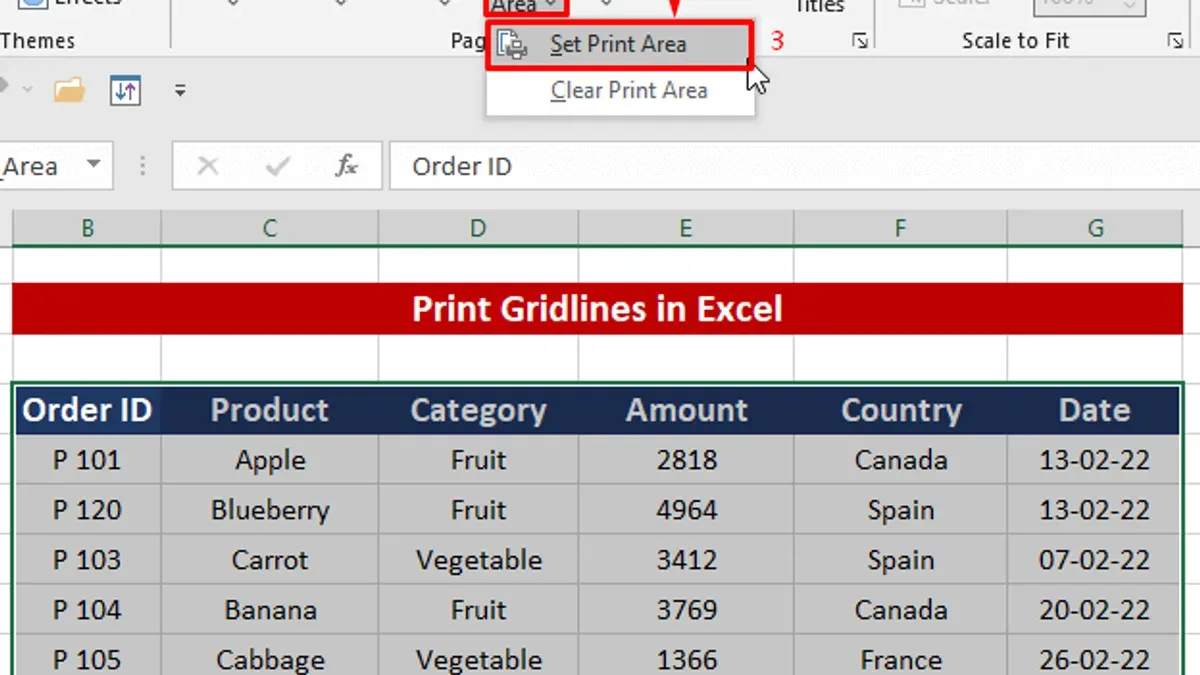
- Go to each worksheet you plan to print and select the range you want to include.
- Click Page Layout on the ribbon, then choose Print Area > Set Print Area. You should see a dotted line outlining your selected cells, confirming the print area.
- Switch to View > Page Break Preview to see how pages will be divided. Drag the blue page break lines as needed to adjust where pages split, ensuring gridlines are not broken awkwardly.
- Return to Page Layout and click Scale to Fit. Use the Width and Height drop-downs to fit your sheet on one page wide or tall if desired. This keeps gridlines aligned without scaling distortions.
- Repeat these steps for all sheets you want to print, confirming the Print Gridlines option remains enabled under each sheet's Page Setup > Sheet tab.
- When printing multiple sheets at once, select them by holding Command and clicking each tab. Use Print Preview to check that gridlines appear consistently across all pages and sheets.
For example, fitting a large sheet to one page wide but allowing multiple pages tall preserves horizontal gridline alignment, avoiding faded or missing lines between pages. Conversely, printing without scaling can cause gridlines to break mid-cell if page breaks aren’t adjusted. Managing print areas and page breaks carefully ensures your printed spreadsheets maintain a professional, clear gridline appearance even across multiple sheets or large data ranges.
How to use Microsoft Excel to print gridlines with custom print settings on Mac
When you want professional print output in Excel on Mac, customizing print settings while keeping gridlines visible is key. Start by accessing the Print dialog via File > Print or pressing Command + P. Here, you’ll find advanced options to tailor margins, headers, and footers without losing gridlines.
- Click Show Details at the bottom of the Print dialog to reveal all available settings. You should now see margins, header/footer, and scaling options.
- Adjust the Margins to create balanced white space around your spreadsheet. You’ll see the preview update, confirming your changes keep gridlines intact.
- Within Headers & Footers, add custom text like page numbers or document titles. These appear outside the gridline area, so gridlines remain clear and uninterrupted.
- Set Print Titles from the Page Setup button, selecting rows or columns to repeat on every printed page. This works seamlessly with gridlines, maintaining consistent structure across pages.
- Review your print preview to ensure gridlines appear crisp alongside your custom headers, footers, and margins. If gridlines look faint or inconsistent, consider exporting your sheet as a PDF via File > Save As or Export and print from the PDF to preserve quality.
Excel’s gridline printing can sometimes be limited by printer capabilities or scaling, making PDF export a reliable alternative for sharp, professional results. Using these custom print settings lets you combine the clarity of gridlines with tailored page elements for a polished printout.
Frequently asked questions
How to print grid lines in excel mac?
To print gridlines in Excel on Mac, first go to the Page Layout tab and check the "Print" box under the "Gridlines" section. Then, verify this in the Print Preview to ensure gridlines appear. If they don’t show, use the Page Setup dialog’s Sheet tab to enable gridlines for printing.
How to print gridlines on excel?
In Excel, gridlines won’t print by default. You need to enable printing by going to the Page Layout tab and ticking the "Print" checkbox under Gridlines. Always check the Print Preview before printing to confirm gridlines are visible on your document.
How to print gridlines in excel for mac?
On Mac, open your Excel file and select the worksheet. Navigate to the Page Layout tab and ensure the "Print" option is checked in the Gridlines group. If gridlines still don’t print, open File > Page Setup > Sheet tab and select "Gridlines" under Print options.
How do i print gridlines in excel for mac?
You print gridlines by selecting the worksheet, going to the Page Layout tab, and checking the "Print" box in the Gridlines section. If needed, adjust settings under File > Page Setup > Sheet to confirm gridlines are enabled for printing. Preview your printout to verify.
How do I print gridlines in Excel for Mac?
Start by selecting the worksheet and clicking the Page Layout tab. Look for the Gridlines group and check the "Print" box. Additionally, in File > Page Setup > Sheet, make sure "Gridlines" is selected. This combination ensures gridlines appear on your printed pages.
What This Guide Does Not Cover
This guide does not cover Excel for iPad or iPhone, which have different interfaces and printing capabilities that may limit gridline printing options. Additionally, gridline printing depends heavily on your printer drivers and settings, which can vary and sometimes override Excel’s print options despite correct setup within the application. If you require exact control over the line thickness or style of gridlines, Excel’s default gridlines may not meet your needs. In those cases, manually adding cell borders is a more reliable method, though it involves extra setup time and attention to detail.
For the best results, ensure you are using Microsoft Excel for Mac with the latest updates and check your printer preferences for any conflicting settings. If you frequently print spreadsheets with complex formatting or multiple sheets, consider creating custom print areas and reviewing print previews carefully to avoid surprises.
The most useful next step is to open your Excel spreadsheet, go to the Page Layout tab, and confirm that the Print Gridlines checkbox is selected under the Sheet Options group. This simple setting often solves the common problem of missing gridlines when printing from Excel on Mac.
See also: How to Freeze Panes in Excel on Mac: Step-by-Step Guide · How to Remove Duplicates in Excel on Mac: Step-by-Step Guide · How to Fix Excel Formulas Not Updating Automatically on Mac · How to Make a Dropdown List in Excel on Mac: Step-by-Step Guide