How to Make a Dropdown List in Excel on Mac: Step-by-Step Guide
This guide shows you how to make a dropdown list in Excel on Mac to streamline data entry and improve spreadsheet accuracy.
Imagine you're organizing a project tracker or inventory sheet in Excel on your Mac, and you want to ensure consistency while making data entry faster. Dropdown lists are a practical way to limit entries to predefined options, reducing errors and saving time.
This article explains how to make a dropdown list in Excel on Mac, guiding you through the differences in the Mac interface and showing you how to create both basic data validation lists and more advanced dropdowns using named ranges and macros. Whether you're new to Excel on Mac or looking to streamline your spreadsheets with dropdown menus, this step-by-step guide will help you build efficient and user-friendly lists.
Key takeaways
- Excel on Mac uses the Data tab's Data Validation feature to create basic dropdown lists.
- Named ranges simplify managing dropdown list sources and updating options.
- Macros can automate dropdown list creation for dynamic or complex needs.
- Troubleshooting common dropdown issues involves checking cell formats and validation settings.
- Customizing dropdown lists improves clarity and usability for data entry on Mac Excel.
Before you start: What you need to create a dropdown list in Excel on Mac
To create a dropdown list in Excel on Mac, first verify that your Excel version supports data validation features. Most recent versions, including Microsoft 365 and Excel 2019 for Mac, have full support. If you are using an older version, some data validation options may be limited or unavailable.
Next, prepare the list of options you want in your dropdown. You can either type these options directly as a comma-separated list within the data validation settings or set up a range of cells that contain the list items. Using a range for your list is ideal if you expect to update the options frequently, as it allows for dynamic changes without adjusting the validation each time.
It’s also important to understand the difference between static dropdown lists and dynamic or macro-driven lists. Static lists use fixed values, while dynamic lists can change based on formulas or macros, offering more flexibility but requiring additional setup and familiarity with Excel macros.
Finally, decide exactly where you want the dropdown list to appear in your worksheet. This could be a single cell, a range of cells, or even multiple locations. Knowing this in advance helps streamline the setup process and avoid redoing steps later.
How to make dropdown list on Excel
- Select the cell or range where you want the dropdown list to appear. When done correctly, the selected cells will be highlighted and ready to receive the dropdown.
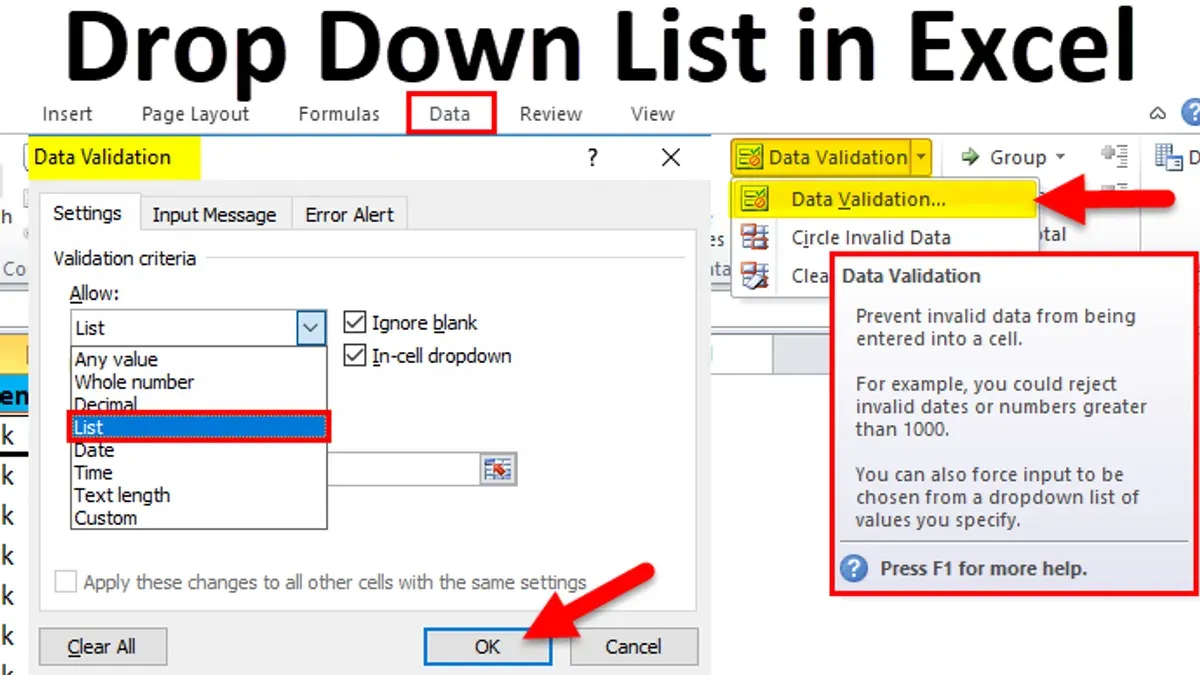
- Go to the Data tab on the Excel ribbon. Here, you will find the Data Validation option, usually represented by an icon labeled "Data Validation" or accessible via a dropdown arrow.
- Click on Data Validation. A dialog box will open. In the "Allow" dropdown menu within this box, choose List as the validation criterion. This setting enables you to define a specific list of acceptable entries.
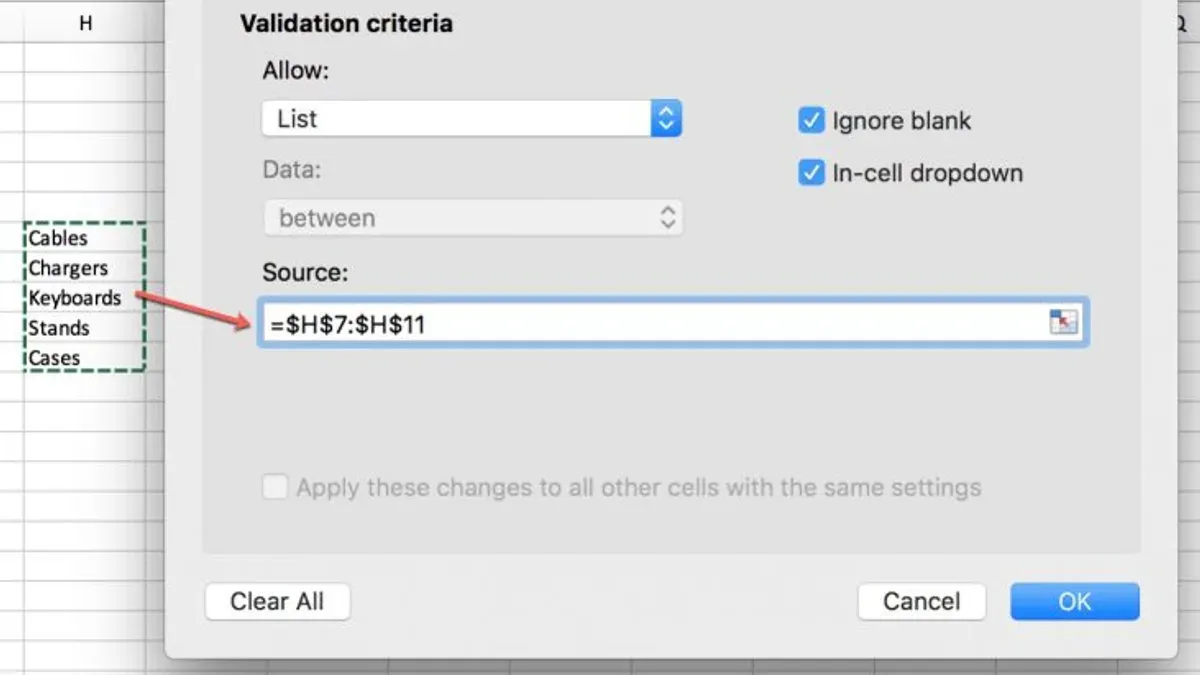
- Enter your list source. You can either type a series of comma-separated values directly into the "Source" field (for example, Apple, Banana, Cherry) or select a predefined cell range containing your list items by clicking the grid icon and highlighting those cells. When you use a cell range, any update to that range will reflect in your dropdown automatically.
- Confirm your settings by clicking "OK". The selected cells will now have a dropdown arrow on their right side.
- Test your dropdown list by clicking the arrow in one of the targeted cells. You should see all the list options appear, ready for selection. If the dropdown does not appear or behaves unexpectedly, check that the list source is correct and the Data Validation settings are properly applied.
Following these steps creates a basic dropdown list that helps control user input efficiently. The dropdown arrow appears only when the cell is selected, keeping your spreadsheet clean and user-friendly. This method works consistently on Excel for Mac, though the exact location of the Data Validation button may vary slightly depending on your ribbon customization.
How to create dropdown list on Excel on Mac
Creating a dropdown list in Excel on Mac involves navigating a slightly different interface compared to Windows. The Data Validation dialog, essential for dropdown creation, can be accessed via the Data tab on the ribbon, but the layout and shortcut keys differ. Unlike Windows, the Mac version does not support the Alt + D, L shortcut. Instead, you can use Control + Command + D to open the Data Validation dialog, or access it manually through Data > Validation from the menu bar.
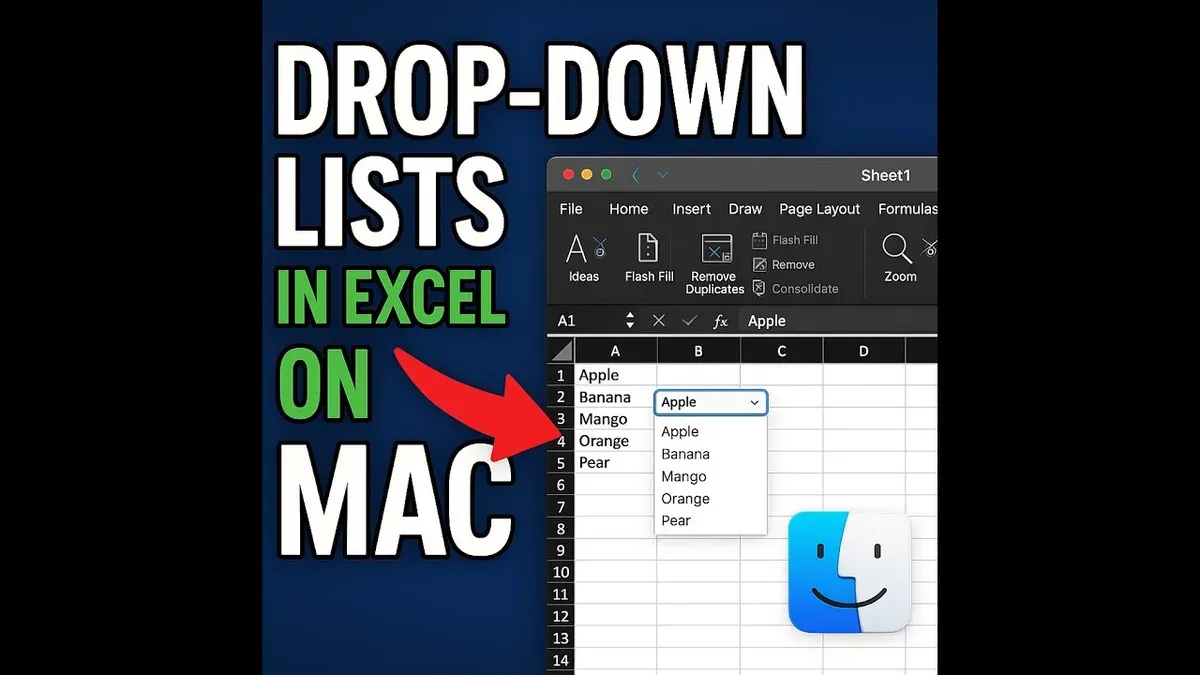
- Select the cell or range where you want the dropdown list. Once selected, proceed to Step 2.
- Open the Data Validation dialog by pressing Control + Command + D or navigating through Data > Validation on the menu bar. You should see the Data Validation window appear with the Settings tab active.
- In the Settings tab, click the Allow dropdown and select List. This change enables the input box for the source list.
- Enter the source values for your dropdown, either as a comma-separated list or by referencing a named range. If using a named range, Mac Excel allows you to create and manage these via the Formulas > Name Manager menu, which is similar to Windows but with a different dialog layout.
- Click OK to apply the dropdown list. Your selected cells will now display the dropdown arrow when active.
Note that the Data Validation dialog on Mac sometimes lacks certain Windows features, like direct shortcut keys for selecting list types or quick access to error alerts. Also, dialog controls may appear slightly rearranged, so it helps to familiarize yourself with the Mac layout. Naming ranges on Mac is straightforward but requires opening the Name Manager from the Formulas ribbon tab rather than a dedicated shortcut key. This approach improves list management and referencing for your dropdown lists.
How to make a drop down list in Excel on Mac using a named range
Named ranges in Excel are user-defined labels for a specific range of cells. Using named ranges for dropdown lists makes managing and updating your options easier because you only need to change the range content without adjusting the dropdown settings. This approach is especially useful for dynamic lists that might grow or shrink over time.
- Select the cells containing the items you want in your dropdown list. For example, select cells A1 to A5 if your list items are in those cells. You should see the cells highlighted.
- Go to the menu bar and click Insert, then select Named Range... from the dropdown. A sidebar or dialog box labeled “Named Ranges” will appear.
- In the Named Range field, type a meaningful name for your range, such as FruitList. Ensure the cell range displayed matches your selection (e.g., A1:A5). Click Done. The named range is now saved.
- Select the cell or cells where you want the dropdown list to appear.
- Click the Data tab on the ribbon, then choose Data Validation.
- In the Data Validation dialog, set the criteria to List.
- In the source input box, type an equals sign followed by the named range you created, for example,
=FruitList. This tells Excel to use your named range as the list source. - Click OK. Your dropdown list now displays the items from the named range.
The key benefit of using named ranges is that if you add or remove items within the named range cells, the dropdown list automatically updates without needing to revisit the Data Validation settings. This setup improves scalability and maintenance, especially in larger spreadsheets where dropdown options might change frequently.
How to create a macro drop down list in Excel
Using macros to create dropdown lists in Excel on Mac is ideal when you need dynamic content or complex validation rules that standard data validation cannot handle. Macros enable you to programmatically control the dropdown options, update them based on other data, or add conditions that change the list content automatically.
To get started, you first need to enable the Developer tab on your Mac Excel ribbon. Go to Excel > Preferences > Ribbon & Toolbar, then check Developer under the Main Tabs section. This gives you access to VBA tools to write and run macros.
Here is a simple VBA macro example that populates a dropdown list in cell A1 with three options: "Apple", "Banana", and "Cherry". This macro sets a data validation list dynamically:
Sub CreateDropdown()
  Dim rng As Range
  Set rng = ThisWorkbook.Sheets(1).Range("A1")
  With rng.Validation.Delete.Add Type:=xlValidateList, AlertStyle:=xlValidAlertStop, Operator:= _
         xlBetween, Formula1:="Apple,Banana,Cherry".IgnoreBlank = True.InCellDropdown = True.ShowInput = True.ShowError = True
  End With
End Sub
To run this macro:
- Open the VBA editor by clicking Developer > Visual Basic.
- Insert a new module via Insert > Module.
- Paste the macro code into the module window.
- Close the editor and return to Excel.
- Run the macro from Developer > Macros, select CreateDropdown, then click Run.
After running, cell A1 will have a dropdown with the three fruit options.
Macros can be edited anytime to modify the list or add more complex logic, such as pulling options from a range or based on other cell values. Always save your workbook as a macro-enabled file (.xlsm) to retain macros. Also, enable macro permissions in Excel preferences under Security to run macros safely on Mac.
How to troubleshoot dropdown list issues in Excel on Mac
Dropdown lists in Excel on Mac can occasionally encounter problems such as not showing up, being greyed out, or source lists not updating. These issues often stem from data validation settings, named range errors, or compatibility hiccups. Identifying the exact cause helps you apply the correct fix quickly.
- Dropdown list not showing or greyed out: Check if the worksheet or workbook is protected. Go to Review > Protect Sheet or Protect Workbook and unprotect if needed. When successful, the dropdown arrow should reappear and be clickable.
- Source list not updating in the dropdown: If using a named range, confirm it includes all intended cells. Navigate to Formulas > Name Manager, select the named range, and adjust the cell range if necessary. After updating, your dropdown will reflect the new list items.
- Error messages on invalid data entry: Excel displays messages like “The value you entered is not valid.” To customize or disable these, select the cell, open Data > Data Validation, and modify the Error Alert tab settings. This controls the warning users see when entering incorrect data.
- Issues with macro-enabled dropdowns: Ensure macros are enabled in Excel > Preferences > Security & Privacy. If macros are disabled, dropdowns relying on VBA won’t function. Enable macros and restart Excel to apply changes.
- Compatibility problems between Excel versions on Mac: Features like dynamic arrays or certain VBA commands may not work uniformly across versions. Verify your Excel update status via Help > Check for Updates and consider saving files in.xlsm format for macro compatibility.
Following these troubleshooting steps should resolve most dropdown list problems on Excel for Mac, allowing your data validation tools to work smoothly and efficiently.
How to customize dropdown lists for better user experience on Mac Excel
Improving dropdown lists goes beyond just creating them. Adding input messages and error alerts helps guide users when entering data, reducing mistakes. You can also format dropdown cells to make them visually distinct, drawing attention to required fields. For more advanced usability, dependent dropdown lists let you create cascading menus based on previous selections, although customization options in Mac Excel have some limits compared to Windows.
Adding Input Messages and Error Alerts
- Select the cell with the dropdown list. You should see the cell highlighted.
- Go to the Data tab on the ribbon, then click Data Validation. The Data Validation dialog box appears.
- Click the Input Message tab, check Show input message when cell is selected, then enter a title and message that instruct users what to pick. For example, title: "Select Product", message: "Choose from available options only."
- Switch to the Error Alert tab, ensure Show error alert after invalid data is entered is checked, then choose Stop, Warning, or Information. Enter a clear error message, like "Invalid choice. Please select from the dropdown list."
- Click OK. Now, when users select the cell, your message appears, and invalid entries trigger alerts.
Formatting Dropdown Cells
To make dropdown lists stand out, apply fill colors, borders, or font styles to the cells containing them. Select the cells, then use the Home tab to add a light fill color or bold font. This visual cue helps users easily identify where they need to choose from a list.
Using Dependent Dropdown Lists
Dependent dropdowns show options based on a previous selection, ideal for categories and subcategories. To set this up, first create named ranges for both main and dependent lists. For example, name a range "Fruits" containing apple, banana, orange, and another range "Vegetables" with carrot, broccoli, spinach.
- Create the first dropdown list (e.g., category) normally using Data Validation with your main categories.
- Select the cell for the dependent dropdown (e.g., specific items).
- Open Data Validation and choose List.
- In the source box, enter the formula =INDIRECT(A1) assuming A1 has the first dropdown’s choice. This formula pulls the named range matching the selected category.
- Click OK. Now the second dropdown adapts based on the first selection.
Note that Mac Excel's dropdown customization does not support changing dropdown arrow styles or adding icons. VBA solutions can help but require macro-enabled workbooks.
Frequently asked questions
How to do a drop down list in excel on mac?
To create a dropdown list in Excel on Mac, select the cell where you want the list, then go to the Data tab and click on Data Validation. In the Data Validation dialog, choose "List" from the Allow menu, and enter your list items separated by commas or refer to a range of cells. Confirm with OK, and your dropdown list will appear in the selected cell.
How to make a drop down menu in excel on mac?
Making a dropdown menu involves using the Data Validation feature. After selecting your cell, navigate to Data > Data Validation, select "List" under Allow, and specify your options either by typing them directly separated by commas or by selecting a named range or cell range containing the choices. This generates a dropdown menu for easy selection.
How to create a drop down list in excel on macbook?
On a MacBook, the process is the same as on other Macs. Highlight the target cell, go to the Data tab, click Data Validation, choose "List" in the Allow dropdown, and input your list values or range. Click OK to apply the dropdown list to the cell.
How do i make a drop down list in excel on mac?
You make a dropdown list by selecting the cell, opening Data Validation from the Data menu, choosing "List" in the Allow box, and entering your list items or referencing a range. Remember to separate multiple items with commas if typing manually. Once set, the cell will offer a dropdown for selection.
How do i create a drop down list in excel on mac?
Creating a dropdown list on Excel for Mac starts with selecting your target cells, then accessing Data Validation through the Data tab. Choose "List" under Allow, and either type your list items separated by commas or select a cell range containing the list. Confirming applies the dropdown functionality.
What This Guide Does Not Cover
This guide does not cover dropdown list creation in Excel for iPad or Excel Online, which have different interfaces and limitations that require separate instructions. The macro dropdown list section assumes you have a basic familiarity with Visual Basic for Applications (VBA) and that you are comfortable enabling macros; be aware that enabling macros from external sources can pose security risks. Additionally, dynamic dropdown lists that update automatically from external data sources involve more advanced configurations that are beyond the scope of this article.
For your next step, try creating a simple dropdown list using the Data Validation feature on your Mac Excel. Focus on selecting your list source carefully and naming your ranges clearly to avoid common errors. This foundation will make it easier to experiment later with named ranges and macros as your comfort with Excel on Mac grows.
See also: How to Freeze Panes in Excel on Mac: Step-by-Step Guide · How to Remove Duplicates in Excel on Mac: Step-by-Step Guide · How to Create a Macro in Excel on Mac: A Step-by-Step Guide · How to Use Data Analysis ToolPak in Excel on Mac: Step-by-Step Guide