How to Back Up to a Synology Drive Using Time Machine Step-by-Step
This guide shows how to back up your Mac to a Synology drive using Time Machine with easy step-by-step instructions.
You rely on your Mac every day, and protecting your data is essential. Setting up a reliable backup system can sometimes feel complicated, especially when combining Apple’s Time Machine with a Synology NAS drive.
This article guides you through how to back up to a Synology drive in Time Machine step-by-step. You’ll learn how to prepare your network, configure your Synology NAS correctly, and connect your Mac so backups run smoothly and securely.
Key takeaways
- Create a dedicated shared folder on your Synology NAS specifically for Time Machine backups.
- Enable Time Machine support in Synology’s Control Panel under File Services, selecting AFP or SMB with Time Machine compatibility.
- Map your Mac to the Synology shared folder using Finder’s Connect to Server feature with the SMB protocol.
- Set a storage quota on the shared folder to prevent backups from using excessive disk space.
- Check network settings and permissions if backups fail to start or complete successfully.
Before You Start: What You Need to Prepare
To ensure a smooth Time Machine backup to your Synology NAS, confirm you have all necessary hardware and software ready. Your Synology NAS should have sufficient free storage space and be running the latest DiskStation Manager (DSM) firmware for compatibility and security. Compatible models include popular series like DS220+, DS920+, and others supporting SMB protocol and Time Machine features.
Your Mac needs to run a macOS version that supports Time Machine with network drives, such as macOS Catalina or later. Time Machine must be enabled on your Mac before you proceed. A stable local network is crucial—ideally, connect both your Mac and Synology NAS to the same router via Ethernet for faster, more reliable backups. Wi-Fi can work but may slow down the backup process.
You will also need a user account on your Synology NAS with permissions to create and access shared folders. Familiarity with basic network settings and the Synology Control Panel will help you navigate these steps efficiently. Minimum recommended network speeds for effective backups are 100 Mbps or higher on Ethernet.
- Check your Synology NAS storage capacity and update DSM firmware via Control Panel > Update & Restore. You should see a confirmation that your system is up to date.
- Verify your Mac’s macOS version under Apple menu > About This Mac. Confirm Time Machine is enabled under System Preferences > Time Machine.
- Ensure your Mac and NAS are connected to the same network, preferably via Ethernet. Test connectivity by pinging your NAS IP address from your Mac Terminal.
- Log into your Synology NAS and confirm your user account has permissions to manage shared folders via Control Panel > User > Edit Permissions. You should see access rights set for shared folders.
Create a Shared Folder on Your Synology for Time Machine Backups
To start backing up your Mac using Time Machine, you first need to create a dedicated shared folder on your Synology NAS. This folder will house all your backup data and should be configured to optimize compatibility and security.
- Log in to your Synology DiskStation Manager (DSM) and open the Control Panel.
- Navigate to Shared Folder and click Create to start a new shared folder setup.
- Name the folder clearly, for example, TimeMachineBackups, to easily identify it later.
- Set the location on your NAS volume where you want the backups stored, then click Next.
- Configure permissions by assigning read/write access to the user account you will use from your Mac. This ensures your Mac can write backups to the folder.
- Proceed to the Advanced settings and enable Enable Mac file service (AFP) or ensure SMB is enabled with Time Machine support checked, depending on your DSM version. This allows Time Machine to recognize and connect to the folder.
- Set a quota limit for the shared folder to avoid it consuming all available NAS storage. A typical quota might be 500 GB to 1 TB, depending on your Mac’s storage size and backup needs.
- Finish the wizard and verify the shared folder appears in your list with correct permissions and quota.
With this shared folder ready and properly configured, your Synology NAS will be prepared to receive Time Machine backups securely and efficiently.
Enable Time Machine Support on Synology NAS
To allow your Mac to recognize your Synology NAS as a Time Machine backup destination, you need to enable specific file services and assign the correct shared folder. Synology supports both AFP (Apple Filing Protocol) and SMB (Server Message Block) for Time Machine backups. AFP is the traditional protocol favored for compatibility, but SMB offers better performance and is recommended by Apple for newer macOS versions.
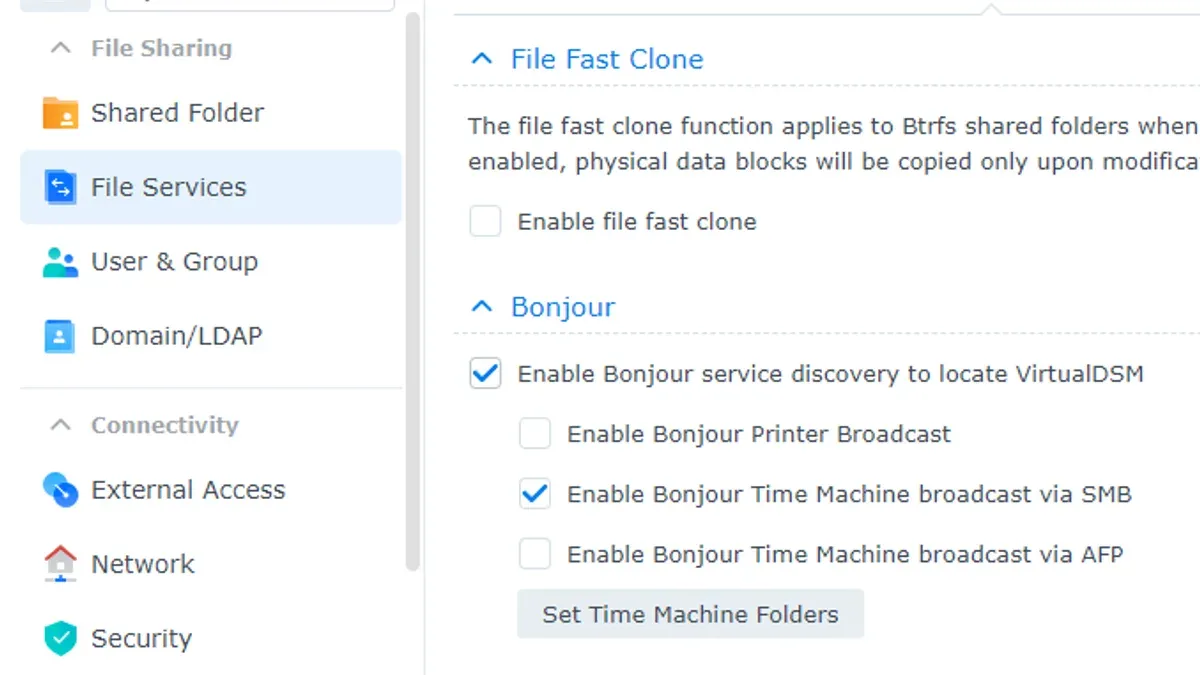
- Open Control Panel on your Synology NAS and navigate to File Services. You should see options for AFP and SMB protocols.
- Under the AFP tab, check Enable AFP service. This step ensures compatibility with older macOS versions. You should see the AFP status change to enabled.
- Switch to the SMB tab and check Enable SMB service. Then, click Advanced Settings and enable Time Machine support. This allows your NAS to be advertised correctly to your Mac over the network. Confirm that SMB is running.
- In the same File Services window, locate the Advanced tab and make sure Bonjour service is enabled for SMB. This broadcasts the NAS presence to your Mac, making it discoverable in Time Machine preferences.
- Assign the shared folder you created earlier as the dedicated Time Machine backup destination. You do this in the SMB settings by selecting the folder under the Time Machine section. Your Mac will now see this folder as the backup target.
- If you made changes, restart the file services or reboot the NAS to apply all settings. After restarting, your Mac should detect the Synology NAS as a valid Time Machine destination.
Choosing SMB is generally recommended for newer macOS versions due to improved speed and better integration, while AFP remains useful for legacy systems. Ensuring Bonjour service is active is a common step often missed but critical for seamless discovery on your Mac.
Connect Your Mac to the Synology Shared Folder
To ensure your Mac can communicate with the Synology NAS for Time Machine backups, you need to mount the shared folder. This confirms that the connection is established and that you have proper access rights.
- Open Finder on your Mac and select Go from the menu bar, then choose Connect to Server….
- In the Server Address field, enter the network path of your Synology shared folder using either smb:// or afp:// protocol. For example, smb://192.168.1.100/TimeMachineBackup or afp://DiskStation/TimeMachineBackup. Then click Connect.
- When prompted, enter your Synology NAS username and password that you set up earlier. Optionally, check Remember this password in my keychain for convenience. Click Connect.
- Your shared folder should mount as a network drive and appear in Finder’s sidebar under Locations. Verify you can open it and create a new folder or file to confirm write access.
- If you encounter errors such as “Could not connect to the server” or “Authentication failed,” first check your Mac’s firewall and the NAS firewall settings to ensure SMB/AFP traffic is allowed. Also, verify both devices are on the same local network and that network discovery is enabled on your Mac (under System Preferences > Network > Advanced > WINS).
Mounting the Synology shared folder successfully lets you proceed confidently to configure Time Machine backups using that location.
Set Up Time Machine to Use the Synology Drive
- Open System Settings on your Mac and click Time Machine. You should see the Time Machine preference pane open, ready to configure your backup disk.
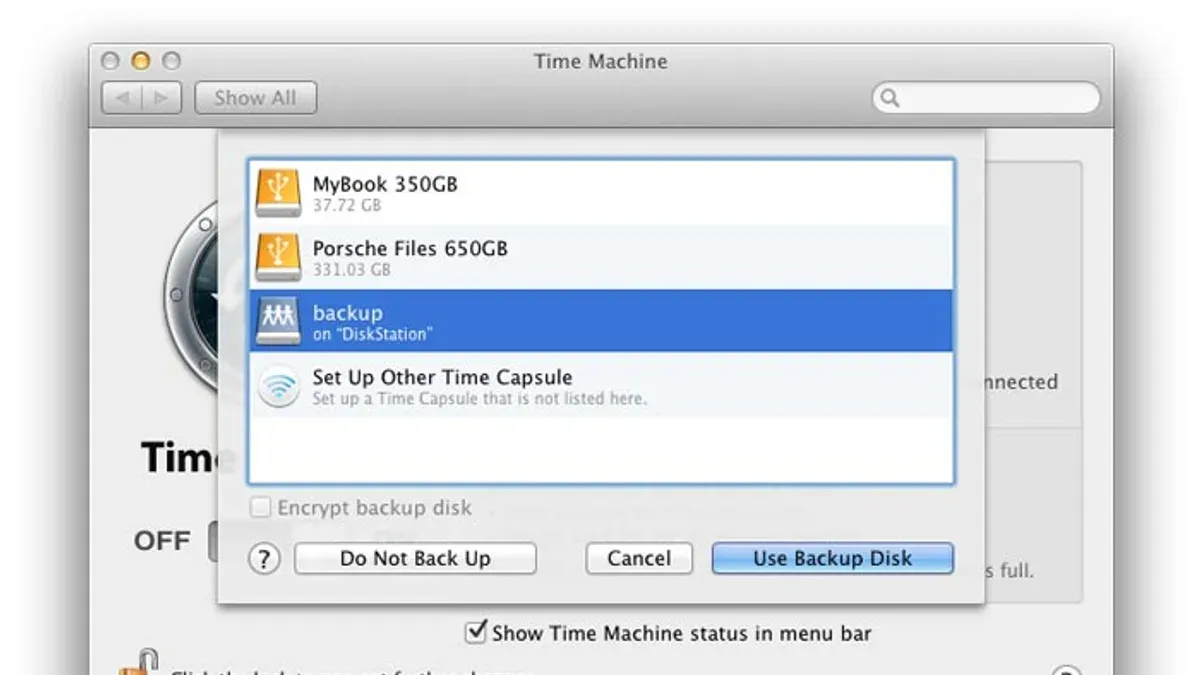
- Click Select Backup Disk… to open the disk selection window. Here, look for the Synology shared folder you previously connected to; it usually appears with the name you assigned to the shared folder.
- Select the Synology shared folder and click Use Disk. A prompt may appear asking you to enter your Synology NAS username and password. Enter the credentials with backup permissions and confirm.
- Once selected, ensure the option Back Up Automatically is enabled. Time Machine will now prepare to start the initial backup to your Synology NAS.
- Start the initial backup by clicking Back Up Now from the Time Machine menu or wait for the scheduled backup. The first backup size depends on your Mac’s used storage and may take from several minutes to hours, depending on your network speed.
- Monitor progress via the Time Machine icon in the menu bar; it shows estimated time remaining. Subsequent backups are incremental, meaning Time Machine only copies changed or new files, speeding up the process.
Manage Backup Storage and Quotas on Synology
To prevent your Synology NAS from filling up due to Time Machine backups, setting user quotas on the shared folder is essential. Navigate to Control Panel > User > Edit the user account used for backups > Quota tab. Here, you can specify a maximum storage limit, such as 200 GB, for the backup user. This ensures your backups do not exceed the allocated space and affect other NAS functions.
Monitoring available storage regularly is also important. Check Storage Manager > Overview to see free space and usage trends. Time Machine automatically manages backup deletion by removing the oldest backups when the quota is reached, but manual oversight helps avoid surprises.
To stay informed, enable notifications for low disk space. Go to Control Panel > Notification > Email or Push Service, then activate Disk Space notifications. You will receive alerts before storage runs critically low, allowing timely action to expand or clean up storage.
Troubleshoot Common Time Machine Backup Issues with Synology
If Time Machine does not detect your Synology drive, first check that your Mac and NAS are on the same network and that AFP or SMB services with Time Machine support are enabled in Synology DSM. You might see the error message “No backup disks found.” Restart your router and NAS if needed, then reconnect via Finder’s Connect to Server (⌘K) using smb:// or afp:// followed by your NAS IP address.
When backups are stuck or slow, verify your network speed and NAS performance. Time Machine may display “Preparing backup” for a long time or progress bars may freeze. Ensure your NAS CPU usage is low via Resource Monitor in DSM and avoid heavy network traffic. Using a wired Ethernet connection often improves speed and reliability.
Authentication failures showing “The username or password is incorrect” require resetting your NAS user password and verifying permissions on the backup shared folder. In DSM, go to Control Panel > User > Edit permissions to confirm your user has read/write access to the Time Machine folder.
If backups become corrupted and Time Machine reports “Backup disk image is damaged,” safely delete the existing backup by removing the.sparsebundle file on the NAS shared folder through File Station. Then set up a new Time Machine backup from scratch to avoid data loss.
After Synology DSM updates, backup compatibility issues may arise. Check Synology’s release notes for known issues and update your Mac’s software if needed. If problems persist, contact Synology Support with error logs and system details for specialized assistance.
Frequently asked questions
Can I use SMB instead of AFP for Time Machine backups on Synology?
Yes, you can use SMB for Time Machine backups on Synology NAS. Since macOS Big Sur and later, Apple recommends using SMB instead of AFP. In Synology DSM, enable SMB support under Control Panel > File Services > SMB/AFP/NFS, then tick "Enable SMB service" and check "Enable SMB Time Machine" for the shared folder used for backups.
How do I increase the storage quota for my Time Machine backup on Synology?
To increase the storage quota, open Synology DSM and go to Control Panel > Shared Folder. Select your Time Machine backup folder, then click "Edit" and go to the "Quota" tab. Here you can adjust the maximum size allocated for backups. Make sure the quota is large enough to accommodate multiple versions of backups but balanced with overall NAS storage availability.
What should I do if Time Machine backups to Synology keep failing?
If backups fail frequently, first check your network stability and ensure your Mac and Synology are on the same reliable network. Verify that SMB or AFP services are properly enabled and that the shared folder permissions allow your Mac to write backups. Also, check for any DSM updates, restart the NAS and your Mac, and consider deleting the existing backup image to start fresh if corruption is suspected.
Is it safe to use Time Machine over Wi-Fi to a Synology NAS?
Using Time Machine over Wi-Fi is generally safe but can be slower and less reliable than a wired connection. For large initial backups or frequent large file changes, a wired Ethernet connection reduces the chance of interruptions. If you use Wi-Fi, ensure your router provides a stable and strong signal to minimize backup failures.
What This Guide Does Not Cover
This guide focuses on setting up Time Machine backups on a Synology NAS for typical home or small office environments. It does not cover complex Synology RAID configurations, advanced network setups, or enterprise-level backup solutions. If your setup involves multiple NAS units, business-grade redundancy, or custom scripting for backups, you should consult official Synology documentation or reach out to Synology support for tailored assistance.
Also, this guide assumes you have administrative access to your Synology device and a stable local network. Users without these prerequisites or those requiring encrypted backups beyond Time Machine’s standard encryption should consider professional consultation.
Next Step: Regularly Monitor Your Backup Status and Storage Usage
After completing your Time Machine setup, make it a habit to check the backup status on your Mac’s Time Machine preferences and monitor storage quotas on your Synology NAS. This practice helps catch issues early, such as failed backups or storage nearing capacity, preventing data loss. You can find storage management under Control Panel > Shared Folder > Edit > Quota on your Synology, and verify backup integrity by clicking the Time Machine icon on your Mac menu bar. Staying proactive ensures your backups remain reliable and your data secure.
See also: How to Browse and Access Old Backups in Time Machine Easily · How to Move Your Time Machine Backups to a New Drive Safely · How to Use Two Backup Drives in Time Machine for Reliable Mac Backup · How to Restore an Entire Mac Using Time Machine: Step-by-Step Guide