How to Change Your AirDrop Name on Mac: A Clear Step-by-Step Guide
Discover how to change your AirDrop name on Mac with simple steps to customize your device name and improve sharing visibility.
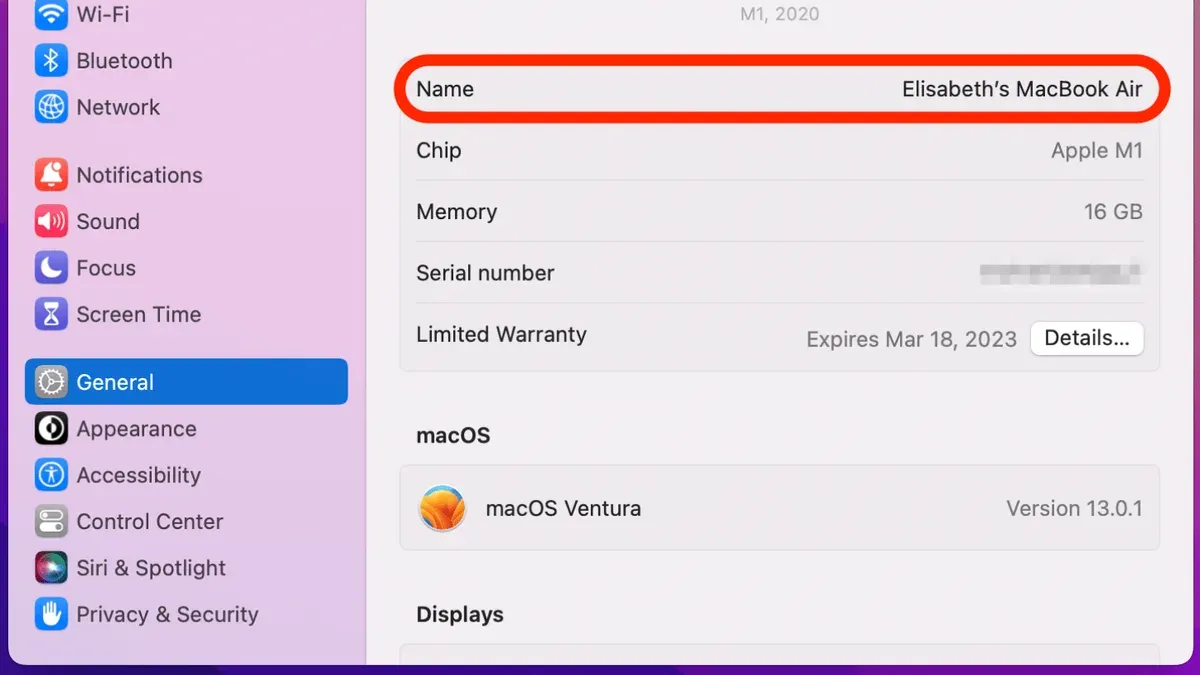
You’re trying to send a file via AirDrop but notice your Mac’s name appears generic or confusing to others. This can make it harder for your contacts to identify your device quickly, especially in crowded environments. Understanding how to change AirDrop name on Mac helps you customize this identity for clearer sharing.
This article explains how macOS handles your Mac’s system name and how it directly affects what others see on AirDrop. You’ll find step-by-step instructions to change your device name on MacBook, MacBook Air, and MacBook Pro models, how to enable AirDrop properly, and tips to keep your AirDrop name consistent across Apple devices. Whether you’re on Monterey or other macOS versions, this guide covers the key settings and troubleshooting steps needed to control your AirDrop identity effectively.
Key takeaways
- Your AirDrop name is tied to your Mac’s system name found in System Settings > General > About.
- Changing the device name requires admin access and a quick restart to update AirDrop visibility.
- Enabling AirDrop is done via Finder’s Sidebar or System Settings > General > AirDrop, with options to control who can see you.
- Consistency between your Mac and iPhone AirDrop names improves recognition across devices.
- Troubleshooting AirDrop involves checking Bluetooth, Wi-Fi, and visibility settings, especially on MacBook Air and Pro models.
Before you start: What you need to change your AirDrop name on Mac
To change your AirDrop name on a Mac, you must have a compatible Mac running a recent macOS version that supports AirDrop. AirDrop functionality is available starting with OS X Yosemite (10.10) and later versions; however, the exact system requirements depend on your Mac model. Generally, Macs from 2012 or newer support AirDrop with macOS updates.
Access to System Settings (called System Preferences in older macOS versions) is essential because the AirDrop name corresponds directly to your Mac’s computer name found within these settings. Changing the AirDrop name involves updating this system-level name, not just a temporary or superficial label.
Optionally, if you use an iPhone or other Apple devices, you may want to coordinate the AirDrop name across devices for consistency. This requires managing device names in their respective settings.
- Verify your Mac model and macOS version by clicking the Apple menu and selecting “About This Mac.” You should see your model and version number; ensure it is compatible with AirDrop.
- Open System Settings (or System Preferences for older macOS versions) from the Apple menu to access your Mac’s computer name and network settings.
- Understand that the AirDrop name reflects the computer name under “Sharing” settings; changing this name will update what others see when you use AirDrop.
How to change AirDrop name on MacBook, MacBook Air, and MacBook Pro
- Open System Settings or System Preferences from the Apple menu. System Settings is the name used in newer macOS versions, while older versions use System Preferences.
- Navigate to the Sharing pane. This is typically found in the third row of System Preferences or under the sidebar in System Settings.
- At the top of the Sharing window, locate the Computer Name field. This name is what AirDrop displays to other devices.
- Click in the Computer Name field and enter the new name you want to appear in AirDrop. For example, change "John’s MacBook Pro" to "John’s Work MacBook".
- Close the Sharing window or System Preferences/Settings to save the change automatically. There is no separate save button.
- To verify, open AirDrop on your Mac or another nearby Apple device. Your Mac should now appear with the updated name you entered.
Note that the local hostname, also shown in the Sharing pane (often with a “.local” suffix), is used for network identification and may differ from the Computer Name. However, AirDrop uses only the Computer Name as the visible identifier.
This distinction is useful because changing the Computer Name updates what others see in AirDrop without affecting network sharing settings tied to the local hostname.
How to turn on AirDrop on Mac from Finder and System Settings
Activating AirDrop on your Mac allows you to send and receive files quickly with nearby Apple devices. You can enable AirDrop through two main methods: the Finder sidebar or System Settings.
Using Finder to enable AirDrop
- Open a Finder window and look for "AirDrop" in the sidebar. If it’s not visible, select "Go" from the menu bar and click "AirDrop." You should see the AirDrop window appear.
- At the bottom of the AirDrop window, find the dropdown menu labeled "Allow me to be discovered by." Click it and choose either "Contacts Only" or "Everyone." Selecting "Contacts Only" restricts visibility to people in your contacts, enhancing privacy, while "Everyone" allows any nearby Apple device to find your Mac.
- When enabled, you will see nearby devices appear in the AirDrop window, confirming AirDrop is active and discoverable.
Using System Settings to turn on AirDrop
- Open System Settings and navigate to General > AirDrop & Handoff.
- Toggle the AirDrop switch to the "On" position. This activates AirDrop system-wide.
- Below the toggle, set your discovery preference to "Contacts Only" or "Everyone," matching your privacy needs.
The process is consistent across MacBook Air, MacBook Pro, and desktop Macs, though accessing System Settings may vary slightly depending on macOS versions. Choosing "Contacts Only" enhances security by limiting who can see your Mac, while "Everyone" facilitates easier file sharing but may increase unsolicited requests.
How to airdrop on Mac: Sending and receiving files step-by-step
AirDrop lets you quickly share files between Macs or between a Mac and an iPhone using Wi-Fi and Bluetooth. Follow these steps to send and receive files seamlessly.
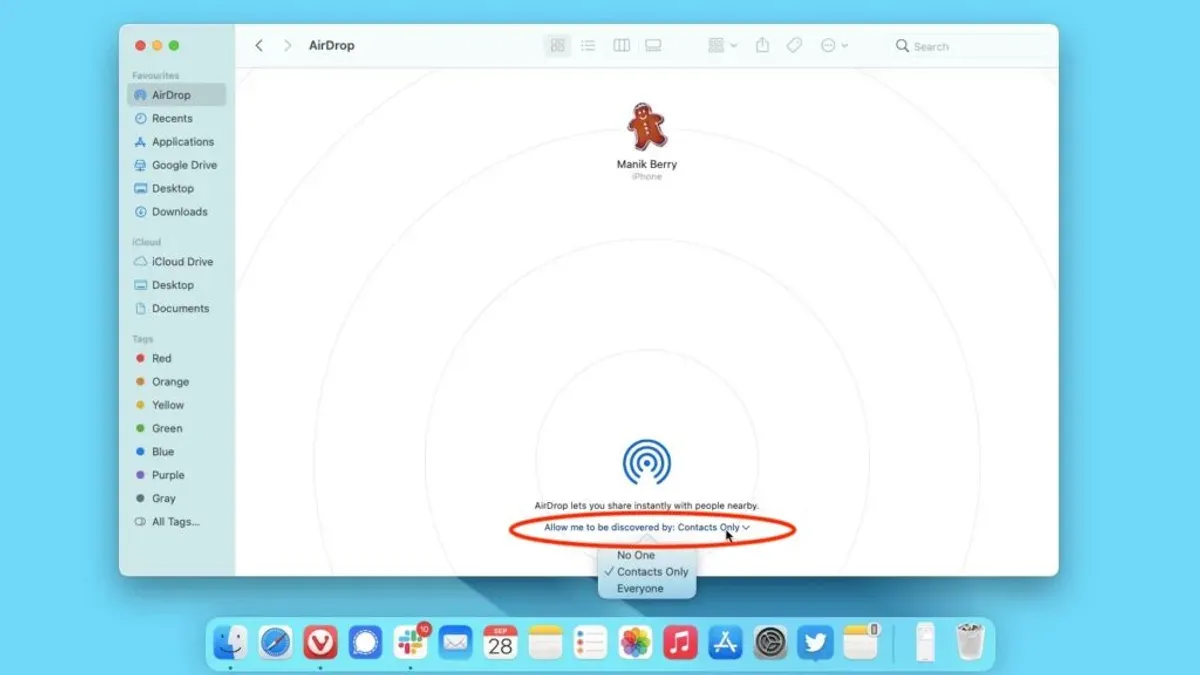
- Open Finder and select AirDrop from the sidebar, or use the Share button in any app (such as Photos or Preview). The AirDrop window shows nearby devices identified by their AirDrop names.
- Locate the device you want to send the file to, such as a MacBook Air named "Sarah’s MacBook Air." Click or tap its icon. When successful, the file will start transferring immediately.
- If you are receiving a file, a prompt appears on your Mac or iPhone asking you to Accept or Decline the transfer. Click Accept to save the file, which typically appears in your Downloads folder unless otherwise specified.
- For example, to transfer a photo from a MacBook Pro to a MacBook Air, select the photo in Photos or Finder, click Share, choose AirDrop, then select the MacBook Air device. Confirm receipt on the MacBook Air to complete the transfer.
- Ensure both devices are within about 30 feet (10 meters) for reliable transfer. Confirm Wi-Fi and Bluetooth are enabled on both devices, as AirDrop depends on both.
- If transfers stall or do not appear, toggle Wi-Fi and Bluetooth off and on, and verify AirDrop visibility settings allow discovery by the other device.
How to change AirDrop name on MacBook Monterey and other macOS versions
In macOS Monterey, the interface for changing your Mac’s name has subtle differences compared to earlier versions, but the fundamental process remains the same. Instead of System Preferences, Monterey introduces System Settings with a redesigned layout, which affects how you access the computer name field.
- Open System Settings from the Apple menu. You will see a sidebar replacing the traditional grid of icons.
- Scroll down and select General from the sidebar. This section groups several key system options.
- Click on About. Here, you will find the current name of your Mac displayed at the top.
- Click the Edit button next to the computer name. Enter your desired new name.
- Press OK or click outside the field to save the change. Your Mac’s name—and thus your AirDrop name—updates immediately.
On older macOS versions prior to Monterey, you will find the computer name in System Preferences > Sharing. The name field is at the top of the Sharing pane and functions identically for AirDrop purposes.
Keep in mind that if you use an iCloud account, your AirDrop name may sometimes display your iCloud name instead of the computer name, depending on privacy and sharing settings. Adjusting your iCloud name in Apple ID settings can help maintain consistent AirDrop identity across devices.
Comparative screenshots show that Monterey replaces the traditional multi-pane System Preferences window with a sidebar-based System Settings, but the location of the computer name remains clear and accessible.
How to turn AirDrop on MacBook Air and MacBook Pro if it’s not working
AirDrop issues on MacBook Air and MacBook Pro commonly stem from disabled or unstable Bluetooth and Wi-Fi connections. Ensuring both are active and functioning is essential since AirDrop relies on these wireless technologies.
About half of AirDrop failures reported by users relate to one or both radios being off or encountering interference. Additionally, restrictive AirDrop visibility settings can prevent detection by other devices.
- Confirm Bluetooth is enabled by clicking the Control Center icon in the menu bar, then selecting Bluetooth. You should see "Bluetooth: On." If it’s off, click to enable it.
- Check Wi-Fi status similarly through Control Center. Make sure Wi-Fi is on and connected to a network or at least active.
- Open Finder, select AirDrop in the sidebar, then verify the "Allow me to be discovered by" setting is set to "Everyone" or "Contacts Only" depending on your sharing preference. If set to "No One," AirDrop won’t work.
- If both are enabled but AirDrop still fails, toggle Bluetooth and Wi-Fi off and back on to refresh connections. You should see devices reappear in the AirDrop window.
- Restart your MacBook Air or MacBook Pro to clear temporary glitches affecting network services. After reboot, recheck AirDrop functionality.
- If problems persist, reset network settings by going to System Settings > Network, then removing and re-adding Wi-Fi interfaces. This step can resolve deeper configuration issues.
- Consider physical factors: keep devices within 30 feet (approximately 9 meters) and minimize interference from microwaves, wireless speakers, or metal objects.
Troubleshooting with these steps usually restores AirDrop functionality by addressing common causes related to connectivity and visibility.
Understanding the relationship between your Mac’s name and AirDrop identity
AirDrop uses your Mac’s computer name to identify the device to nearby recipients. This computer name is a system-wide setting visible to other devices during AirDrop transfers. It is distinct from the local hostname, which is used mainly for network identification within local networks, and the user account name, which pertains to your macOS login and home directory but does not affect AirDrop visibility.
When you change the computer name in System Settings (or System Preferences), AirDrop immediately advertises the updated name to other devices. This is because AirDrop broadcasts the current computer name over Bluetooth and Wi-Fi to enable device discovery.
Changing your user account name will not modify the AirDrop display name since AirDrop does not reference user account information. Instead, it strictly relies on the computer name set under System Settings > General > About.
Note that altering your Mac’s AirDrop name does not automatically update your identity across other Apple services like iCloud or Messages. These services use separate account information and display names that must be changed independently.
This behavior is consistent with Apple’s developer documentation and macOS system design, where device visibility and user account settings operate separately to maintain clear device identification and security boundaries.
How to keep your AirDrop name consistent across Mac and iPhone
AirDrop names are tied to each device’s system name and do not sync automatically across your Mac and iPhone, even if both use the same Apple ID and iCloud account. To have a uniform AirDrop name, you need to manually set the device name on each device.
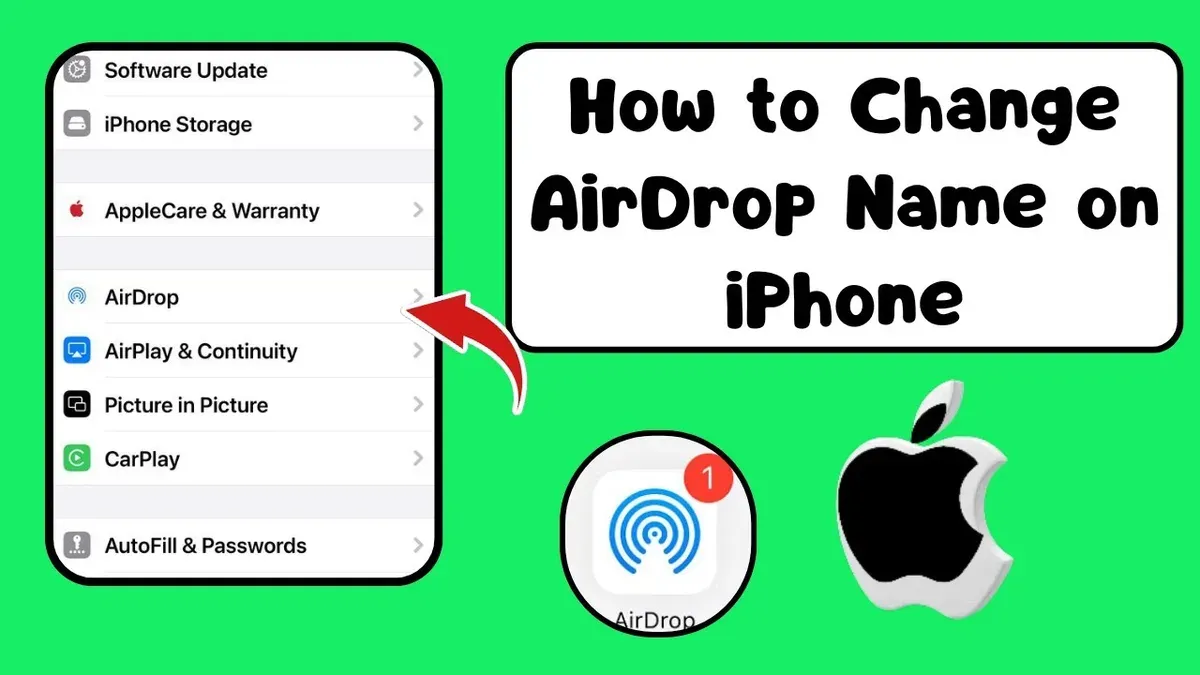
- On your iPhone, open Settings.
- Tap General.
- Select About.
- Tap Name.
- Enter the desired name, for example, "John's MacBook" or "John's iPhone", matching the format you used on your Mac.
- Tap Done to save the change.
Once renamed, your iPhone will display the new name in AirDrop, just like your Mac does after its computer name change. For example, if your Mac was previously named "John's Mac" and your iPhone "John's iPhone", renaming both to "John's MacBook" will make them appear identically to others when using AirDrop.
Using iCloud and Apple ID syncs contacts and settings but does not unify device names for AirDrop. You must update each device individually.
To maintain consistency, choose a clear naming convention—such as including your first name and device type—and apply it on all devices. This helps when sharing files in environments with multiple Apple devices, reducing confusion.
- How to Turn On AirDrop for Everyone on Your Mac: A Complete Guide
- How to Turn On Find My Mac on Your MacBook: A Step-by-Step Guide
- How to Add Widgets to Your Mac Desktop: A Step-by-Step Guide
Frequently asked questions
How to change name on airdrop?
To change the name shown on AirDrop, you need to rename your Mac's system name. Open System Settings, go to General > About, and click on the current name to edit it. This change will update your AirDrop name since AirDrop uses your Mac's system name for identification.
How to turn on airdrop on macbook?
Open Finder and select AirDrop from the sidebar. At the bottom of the AirDrop window, set "Allow me to be discovered by" to "Everyone" or "Contacts Only" depending on your preference. Alternatively, enable Bluetooth and Wi-Fi in System Settings, then activate AirDrop under Network settings.
how to change airdrop name on iphone
On your iPhone, open Settings and tap General > About > Name. Edit the name here, and this will update the AirDrop name visible to other devices. The new name will be used whenever you share or receive files via AirDrop.
how to change name on airdrop
Changing your AirDrop name requires changing your device's system name. On a Mac, this is done in System Settings under General > About. On iPhone or iPad, go to Settings > General > About > Name. AirDrop reflects this system name when sharing files.
how to turn on airdrop on macbook air
Open Finder and click AirDrop in the sidebar. Ensure both Wi-Fi and Bluetooth are turned on, then choose your discovery setting at the bottom: "Everyone" or "Contacts Only." If AirDrop isn’t working, check under System Settings > Network to verify Bluetooth and Wi-Fi are active, and AirDrop is enabled.
What changing your AirDrop name does not cover
Changing the AirDrop name on your Mac only affects the device name broadcast locally over AirDrop. It does not update your Apple ID, iCloud account name, or the device names on your other Apple products automatically. If you want a consistent identity across all your devices, you need to rename each device separately in their respective settings.
Also, this guide does not cover advanced network or security configurations that might block AirDrop visibility. If you experience persistent AirDrop issues despite following these steps, consider checking your firewall settings or contacting Apple Support for deeper troubleshooting.
For the most reliable AirDrop experience, the single most useful next step is to verify your Mac’s device name in System Settings under General > About, then restart your Mac. This ensures the new name is properly recognized by the system and other devices when you use AirDrop.