How to Use and Customize the 24 Hour Clock on Your Mac
Discover how to use the 24 hour clock on Mac, customize its settings, and sync your time format across devices for clear and precise timekeeping.
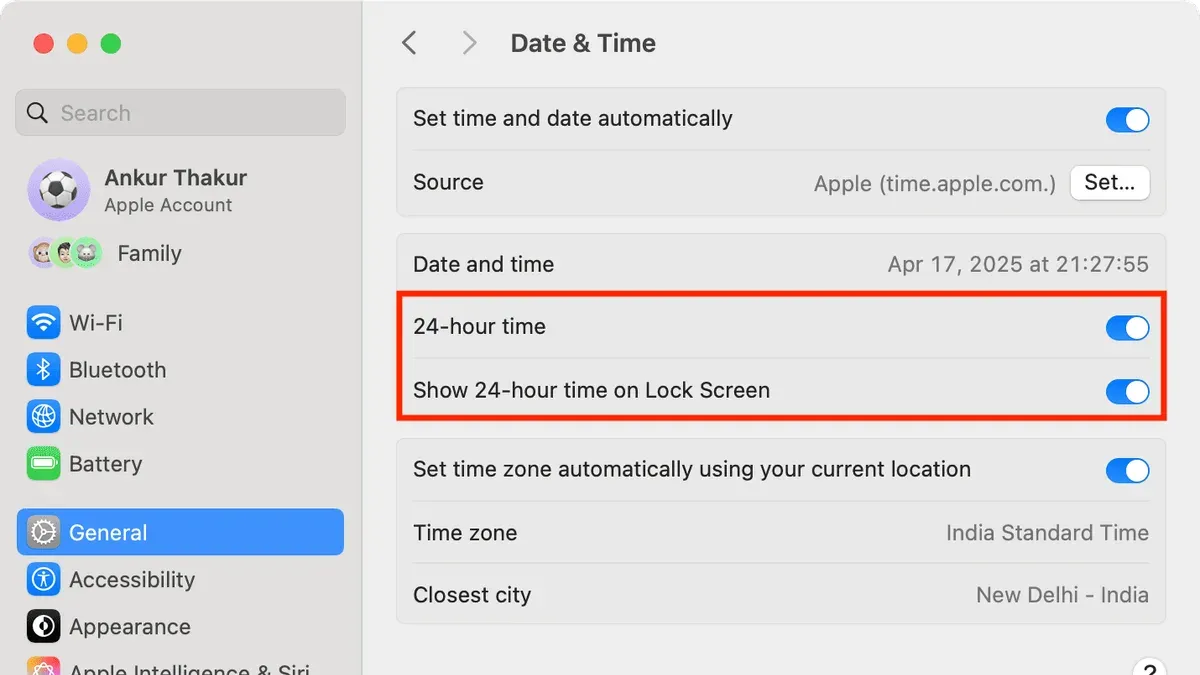
You glance at the menu bar on your Mac and realize the clock shows time in the familiar 12-hour format, but you prefer the clarity of a 24 hour clock. Switching to this format can help avoid confusion, especially if you work with international teams or military schedules.
This article explains how to use 24 hour clock on Mac, guiding you through setting it up, customizing additional options like seconds display, and understanding how it integrates with various apps. You’ll also find tips on reading the 24 hour clock and making sure your time settings stay consistent across different devices and platforms.
Key takeaways
- Change to 24 hour time via System Settings > General > Language & Region > Time Format.
- You can enable seconds display in the Clock preferences for more precise timekeeping.
- Understanding 24 hour time means reading hours from 00 to 23 instead of AM/PM.
- Customization options vary slightly depending on macOS version but remain accessible in System Settings.
- Sync time format settings across devices by adjusting region and time preferences consistently.
Before you start: What you need to know about the 24 hour clock on Mac
The 24 hour clock format displays time from 00:00 (midnight) to 23:59, unlike the 12 hour format which cycles from 12:00 AM to 11:59 PM. Setting this format on your Mac changes how time appears in system menus like the menu bar clock, notifications, and some native apps. However, it does not automatically apply to all third-party applications, which might have their own time settings.
To change the system time format, you need either administrator or user access to the System Settings (macOS Ventura and later) or System Preferences (earlier versions). This guide focuses on recent versions of macOS; if you use an older version, menu names or paths may differ slightly.
| 12 Hour Format | 24 Hour Format |
|---|---|
| 1:00 AM | 01:00 |
| 12:00 PM (noon) | 12:00 |
| 6:30 PM | 18:30 |
| 11:59 PM | 23:59 |
Keep in mind that the 24 hour clock setting is system-wide but some apps might not reflect the change immediately. For example, calendar or messaging apps may need their own preferences adjusted. The steps provided here are tested on macOS Ventura and Monterey; earlier versions like macOS Big Sur or Catalina may have slightly different interface elements.
How to set clock to 24 hour on Mac
Switching your Mac’s clock to a 24 hour format is straightforward and takes just a few steps within the system settings. The process slightly differs depending on whether you are using macOS Ventura or an earlier version.
- Open System Settings (Ventura and later) or System Preferences (earlier macOS versions). You can find this by clicking the Apple menu at the top left corner of your screen.
- In System Settings, scroll down and select Language & Region. In System Preferences, click on Language & Region directly from the main window.
- Locate the option labeled Use 24-hour clock. This checkbox controls whether your Mac displays time in the 24 hour format instead of the default 12 hour format.
- Click to enable Use 24-hour clock. Once checked, the change applies immediately.
- Check your Mac’s menu bar clock (top right of the screen). It should now display the time in 24 hour format. For example, instead of 2:45 PM, you’ll see 14:45.
If you don’t see the change instantly, try clicking the clock or restarting your Mac. Some versions of macOS may require a sign-out/sign-in or reboot for the setting to take full effect.
Keep in mind that while this changes the system clock, some third-party apps or widgets may have separate time display settings that need adjustment.
How to show seconds on Mac clock
By default, the Mac menu bar clock displays only hours and minutes. To see seconds alongside, you need to enable this feature in System Settings.
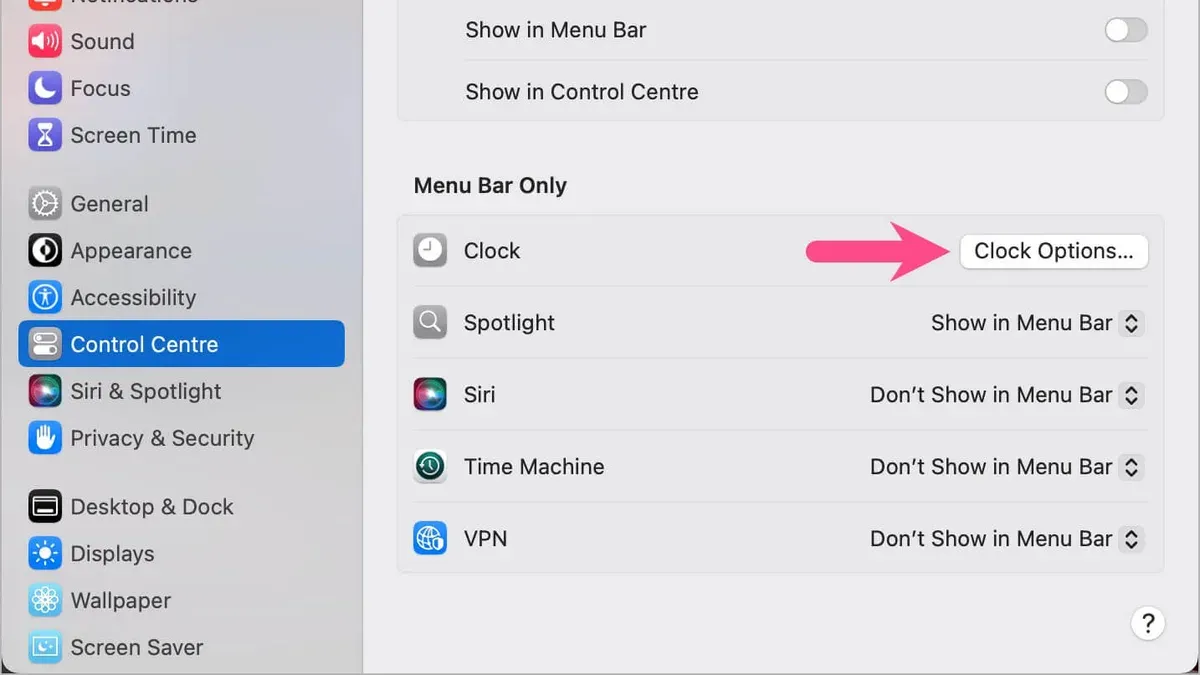
- Open System Settings from the Apple menu.
- Navigate to Dock & Menu Bar in the sidebar.
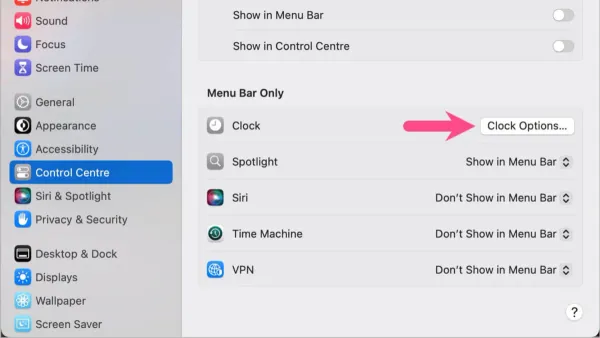
- Scroll down to and select the Clock section under Menu Bar Only.
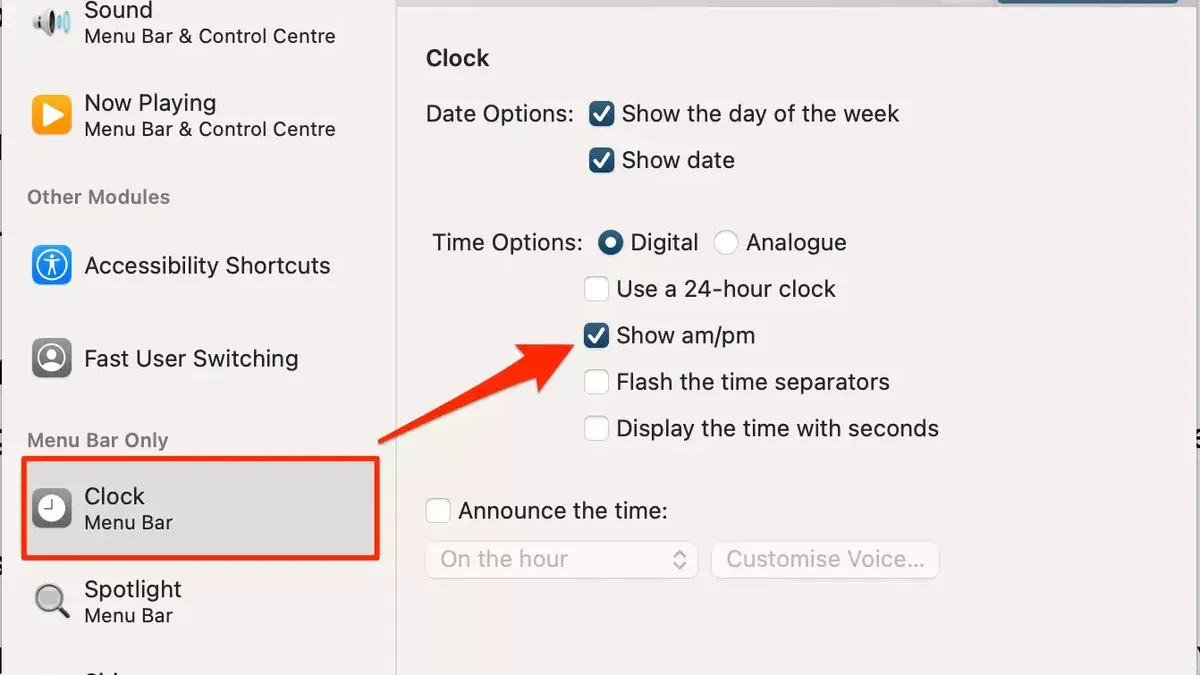
- Locate the Show seconds checkbox and click to enable it. You should see seconds immediately appear in the menu bar clock.
Displaying seconds is popular among users who require precise timekeeping, such as those tracking tasks or monitoring timed events.
Keep in mind that showing seconds updates the clock every second, which may slightly affect battery life or performance on older Mac models. On modern machines, this impact is generally minimal and unlikely to be noticeable during regular use.
If you later decide to hide seconds, simply return to the same setting and uncheck the box. The clock will revert to showing only hours and minutes.
Screenshot examples typically show this toggle switch in System Settings with seconds visible and hidden, helping confirm that you have found the correct option.
How to read a 24 hour clock
The 24 hour clock counts hours from 00 to 23, starting at midnight and ending just before the next midnight. Each hour value corresponds directly to a time of day: 00 is midnight, 01 is 1 AM, up to 12 which is noon, and 23 is 11 PM.
Minutes and seconds remain the same as in the 12 hour clock. For example, 15:30 means 15 hours and 30 minutes, or 3:30 PM in 12 hour format.
Here is a simple way to convert common 12 hour times to 24 hour format:
- For AM times from midnight to 11:59 AM, use the same hour number, except midnight is 00. So 7:45 AM is 07:45.
- For PM times from 12:00 PM to 11:59 PM, add 12 to the hour number except for noon which is 12 itself. So 3:30 PM becomes 15:30.
Use this example: 3:30 PM plus 12 equals 15:30. This means the 24 hour clock shows afternoon and evening hours as numbers above 12.
| 12 Hour | 24 Hour |
|---|---|
| 12:00 AM (midnight) | 00:00 |
| 6:00 AM | 06:00 |
| 12:00 PM (noon) | 12:00 |
| 3:30 PM | 15:30 |
| 11:59 PM | 23:59 |
To quickly convert times mentally, remember that PM hours always equal the hour plus 12, except for noon. For hours after midnight but before noon, the number stays the same, except midnight which is 00.
How to change 24 hour clock on MacBook
The process to switch your MacBook's clock to 24 hour format is essentially the same as on desktop Macs, using System Settings. However, MacBooks have some interface nuances and limitations, especially involving the Touch Bar and keyboard shortcuts.
- Open System Settings from the Apple menu or Dock. You should see a window with various configuration options.
- Navigate to Language & Region. This is where you find regional and time format settings.
- Find the option labeled Use 24-hour clock and toggle it on. The change should immediately reflect in the menu bar clock at the top right of your screen.
- If your MacBook has a Touch Bar, note that there is no direct shortcut or quick toggle to switch between 12 and 24 hour clocks. Apple’s official documentation confirms that time format changes require System Settings adjustments rather than Touch Bar controls.
- On some MacBooks, keyboard shortcuts do not provide a quick toggle for 24 hour time either. Users report that unlike some desktop Macs with customized shortcuts, the MacBook relies on the System Settings path exclusively.
- After toggling, confirm the menu bar clock displays time in 24 hour format. If it does not update, restarting the MacBook usually resolves the issue.
While the method is uniform across Mac devices, the absence of quick toggles on MacBooks means you need to plan changes ahead. The Touch Bar’s lack of time format controls is a known limitation noted in Apple’s user guides and user forums.
How to make computer clock 24 hour across platforms
When you use multiple devices like a Mac, Windows PC, and iPhone, setting the 24 hour clock consistently can help reduce confusion. Each platform has its own steps and settings names, but the concept is similar.
Setting the 24 hour clock on Windows
- Open the Settings app and select Time & Language.
- Click on Region on the sidebar to access regional formats.
- Under Regional format, click Change data formats.
- Find the Short time and Long time dropdowns and select formats that use 24-hour notation, like HH:mm.
- Close settings and check the taskbar clock to see the 24 hour format applied.
Setting the 24 hour clock on iPhone
- Open the Settings app.
- Go to General and then Date & Time.
- Toggle on 24-Hour Time.
- Exit settings and verify the time on the lock screen or status bar shows in 24 hour format.
How macOS interacts with iPhone settings
macOS and iPhone settings for the 24 hour clock are independent but can sync time zone and other time-related data via iCloud and Continuity. Changing the clock format on one device does not automatically update the other.
This means if you set your Mac to 24 hour time but leave iPhone on 12 hour, each device will show its own format. This can cause confusion if you glance between devices quickly.
It is best to manually set the 24 hour clock on each device according to your preference.
| Platform | How to Set 24 Hour Clock | Settings Location | Effect |
|---|---|---|---|
| Mac | Toggle "Use 24-hour clock" | System Settings > Language & Region | System-wide, affects menu bar clock |
| Windows | Change short and long time formats to 24-hour | Settings > Time & Language > Region > Change data formats | Taskbar and system apps |
| iPhone | Toggle "24-Hour Time" | Settings > General > Date & Time | Status bar, lock screen, apps |
Troubleshooting the 24 hour clock on Mac
If your Mac clock does not update to 24 hour format or fails to show seconds after enabling these options, several common issues could be the cause. One frequent problem is that system preference changes are not saved due to insufficient user permissions. Ensure you are logged in as an administrator or have the correct credentials to modify these settings.
Another useful step is restarting the menu bar clock process, SystemUIServer, which manages the status items including the clock. To do this, open the Terminal app and enter the command killall SystemUIServer. After pressing enter, the menu bar icons will briefly disappear and then reload, refreshing the clock display. A successful restart does not produce an error message; the command simply returns to a prompt. This often resolves display glitches when changes do not appear immediately or after a reboot.
Third-party applications that customize or override system time formats can interfere with the 24 hour clock settings. Check if any time-related apps or menu bar utilities are installed and temporarily disable them to see if the Mac’s native clock behaves correctly.
If seconds do not appear after enabling them, verify that the setting is active in System Settings > Dock & Menu Bar > Clock. Some older Mac models may not support seconds in the menu bar clock or may experience performance issues when this option is enabled.
When changes to the clock format do not reflect even after restarting or logging out, resetting the Language & Region preferences by toggling the 24 hour clock option off and on can help. If problems persist, consulting Apple’s official support documentation or contacting support may be necessary, as system-level corruption or bugs can occasionally affect time display.
- How to Use Night Shift on Mac: A Clear Step-by-Step Guide
- How to Set Up a Guest User on Mac: A Clear Step-by-Step Guide
Frequently asked questions
How to turn on 24 hour clock?
To turn on the 24 hour clock on your Mac, open System Preferences and go to the Date & Time pane. Click the Clock tab, then check the box labeled “Use a 24-hour clock.” This will immediately switch the menu bar clock to 24-hour format.
How to switch to 24 hour clock?
Switching to the 24 hour clock involves accessing System Preferences, then Date & Time, followed by the Clock tab. From there, simply select the “Use a 24-hour clock” option. This change applies system-wide and reflects in menus and supported apps.
How to make windows 24 hour clock?
On Windows, open Settings and navigate to Time & Language, then Date & Time. Click on “Change date and time formats” and select the 24-hour time option for the Short time and Long time fields. This will update the taskbar clock and other time displays to 24-hour format.
How to set 24 hour clock on mac?
Setting the 24 hour clock on a Mac is done through System Preferences. Go to Date & Time, select the Clock tab, and check the box for “Use a 24-hour clock.” Ensure that your region and language settings do not override this preference.
How to get 24 hour clock on mac?
If you want to get the 24 hour clock on your Mac, the key is enabling it in System Preferences under Date & Time settings. Once enabled, the menu bar clock and compatible apps will display time in 24-hour format, which can be useful for work or international coordination.
What this advice does not cover
This article does not cover how to change time zones or daylight saving time settings, which are separate from time format. Adjusting these requires different steps found in System Settings under Date & Time.
Not all third-party applications on Mac respect the system 24 hour clock setting, so you may need to configure time display manually within those apps if they offer such options.
Older macOS versions might have different menu layouts or lack some of the options described here, meaning some instructions may not apply exactly.
To ensure consistent 24 hour time display across your Mac and apps, the most useful next step is to verify the system time format setting under System Settings > General > Language & Region, and then check your frequently used applications to confirm or adjust their time display preferences individually.