How to Hide the Menu Bar on Mac: A Clear Step-by-Step Guide
Discover simple steps to hide the menu bar on Mac and manage your Dock for a cleaner, distraction-free workspace.
You open your MacBook and notice the screen feels cluttered, with the menu bar and Dock taking up precious space. You wonder if there’s a way to streamline your workspace without losing easy access to essential tools.
This article explains how to hide the menu bar on Mac using built-in settings, manage the Dock to reduce visual distraction, and remove or hide individual menu bar icons. You will find step-by-step instructions for MacBook Pro, MacBook Air, and desktop Macs, along with tips on troubleshooting common issues and understanding the difference between hiding the menu bar and managing icons.
Key takeaways
- Use System Settings > Desktop & Dock to enable "Automatically hide and show the menu bar" for auto-hiding the top bar.
- Manage the Dock by enabling "Automatically hide and show the Dock" to free screen space at the bottom.
- Remove menu bar icons by dragging them off while holding the Command key or using third-party apps for system icons.
- Keep in mind auto-hide hides the bar but may delay quick access; disabling it fixes persistent hiding issues.
- Different Mac models share the same settings; the process is consistent across MacBook Pro, Air, and desktops.
Before you start: What you need to know about the Mac menu bar
The menu bar on a Mac is the horizontal strip running across the top of your screen. It contains system menus like Apple, File, Edit, View, and icons for system status, such as Wi-Fi, battery, and Spotlight search. This bar is always visible by default but can be set to auto-hide on supported macOS versions.
macOS does not provide a separate bottom menu bar. Instead, the Dock serves a similar purpose as a bottom bar, holding app shortcuts and minimized windows. You can manage the Dock’s visibility independently from the menu bar.
It is important to distinguish between hiding the entire menu bar and hiding individual icons on it. These are controlled separately: auto-hide affects the whole bar, while icon visibility is managed via system preferences or app settings.
Auto-hide for the menu bar was introduced in macOS El Capitan (10.11) and improved in later versions, including macOS Big Sur and beyond. The Dock has long had settings to hide or show automatically, compatible with all modern macOS releases.
This guide will cover three main areas: setting the menu bar to auto-hide, managing the Dock as the bottom bar, and hiding or removing menu bar icons. Understanding these basics will help you customize your Mac interface effectively.
How to hide the menu bar on Mac with auto-hide settings
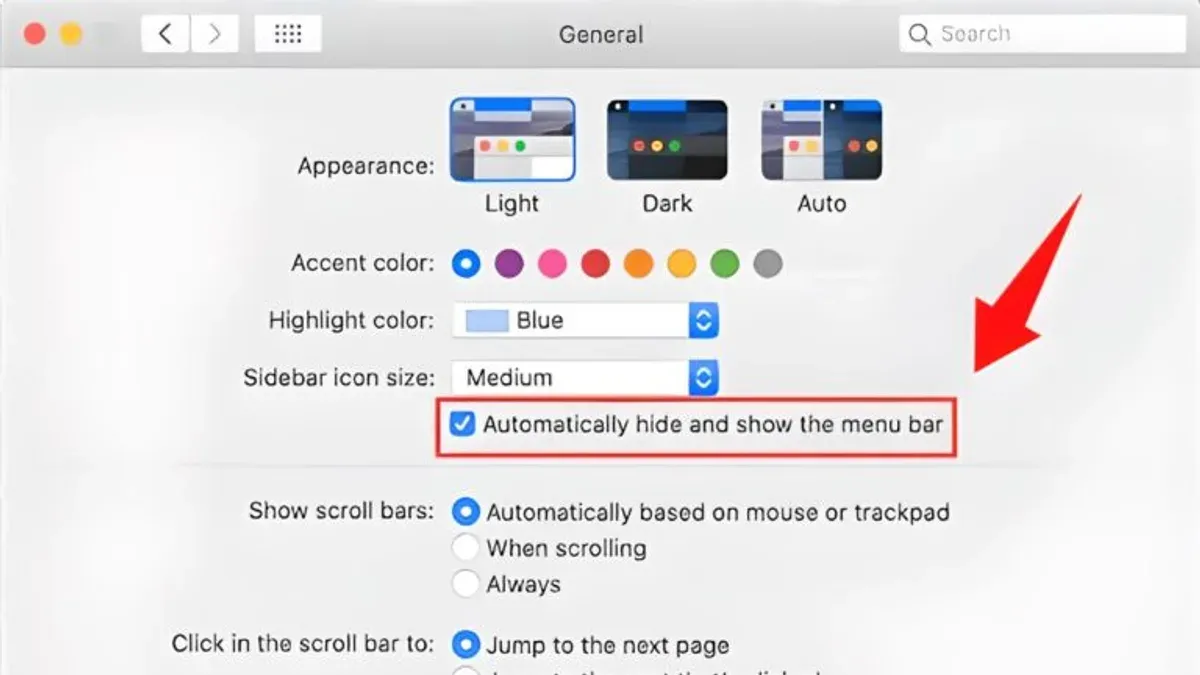
To keep your Mac's top menu bar hidden until you need it, use the auto-hide feature available in System Settings or System Preferences. This setting makes the menu bar disappear from view, giving you a cleaner desktop, and it reappears when you move your cursor to the top of the screen.
- Open System Settings (called System Preferences on older macOS versions) by clicking the Apple menu in the upper-left corner and selecting it.
- Navigate to Desktop & Dock. In some macOS versions, this might be under Appearance instead.
- Scroll through the options until you find Automatically hide and show the menu bar.
- Toggle this option on. The menu bar will now hide automatically when not in use.
- To reveal the hidden menu bar, move your cursor to the top edge of the screen. The menu bar will slide down temporarily and remain visible while your cursor is there.
In macOS versions prior to Ventura, the setting may be labeled slightly differently or located under the Dock preferences, but the functionality remains similar. Once enabled, the menu bar will not show unless hovered over, which helps declutter your screen but requires a deliberate cursor movement to access menu items.
How to hide the bottom bar on Mac by managing the Dock
The Dock serves as the bottom menu and navigation bar on your Mac, providing quick access to apps, folders, and minimized windows. You can choose to hide it automatically or adjust its size and position to reduce screen clutter.
- Open System Settings by clicking the Apple menu and selecting it.
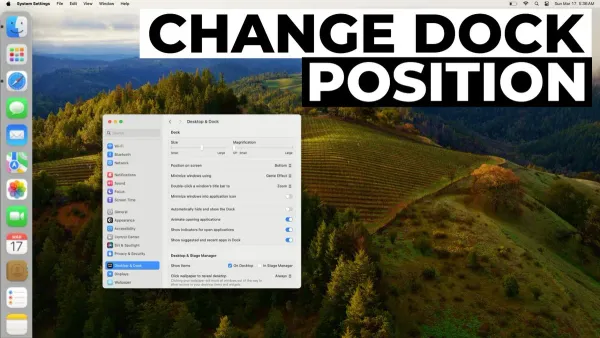
- Navigate to Desktop & Dock in the sidebar to access Dock settings.
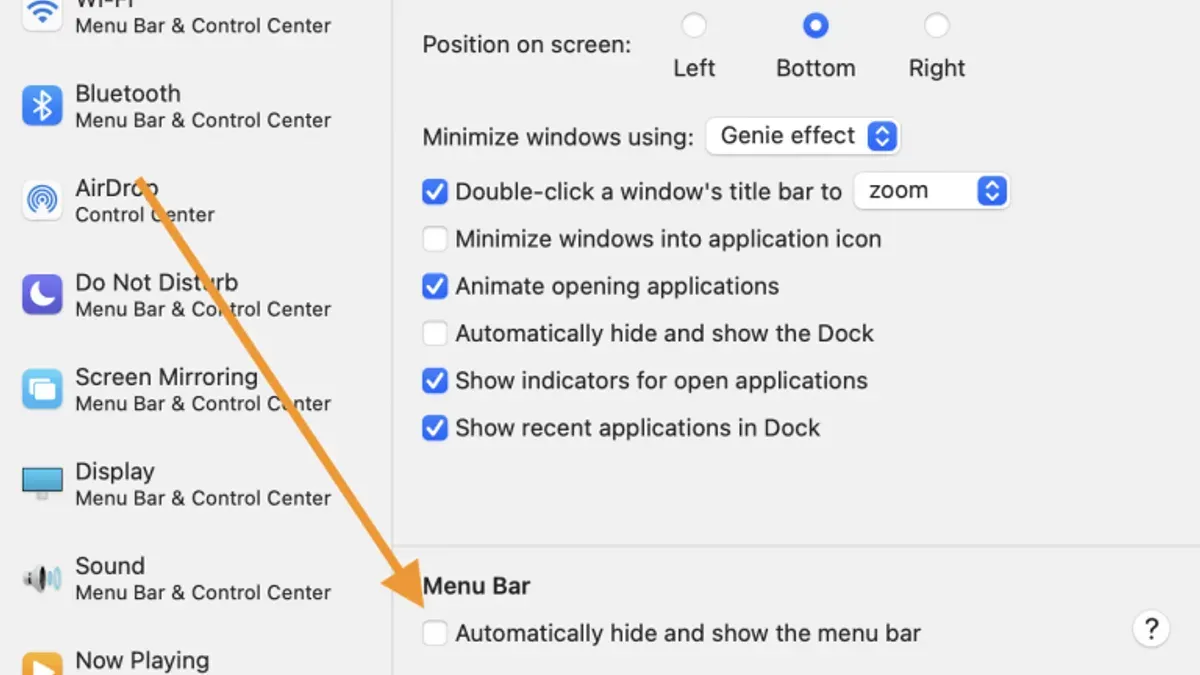
- Locate the option labeled Automatically hide and show the Dock and toggle it on. This setting keeps the Dock hidden until you move your cursor to the screen edge where the Dock is located, restoring workspace visibility.
- Adjust the Size slider to resize the Dock, making it smaller if you want less visual distraction while keeping it visible.
- Use the Position on screen options to move the Dock to the left, bottom, or right edge, depending on your workflow preferences.
When the Dock is visible, you have instant app access, but it occupies screen space. Auto-hiding the Dock frees up space but requires an extra cursor movement to reveal it, which may slow workflow if you access it frequently.
If you want to remove the Dock entirely or apply advanced customizations beyond built-in options, third-party utilities like cDock or DockMate exist. However, these can affect system stability and are not officially supported by Apple, so use them with caution.
How to stop the menu bar from hiding if auto-hide is enabled
If your menu bar hides unexpectedly or does not stay visible, first check if auto-hide is enabled in System Settings. Sometimes, full-screen apps automatically hide the menu bar, which can be confusing. Other apps or preferences might also override the menu bar's visibility.
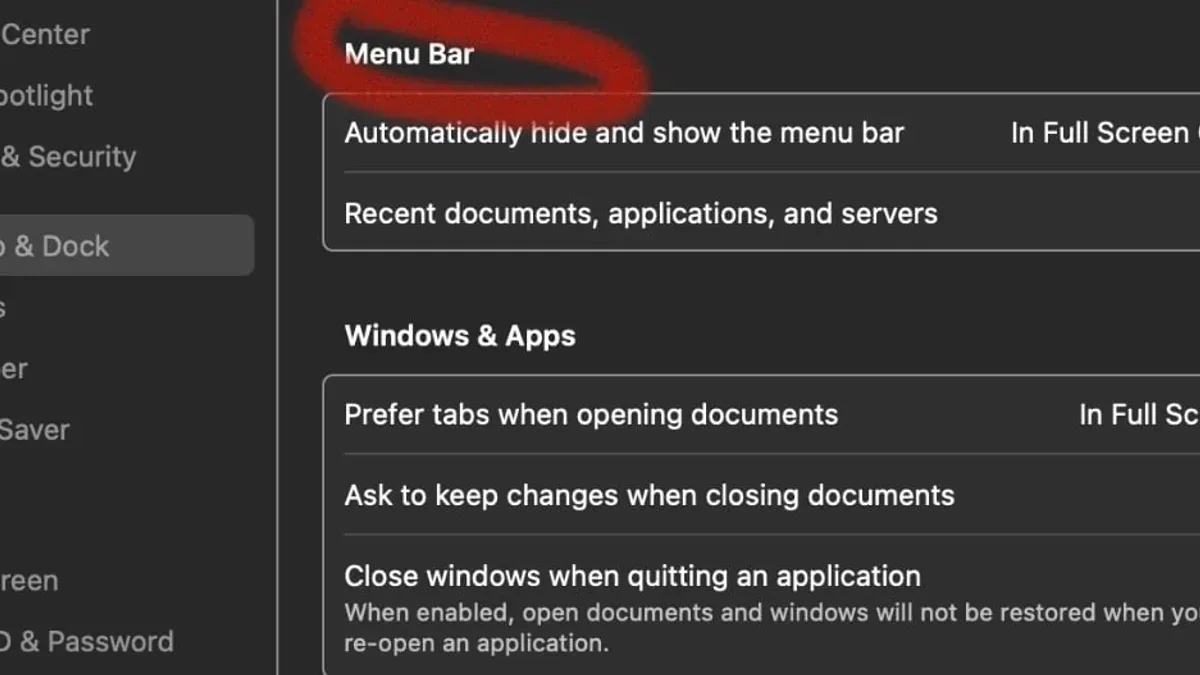
- Open System Settings and go to Desktop & Dock.
- Locate the option labeled Automatically hide and show the menu bar. If it is enabled, toggle it off to keep the menu bar always visible.
- Exit the settings and move your cursor to the top of the screen to confirm if the menu bar remains visible.
- If you are inside a full-screen app, press the Escape key or use the green window button in the top-left corner to exit full-screen mode; the menu bar will then remain visible.
- Check if any app-specific settings or third-party tools are managing the menu bar; disable those if they interfere with visibility.
- Restart your Mac if changes don’t take effect immediately, as some settings require a system refresh.
Common mistakes include not realizing the menu bar hides in full-screen mode or toggling the wrong setting. Disabling auto-hide balances screen space with easy access but can reduce usable screen area.
How to remove or hide menu bar icons on Mac
You can clean up your Mac's menu bar by removing or hiding individual icons without hiding the entire bar. This lets you keep essential system controls visible while reducing clutter.
- Remove system icons by Command-dragging: Hold the Command key (⌘), click on a system icon like Wi-Fi, Bluetooth, or Volume, then drag it out of the menu bar. Release the mouse button when you see a small “x” icon; the item disappears. This works for many built-in icons but not all.
- Use Control-click or right-click for options: Some icons offer a menu when you Control-click or right-click them. For example, the Time Machine icon lets you toggle its visibility or access preferences. Check these menus for a “Remove from Menu Bar” or similar option.
- Manage third-party app icons carefully: Many apps add icons to your menu bar. Their removal usually requires quitting the app or changing its preferences, as Command-dragging often won't work. Look in the app’s settings for options to hide the icon or disable menu bar presence.
- Understand the difference between hiding icons and hiding the menu bar: Removing icons declutters the bar but keeps it visible and functional. Hiding the entire menu bar hides all icons and menus until you hover over the top of the screen, which is a broader setting controlled elsewhere.
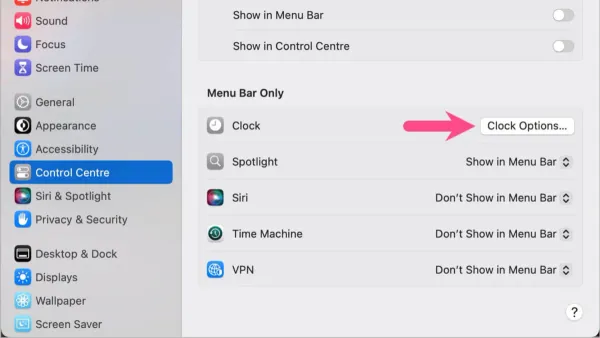
Common system icons you can remove include Wi-Fi, Bluetooth, Volume, Battery, and User Switching. Some, like the Clock or Siri, may require adjustments in System Settings under Dock & Menu Bar. Icons removed this way can usually be restored by revisiting those settings.
How to hide the menu bar on MacBook Pro and MacBook Air
The steps to hide the menu bar on MacBook Pro and MacBook Air are identical, as both run the same macOS with consistent system settings. You enable or disable auto-hide for the menu bar via System Settings under Appearance, which works uniformly across these models.
On certain MacBook Pro models equipped with a Touch Bar, the menu bar behavior can feel different. The Touch Bar replaces some traditional function keys, but it does not affect the menu bar’s auto-hide settings. However, the Touch Bar may provide quick access to system controls that reduce your need to access menu bar items frequently.
For smaller MacBook Air displays, hiding the menu bar can free up valuable vertical space, making it easier to focus on content. Keep in mind that when the menu bar is hidden, you need to move your cursor to the top edge to reveal it, which might slightly slow workflow if you rely heavily on menu items.
Performance-wise, hiding the menu bar has no significant impact on either MacBook Pro or Air, as this is a visual setting with minimal resource use. Both models handle these interface adjustments smoothly.
- Open System Settings from the Apple menu.
- Select Appearance in the sidebar.
- Find the option labeled Automatically hide and show the menu bar and toggle it on.
- Move your cursor to the top of the screen to confirm the menu bar appears as expected, then moves away to see it hide.
How to hide the navigation bar on Mac apps and browsers
Navigation bars inside apps and browsers differ from the Mac system menu bar. These bars typically contain toolbars, sidebars, or tabs specific to the app's interface, such as Safari’s toolbar or the Finder sidebar. Hiding these elements can declutter your workspace but does not affect the system-level menu bar at the top of the screen.
Hiding Safari’s toolbar
- Open Safari.
- Click on the View menu in the menu bar.
- Select Hide Toolbar.
- The toolbar, including the address and tab bar, will disappear, giving more screen space for web content.
You can bring it back anytime by selecting Show Toolbar from the same menu.
Hiding Finder’s sidebar
- Open a Finder window.
- Go to the View menu.
- Click Hide Sidebar.
- The left sidebar with favorites and locations will collapse, expanding the main Finder window.
To show the sidebar again, choose Show Sidebar from the same menu.
Other apps like Mail or Notes may offer similar options under their View menus to hide or minimize sidebars and toolbars. These controls only affect the app’s interface, not the system menu bar.
Troubleshooting when the menu bar is not showing or behaving unexpectedly
If your menu bar is missing, stuck hidden, or icons are not displaying correctly, several common issues could be the cause. Start by checking if your Mac is in full-screen mode. Exit full-screen by moving your cursor to the top of the screen and clicking the green button in the window's upper-left corner or pressing Control + Command + F. This often restores the menu bar.
Restarting the Finder or your Mac can refresh the user interface and resolve temporary glitches. To restart Finder:
- Open Activity Monitor via Spotlight or Applications > Utilities.
- Find and select Finder in the process list.
- Click the X button in the toolbar and choose Force Quit.
- Finder will automatically restart; the menu bar should reappear.
If problems persist, consider resetting the menu bar preferences. Navigate to ~/Library/Preferences/ and delete files named com.apple.systemuiserver.plist or related preference files. Log out and back in or restart to apply changes.
Third-party applications that customize or manage menu bar icons can interfere with visibility. Temporarily disable or uninstall such apps to test if they cause the issue.
If none of these steps work, contact Apple Support or an authorized service provider for expert assistance, especially if the issue affects multiple users or devices.
- How to Use and Customize the 24 Hour Clock on Your Mac
- How to Set Up Hot Corners on Mac: A Complete Step-by-Step Guide
- How to Set and Customize a Screen Saver on Your Mac
Frequently asked questions
How to hide top bar on mac?
You can hide the top menu bar by enabling the auto-hide feature. Go to System Preferences > Dock & Menu Bar, then check the box for "Automatically hide and show the menu bar". This makes the menu bar disappear until you move your cursor to the top of the screen.
How to hide bottom bar on mac?
The bottom bar, known as the Dock, can be hidden by enabling auto-hide. Open System Preferences > Dock & Menu Bar and check "Automatically hide and show the Dock." This causes the Dock to slide out of view until you hover at the bottom of the screen.
How to hide menu bar in windows?
Windows does not have a traditional menu bar like macOS. However, you can auto-hide the taskbar by right-clicking it, selecting "Taskbar settings," and enabling "Automatically hide the taskbar in desktop mode." This hides the taskbar until you move the cursor to the screen edge.
How to stop menu bar from hiding?
If your menu bar keeps hiding, disable the auto-hide setting. Go to System Preferences > Dock & Menu Bar and uncheck "Automatically hide and show the menu bar." This will keep the menu bar visible at all times, though it takes up some screen space.
How to remove the menu bar on mac?
The menu bar itself cannot be completely removed, as it is integral to macOS. However, you can minimize its presence by hiding icons or enabling auto-hide. For individual icons, hold Command and drag them off the menu bar or use app-specific settings to disable them.
What this advice does not cover
This article does not cover permanently removing system UI elements through unsupported hacks, which can affect system stability and security. If you require deep customization beyond the built-in options, consider consulting professional support or Apple’s developer resources.
For users who need to hide interface elements for accessibility reasons or require specialized setups, alternative software solutions or assistive technologies may be more appropriate.
To maintain a smooth experience, focus on the auto-hide functions and icon management described here rather than attempting unsupported modifications.
The most useful next step is to explore the System Settings > Desktop & Dock panel on your Mac. Adjust the Automatically hide and show the menu bar and Automatically hide and show the Dock options to customize your workspace effectively. These settings offer a balance between screen space and quick access, helping you declutter your Mac without compromising usability.