How to Change Screen Resolution on Mac: Clear Step-by-Step Guide
This guide shows you how to change screen resolution on Mac devices to improve display clarity and customize your viewing experience.
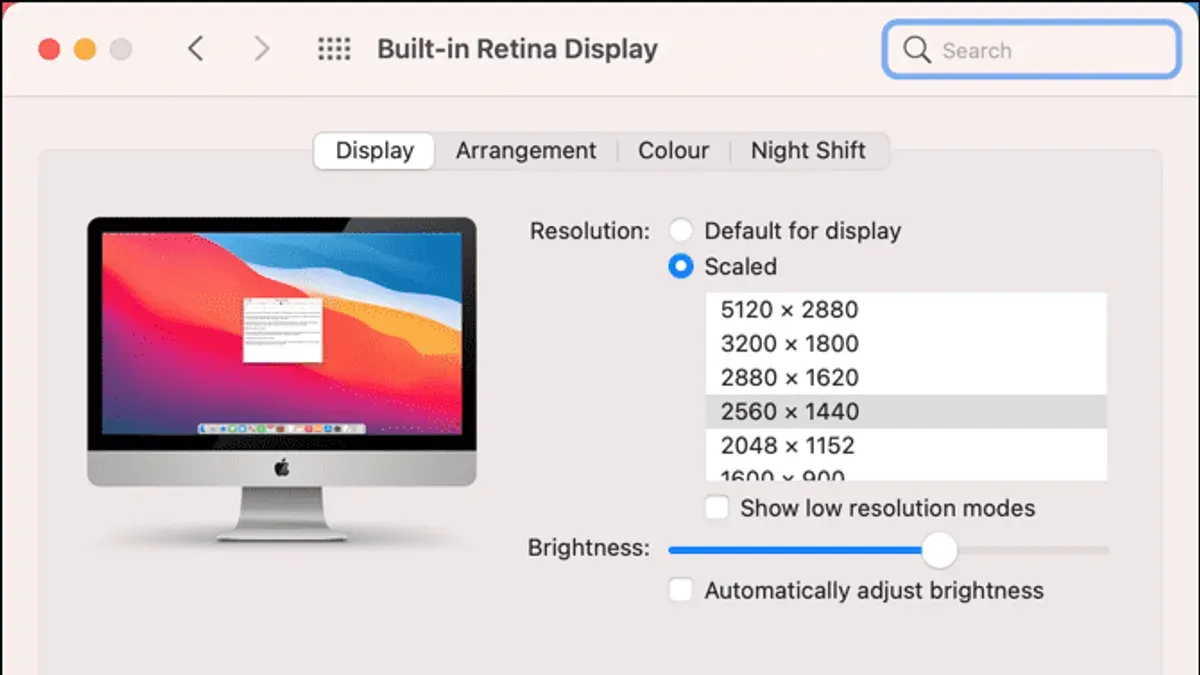
You’ve just connected your MacBook to an external display, but the crispness you expected isn’t there. Or maybe text and images look too small or large on your MacBook Air’s Retina screen, making it harder to work comfortably.
This guide explains how to change screen resolution on Mac across various devices, from MacBook Pro to Mac mini with external monitors. You’ll learn practical steps for adjusting resolution settings, understand Retina scaling’s effect on image clarity, and discover how to balance screen space and sharpness effectively.
Key takeaways
- Access display settings via System Settings > Displays to view and change resolution options.
- Retina Mac screens use scaling that affects perceived resolution, not just pixel count.
- External monitors require manual resolution adjustments for best image quality and compatibility.
- Auto resolution settings optimize display but can be overridden for specific needs.
- Increasing image resolution involves more than just screen settings; it may require app-level changes or higher-quality source images.
Before you start: What you need to know about Mac screen resolutions
Mac displays use a concept called Retina scaling, which differs from traditional DPI scaling found on other operating systems. Instead of simply changing pixels per inch, macOS uses scaled resolutions to adjust UI size and sharpness, balancing clarity with screen real estate. The native resolution is the actual pixel count of your display; for example, a MacBook Pro’s Retina screen might have a native resolution of 2880×1800 pixels.
Scaled resolutions simulate different screen sizes by rendering the UI larger or smaller while trying to maintain sharpness. For instance, the default Retina setting provides crisp text and images, but selecting a scaled resolution that makes UI elements larger can reduce overall sharpness because pixels are interpolated.
Most Macs support resolution changes, including MacBook Air, MacBook Pro, Mac Mini (when using external monitors), and various external displays. However, built-in Retina displays handle scaling differently than standard non-Retina external monitors.
Changing your screen resolution affects both image quality and UI clarity. It’s advisable to note your current resolution settings or back them up before making changes, so you can restore them if needed.
For example, switching from the default Retina scaled resolution of 2560×1600 on a 13-inch MacBook Pro to a larger scaled resolution like 1680×1050 increases UI element size but may cause slight fuzziness in text and images.
How to check screen resolution on Mac
To confirm your current screen resolution on a Mac, you primarily use the System Settings app. This provides a straightforward way to see the active resolution and scaling status for your display.
- Open System Settings from the Apple menu.
- Click Displays in the sidebar.
- Look under the Resolution section to find your current setting. If “Default for display” is selected, macOS is using the native Retina scaling for optimal appearance. If “Scaled” is selected, the chosen resolution is different from the default and may affect clarity or UI size.
For more detailed metrics, including exact pixel dimensions and display type, use the About This Mac window:
- Click the Apple menu and select About This Mac.
- Go to the Displays tab.
- Here you will see detailed information such as the native resolution, pixel density (PPI), and color profile.
If you have complex setups with multiple monitors or non-standard resolutions, third-party apps like SwitchResX or Display Menu offer advanced controls and display information beyond macOS defaults, including exact scaling factors.
Recognizing scaled versus native resolutions in macOS is crucial: native resolution matches the physical pixels of the display, offering sharpest images, while scaled resolutions adjust UI elements to appear larger or smaller but can reduce crispness.
How to change screen resolution on MacBook, MacBook Air, and MacBook Pro
Mac portable devices with Retina displays offer several scaled resolution options that affect the size of UI elements and workspace. The default setting, labeled "Default for display" or "Best for display," balances sharpness and readable text size.
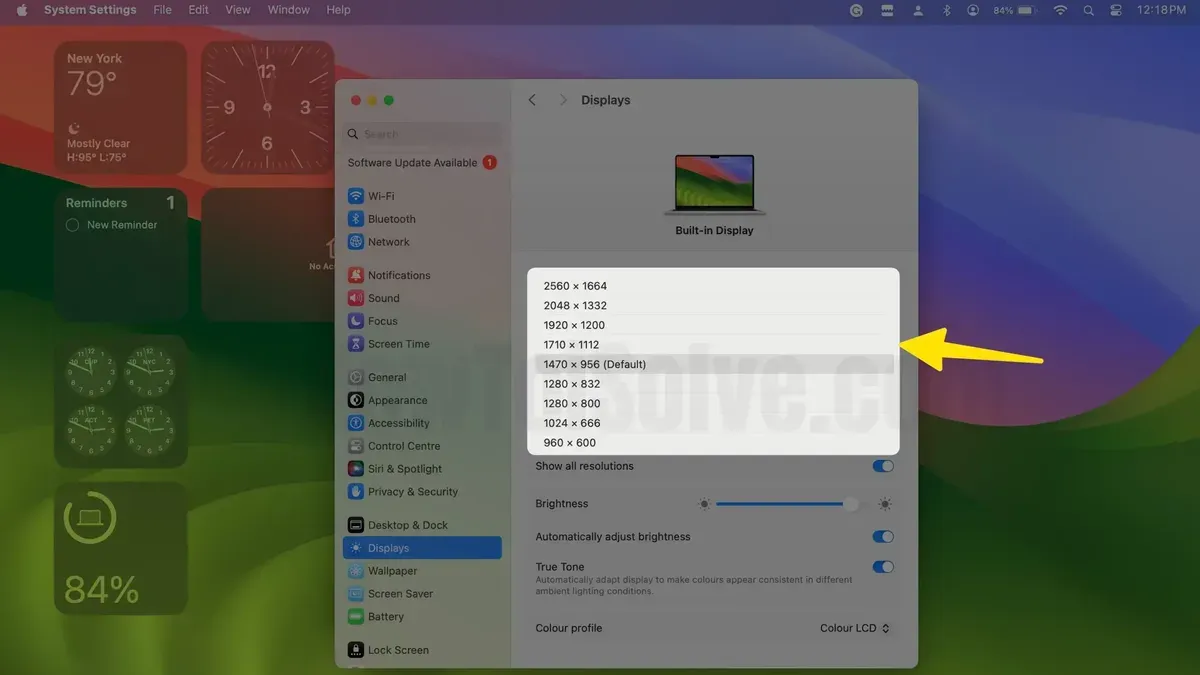
- Open System Settings (or System Preferences) from the Apple menu.
- Click Displays. You will see a preview of your current resolution setting.
- Select Scaled to view available resolution options. macOS typically shows four or five choices, ranging from "Larger Text" (lower resolution, bigger UI elements) to "More Space" (higher resolution, smaller UI elements).
- To reveal additional resolution options, hold down the Option key while clicking Scaled. This action displays numeric resolution values such as 1680×1050 or 1440×900, letting you pick precise sizes.
- Choose a lower resolution if you need larger text or compatibility with older apps that do not scale well, or when sharing your screen externally for better visibility.
- Confirm your selection; the display will adjust immediately. If the UI elements become too small or too large, revisit the settings to find a comfortable balance.
For example, on a 13-inch MacBook Pro with Retina, using 1680×1050 scaled resolution enlarges UI elements compared to the default 2560×1600 effective resolution, improving readability at the cost of workspace size.
How to change screen resolution on Mac Mini and external monitors
When using a Mac Mini or connecting external monitors, resolution settings differ from built-in displays. You can configure each display independently through System Settings to optimize clarity and workspace.
- Open System Settings and select Displays. You will see a representation of your connected monitors.
- Click the display you want to adjust if multiple are connected. Each monitor’s settings appear separately.
- Under Resolution, choose Scaled to see available options. For non-Retina external monitors, focus on selecting the monitor’s native resolution for the best image sharpness and accurate UI scaling.
- For a 4K display connected to your Mac Mini, available resolutions typically include 3840×2160 (native), 2560×1440, and 1920×1080. Selecting the native 3840×2160 resolution provides the sharpest image but UI elements appear smaller; lower resolutions increase UI size but reduce clarity.
- If you want more granular control, install third-party tools like SwitchResX. This app allows custom resolutions and detailed scaling adjustments beyond System Settings.
- After selecting a resolution, the screen will adjust immediately. Confirm the change by checking UI sharpness and size to ensure it matches your preference and monitor capability.
By matching resolution settings to each monitor’s native capabilities and using advanced tools if needed, you maintain optimal display quality whether on a Mac Mini or external screen.
How to change auto resolution on Mac and what it means
macOS uses automatic resolution scaling to optimize display clarity and usability depending on the app and display you use. This dynamic scaling adapts resolution settings when you move an app between Retina and non-Retina displays or external monitors, ensuring text and images remain sharp and appropriately sized.
By default, macOS manages this process behind the scenes, but you can manually override auto resolution to gain control over how your screen looks, especially if you face compatibility issues like blurry images during screen sharing or remote desktop sessions.
- Open System Settings and go to Displays.
- Select the display you want to adjust if you have multiple.
- Uncheck or disable the “Default for display” resolution option if available.
- Choose Scaled resolutions manually to force a specific setting instead of auto scaling.
- Check how the UI and apps render; you may need to try different scaled options for the best clarity and workspace balance.
For example, when dragging an app window from a MacBook’s Retina screen to an external standard display, auto resolution scaling adjusts the app’s rendering to match the new screen’s pixel density. However, this can cause visual glitches or blurry text if the external display’s resolution is non-standard or if you use remote desktop tools.
In these cases, forcing a fixed resolution can improve compatibility and clarity. Utilities like SwitchResX offer more granular control over resolution settings when macOS’s default options are insufficient.
How to change screen size on Mac beyond resolution settings
Changing your Mac’s screen size without adjusting resolution technically means modifying how UI elements appear rather than the pixel dimensions. Display scaling, which you access through "System Settings > Displays," changes the size of text and interface elements by simulating different resolutions while maintaining sharpness, unlike simply lowering resolution which can cause blurriness.
If you want to enlarge or shrink UI elements without affecting overall screen sharpness, adjusting system font size and using zoom features is often more effective. For instance, increasing the system font size in System Settings > Accessibility > Display > Text Size makes text easier to read without altering display resolution. Similarly, enabling the Zoom feature under Accessibility > Zoom lets you magnify portions of the screen on demand, useful for temporary enlargement.
Accessibility settings also offer options like “Increase contrast” and “Reduce transparency” to enhance visual clarity without changing size or resolution. These tweaks improve usability for those with visual impairments or preference for clearer visuals.
Third-party apps such as BetterDisplay or Display Menu can provide additional control over scaling and UI size beyond macOS defaults, letting you fine-tune display appearance without compromising sharpness.
Changing resolution alone is not always the best approach because it can degrade image quality or cause UI elements to become too large or small. Using scaling and accessibility features offers a more flexible way to adjust screen size and readability while preserving display integrity.
How to increase image resolution or enhance picture quality on Mac
Image resolution refers to the amount of detail an image holds, measured in pixels per inch (PPI), which is different from your Mac’s screen resolution. Increasing image resolution means adding pixels to an image file, improving its clarity for printing or zooming, not changing how it appears on your display.
You can use Preview to check and adjust image resolution. Open your image in Preview, then select Tools > Adjust Size. In the dialog, uncheck "Resample image" to see current resolution, then check it to increase resolution by entering higher pixel dimensions. Note that increasing resolution this way can cause some loss in sharpness or introduce blurriness because the software interpolates pixels.
Similarly, the Photos app lets you export images at a higher resolution via File > Export > Export 1 Photo, where you can set the size and quality. However, it doesn't offer direct pixel resampling like Preview.
For better quality upscaling, consider third-party apps like Adobe Photoshop or specialized AI upscaling tools. These use advanced algorithms to enhance detail but still have limits depending on the original image quality.
Remember, changing your Mac’s display resolution does not improve the actual image file’s resolution or quality. It only affects how large or sharp the image looks on your screen.
- Open the image in Preview. You should see the image displayed.
- Go to Tools > Adjust Size. The image size dialog appears.
- Uncheck "Resample image" to view current resolution without changing pixel data.
- Check "Resample image" to enable changing pixel dimensions.
- Increase width and height values to raise pixel count (e.g., from 1000x800 to 2000x1600). The resolution value updates accordingly.
- Click OK. The image resizes with added pixels, which may soften edges.
- Save the image as a new file to preserve the original. The new file shows increased resolution but may have less sharpness.
Troubleshooting common issues when changing screen resolution on Mac
Changing screen resolution can sometimes cause unexpected problems such as blurry displays, UI elements appearing too large or small, or resolution options being inaccessible. Here are practical steps to resolve frequent issues.
Fixing a blurry display after resolution change
- Open System Settings and go to Displays. You should see resolution options.
- Hold the Option key and click Scaled to reveal more resolution choices.
- Select a resolution labeled as “Default for display” or the native resolution of your screen to restore clarity.
- If the display remains blurry, toggle the “Use low resolution mode” option off if it is enabled.
- Restart your Mac to apply changes fully.
Resolving greyed out or missing resolution options
Ensure your Mac is not running in a restricted mode like AirPlay or screen sharing, which limits resolution choices. Disconnect and reconnect external displays, and check cables. If issues persist, reset the NVRAM (non-volatile random-access memory) by restarting and holding Option + Command + P + R keys until the startup sound plays twice.
External display issues
If an external monitor is not detected or resolution is stuck, try unplugging it, waiting a few seconds, then reconnecting. Check for macOS updates and use System Settings > Displays > Detect Displays if available. Third-party tools like SwitchResX can help override stuck resolutions.
Resetting to default resolution safely
To revert all changes, boot into Safe Mode by holding the Shift key during startup. Safe Mode loads default system settings and disables third-party display utilities. After logging in, go to Displays and select “Default for display.” Restart normally afterward.
- How to Speed Up Import in Lightroom Classic on Mac: Step-by-Step Guide
- How to Use AI Denoise in Lightroom Classic on Mac: Step-by-Step Guide
- How to Best Render Settings in Blender on Mac for High-Quality Results
- How to Speed Up Photoshop Performance on Mac: Step-by-Step Guide
Frequently asked questions
How to change resolution on macbook?
To change the resolution on a MacBook, open System Settings and go to Displays. Select your built-in display, then choose the Resolution option. Switch from Default for display to Scaled, and pick the resolution you prefer. Keep in mind that lower resolutions increase screen space but may reduce text and image sharpness.
how to change resolution on macbook
Changing the resolution on a MacBook involves navigating to System Settings > Displays. Under Resolution, select Scaled to see available options. Choose one that suits your needs, balancing clarity and workspace. Remember that Retina Macs manage scaling differently, so some options prioritize sharpness over actual pixel count.
how to change screen resolution on macbook air
On a MacBook Air, open System Settings and click Displays. Select Scaled under Resolution to view alternative resolutions. Pick a setting that either enlarges text and interface elements or provides more screen space. The Retina display on MacBook Air uses pixel doubling, so some resolutions are optimized for clarity rather than raw pixel count.
how to change screen resolution on macbook pro
To adjust the screen resolution on a MacBook Pro, access System Settings and choose Displays. Under Resolution, select Scaled and pick from the available options. MacBook Pro models with Retina displays use scaling to maintain sharpness, so selecting a scaled resolution modifies the effective workspace without losing image quality.
how to change screen resolution on mac mini
For Mac Mini users, connect your external monitor and open System Settings > Displays. Select the monitor you want to adjust, then under Resolution, choose Scaled. You can pick from resolutions supported by your monitor, balancing between clarity and screen real estate. Unlike built-in Retina screens, external monitors rely strictly on physical resolution settings.
What this guide does not cover
This guide does not cover advanced hardware hacks or unsupported third-party drivers that force unsupported resolutions, which may void your warranty or cause system instability. If you require specialized resolutions beyond macOS’s built-in options, or if you have unique professional needs such as custom color profiles for high-end video production, consider consulting Apple Support or a certified technician. Attempting unsupported changes can lead to display issues or system malfunctions.
The single most useful next step is to familiarize yourself with the built-in Display settings found under System Settings > Displays. Experiment with the “Default for display” and “Scaled” options to find a balance between screen space and clarity that suits your workflow. Remember that Retina scaling prioritizes sharpness over pixel count, so adjusting resolution may affect text and icon size differently. Take time to test settings with your most-used apps and external monitors to optimize your viewing experience on your specific Mac model.