How to Create a Quick Action in Automator: A Step-by-Step Guide
Discover how to create a quick action in Automator to automate repetitive tasks on your Mac with simple, clear steps.
You often find yourself performing the same tasks on your Mac repeatedly, like resizing images or renaming files. Instead of going through multiple steps each time, you can save time by creating a custom quick action.
This article walks you through how to create a quick action in Automator, Apple's built-in tool for automating repetitive tasks. You'll learn how to open Automator, build your first workflow with clear explanations of each step, and how to apply your quick actions to everyday tasks. By the end, you’ll be able to create personalized automations that fit your workflow, going beyond default templates.
Key takeaways
- Automator lets you create quick actions accessible from Finder and other apps.
- Start by choosing the Quick Action document type when you open Automator.
- Drag and drop actions like "Rename Finder Items" or "Resize Images" to build your workflow.
- Save your quick action with a descriptive name to find it easily later.
- Run your quick action via right-click menus or the Finder toolbar.
Before you start: What you need to create a quick action
To create a Quick Action in Automator, you need a Mac running macOS that supports both Automator and Quick Actions. Specifically, Quick Actions are available starting from macOS Mojave (10.14) and onward. Ensure your Mac is running one of these versions or a later one to access the relevant features.
Basic familiarity with the Finder will help, especially knowing how to select files, folders, or text. It’s also useful to understand simple automation concepts, such as workflows and actions, which will make following the steps easier. If you are new to automation, don’t worry—this guide will build your knowledge gradually.
You will need access to the Automator app, which comes preinstalled on supported macOS versions. You can find it via Spotlight Search or in the Applications folder. Additionally, check System Preferences under Extensions > Finder Extensions to enable Quick Actions if they are not already active. This step ensures your created Quick Actions appear in Finder's contextual menus.
It’s important to understand how Quick Actions differ from other Automator workflows. Quick Actions are designed to be accessible directly from Finder or the Touch Bar for faster use, while other workflows might run standalone or from the Services menu. Knowing this distinction will help you design workflows that behave as expected.
- Open the Automator app from your Applications folder or by searching with Spotlight. You should see the Automator interface with a template selection window, offering options like Workflow, Application, and Quick Action.
- Go to System Preferences > Extensions > Finder Extensions. Make sure the checkbox for Quick Actions is checked. When enabled, this will allow Quick Actions you create to show up in Finder’s right-click menu.
- Open Finder and right-click any file or folder. If Quick Actions are enabled, you will see a Quick Actions submenu. It might be empty before you create your own, but this confirms the feature is active.
How to open quick actions in Automator
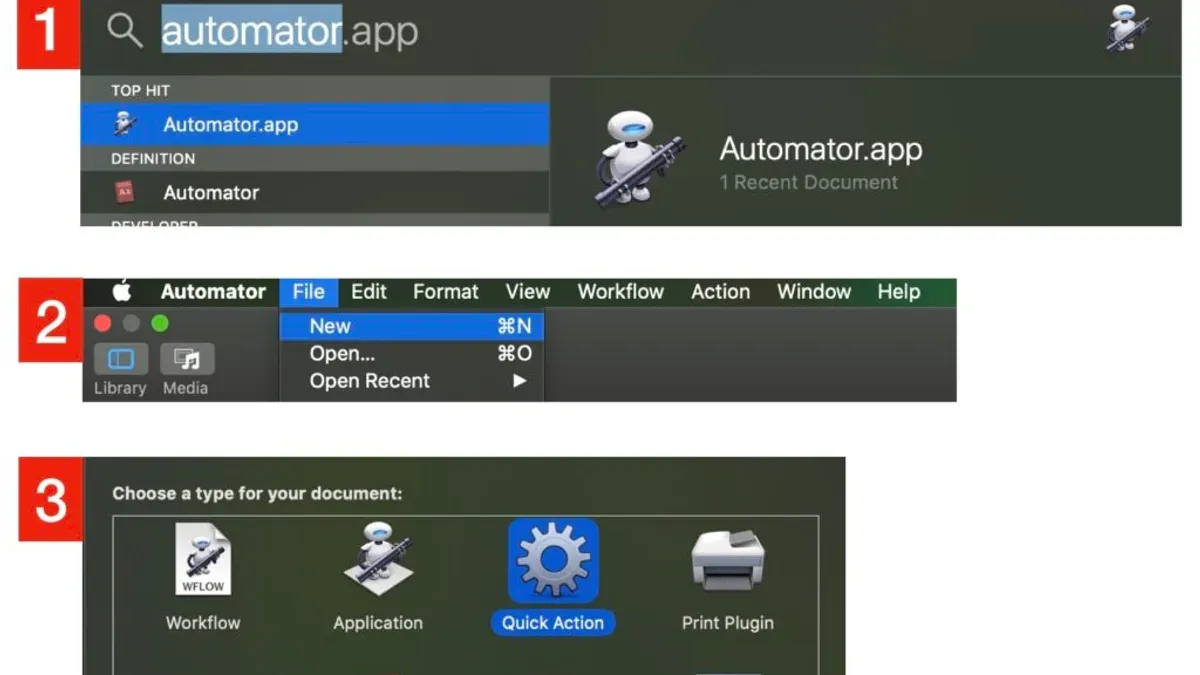
To begin creating a Quick Action, you first need to open the Automator app. You can find Automator in your Applications folder or use Spotlight to launch it quickly. Once opened, Automator prompts you to choose a document type, which determines the workflow you will build.
- Open Automator by clicking on the Applications folder and selecting Automator, or press Command + Spacebar and type Automator in Spotlight, then press Enter. You should see the Automator welcome window once the app launches.
- In the template chooser window, select Quick Action as the document type. This option is designed specifically for workflows that integrate into the Finder and other parts of macOS. After selecting it, click Choose.
- The Quick Action workflow interface will open, showing a blank workflow and options at the top. Here, you can configure important settings such as the input type your Quick Action accepts and where it appears in the system.
- Look for the dropdown menus near the top labeled Workflow receives current. Click this to specify what kind of input your Quick Action will handle, such as files or folders in Finder, text, images, or no input at all.
- Next, use the dropdown labeled in to select where this Quick Action will be available. Common options include Finder, Mail, or all applications depending on your chosen input type.
By setting these options correctly, you control how and where your Quick Action integrates with macOS. This initial setup is essential before you start adding actions to your workflow.
Following these steps ensures you have a Quick Action project ready to build a customized automation tailored to your needs.
How to create a quick action: Building your first workflow
Now that you have opened Automator and selected the Quick Action template, you can start building your workflow. Begin by choosing the input type your Quick Action will accept; for example, select "files or folders" in the "Workflow receives current" dropdown at the top. This ensures your Quick Action operates on the correct data type—in this case, files you select in Finder.
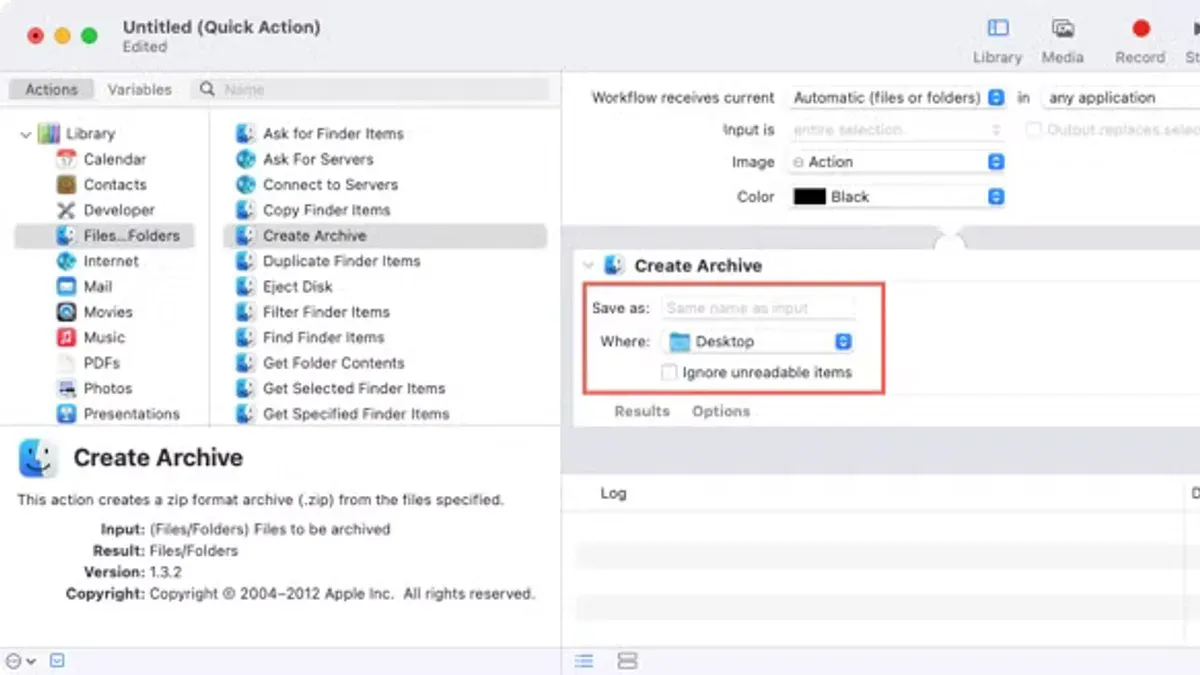
- From the Library pane on the left, find and drag the "Rename Finder Items" action into the workflow area. Automator will prompt you to add a "Copy Finder Items" action before renaming to avoid overwriting originals; choose "Don't Add" if you want to rename files directly.
- In the "Rename Finder Items" action settings, select "Add Date or Time" from the dropdown menu. Configure it to "after name" and choose the date format that suits your needs, such as "YYYY-MM-DD." This setup appends the date to file names.
- To customize further, add a "Filter Finder Items" action before renaming. Set a condition like "Name ends with.txt" to limit the Quick Action to text files only. This step introduces a condition that refines when your action runs.
- Once your workflow is complete, save it by selecting File > Save. Give your Quick Action a descriptive name like "Append Date to Text Files" to recognize it easily when using it later.
- After saving, test your Quick Action by selecting some files in Finder, right-clicking, and choosing your new Quick Action from the Quick Actions menu. You should see the selected files renamed with the date appended as configured.
This example shows how to build a simple but practical Quick Action that renames selected files based on specific criteria. You can expand on this by adding more actions, using variables, or incorporating loops and conditions to tailor your workflow further.
How to use quick actions once created
After creating a Quick Action, you can easily run it directly from Finder to speed up your daily tasks. To access your Quick Actions, right-click (or Control-click) on any file or folder in Finder. In the context menu, look for the Quick Actions submenu where your custom actions appear alongside system-provided ones.
You can also find Quick Actions in the Preview pane within Finder’s View Options. Select a file, then check the Show Preview sidebar by clicking the View menu and choosing Show Preview. Your Quick Actions will show as clickable buttons at the bottom of this pane. On MacBook models with a Touch Bar, Quick Actions appear as customizable buttons, enabling even faster access with a tap.
Applying Quick Actions to multiple files or folders is straightforward. Select several items in Finder, right-click, and choose the desired Quick Action. It will run on all selected objects, saving time on repetitive tasks like renaming or converting files.
If you need to modify or remove a Quick Action, open Automator and either edit the workflow to change its behavior or delete it to remove it from Finder menus. Remember to save any changes to update the available Quick Actions immediately.
- Open Finder and select one or more files or folders. You should see the items highlighted.
- Right-click (or Control-click) the selection and hover over Quick Actions in the context menu. A list of available actions will appear.
- Click the Quick Action you want to run. The action will execute on the selected items, such as renaming or moving them.
- To use Quick Actions from the Preview pane, select a file and open the Finder sidebar with View > Show Preview. The Quick Actions appear as buttons below the preview.
- On a MacBook with a Touch Bar, look for Quick Action buttons that change depending on your selection; tap one to run the action.
- To edit or delete a Quick Action, launch Automator, open the saved workflow from File > Open, make your changes or delete the file, and save or close. The changes reflect in Finder immediately.
Troubleshooting common issues when creating quick actions
If your Quick Actions do not appear in Finder or the context menu, the first step is to verify that the workflow input types match the files or data you are selecting. For example, if your Quick Action is set to receive "image files" but you select a text document, it will not show up. To fix this, open your Quick Action in Automator and check the "Workflow receives current" dropdown to ensure it matches your intended file type.
Input and output mismatches can cause workflows to fail silently or display error messages like "The action failed to complete." If you see such an error, check each action’s "Input" and "Output" settings within Automator. Make sure the output of one action is compatible with the input of the next. Using the "Get Specified Finder Items" action as a test input can help isolate where the failure occurs.
Sometimes, Automator actions behave unexpectedly or show errors due to permission restrictions. macOS security settings may block Quick Actions from running. To resolve this, open System Preferences, go to "Security & Privacy," then select the "Privacy" tab. Under "Automation," ensure Automator and related apps have permission to control Finder or other apps involved in your workflow. Additionally, check "Full Disk Access" if your Quick Actions interact with files in protected locations.
- Open System Preferences and navigate to "Security & Privacy" > "Privacy" tab.
You should see a list of permission categories on the left. - Select "Automation" from the list and locate Automator in the right pane.
Verify that Automator has permission to control Finder or other apps your workflow uses. - If permissions are missing, click the lock icon at the bottom left, enter your Mac password, and check the appropriate boxes.
Permissions update immediately; your Quick Action should now run correctly. - Test your Quick Action again in Finder by right-clicking a compatible file.
Your Quick Action should appear and execute without errors.
If issues persist, try re-saving your Quick Action with a new name and restarting your Mac. This can refresh system caching related to Quick Actions.
Frequently asked questions
How to make automatons?
Automatons, or automated workflows, are created by defining a sequence of actions that your device or software performs automatically. In macOS, tools like Automator let you drag and drop actions into a workflow and save it as a Quick Action, application, or service. The key is selecting the right trigger and actions that fit the task you want to automate, then testing the workflow to ensure it runs smoothly.
How to create smart actions?
Smart actions usually refer to automation that adapts based on conditions or inputs. In Automator, you can add conditional actions like 'If' statements to create workflows that respond differently depending on the input or state. Combining these with variables and looping actions lets you build smarter, dynamic workflows tailored to your needs.
How to build an automaton?
Building an automaton starts with identifying the repetitive task you want to simplify. Open Automator, choose a workflow type such as Quick Action, then add actions from the library in the order they should run. After arranging and configuring each action, save and test the automaton to make sure it performs as expected.
Do until action power automate?
In Microsoft Power Automate, the 'Do Until' action repeats a set of steps until a specified condition is met. This is useful for looping processes that need to check for a status or wait for an event. You define the condition and the actions inside the loop, allowing automated workflows to handle repeated tasks efficiently.
How do automatons work?
Automatons work by executing predefined sequences of actions triggered by specific events or inputs. In Automator, these actions manipulate files, applications, or system settings automatically, saving you from manual repetition. Under the hood, each action runs a script or command that performs its designated task, and the workflow connects these actions in a logical order.
What This Guide Does Not Cover
This guide focuses on creating basic quick actions using Automator’s built-in library of actions and simple workflows. It does not cover advanced scripting, such as AppleScript or JavaScript for Automation, nor integration with third-party apps beyond what Automator provides by default. If you need complex automations involving multiple apps, conditional logic beyond Automator’s scope, or custom scripting, exploring tools like Shortcuts, Keyboard Maestro, or learning scripting languages may be necessary.
While Automator is user-friendly for many tasks, some workflows may require trial and error or additional technical knowledge to build. If you find yourself limited by the available actions or need more flexibility, consider consulting resources focused on macOS automation scripting or dedicated automation communities.
Your Next Step
Now that you’ve built your first quick action, try adding it to Finder’s Services menu or the Touch Bar to test its convenience in real scenarios. Experiment with modifying the input types or combining multiple actions to match your specific workflow needs. The best way to gain confidence is by creating quick actions for simple, repetitive tasks you perform daily—this hands-on approach will reveal Automator’s power and help you refine your custom workflows efficiently.
See also: How to Install and Use Fonts in Font Book on Your Mac · How to Reset Fonts to Default in Font Book and Related Apps