How to Open and Use.ISO Files on Mac: A Clear Step-by-Step Guide
Discover simple steps to open and use.ISO files on Mac with Finder, Disk Utility, and trusted third-party software.
You’ve downloaded an.ISO file on your Mac and wonder how to access its contents or install software from it. Whether it’s a Windows installer or a macOS disk image, knowing how to open.iso file on Mac is essential to proceed efficiently.
This guide covers practical methods using native tools like Finder and Disk Utility, as well as reliable third-party software options. You’ll learn how to mount.ISO files for browsing, install operating systems or applications from them, safely obtain macOS ISO files, and create your own disk images when needed. Troubleshooting tips will help you avoid common pitfalls encountered during these processes.
Key takeaways
- You can mount.ISO files directly in Finder or Disk Utility without extra software.
- Installing from a macOS ISO requires creating a bootable USB or using macOS Installer.
- Downloading macOS ISO files should be done through Apple’s official channels to ensure safety.
- Third-party apps like Etcher or Toast offer additional features for handling ISO files.
- Common issues include permission errors and unsupported file formats, which have straightforward fixes.
Before you start: what you need to open an.ISO file on Mac
An.ISO file is a disk image that contains an exact copy of data from a CD, DVD, or other disk. You might have one to install software, run an operating system installer, or access archived data. Macs can open these files natively, but understanding the tools and requirements will help you avoid common pitfalls.
macOS includes built-in options like Finder and Disk Utility to mount or burn.ISO files. Finder lets you mount an ISO with a double-click, while Disk Utility offers more detailed management, such as verifying and burning images. These native tools work well on macOS versions from Sierra onward, but performance depends on available disk space—ISO files often range from a few hundred megabytes to several gigabytes, so ensure you have enough free storage.
For additional features like editing ISO contents or improved compatibility with Windows ISO files, third-party apps such as DAEMON Tools, Toast Titanium, or VirtualBox are popular. These require macOS 10.13 or later and generally need more system resources.
Before opening an ISO file, confirm your macOS version and check free disk space. Also, verify the source of your ISO file to avoid corrupted or malicious images.
- Check your macOS version by clicking the Apple menu and selecting 'About This Mac.' Confirm you are running macOS Sierra or later.
- Verify you have sufficient free disk space by opening Finder, selecting your main drive, and pressing Command + I to view available space. For typical ISO files, aim for at least 5 GB free.
- Locate your.ISO file in Finder. If you plan to use third-party software, download and install it from a trusted developer website before proceeding.
- Double-click the.ISO file to mount it using Finder or open Disk Utility via Applications > Utilities for more options.
How to open a.ISO file on Mac using Finder and Disk Utility
You can mount and access.ISO files on your Mac without installing extra software by using Finder or Disk Utility. This allows you to view and use the contents of the ISO as a virtual drive.
Mounting an.ISO file using Finder
- Locate the.ISO file in Finder.
When successful: The file icon changes to a mounted disk image icon. - Double-click the.ISO file.
When successful: The ISO mounts and appears as a new drive in the Finder sidebar under "Locations" and on your desktop. - Click the mounted drive to access its contents.
When successful: You see the files and folders inside the ISO, similar to browsing a USB drive.
Mounting and verifying.ISO files using Disk Utility
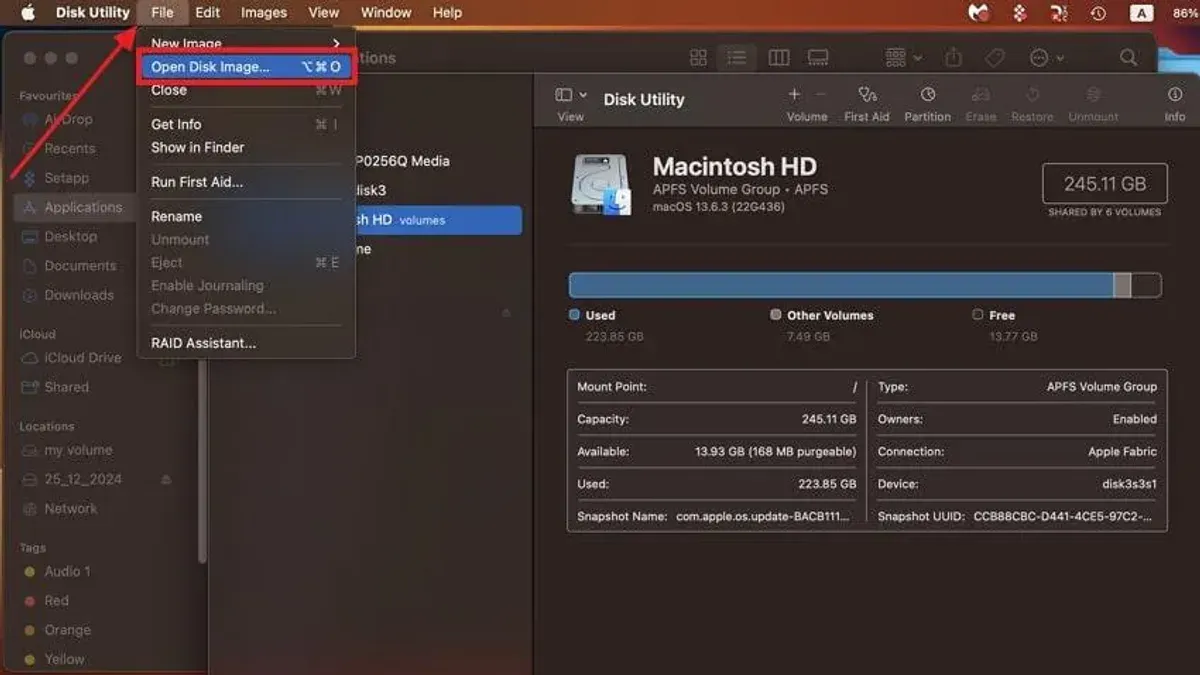
- Open Disk Utility from Applications > Utilities.
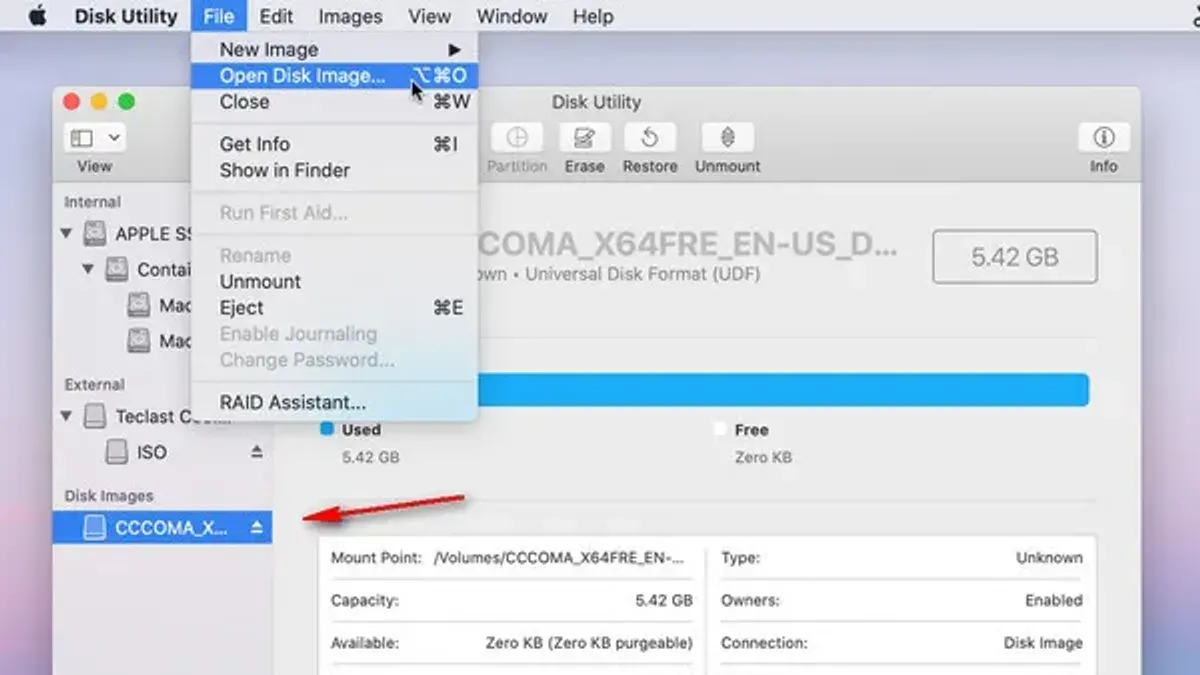
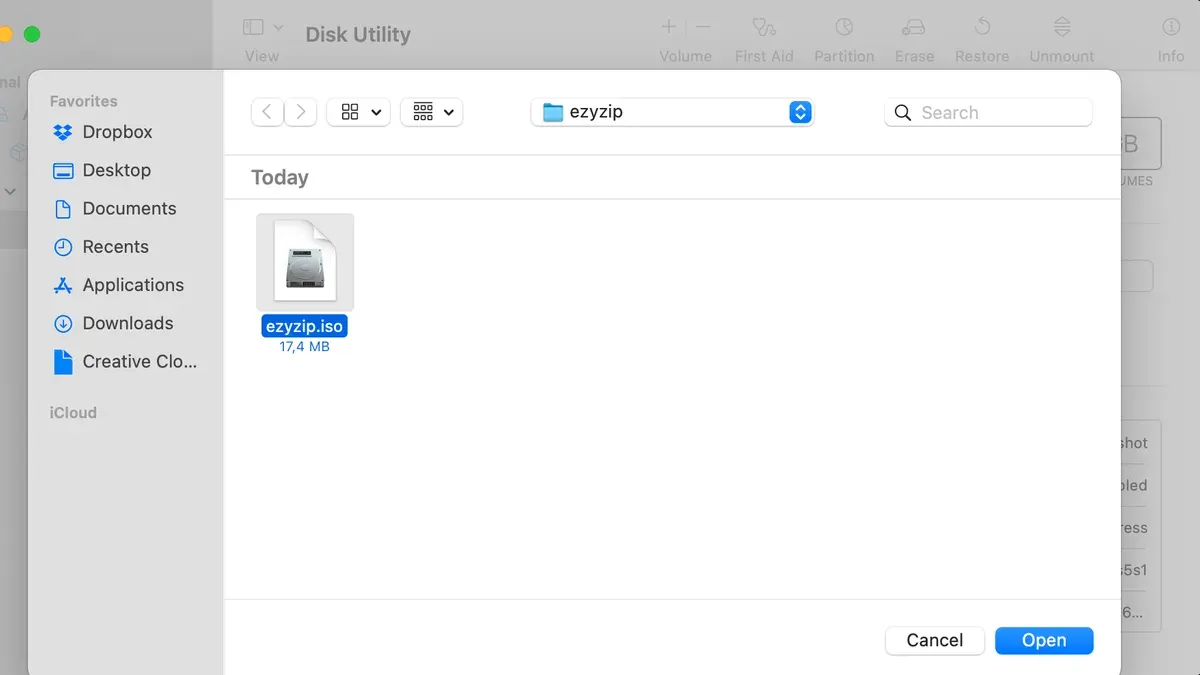
When successful: Disk Utility window opens showing volumes and disks. - Click "File" in the menu bar, select "Open Disk Image", then choose your.ISO file.
When successful: The ISO mounts and appears in the sidebar of Disk Utility and Finder. - Select the mounted image in Disk Utility and click the "Info" button (or press Command+I) to verify details like capacity and format.
When successful: A window shows the ISO’s properties confirming it mounted properly.
After mounting, the ISO behaves like a virtual drive. You can browse and copy files but cannot modify or add files because the mount is read-only.
Keep in mind that native mounting in macOS does not support writing to the ISO or extracting it as a standalone folder; for those tasks, third-party tools are necessary.
How to install.ISO files on Mac: installing macOS or software from ISO images
Installing an operating system or software from an.ISO file on Mac is necessary when you want to reinstall macOS, install Windows via Boot Camp, or run software distributed as ISO images. Since macOS cannot install directly from an ISO file, you generally need to create a bootable USB installer.
- Prepare a USB flash drive with at least 16GB capacity and back up its contents as it will be erased.
- Convert the macOS ISO to a bootable installer by using Terminal commands such as createinstallmedia or third-party tools designed for this purpose. When successful, the USB will be recognized as a bootable drive.
- Restart your Mac and hold the Option (⌥) key during boot to access Startup Manager; select the USB installer to start the macOS installation process.
- Follow the on-screen prompts to install macOS from the USB drive.
For Windows installation, use Boot Camp Assistant to select the Windows ISO file and create a Windows partition. Boot Camp will guide you through creating a bootable USB if needed and installing Windows. This method has a high success rate on compatible Intel-based Macs.
To run installers contained within ISO files for software, you can mount the ISO and open the installer package directly from the mounted volume, following the software-specific installation instructions.
How to download macOS ISO files safely and legally
Obtaining macOS ISO files directly from Apple is not typically supported, as Apple distributes macOS installers through the App Store or software update mechanisms rather than as ISO images. To acquire macOS installers safely and legally, you should download the full macOS installer app from official Apple sources such as the Mac App Store or the Apple Support download page.
Once you have the macOS installer app, you can create an ISO file by converting the installer using Terminal commands. This involves creating a disk image, mounting it, copying the installer contents, and then converting it to an ISO format. Apple provides detailed guidance on creating bootable installers, which can be adapted to generate ISO files. For example, the process often includes commands like hdiutil create, hdiutil attach, asr restore, and hdiutil convert. This method ensures the ISO is authentic and compatible.
Avoid downloading macOS ISO files from unofficial or third-party websites. These sources may provide outdated, modified, or malicious software, potentially compromising system security and violating Apple's software licensing terms. Unlike macOS installer apps, ISO files are not the standard distribution format, so verifying their origin is more difficult.
In summary, the safest approach is to obtain the macOS installer app directly from Apple and convert it yourself if an ISO is required, rather than relying on external downloads.
How to run ISO files on Mac using third-party software
When native macOS tools limit you to read-only access or basic mounting, third-party software can provide more advanced options such as running ISO files in virtual machines, editing ISO contents, or creating new ISO images. Popular options include VirtualBox, Parallels Desktop, and Daemon Tools.
VirtualBox is a free, open-source virtualization app that allows you to run ISO files by creating virtual machines. It supports a wide range of guest operating systems and is ideal for running Windows ISOs without rebooting your Mac. Parallels Desktop is a paid option with a polished interface and seamless macOS integration, offering better performance and easier setup for running ISO files in virtual machines.
Daemon Tools is often used for mounting and managing ISO files, offering editing and creation tools beyond macOS capabilities. It is useful if you need to modify ISO files or create new disk images from files on your Mac.
| Software | Main Function | Cost | Ease of Use | Notable Feature |
|---|---|---|---|---|
| VirtualBox | Virtualization, ISO mounting | Free | Moderate | Supports multiple OS |
| Parallels Desktop | Virtualization, ISO mounting | Subscription or one-time purchase | Easy | macOS integration |
| Daemon Tools | ISO mounting, editing, creating | Free and Paid tiers | Easy | ISO editing tools |
Example use case: To run a Windows ISO, install VirtualBox and create a new virtual machine. When prompted, select the Windows ISO file as the startup disk. Once configured, the virtual machine boots from the ISO, allowing you to install Windows on your Mac without altering your system.
- Download and install your chosen software (e.g., VirtualBox) from the official website.
- Open the software and create a new virtual machine or mount the ISO file using the app’s interface.
- If creating a VM, select the ISO file as the boot disk when prompted.
- Start the VM or mount process; you should see the ISO contents accessible or the OS installer boot up.
- Use the tools provided to interact with or modify the ISO file as needed.
How to create a macOS ISO file from an installer
Creating a macOS ISO file from an installer is useful for backup purposes or deploying macOS on multiple machines. The process involves converting the macOS installer app into an ISO image using Terminal commands.
- Locate the macOS installer app in your Applications folder, typically named like "Install macOS Ventura.app". You should see it when you list the folder contents.
- Open Terminal and create a temporary disk image with the command:
hdiutil create -o /tmp/macOS.cdr -size 8500m -layout SPUD -fs HFS+J
You should see a confirmation message indicating the image was created. - Mount the disk image with:
hdiutil attach /tmp/macOS.cdr.dmg -noverify -mountpoint /Volumes/install_build
The volume "install_build" should appear in Finder. - Use the createinstallmedia tool within the installer app to copy files:
sudo /Applications/Install\ macOS\ Ventura.app/Contents/Resources/createinstallmedia --volume /Volumes/install_build
Enter your password and wait until the process completes successfully. - Unmount the disk image:
hdiutil detach /Volumes/install_build
The volume should disappear from Finder. - Convert the disk image to ISO format with:
hdiutil convert /tmp/macOS.cdr.dmg -format UDTO -o ~/Desktop/macOS.iso
A new file named "macOS.iso.cdr" will appear on your Desktop. - Rename the file to remove the.cdr extension:
mv ~/Desktop/macOS.iso.cdr ~/Desktop/macOS.iso
The final ISO file is ready for use.
Verify the ISO by mounting it with Disk Utility or Finder; it should show the macOS installer contents. Common errors include insufficient disk space, incorrect path names, or missing installer permissions. Ensure the installer app is fully downloaded and not corrupted. This method provides a bootable ISO but is limited to versions supported by your macOS installer app.
How to mount ISO files on MacBook for easy access
Mounting ISO files on a MacBook is straightforward using native tools like Finder and Disk Utility, offering quick access without extracting the file.
- Locate the ISO file in Finder. Double-clicking it will usually mount the image automatically, showing it as a new drive on your desktop and in the Finder sidebar.
- If double-clicking does not work, open Disk Utility (found in Applications > Utilities). From the menu bar, choose File > Open Disk Image, then select your ISO file. The image will appear as a mounted volume in Disk Utility and Finder.
- Access the mounted ISO through Finder or the desktop to browse its contents as if it were a physical disk.
MacBooks handle ISO mounting efficiently, but large ISO files (several gigabytes) can use noticeable system resources, potentially affecting battery life and performance on older or entry-level models. Mounting an ISO is mostly a read operation, so CPU usage is low, but disk activity and RAM use increase slightly while the image is mounted.
To free resources and avoid battery drain, unmount the ISO when done by right-clicking the mounted volume in Finder and selecting "Eject," or by clicking the eject icon next to the volume name in the Finder sidebar. This safely disconnects the image without risking data corruption.
Troubleshooting common issues when opening or installing ISO files on Mac
If your ISO file won’t mount or open, start by verifying the file integrity. A common error message is "The disk image could not be opened." Use Disk Utility’s "First Aid" feature to check and repair the ISO file. If the repair fails, the ISO might be corrupt or incomplete, requiring a fresh download.
During macOS installation from an ISO or bootable USB, errors like "This copy of the Install macOS app is damaged" or "Could not verify the installer" often indicate corrupted installation media. Recreate the bootable USB using Terminal commands or Boot Camp Assistant, ensuring the ISO source is verified and complete.
Permission and security settings can block ISO access. If you see messages like "You do not have permission to open the file," check the file’s permissions by selecting the ISO in Finder, pressing Command+I, and adjusting settings under "Sharing & Permissions." Also, macOS Gatekeeper might block unsigned software; allow the ISO or installer via System Preferences > Security & Privacy > General by clicking "Open Anyway."
- Open Disk Utility from Applications > Utilities.
- Select your ISO file from the sidebar.
- Click "First Aid" and confirm to run checks; a successful check shows "The volume appears to be OK."
- If errors persist, redownload the ISO from a trusted source.
- For permission issues, right-click the ISO, choose "Get Info," expand "Sharing & Permissions," and set your user to "Read & Write."
- If blocked by Gatekeeper, open System Preferences > Security & Privacy > General and click "Open Anyway" next to the blocked app message.
Following these steps addresses most common ISO-related issues on Mac, ensuring smoother mounting and installation experiences.
Frequently asked questions
How to download mac os iso file?
You can download a macOS ISO file safely and legally from Apple's official sources, such as the Mac App Store or Apple's developer website if you have an account. After downloading the macOS installer app, you typically need to create an ISO file manually using Terminal commands or third-party tools, as Apple does not provide direct ISO downloads.
How to download mac iso file?
When searching for a Mac ISO file, ensure you obtain it from official channels to avoid corrupted or malicious files. The typical process involves downloading the macOS installer app from the Mac App Store and then converting it into an ISO file yourself, since Apple releases macOS installers in.app format, not direct ISOs.
How to run iso on mac?
To run an ISO file on a Mac, you can mount it using Finder by double-clicking the file or using Disk Utility to mount the image. This allows you to access the contents as if it were a physical disk. For bootable ISOs, you may need to create a bootable USB drive or use virtualization software.
How to get a macos iso?
Getting a macOS ISO involves downloading the macOS installer app from Apple, then using Terminal commands or third-party utilities to convert that installer into an ISO file. This process requires some familiarity with command-line tools and is necessary because Apple does not distribute macOS directly as ISO files.
How to install iso on mac?
Installing software from an ISO on Mac usually starts with mounting the ISO via Finder or Disk Utility. If the ISO contains a macOS installer, you can create a bootable USB drive from it and then boot your Mac from that drive to begin installation. For other software, mounting the ISO lets you run the installer inside it directly.
What this guide does not cover
This guide does not cover advanced ISO editing, such as modifying ISO contents or creating hybrid ISOs, nor does it address usage on unsupported macOS versions. Users with older Macs or non-standard setups may face additional challenges, including compatibility issues or lack of built-in tools. For those needing to work extensively with ISO files beyond mounting or installation, or who encounter persistent errors, specialized software or professional support is recommended.
The most useful next step is to ensure your ISO file is from a trusted source and properly verified. Then, use Finder’s built-in Disk Image Mounter or Disk Utility to mount the ISO, which provides straightforward access without extra software. This approach balances simplicity and reliability for most Mac users handling ISO files.