How to Pin a Note in the Notes App: Step-by-Step Guide
Discover how to pin a note in the Notes app and other popular apps to keep your important information easily accessible and organized.
You have a list of notes, but the most important ones keep getting buried as you add more. Finding a quick way to access those key notes can save you time and keep your workflow smooth. If you've ever wondered how to pin a note in Notes app or similar applications, this guide will walk you through the process step by step.
This article compares how to pin notes across popular apps and devices, such as the iPhone Notes app, OneNote, Sticky Notes, and even how to pin notes directly to your desktop. By exploring these options, you'll learn which method fits your style of organizing and prioritizing digital notes effectively.
Key takeaways
- Pinning a note in the iPhone Notes app involves swiping right on the note and tapping the pin icon.
- OneNote allows you to right-click a note or page and select "Pin to Start" for easy access.
- Sticky Notes on Windows lets you pin notes to your desktop and keep them visible while working.
- Pinning notes directly to your desktop can be done through third-party apps or built-in features depending on your OS.
- Organizing pinned notes thoughtfully makes retrieving important information faster and keeps your workspace clutter-free.
Before you start: What you need to pin notes effectively
Pinning notes helps you keep important information accessible across your devices and apps. To do this effectively, you need to know which devices and applications support pinning features, along with any necessary accounts or software versions. This guide covers pinning notes on iPhone, Mac, and Windows PC using Apple Notes, OneNote, Sticky Notes, and Pinterest.
Each app handles pinning differently: some let you pin notes within the app itself, while others allow you to pin notes directly to your desktop or screen for quick reference. Understanding these distinctions helps you choose the best method for your workflow.
| App | Devices Supported | Pinning Type | Account/Version Requirements |
|---|---|---|---|
| Apple Notes | iPhone, iPad, Mac | Pin within app | iCloud account; iOS 14 or later, macOS Big Sur or later |
| OneNote | Windows PC, Mac, iPhone, Android | Pin within app | Microsoft account; OneNote app updated to latest version |
| Sticky Notes | Windows PC | Pin notes to desktop | Windows 10 or later; Microsoft account for sync |
| iPhone, Android, Web | Pin notes to Pinterest pins | Pinterest account; latest app or web browser |
- Confirm your device and operating system meet the app’s requirements. You should see the app icon available in your device’s app store or pre-installed on your computer.
- Ensure you have the necessary account (iCloud for Apple Notes, Microsoft account for OneNote and Sticky Notes, Pinterest account for Pinterest). After signing in, you should see your notes or pins synced across devices.
- Understand whether you want to pin notes inside the app or directly to your desktop or screen. Pinning within the app keeps notes organized in one place, while desktop pinning places notes always visible on your computer screen.
Following these steps prepares you to pin notes effectively and choose the right tool for your needs.
How to pin a note on iPhone using the Notes app
Pinning notes in the Apple Notes app on your iPhone helps you keep important information easily accessible at the top of your notes list. This feature is especially useful for notes you refer to frequently or need quick access to throughout your day.
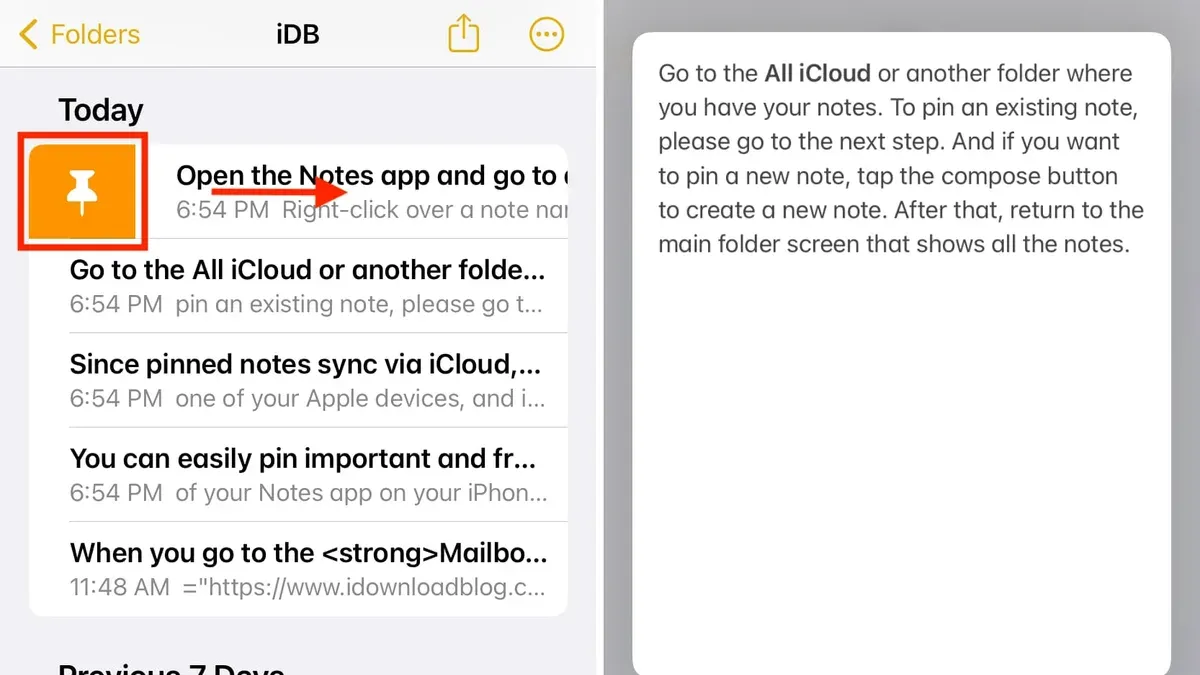
- Open the Notes app on your iPhone and navigate to the folder containing the note you want to pin. You should see a list of your notes displayed.
- Locate the note you want to pin and swipe right on it gently. As you swipe, a yellow pin icon will appear on the left side of the note.
- Tap the yellow pin icon that appears to pin the note. Once pinned, the note will move to the top of the list under a separate pinned section, making it easy to find.
- To confirm the note is pinned, scroll to the top of your notes list. You should see a Pinned section with your note displayed there, distinguished from the other notes below.
- If you want to unpin a note later, repeat the swipe right gesture on the pinned note and tap the yellow pin icon again. This removes the note from the pinned section and places it back into the regular list.
Managing pinned notes effectively means keeping only the most relevant notes pinned to avoid clutter. You can pin multiple notes, and they will all appear in the pinned section in the order you pinned them. Regularly review your pinned notes to ensure they reflect your current priorities.
How to pin notes in OneNote for quick access
In Microsoft OneNote, you can pin individual pages or entire sections, but the app does not support pinning notebooks directly within the interface. Pinning a page keeps it easily accessible within a section, while pinning a section helps you focus on a group of related pages. Additionally, on Windows, you can pin OneNote pages or the app itself to the Start menu or taskbar for faster launching.
Pinning a OneNote page or section within the app
- Open OneNote and navigate to the notebook containing the page or section you want to pin. You should see the notebook's sections listed across the top or side, depending on your layout.
- To pin a page, right-click the page tab and select "Add to Favorites" (available in some versions) or use tags to mark important notes, as OneNote does not have a universal native pin feature for pages.
- To pin a section, right-click the section tab and choose "Copy Link to Section." You can then paste this link into a note or a task management app for quick access, as direct pinning inside OneNote isn’t supported.
Pinning OneNote pages to Start menu or taskbar on Windows
- Open the specific OneNote page you want to pin in the OneNote desktop app.
- Click the three-dot menu in the top-right corner and select "Pin to Start" or "Pin to taskbar."
- You will see a tile or icon appear on your Start menu or taskbar, which you can click to open that page directly.
Keep in mind, OneNote's pinning options are less straightforward compared to apps designed solely for note organization. While you can pin shortcuts externally on Windows, the app itself relies more on tagging and search to organize notes internally. Using these methods together can help you create a workflow that balances quick access and comprehensive note management.
How to pin a note to your desktop or screen
Keeping notes visible on your desktop can help you quickly reference important information without opening an app. On Windows, the built-in Sticky Notes app allows you to create notes that stay on top of other windows, effectively pinning them to your desktop. These notes remain accessible and visible as you work, minimizing the need to switch contexts.

- Open the Sticky Notes app by searching for "Sticky Notes" in the Start menu. A small note window will appear on your desktop.
- Click the plus (+) icon to create a new note or select an existing note to pin.
- To keep the note visible on top of all other windows, click the ellipsis (three dots) menu in the note's top-right corner and select "Always on top." The note will stay visible even when you switch to other applications.
- Resize or move the note anywhere on your desktop by dragging its edges or title bar.
- Repeat these steps to add more notes, but be mindful of clutter as too many pinned notes can overcrowd your workspace.
On a Mac, the Notes app does not offer a direct way to pin notes on the desktop, but you can use floating windows to keep notes visible. Open the Notes app, double-click a note to open it in a separate window, then choose Window > Float on Top from the menu bar. This window will stay above others, similar to pinned notes in Windows.
Be aware that pinning notes to your desktop or screen is less integrated than pinning within apps. Desktop notes don’t sync or organize themselves, so managing note clutter is important. Consider periodically reviewing and closing notes you no longer need visible to maintain a clean workspace.
How to pin sticky notes in the Sticky Notes app
The Sticky Notes app on Windows lets you create digital notes that stay on your desktop for quick reminders and easy access. To start, open the Sticky Notes app and create a new note. Your note will appear as a small window on your desktop, which you can move and resize to fit your workspace.
- Open the Sticky Notes app from your Start menu. You should see any existing notes or a blank window to create a new one.
- Click the plus (+) button to create a new sticky note. A new note window appears on your desktop where you can type your content.
- To keep the note visible and "pinned" on your desktop, simply leave the note window open. The note stays on top of your desktop but does not overlay other apps unless you use third-party tools.
- Resize the note by dragging the bottom-right corner to adjust how much content you want visible. You can also change the note’s color by clicking the three-dot menu and selecting a different color for better organization.
- Sign in with your Microsoft account in the Sticky Notes app settings to enable syncing. This syncs your notes across all Windows devices linked to your account, so your pinned notes appear wherever you use Sticky Notes.
If your notes do not sync, check your internet connection and ensure you are signed in with the same Microsoft account on all devices. Restarting the app can also resolve syncing delays.
Sticky Notes do not have a formal "pin" button, but keeping the note open on your desktop effectively pins it there. You can minimize or close notes to remove them from view, but reopening the app restores your saved notes.
How to add notes to Pinterest pins for organization
Pinterest allows you to attach notes or detailed descriptions to your pins, which helps keep track of ideas and inspirations effectively. Unlike traditional note apps where you pin notes to the top, Pinterest uses the description field to add context or reminders directly to the pin. This method keeps your ideas connected to the visual content you saved.
To add or edit a note on a Pinterest pin, follow these steps:
- Open Pinterest and navigate to your profile, then select the board containing the pin you want to annotate. You should see all the pins listed.
- Click on the pin to open its detailed view. Here, look for the "Edit" button (usually represented by a pencil icon) near the pin’s image or description.
- In the edit screen, locate the description field. Add your detailed notes or reminders here. For example, if you pinned a recipe, you might add notes about ingredient substitutions or cooking tips.
- Save the changes by clicking the "Done" or "Save" button. Your notes will now appear below the pin image whenever you open it.
If you need more extensive note-taking features than Pinterest offers, some users combine Pinterest with third-party tools like Evernote or Notion. They save the pin’s URL in those apps and write detailed notes alongside it, linking back to Pinterest for visual reference.
When organizing boards, use clear, descriptive titles and consistent naming conventions to make your notes and pins easier to find. Group related pins together and leverage the description field to tag keywords or project details. This approach makes Pinterest a useful visual and textual organizer, even though it doesn’t pin notes in the traditional sense.
For example, a pin of a home office setup could have a description reading: "Ergonomic chair recommended for back support, budget-friendly desk option included, colors to match light wood flooring." This blends visual inspiration with practical notes for your project.
How to use the Notes app to organize and prioritize your notes
Organizing your notes effectively in the Notes app goes beyond simply pinning. Start by creating folders and subfolders to group related notes, which helps reduce clutter and makes navigation easier. For instance, you might create a folder for Work and subfolders for Projects, Meetings, and Ideas. This hierarchical structure lets you find notes quickly and keeps your workspace tidy.
Tags are another powerful tool within the Notes app. By adding tags to notes, you enable easier sorting and searching across folders. Use clear, consistent tags like #urgent or #reference to filter notes instantly. The search function complements tags by allowing you to enter keywords or tag names, surfacing relevant notes no matter where they are stored.
Pinning important notes should be part of this overall strategy. Pin your highest priority notes to the top of a folder or list, so they remain immediately accessible without scrolling. This way, pinning highlights what needs your attention while folders and tags structure the rest of your content.
Finally, ensure your notes sync across your devices via iCloud or your preferred cloud service. Syncing keeps your organization consistent whether you access notes on your phone, tablet, or computer, preventing fragmentation and lost information.
- Create a new folder by tapping the New Folder icon. You should see the folder appear in your list.
- Tap a folder, then tap New Folder again to create a subfolder within it. The subfolder will appear nested under the parent folder.
- Add tags to a note by typing #tagname anywhere in the note body. Tagged notes will show up in the tag browser.
- Use the search bar to enter a keyword or tag; notes matching the query will be displayed.
- Pin a note by swiping right on it and tapping the pin icon; the note moves to the top of its folder.
- Check your iCloud settings to confirm Notes syncing is enabled to keep all devices updated.
Before using these tools, your notes might have appeared as a long, unorganized list, making it hard to locate or prioritize information quickly. After applying folders, tags, and pinning, your notes become structured, searchable, and prioritized, streamlining your workflow.
Troubleshoot common issues when pinning notes
If you notice a pinned note not staying at the top or disappearing, it often relates to syncing problems or app glitches. Start by closing and reopening the app to refresh its state. If the note still moves, check your device’s connectivity and ensure the app is updated to the latest version.
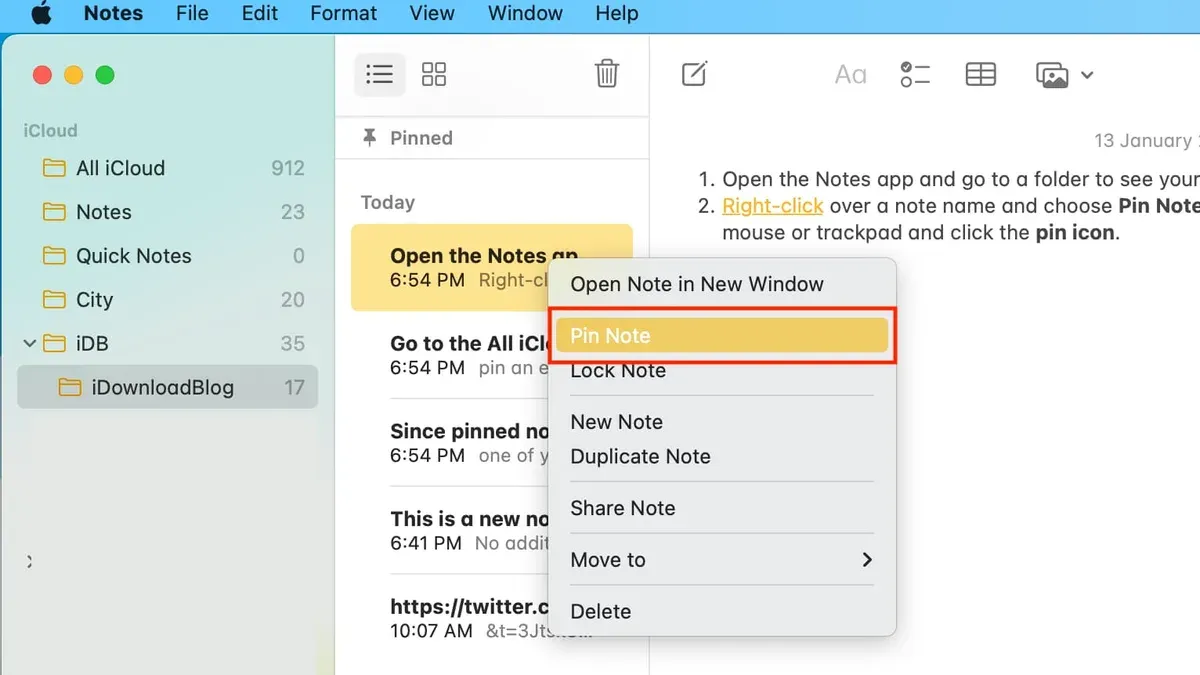
When the pin option is missing or greyed out, verify that you are using a supported app version and that the note type allows pinning. For example, certain shared or locked notes may restrict pinning features. Also, look for any app-specific settings that enable or disable pinning.
Sync issues can cause pinned notes not to appear on other devices. To fix this, confirm that you are signed into the same account across all devices and that syncing is enabled in the app’s settings. Manually triggering a sync or restarting devices can resolve temporary hiccups.
Each app has quirks: for instance, OneNote does not have a universal pin feature but uses page flags and shortcuts instead. Sticky Notes on Windows requires Microsoft account sign-in for syncing pinned notes. Understanding these nuances helps avoid confusion.
Step-by-step fixes for pinned notes issues
- Close and reopen the notes app; the pinned note should remain visible at the top.
- Check for app updates in your device’s app store; after updating, verify if pinning is enabled.
- Ensure you are signed into the same account on all devices and that syncing is active; pinned notes should then appear consistently.
- If pinning is disabled, open the note’s options menu and look for restrictions like locked or shared status; unlocking or changing permissions may restore pinning.
- Restart your device to clear temporary glitches; after reboot, pinned notes should behave normally.
Frequently asked questions
How to pin sticky notes app?
To pin a note in the Sticky Notes app on Windows, open the note you want to pin and click the thumbtack icon in the upper-right corner of the note window. This keeps the note on top of other windows, ensuring it stays visible. You can unpin it by clicking the thumbtack again if needed.
How to pin a note to desktop?
Pinning a note directly to the desktop usually involves apps like Sticky Notes or third-party tools. In Sticky Notes, notes appear on the desktop as separate windows you can move and resize freely. Simply create a new note and position it where you want on your desktop; it will remain there unless closed.
How to pin a note to screen?
Pinning a note to the screen means keeping it visible above other windows. In Windows Sticky Notes, use the thumbtack icon to keep the note always on top. On Mac, apps like Stickies offer similar functionality with a “Float on Top” option under the Window menu.
How to pin notes to desktop?
To pin notes to your desktop, use note-taking apps that support desktop widgets or floating notes, such as Sticky Notes on Windows or Stickies on Mac. Create or open a note and then position it on your desktop workspace; the note will stay visible unless you close it. Some third-party apps also let you save notes as desktop files for quick access.
How to pin notes on screen?
Pinning notes on screen typically involves enabling the “always on top” feature in your note app. For example, in Sticky Notes on Windows, click the pin icon to keep the note above other windows. Other note apps may have a similar setting labeled “float,” “pin,” or “keep on top” in their menus.
What This Advice Does Not Cover and Who Should Look Elsewhere
This article does not cover pinning notes in every note-taking app available, focusing only on the most commonly used ones like the Notes app on iPhone, OneNote, Sticky Notes, and Pinterest. Pinning notes to your desktop or screen is limited by the operating system's built-in capabilities and may require third-party applications if you want features beyond simple pinning, such as always-on-top windows or advanced customization. Additionally, some pinning features depend on the specific version of the app and the device’s operating system updates; you should check that your software is current to access the latest options.
For users who rely on more complex note organization systems or who use less common apps, exploring specialized productivity tools or workflow automation may be more effective than the methods covered here.
The single most useful next step is to open the Notes app or your preferred note-taking application now and try pinning a note following the steps described. Practicing this will help you see how pinning integrates into your daily workflow and whether you need to adjust your approach or explore additional tools for better organization.
See also: How to Recover Deleted Notes in the Notes App: Step-by-Step Guide · How to Sync Messages on Mac: A Step-by-Step Guide for Apple Users · How to Use Mac Force Quit to Fix Unresponsive Apps Quickly