How to Install Ice Menu Bar on Mac: A Clear Step-by-Step Guide
This guide explains how to install Ice Menu Bar on Mac and customize your menu bar for improved productivity and ease of use.
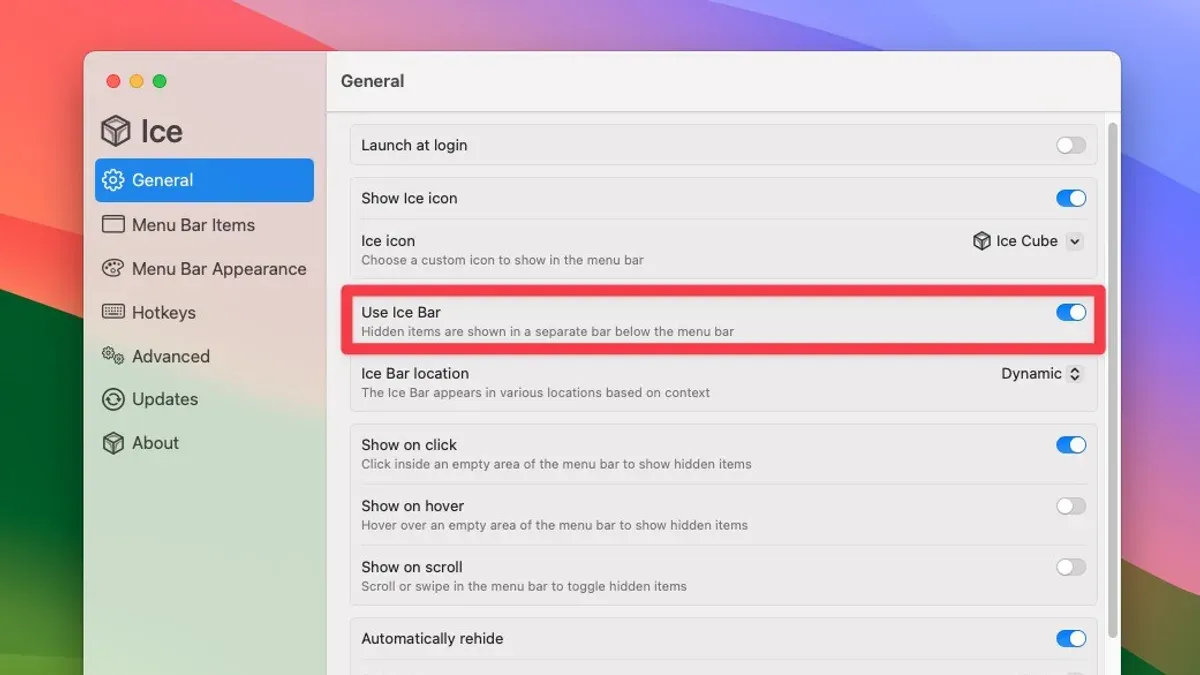
You may find your Mac's default menu bar cluttered or lacking the quick-access features you want. Installing a third-party app like Ice Menu Bar can help you customize and streamline your workspace for better productivity.
This article explains how to install Ice Menu Bar on Mac, guiding you through the installation process step-by-step. You will also learn how to customize your menu bar using Ice Menu Bar's options, understand where the menu bar is located, and troubleshoot common issues to ensure smooth operation.
Key takeaways
- Download Ice Menu Bar from the official website or the Mac App Store to ensure safety and compatibility.
- Grant necessary permissions in System Preferences under Security & Privacy to enable full functionality.
- Customize menu bar icons and shortcuts through Ice Menu Bar preferences for a personalized setup.
- Access the menu bar at the top of your screen and expand it by adjusting System Preferences > Dock & Menu Bar settings.
- Resolve common issues by checking permissions, restarting the app, or updating macOS and Ice Menu Bar to the latest versions.
Before you start: What you need to install Ice Menu Bar on Mac
Before installing Ice Menu Bar, ensure your Mac meets the necessary system requirements. The app supports macOS versions 11.0 (Big Sur) and later, including macOS Monterey and Ventura. Attempting installation on earlier macOS versions may result in compatibility issues.
You must have administrator access on your Mac to complete the installation. If you are using a managed device, verify with your IT administrator that you have the needed permissions.
Download Ice Menu Bar only from the official website or a trusted source to avoid security risks. After downloading, verify the app’s authenticity by checking the developer signature in the app’s info panel. This prevents installing tampered or malicious software.
Backing up your system or important data before installation is recommended. Use Time Machine or another reliable backup method to safeguard your data in case of unexpected issues during or after installation.
- Check your macOS version by clicking the Apple menu and selecting About This Mac. Confirm the version is 11.0 or higher. You should see a version number like “macOS Monterey 12.0” or later.
- Verify you have administrator access by opening System Preferences and navigating to Users & Groups. Your user account should say “Admin” under your name.
- Download Ice Menu Bar from the official website. After downloading, right-click the app file and select Get Info. Look for the developer name to confirm authenticity.
- Create a backup using Time Machine or your preferred backup tool. This ensures your data is safe in case you need to restore it.
How to install Ice Menu Bar on Mac step-by-step
- Visit the official Ice Menu Bar website or a trusted software source and download the latest Mac installer. When the download completes, check your Downloads folder for the installer file, usually named something like IceMenuBar.dmg.
- Double-click the IceMenuBar.dmg file to mount the installer disk image. A new window should appear displaying the Ice Menu Bar installer icon and possibly a shortcut to the Applications folder.
- Drag the Ice Menu Bar icon into the Applications folder shortcut within the installer window. This copies the app to your Applications directory.
- Open your Applications folder and double-click Ice Menu Bar to launch the app. The first time you do this, you may see a security prompt; click Open to proceed.
- Go to System Preferences > Security & Privacy > Privacy tab. Select Accessibility and ensure Ice Menu Bar is checked to grant necessary permissions for full functionality.
- Return to the app and confirm it starts correctly. You should now see the Ice Menu Bar icon appear in the top menu bar near the system icons.
Following these steps, Ice Menu Bar will be installed and ready for customization.
How to customize menu bar on Mac with Ice Menu Bar
After installing Ice Menu Bar, you can personalize your Mac’s menu bar to better suit your workflow and style. Begin by accessing Ice Menu Bar settings through the app icon in the menu bar; click it and select Preferences from the dropdown menu. This opens the customization panel where you control the appearance and functionality.
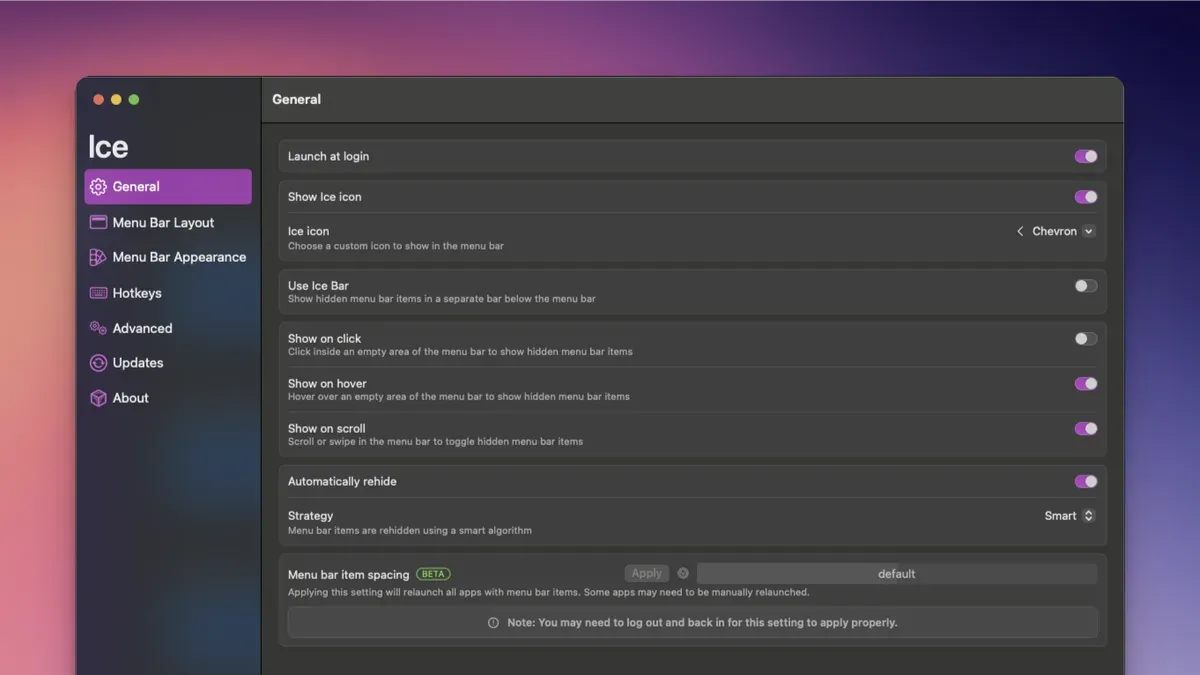
- Click Icons & Widgets tab to add or remove items. Use the checkboxes next to available widgets like CPU usage, weather, or calendar to toggle their presence. When enabled, the icons appear immediately in your menu bar.
- To rearrange icons, drag them directly within the menu bar while holding the Command (⌘) key. This allows you to prioritize what’s most visible, such as placing frequently used widgets near the left side for quick access.
- Under Appearance, adjust the icon size by choosing between Small, Medium, or Large. Select a theme option like Light, Dark, or Auto to match your Mac’s system appearance. Changes update instantly for real-time preview.
- Integrate Ice Menu Bar with other menu bar apps by enabling the App Integration feature. This allows Ice Menu Bar to manage overlapping icons and streamline notifications, reducing clutter and improving workflow efficiency.
For example, enabling the CPU widget and setting icon size to Medium while arranging it next to your Wi-Fi icon creates a compact view that keeps vital information accessible without overwhelming the bar. Before-and-after screenshots in the preferences panel illustrate how a minimal setup contrasts with a fully customized, information-rich menu bar.
Where is the menu bar on Mac and how to expand it
The Mac menu bar is located at the very top of your screen, stretching horizontally across the display. It provides quick access to system status icons, app menus, and various controls. By default, this bar remains visible unless you enable auto-hiding in System Settings.
Ice Menu Bar integrates directly into this existing menu bar area, enhancing its functionality by allowing more icons to be displayed and providing better organization. Rather than replacing the native menu bar, Ice Menu Bar works alongside it, adding features like icon grouping and custom sizing to maximize space.
Expanding the visible icons in the menu bar
You can increase the number of visible icons using both Ice Menu Bar features and macOS native options:
- Open Ice Menu Bar's preferences and enable icon grouping and resizing options. You should see more icons neatly arranged and fitting into the menu bar.
- Go to System Settings > Desktop & Dock and disable Automatically hide and show the menu bar. This ensures the menu bar stays visible at all times.
- Use the Control Center settings to customize which system icons appear in the menu bar, removing less-used ones to free space.
- If your screen resolution is set low, increase it via System Settings > Displays to fit more icons horizontally.
Visual diagrams of the menu bar placement show the bar situated at screen top, with grouped icons clustering neatly when Ice Menu Bar is active. Expanded states illustrate how more system and app icons can appear without clutter.
Troubleshooting common issues with Ice Menu Bar on Mac
If Ice Menu Bar icons do not appear, first check that the app has the necessary permissions. Go to System Preferences > Security & Privacy > Privacy tab > Accessibility and Screen Recording, and ensure Ice Menu Bar is checked. Missing permissions often trigger error messages like "Access Denied" or "Permission Required."
Permission issues may prevent Ice Menu Bar from running properly. If you see alerts such as "Cannot access menu bar elements" or the app fails to launch, granting these permissions and restarting your Mac typically resolves the problem.
Conflicts with other menu bar apps or macOS settings can cause icons to disappear or behave erratically. Try temporarily disabling other menu bar utilities to identify conflicts. Some users report that apps controlling menu bar visibility or third-party customization tools clash with Ice Menu Bar.
To uninstall Ice Menu Bar safely, quit the app, then drag it from the Applications folder to the Trash. Remove related preference files from ~/Library/Preferences (look for files named with "ice" or the app’s developer name). Reinstalling involves downloading the latest version from the official source and repeating the installation steps.
- Open System Preferences > Security & Privacy > Privacy tab > Accessibility and Screen Recording.
- Check the box next to Ice Menu Bar to grant permissions.
- Restart your Mac to apply changes. You should now see Ice Menu Bar icons in the menu bar.
- If icons remain missing, quit conflicting apps and restart Ice Menu Bar.
- To uninstall, drag Ice Menu Bar to Trash and delete related preference files from ~/Library/Preferences.
- Re-download and reinstall Ice Menu Bar following the official guide.
- How to Install and Use Bartender on Mac: A Step-by-Step Guide
- How to Install Alfred on Mac: A Step-by-Step Guide
- How to Install Raycast on Mac: A Clear Step-by-Step Guide
- How to Install and Use Magnet on Mac: A Complete Step-by-Step Guide
Frequently asked questions
Where is the mac menu bar?
The Mac menu bar is located at the top of your screen, stretching horizontally across the entire width. It displays menus such as Apple, File, Edit, and system icons on the right side like Wi-Fi, battery, and clock.
How to expand menu bar on mac?
You cannot physically expand the Mac menu bar beyond its fixed height, but you can add more icons and controls by enabling additional menu bar apps. To add items, go to System Settings > Control Center or use third-party apps like Ice Menu Bar to customize and increase functionality.
Where is the menu bar on macbook?
On a MacBook, the menu bar is similarly positioned at the very top of the screen. It remains visible whether you are on the desktop or in most applications, providing quick access to system and app menus.
Where is the menu bar on Macbook?
The menu bar on a MacBook appears at the top edge of the display. It contains system menus on the left and status icons on the right, maintaining consistency across Mac desktops and laptops.
How to add app to menu bar on Mac?
To add an app to the menu bar, first check if the app supports a menu bar icon in its preferences. Many apps include an option like “Show in Menu Bar.” For apps without this feature, you can use utilities such as Ice Menu Bar to add or manage menu bar items effectively.
What this guide does not cover and who should seek alternative resources
This guide does not cover advanced developer customization or scripting with Ice Menu Bar; users seeking deep technical modifications should consult official developer resources. Additionally, Ice Menu Bar may not support all macOS versions or hardware configurations, so verifying compatibility before installation is essential.
For most users, the next best step is to familiarize yourself with the System Preferences > Dock & Menu Bar pane on your Mac. This section lets you control which icons appear by default and how the menu bar behaves alongside Ice Menu Bar. Adjusting these settings helps you optimize your menu bar experience and ensures that Ice Menu Bar integrates smoothly with your existing setup.