
Mastering Mac Users and Groups: A Clear Guide to Managing Accounts
This guide helps you confidently manage mac users and groups to control access and permissions for personal or business needs.
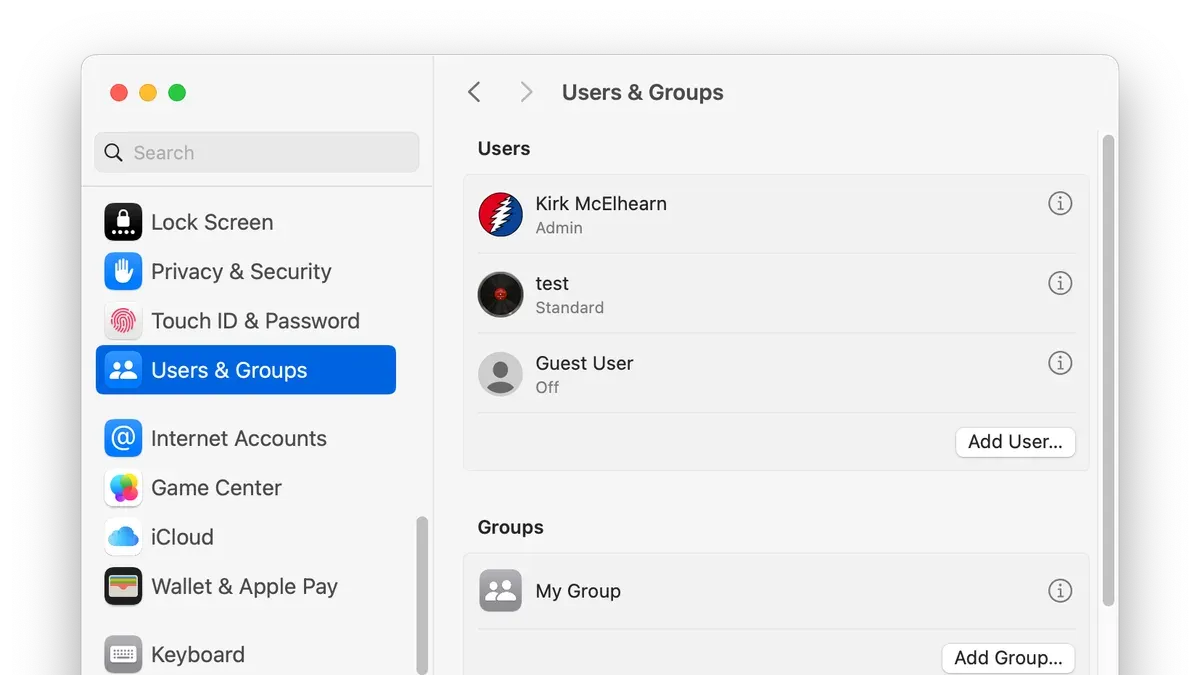
You just set up a new Mac for your home office or small business, and now you need to organize who can access the computer and what they can do. Managing multiple accounts effectively is essential to keep your data secure and workflows smooth. This article walks you through managing mac users and groups, explaining how to find, modify, and troubleshoot user and group settings on your Mac.
From understanding what Mac groups are and why they matter to handling advanced options and common access issues, you’ll gain clear, step-by-step guidance tailored to both beginners and those looking for more control. By the end, you’ll confidently manage user accounts and groups to suit your personal or business needs.
Key takeaways
- Mac groups help organize users by roles or permissions for easier management.
- You can find Users and Groups settings in System Settings under Users & Groups.
- Adding, modifying, or deleting users and groups requires administrator privileges.
- Grouping tabs and apps separately enhances multitasking without changing user accounts.
- If access to Users and Groups is restricted, checking admin rights and using Safe Mode can help.
What is a Mac group and why are Mac groups established and organized
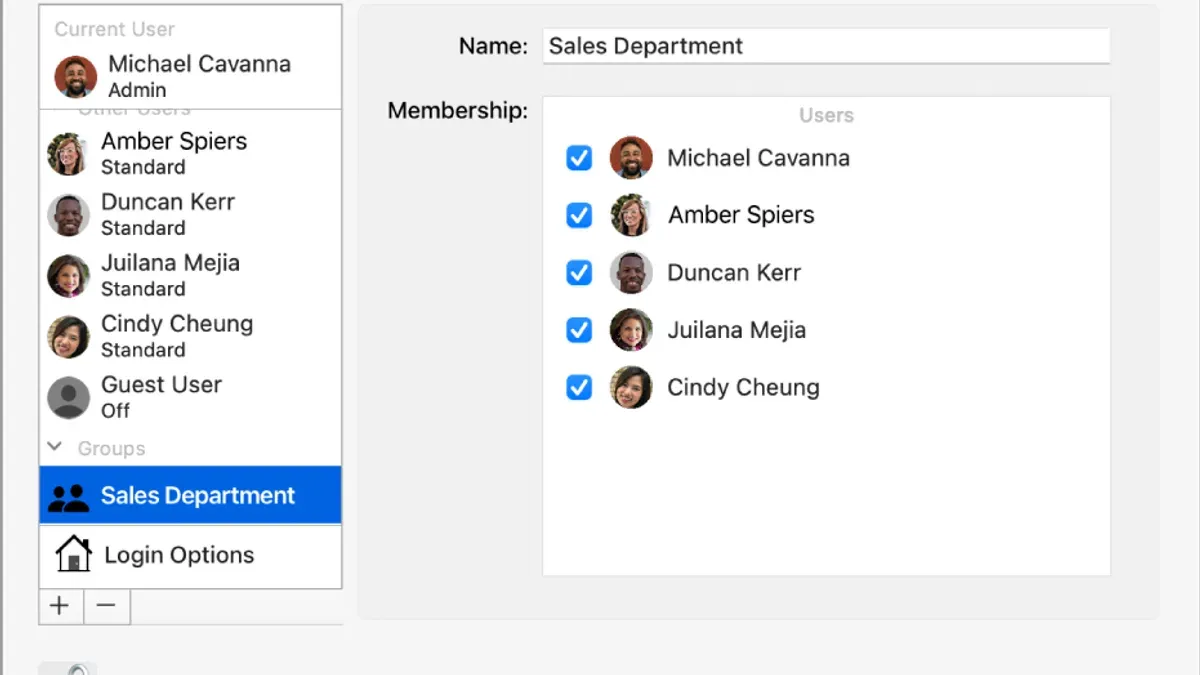
In macOS, a user account represents an individual who logs into the system, while a group is a collection of multiple user accounts. Groups are created to simplify the management of permissions and resource sharing by allowing you to assign rights to several users at once instead of configuring each user individually. This organizational structure helps streamline administrative tasks, especially when multiple users need similar access.
For example, imagine you have a small business where several employees need access to a shared folder containing project files. Instead of setting read and write permissions for each employee’s user account separately, you can create a group—say, "Project Team"—and assign all relevant users to it. Then you grant the folder permissions to that group. This way, anyone added to or removed from "Project Team" automatically gains or loses access without further adjustment.
Groups also enhance security by controlling who can access sensitive information or system settings. By carefully organizing users into groups based on roles or departments, you reduce the risk of unauthorized access. Unlike user accounts, groups do not represent actual individuals but serve as permission containers that make collaboration and administration more efficient.
Where is Users on Mac and how to find Users and Groups on Mac
To manage user accounts and groups on your Mac, the most straightforward place to start is the Users & Groups panel within System Settings. You can access this by clicking the Apple menu at the top-left corner of your screen, selecting System Settings, then scrolling down the sidebar until you find Users & Groups. This panel lists all user accounts on the Mac, including administrator and standard users, and allows you to add, modify, or remove accounts with a clear graphical interface.
In addition to the graphical interface, the Terminal offers a powerful alternative for viewing and managing users and groups. To see all users recognized by the system, open Terminal and enter the command dscl. list /Users. This command outputs a list of all user accounts, including system and hidden users that may not appear in the System Settings panel.
For example, running dscl. list /Users might return entries like root, guest, and your personal user account name. This approach is helpful if you need a comprehensive view or want to script user management tasks. However, it requires familiarity with command-line operations, unlike the more user-friendly System Settings.
Understanding the difference between these two methods is key: the System Settings panel is designed for everyday users to manage accounts with ease, while Terminal commands provide deeper system-level access and flexibility. Depending on your comfort level and requirements, you can choose the method that best fits your needs.
How to change Users and Groups on Mac
To modify user accounts or group memberships on your Mac, start by opening System Settings and navigating to Users & Groups. Unlock the panel by clicking the lock icon in the lower-left corner and entering an administrator password. This grants you permission to make changes safely.
If you want to change a user’s account type, select the user from the list on the left. Click Edit or the equivalent option, then check the box labeled Allow user to administer this computer to promote a standard user to administrator. For example, if you have a standard user named "Jordan" who needs admin privileges to install software, enabling this option elevates their rights immediately.
Changing a user’s password is straightforward: select the user, then click Change Password. Enter the current password (if required) and the new password twice to confirm. This action ensures account security without affecting other settings.
To edit group memberships, first select the group from the list of groups. Click Edit or the equivalent button, then add or remove users by selecting their names. For instance, adding user "Jordan" to the "Staff" group grants them the permissions associated with that group collectively, streamlining management.
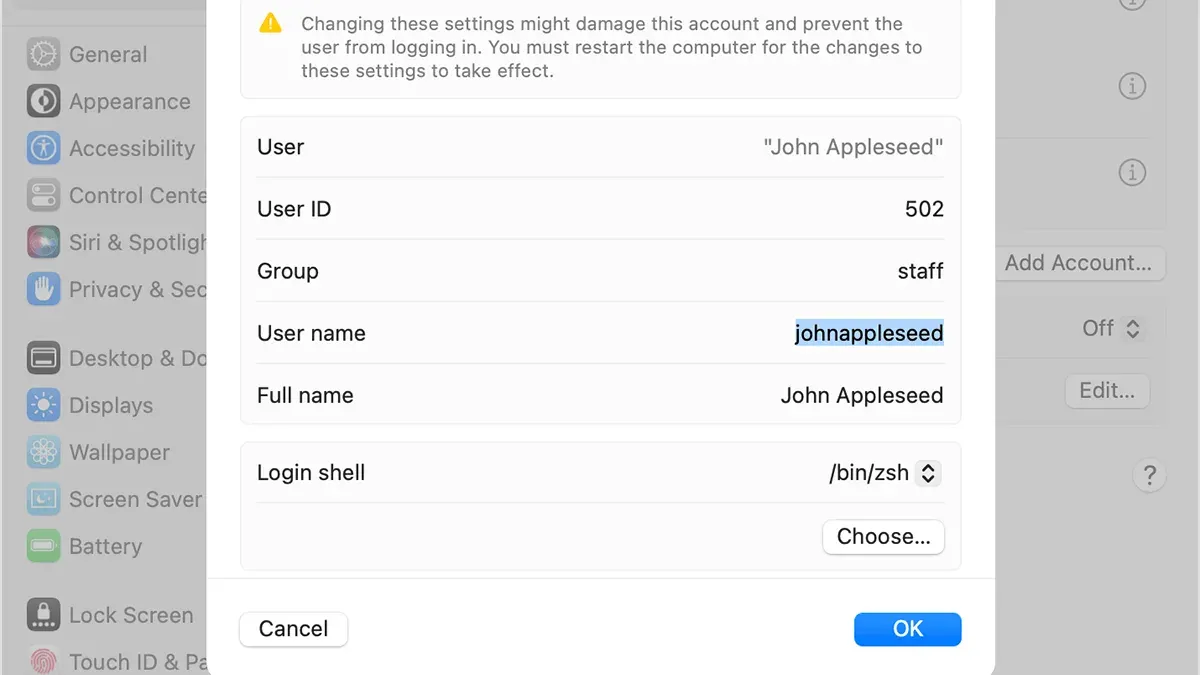
Advanced options, accessible via the user’s settings, allow changing the user’s account name, home directory location, or user ID. These should be handled cautiously because incorrect changes can lock you out or cause system issues. Always make sure you have another administrator account available before modifying these settings.
Remember, if you lock yourself out by changing permissions or account types, it can be difficult to regain access without recovery tools or reinstalling the system. Proceed step-by-step and verify changes before closing the settings panel.
How to delete Users and Groups on Mac
Before deleting any user or group on your Mac, it is essential to back up important data. When you delete a user account, all associated files in that account’s home folder can be permanently removed unless you choose to save them. Consider copying critical documents to an external drive or cloud storage to avoid accidental data loss.
To delete a user via System Settings, open System Settings and go to Users & Groups. Select the user account you want to remove and click the minus (-) button below the user list. You will be prompted to either delete the home folder immediately, save it as a disk image, or leave the home folder untouched. Choose the option that suits your needs and confirm the deletion.
Alternatively, advanced users can delete accounts through Terminal using the dscl command. For example, running sudo dscl. -delete /Users/username removes the user account, but you must manually delete the home folder to free disk space. This method is faster for bulk deletions but carries higher risk if commands are mistyped.
Deleting groups follows a similar pattern. In System Settings under Users & Groups, switch to the Groups tab, select the group, then click the minus (-) button. Removing a group affects permissions associated with that group, so verify that no essential access depends solely on it. In Terminal, you can delete a group with sudo dscl. -delete /Groups/groupname.
Be cautious with system or default accounts—these cannot be deleted through System Settings and should not be removed via Terminal as it can destabilize your Mac. For example, the “_spotlight” or “_windowserver” accounts are necessary for system functions. Also, 'Other Users' and Shared accounts in System Settings represent network or guest accounts; deleting these may require additional steps such as disabling Sharing preferences or guest access.
How to group tabs and apps on Mac
Grouping tabs and apps on your Mac is a practical way to stay organized and boost productivity, distinct from managing user groups. Safari's Tab Groups allow you to collect related tabs under a single group for easy access. To create a Tab Group, open Safari, click the sidebar icon in the toolbar, then select the "New Tab Group" option. Name your group, for example, "Work Research," and add relevant tabs by dragging them into this group or opening new tabs within it. Switching between Tab Groups lets you focus on different tasks without clutter.
Beyond tabs, you can organize apps in the Dock or use Mission Control’s Spaces to separate workflows. To group apps in the Dock, drag app icons next to each other to create a tidy arrangement based on usage, like placing all communication apps together. Mission Control allows you to add multiple Desktops (Spaces) by clicking the Mission Control icon or swiping up with three or four fingers, then clicking the plus button at the top right. Assign different apps or windows to each Space, such as one for design and another for email, to reduce distractions.
Remember, user groups manage permissions and access, while tab and app grouping streamline your workflow visually and functionally. For example, you might have a Safari Tab Group named "Client Proposals" and a dedicated Space with all related apps open, making task switching seamless. Experiment with these features to find a setup that fits your workflow best.
What to do if you can’t access Users and Groups on Mac
Sometimes, trying to open Users & Groups in System Settings results in an error message like “You do not have permission to access this preference pane” or the pane simply fails to load. This often happens due to corrupted permissions or system glitches. To fix this, start by restarting your Mac and then try accessing Users & Groups again, as a simple reboot can clear temporary issues.
If the problem persists, check your user account permissions. You need administrator privileges to access Users & Groups. Go to System Settings > Users & Groups and confirm your account type. If you find you lack admin rights unexpectedly, this indicates a permission problem that might require resetting your account privileges.
Safe Mode can help when standard attempts fail. Restart your Mac and hold down the Shift key until the login window appears. Safe Mode disables non-essential processes and performs system checks, which can resolve underlying issues preventing access. After logging in Safe Mode, try opening Users & Groups again.
For more advanced troubleshooting, use Terminal commands to reset permissions or repair system files. For example, running diskutil repairPermissions in Terminal (on supported versions) can fix permission inconsistencies. Be cautious with Terminal commands and ensure you have backups before proceeding.
If none of the above steps work, it’s advisable to contact Apple Support or a certified technician. Persistent inability to access Users & Groups may indicate deeper system corruption or account issues that require professional diagnosis and repair.
Understanding Mac Users and Groups advanced options and the orange check mark
In the Users & Groups panel, you might notice an orange check mark next to some user accounts. This icon indicates that the account is enabled for fast user switching, allowing you to quickly switch between user sessions without logging out. This feature improves convenience when multiple users share the same Mac but does not affect the permissions or settings of the account itself.
Advanced options for user accounts go beyond basic configuration and include settings such as the user’s UUID (Universally Unique Identifier), home directory path, and login shell. You can access these by right-clicking a user in the Users & Groups list and selecting "Advanced Options." The UUID is a system-generated identifier unique to each user and is essential for internal processes, so it should never be changed.
The home directory path specifies where the user’s personal files and settings are stored, typically "/Users/username." Changing this path can cause the user to lose access to their files or experience login issues. The login shell defines the command-line interface the user interacts with if they access the Terminal; common shells include "/bin/bash" or "/bin/zsh." Altering the shell is usually safe if you know what you’re doing, but it should be done carefully.
For example, if you mistakenly change the home directory for a user from "/Users/john" to an incorrect or non-existent path, that user might face problems logging in or lose access to their documents. Because of such risks, these advanced options should only be modified when necessary, such as during migration or troubleshooting, and ideally with a full backup in place.
Typical use cases for these settings include system administrators migrating user data to a new volume or changing a user’s shell to customize their Terminal environment. To avoid misconfiguration, always verify changes and understand their impact before applying them.
Frequently asked questions
What are mac groups?
Mac groups are collections of user accounts that share common permissions and access rights. They simplify managing multiple users by allowing you to assign permissions once to the group instead of individually to each user. Groups help organize users based on roles such as administrators, staff, or guests.
Where is users in mac?
You can find Users on Mac by opening System Settings (or System Preferences) and selecting "Users & Groups." This section displays all user accounts and groups on your Mac, allowing you to manage account types, passwords, and permissions.
How to group tabs on mac?
To group tabs in Safari on your Mac, open multiple tabs, then right-click a tab and choose "Add to New Tab Group." You can name the group and access it later from the sidebar, making it easier to organize and switch between sets of related web pages.
How to group apps in mac?
Grouping apps on a Mac can be done using the Dock or Launchpad folders. To create a folder in Launchpad, drag one app icon onto another; this creates a group you can name. In the Dock, you can organize apps by placing them near each other, but true grouping is mainly supported within Launchpad folders.
Can t access users and groups mac?
If you can’t access Users and Groups on your Mac, it’s often due to insufficient permissions or a system restriction. Make sure you are logged in with an administrator account. If the option is grayed out, try unlocking the pane by clicking the lock icon and entering an admin password.
What This Guide Does Not Cover
This guide does not cover enterprise-level user and group management involving centralized directory services like Active Directory or Open Directory. These systems require specialized software, network configurations, and advanced knowledge beyond typical Mac user and group settings. If you manage users in a large organization or require network-wide policies, consulting with IT professionals who specialize in directory services is recommended.
For most personal or small business users, the steps outlined here provide a solid foundation to confidently manage local accounts and groups on your Mac. The single most useful next step is to familiarize yourself with the System Preferences > Users & Groups pane and explore the options available when clicking the lock icon to unlock changes. This action opens access to adding, modifying, and deleting accounts, allowing you to tailor user permissions and group memberships effectively. Remember to always create a backup or ensure you have administrator access before making major changes.
See also: How to Sync Messages on Mac: A Step-by-Step Guide for Apple Users · Fix Mail Repeatedly Asking for Password on Mac: Step-by-Step Guide · How to Fix Apple ID Verification Failed on Mac: Step-by-Step Guide · Fix iCloud Drive Stuck on Uploading on Mac: Step-by-Step Guide



