How to Record a FaceTime Call on Mac: Step-by-Step Guide
Step-by-step guide to recording a FaceTime call on Mac with audio and video using QuickTime Player and macOS screen recording features.
You’re on a FaceTime call and want to save the conversation for reference or sharing. Whether it’s a work meeting or a personal chat, capturing both video and audio can be essential. However, you might wonder how to record a FaceTime call in FaceTime on Mac without losing sound or video quality.
This article guides you step-by-step through reliable methods to record FaceTime calls on your Mac. You’ll learn how to use built-in tools like QuickTime Player and macOS screen recording features, tailored for MacBook Air, MacBook Pro, and iMac. We also cover how to ensure audio is captured correctly and provide tips on editing your recording afterward.
Key takeaways
- Use QuickTime Player's screen recording with microphone enabled to capture FaceTime calls with sound.
- macOS's screenshot toolbar (Command + Shift + 5) offers flexible screen recording options for FaceTime.
- Ensure microphone input is selected to record both your voice and the other party’s audio.
- Editing tools in QuickTime can trim your FaceTime recordings before exporting.
- Check system permissions if recordings don’t capture audio or video properly.
Before you start: What you need to record a FaceTime call on Mac
Recording a FaceTime call on your Mac requires a combination of compatible software, hardware readiness, and understanding of legal considerations. First, make sure your Mac runs macOS Mojave (10.14) or later, as these versions include native screen recording capabilities with QuickTime Player and the Screenshot toolbar. Without this, you may need third-party software for recording.
Next, check that you have enough free storage space. FaceTime calls recorded in HD quality can consume about 60 MB per minute. It’s wise to have at least a few gigabytes free to avoid interruptions or incomplete recordings. Open the Apple menu > About This Mac > Storage to verify available space.
Before recording, consider privacy and legal aspects. Recording calls may require consent from all participants depending on your jurisdiction. Ensure you inform everyone on the call and obtain permission to avoid any legal issues.
Prepare your software by ensuring QuickTime Player is installed and updated, or have a reliable screen recording app ready. Check your microphone and system audio settings in System Preferences > Sound. Enable the correct input device and adjust volume levels so audio is captured clearly during the recording.
- Verify your macOS version is Mojave (10.14) or newer. Open Apple menu > About This Mac > Overview. You should see the version number; if it’s older, update your system.
- Check available storage. Go to Apple menu > About This Mac > Storage. Confirm you have at least a few gigabytes free. If not, free up space.
- Review your audio settings. Open System Preferences > Sound > Input. Select the microphone you’ll use, and test the input level.
- Confirm QuickTime Player is installed. Open Launchpad and search for QuickTime Player. If missing, download it from the App Store or use another trusted screen recorder.
- Understand legal requirements. Plan to notify all call participants that you will be recording and get their consent before starting.
How to record a FaceTime call on Mac using QuickTime Player
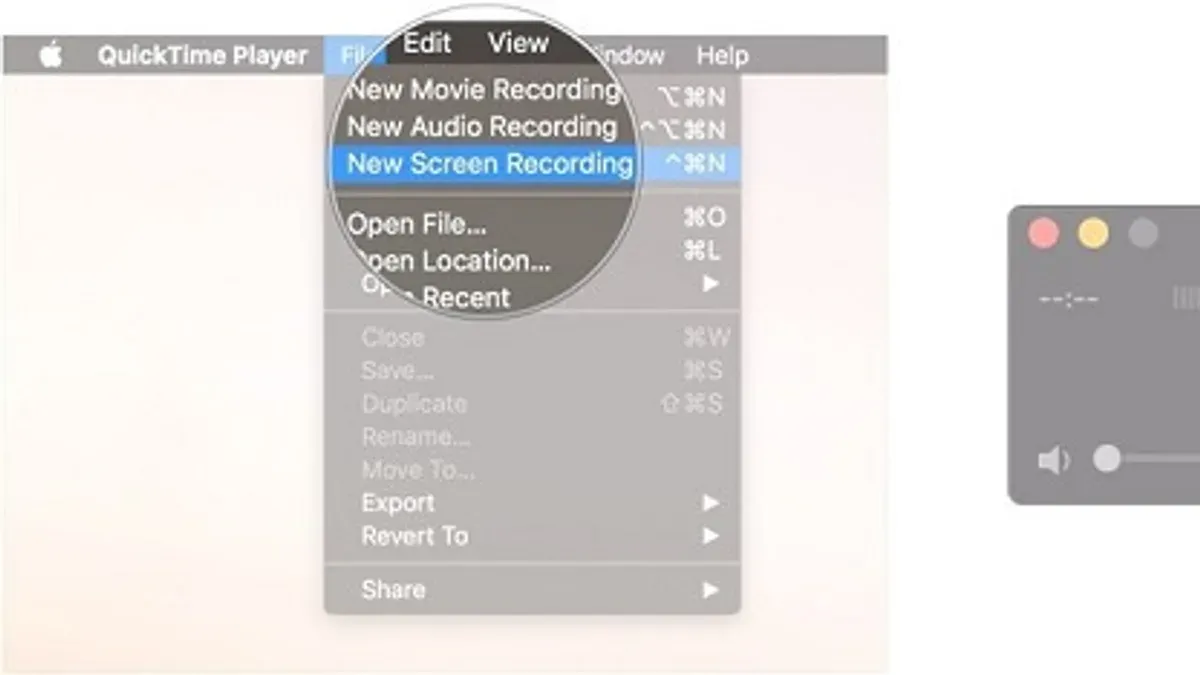
QuickTime Player is a built-in app on your Mac that allows you to record your screen along with audio, making it a reliable choice for capturing FaceTime calls. This method captures both video and sound directly from your Mac’s microphone, so you can record the entire conversation seamlessly.
- Open QuickTime Player from your Applications folder or by searching with Spotlight. When it launches, click File in the menu bar, then select New Screen Recording. You will see the Screen Recording window appear.
- Before starting, click the small arrow next to the red Record button. From the dropdown, select your preferred Microphone (usually “Internal Microphone”) to ensure audio is captured during the recording. You can also enable the option to show mouse clicks if desired.
- When you are ready, click the red Record button. You will be prompted to either click to record the entire screen or drag to select a portion; for FaceTime, recording the full screen is usually best. Once you begin, start or continue your FaceTime call.
- To stop recording, click the Stop button in the menu bar at the top of your screen. QuickTime Player will automatically open the recording for preview.
- Save your recording by clicking File > Save. Choose your desired location and file name. Your FaceTime call video with audio is now saved and ready for viewing or sharing.
Remember, recording starts when you click the record button, so make sure your FaceTime call is active or about to begin. This straightforward method works on all Macs with QuickTime Player and does not require additional software.
How to record a FaceTime call on Mac with sound
By default, QuickTime Player captures audio only from your Mac’s microphone during a screen recording. This means it records your voice but not the other person's audio from the FaceTime call. To capture both sides of the conversation, you need to include system audio—the sound your Mac outputs—alongside your microphone input.
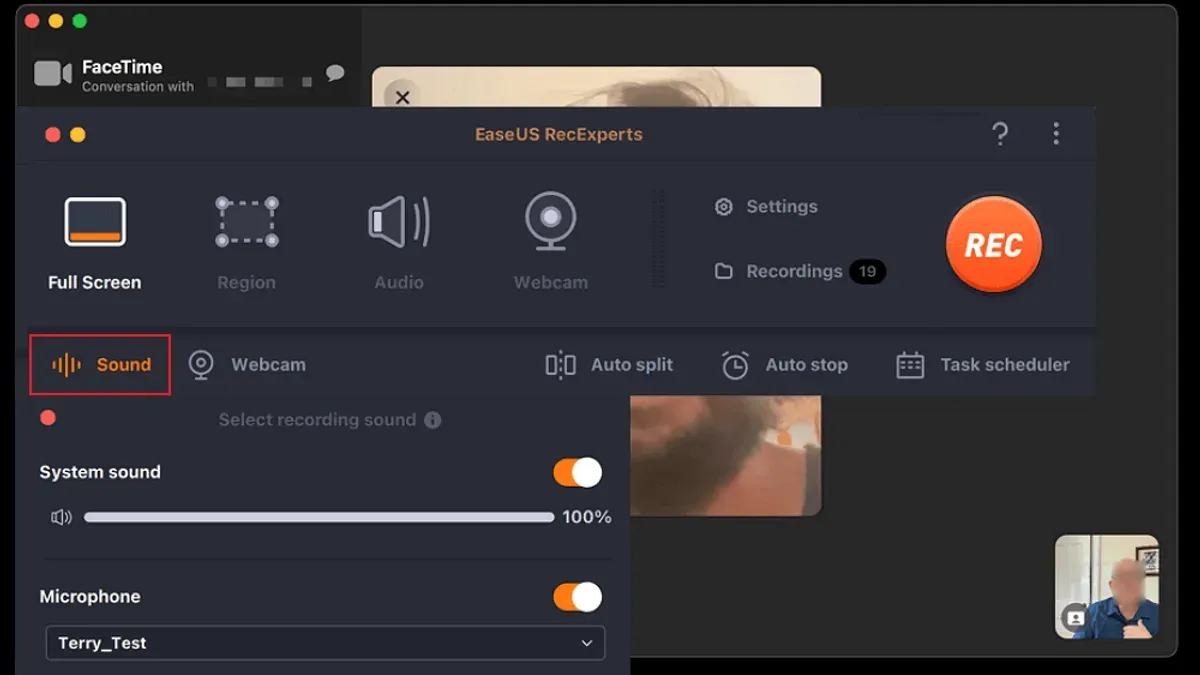
One common solution is to use third-party audio routing tools like Loopback or Soundflower. These apps create virtual audio devices that combine your microphone and system audio into a single input, which QuickTime Player can then record. Loopback is user-friendly and supports multiple sources, while Soundflower is free but requires more setup.
Here’s a step-by-step method using Soundflower to record FaceTime audio:
- Download and install Soundflower from a trusted source. After installation, open Audio MIDI Setup (found in Applications > Utilities).
- Create a new Multi-Output Device by clicking the plus (+) button in the bottom-left corner. Add both your built-in output (speakers or headphones) and Soundflower (2ch) to this device.
- Set the Mac’s audio output to the Multi-Output Device you just created. This routes sound to both your speakers and Soundflower.
- In System Preferences > Sound > Input, select Soundflower (2ch) as the input device. This means QuickTime will record all system audio.
- Open QuickTime Player, choose New Screen Recording, click the arrow next to the record button, and select Soundflower (2ch) as the microphone input.
- Test by playing any audio and speaking into the microphone. You should see input level movement from both sources before starting your FaceTime call recording.
Below is a comparison of common audio capture methods for FaceTime calls on Mac:
| Method | Captures Microphone | Captures System Audio | Ease of Setup | Audio Quality |
|---|---|---|---|---|
| QuickTime Player alone | Yes | No | Very Easy | Clear, but one-sided |
| Soundflower + QuickTime | Yes | Yes | Moderate | Good, some latency possible |
| Loopback + QuickTime | Yes | Yes | Easy | High quality, low latency |
Using these setups ensures that your FaceTime recording captures full conversations with both your voice and the other party’s audio clearly. Always perform a quick test to balance audio levels and avoid recording silence or distorted sound.
How to screen record a FaceTime call on MacBook Air and MacBook Pro
You can quickly start recording your FaceTime call on MacBook Air and MacBook Pro using macOS's built-in screenshot toolbar. Press Shift + Command + 5 to open the toolbar, which provides options for capturing your screen and recording video. For recording a FaceTime call, select the Record Entire Screen or Record Selected Portion button depending on whether you want to capture the whole display or just the FaceTime window.
While both MacBook Air and MacBook Pro models support this feature, be aware of hardware differences. MacBook Pro typically offers more processing power and better thermal management, which helps maintain smoother performance during long recordings. MacBook Air, especially models with fanless designs, might experience slight slowdowns or increased heat, so it’s wise to monitor your device’s temperature and avoid demanding multitasking while recording.
Battery life also differs; recording video consumes more power, so connecting your MacBook Air or Pro to power is recommended to prevent interruptions. After starting the recording via the toolbar, you’ll see a small stop button in the menu bar—click it to finish. Your recording automatically saves to the desktop by default, but you can change this location in the toolbar’s Options menu to organize files more efficiently.
- Press Shift + Command + 5 to open the screenshot and recording toolbar; you will see controls for capturing screen content.
- Choose either Record Entire Screen or Record Selected Portion depending on your preference; a red border will appear around the recording area.
- Click Options to select a save location and enable microphone audio if needed; this ensures your FaceTime call's sound is captured.
- Click Record to begin recording; a stop icon appears in the menu bar indicating recording is active.
- Conduct your FaceTime call as usual; monitor your Mac’s performance and battery to avoid overheating or shutdowns.
- When finished, click the stop icon in the menu bar; the recording file will appear in the location you chose.
How to record a FaceTime call on iMac
Recording a FaceTime call on an iMac involves using macOS’s built-in screen recording tools, but the setup can differ slightly due to the iMac’s hardware and audio configurations. Since iMacs often use external speakers or microphones, you'll want to ensure these devices are properly configured for clear audio capture.
- Open FaceTime and prepare your call.
- Press Shift + Command + 5 to bring up the screen recording toolbar. You will see options for capturing the entire screen, a selected window, or a portion of the screen.
- Choose Record Entire Screen or Record Selected Portion to frame the FaceTime window. You should see a red border indicating the recording area.
- Click Options in the toolbar, then select your audio input device under Microphone. If you use an external microphone, confirm it appears here and is selected to capture your voice clearly.
- Check that Save To location has enough free space for the recording. FaceTime calls can generate large files, especially in high resolution.
- Click Record to start capturing your FaceTime call. You will see a small stop button in the menu bar when recording is active.
- After finishing the call, click the stop button. The recording will save to the location you chose.
- Review the recording by opening the file. If audio levels are low, revisit System Preferences > Sound to adjust input/output volumes or switch devices.
- If storage space is tight, consider moving large video files to an external drive or using macOS's built-in storage management tool found under About This Mac > Storage > Manage. This tool helps identify large files and provides cleanup recommendations.
For optimal recording quality, it’s helpful to disable notifications and close unnecessary apps to reduce background noise and CPU load. Also, periodically check your storage during long recording sessions to avoid interruptions.
How to edit and export your FaceTime recording after capture
Once you have your FaceTime call recording, refining it before sharing or saving can make a significant difference. QuickTime Player provides straightforward tools to trim your video, improve audio clarity, and export the file in formats suitable for various uses.
- Open your recorded FaceTime video in QuickTime Player. You should see the playback controls at the bottom.
- Click on the Edit menu and select Trim. A yellow trimming bar appears at the bottom of the window.
- Drag the handles of the yellow bar to select the portion you want to keep. For example, if your original recording is 10 minutes and you want to keep the first 5 minutes, drag the right handle to the 5-minute mark. You will see the exact timestamp as you move the handles.
- Click Trim to remove the unselected parts. Your video now contains only the trimmed segment.
- To enhance audio, click Window > Show Audio Track. Adjust volume sliders if needed to boost quiet parts or reduce background noise. While QuickTime has basic controls, for advanced editing consider dedicated software.
- Next, export your trimmed video by clicking File > Export As. Choose a resolution based on your needs: 4K for highest quality, 1080p for general use, or 720p for smaller file size.
- Name your file and select the destination folder. Click Save to complete the export.
- Organize your recordings by creating dedicated folders on your Mac or external drives. Back up important files to cloud storage or external devices to prevent loss.
Following these steps, you can efficiently trim a 10-minute FaceTime recording down to the essential 5 minutes, adjust audio levels for clearer sound, and export in the format best suited for your intended use.
Troubleshooting common problems when recording FaceTime calls on Mac
When recording FaceTime calls on your Mac, you might encounter issues like missing audio, disabled buttons, or poor video quality. These problems often stem from permission settings, insufficient storage, or software conflicts. Addressing these common errors step-by-step can help you capture your calls smoothly.
Audio not recording or no sound in playback
If your recording lacks audio or you hear silence during playback, check your microphone permissions first. Go to System Settings > Privacy & Security > Microphone, and confirm that your screen recording app (like QuickTime Player) has access enabled. Also, verify that the input volume is set correctly in System Settings > Sound > Input. If you see an error message such as “Cannot record audio from microphone”, restarting your Mac can resolve temporary glitches.
Screen recording button grayed out or disabled
If the screen recording button is grayed out in QuickTime Player or the macOS screen capture toolbar, it usually means the app lacks screen recording permissions. Open System Settings > Privacy & Security > Screen Recording, and enable permission for the app you are using. After allowing access, you must quit and reopen the app for changes to take effect. If the problem persists, check if any other software is blocking screen capture.
Recording lag or poor video quality
Lagging or choppy video during recording often relates to system performance. Close unnecessary apps to free up CPU and RAM resources. Lower the FaceTime call resolution if possible, and avoid running heavy background processes. Using an external microphone instead of the built-in one can also improve audio-video synchronization. If you receive messages like “Recording interrupted due to resource constraints”, freeing storage space and rebooting your Mac can help.
Permission issues with microphone or screen capture
Common permission errors include prompts saying “Screen recording permission denied” or “Microphone access required”. To fix these, navigate to System Settings > Privacy & Security and ensure all relevant permissions are granted. If you recently updated macOS, permissions might reset, so double-check before recording. Restart your Mac after changing settings to ensure proper application.
Storage full or saving failures
If your recording fails to save with errors like “Disk is full” or “Failed to save recording”, check your available storage in System Settings > Storage. Delete or move large files to free up space. Save recordings to a different folder or an external drive to avoid permission conflicts. Regularly backing up and clearing caches can prevent storage issues during recording sessions.
Following these troubleshooting steps will resolve most common problems, ensuring your FaceTime call recordings on Mac have clear audio, smooth video, and are saved without error.
Frequently asked questions
How to record a facetime video call on mac?
To record a FaceTime video call on Mac, you can use QuickTime Player’s screen recording feature. Open QuickTime Player, go to File > New Screen Recording, select the area of the screen showing your FaceTime call, and click the record button. Make sure to enable the microphone option to capture audio during the call.
How to record a facetime call.on imac?
On an iMac, you can record FaceTime calls similarly by using QuickTime Player. Launch QuickTime, choose New Screen Recording, and select the FaceTime call window or full screen. Enable the microphone to record audio. After the call, stop the recording and save your file.
how to record a facetime call on macbook air
For MacBook Air, use the built-in Screenshot toolbar by pressing Shift + Command + 5. Choose the screen recording option, select the FaceTime window or full screen, and click record. To capture sound, click Options and select the internal microphone before starting the recording.
how to record a facetime call on macbook pro
Recording FaceTime calls on MacBook Pro also uses the Screenshot toolbar (Shift + Command + 5). Pick the screen recording tool, enable the internal microphone in Options, and start recording the call. This method captures both video and audio without additional software.
how to record a facetime call with audio on macbook
To capture audio while recording a FaceTime call on MacBook, you need to enable the internal microphone in your screen recording tool. Using QuickTime Player or the Screenshot toolbar, select Options and choose Built-in Microphone before recording. This ensures both ends of the conversation are heard in your recording.
Honest Limits of This Guide
This guide does not cover the legal restrictions on recording calls, which vary significantly by jurisdiction. You should always obtain explicit consent from all parties before recording any FaceTime call to avoid legal issues. Additionally, capturing system audio—meaning the voices of both you and the other participants—requires third-party software because macOS’s built-in tools, such as QuickTime Player and the Screenshot toolbar, cannot record both sides of the conversation audio simultaneously.
For users who need comprehensive audio capture or must comply with specific legal requirements, exploring dedicated recording software or consulting legal advice is recommended.
To get the most reliable recording with clear video and sound using built-in macOS features, your next best step is to practice the QuickTime Player method outlined earlier, ensuring your microphone settings are correctly configured and that you have permission to record. This hands-on approach will help you familiarize yourself with the process and identify any device-specific adjustments you might need.
See also: How to Share Your Screen on FaceTime on Mac: Step-by-Step Guide · How to Use Reactions in FaceTime on Mac: A Step-by-Step Guide · How to Screen Record with Internal Audio in QuickTime Player